Page 1 of 433

ContentsThis owner’s manual should be considered a permanent part of the
vehicle and should remain with the vehicle when it is sold.
This owner’s manual covers all models of your vehicle. You may find
descriptions of equipment and features that are not on your
particular model.
Images throughout this owner’s manual (including the front cover)
represent features and equipment that are available on some, but
not all, models. Your particular model may not have some of these
features.
This owner’s manual is for vehicles sold in the United States and
Canada.
The information and specifications included in this publication were
in effect at the time of approval for printing. Honda Motor Co., Ltd.
reserves the right, however, to discontinue or change specifications
or design at any time without notice and without incurring any
obligation.
2Safe Driving P. 25For Safe Driving P. 26 Seat Belts P. 30 Airbags P. 392Instrument Panel P. 71Indicators P. 72 Gauges and Displays P. 862Controls P. 107Setting the Clock P. 108 Locking and Unlocking the Doors P. 109
Security System P. 133 Opening and Closing the Windows P. 136
Adjusting the Mirrors P. 151
Heating and Cooling
* P. 182
2Features P. 193Audio System P. 194 Audio System Basic Operation P. 197
Rear Entertainment System
* P. 236 HomeLink® Universal Transceiver
* P. 252
2Driving P. 279Before Driving P. 280 Towing a Trailer P. 285
Rearview Camera P. 317 Refueling P. 3182Maintenance P. 323Before Performing Maintenance P. 324 Maintenance Minder™ P. 327
Checking and Maintaining Wiper Blades P. 358
Remote Control and Wireless Headphone Care
* P. 374
2Handling the Unexpected P. 381Tools P. 382 If a Tire Goes Flat P. 383
Overheating P. 396 Indicator, Coming On/Blinking P. 398
When You Cannot Open or Close the Tailgate P. 4102Information P. 411Specifications P. 412 Identification Numbers P. 414
Warranty Coverages P. 419 Authorized Manuals P. 421
Page 80 of 433

79
uuIndicatorsu
Instrument Panel
System Message
Indicator
*
●Comes on for a few seconds when
you turn the ignition switch to ON (w
, then goes off.
●Comes on along with a beep when a
problem is detected. A system
message on the multi-information
display appears at the same time.
●While the indicator is on, press the
/ (information) button to see the
message again.●Refer to the Indicators information in
this chapter when a system message
appears on the multi-information
display. Take the appropriate action for
the message.●The multi-information display does not return
to the normal screen unless the warning is
canceled, or the / (information)
button is pressed.
—
Turn Signal and
Hazard Warning
Indicators
●The turn signal indicators blink when
you operate the turn signal lever.●If you press the hazard warning
button, both indicators and all turn
signals blink at the same time.
●Does not blink or blinks rapidly - A
turn signal light bulb has blown.
Change the bulb immediately.
2Replacing Light Bulbs
P. 352, 353
—
High Beam
Indicator
●Comes on when the high beam
headlights are on.
—
—
Lights On
Indicator
●Comes on whenever the light switch
is on, or in AUTO
* when the exterior
lights are on.
●If you remove the key from the ignition
switch while the lights are on, a chime
sounds when the driver's door is
opened.
—
Indicator
Name
On/Blinking
Explanation
Message
*
* Not available on all models
Page 95 of 433

uuGauges and DisplaysuAudio/Information Screen
94Instrument Panel
You can change, store, delete the wallpaper on the audio/information screen.
See the navigation system manual for how to change the wallpaper.■Importing pictures from USB
You can import up to five images, one at a time, for wallpaper from USB flash drive.
Select Import picture from USB from setup menu and properly connect a USB
flash drive to store an image.
1.Connect the USB flash drive to the adapter
cable.
2USB Adapter Cable P. 195
2.Press the SETUP button.
3.Rotate to select Wallpaper Setup,
then press .
4.Rotate to select Import picture from
USB, then press .
5.Rotate to select a desired picture, then
press .
uLoading Picture will appear on the
display.
■
Wallpaper Setup
1Wallpaper Setup•When importing wallpaper files, the image must be
in the USB flash drive’s root directory.
Images in a folder cannot be imported.•The file format of the image that can be imported
is BMP (bmp) or JPEG (jpg).•The maximum image size is 1,024 x 768 pixels.
Smaller images are displayed in the middle of the
screen with the extra area appearing in black.
If the USB flash drive does not have any pictures, No
Files will appear.
Models with navigation system
Page 99 of 433
98
uuGauges and DisplaysuMulti-Information Display
*
Instrument Panel
Multi-Information Display
*
The multi-information display shows the odometer, trip meter, outside temperature
indicator, and other gauges.
It also displays important messages such as warnings and other helpful information.
Press the / (information) button or the SEL/RESET button to change the
display.■
Switching the Display
SEL/RESET
ButtonAverage fuel economy/
Instant fuel economy
Average Speed
/ Button
Engine oil lifeTrip meter B Trip meter AOdometer
Customize SettingsElapsed TimeRange
* Not available on all models
Page 100 of 433

Continued
99
uuGauges and DisplaysuMulti-Information Display
*
Instrument Panel
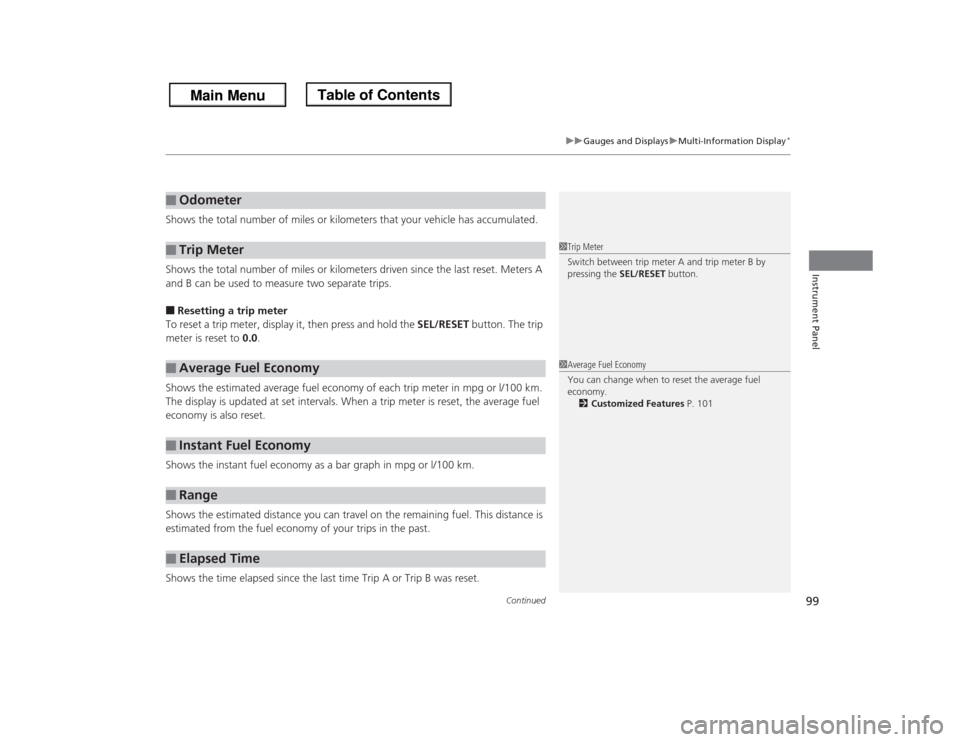
Shows the total number of miles or kilometers that your vehicle has accumulated.
Shows the total number of miles or kilometers driven since the last reset. Meters A
and B can be used to measure two separate trips.■Resetting a trip meter
To reset a trip meter, display it, then press and hold the SEL/RESET button. The trip
meter is reset to 0.0.
Shows the estimated average fuel economy of each trip meter in mpg or l/100 km.
The display is updated at set intervals. When a trip meter is reset, the average fuel
economy is also reset.
Shows the instant fuel economy as a bar graph in mpg or l/100 km.
Shows the estimated distance you can travel on the remaining fuel. This distance is
estimated from the fuel economy of your trips in the past.
Shows the time elapsed since the last time Trip A or Trip B was reset.■
Odometer
■
Trip Meter
■
Average Fuel Economy
■
Instant Fuel Economy
■
Range
■
Elapsed Time
1Trip Meter
Switch between trip meter A and trip meter B by
pressing the SEL/RESET button.1Average Fuel Economy
You can change when to reset the average fuel
economy.
2Customized Features P. 101
Page 102 of 433
Continued
101
uuGauges and DisplaysuMulti-Information Display
*
Instrument Panel
Use the multi-information display to customize certain features.■How to customize
Select the CUSTOMIZE SETTINGS by pressing the / button while the
ignition switch is in ON
(w
. Press the SEL/RESET button to change the display to the
CHANGE SETTINGS.
■
Customized Features
1Customized Features
To customize other features, press the /
button.
2List of customizable options P. 103
2Example of customization settings P. 105
Customization is possible when you see the driver’s
ID (DRIVER 1 or DRIVER 2) on the CHANGE
SETTINGS screen.
The driver’s ID indicates which remote transmitter
you have used to unlock the driver’s door.
The customized settings are recalled every time you
unlock the driver’s door with that remote.
When you customize settings:
Shift to
(P.
SEL/RESET Button
Enters the selected item. / Button
Changes the customize
menu and items.
Page 104 of 433

103
uuGauges and DisplaysuMulti-Information Display
*
Continued
Instrument Panel
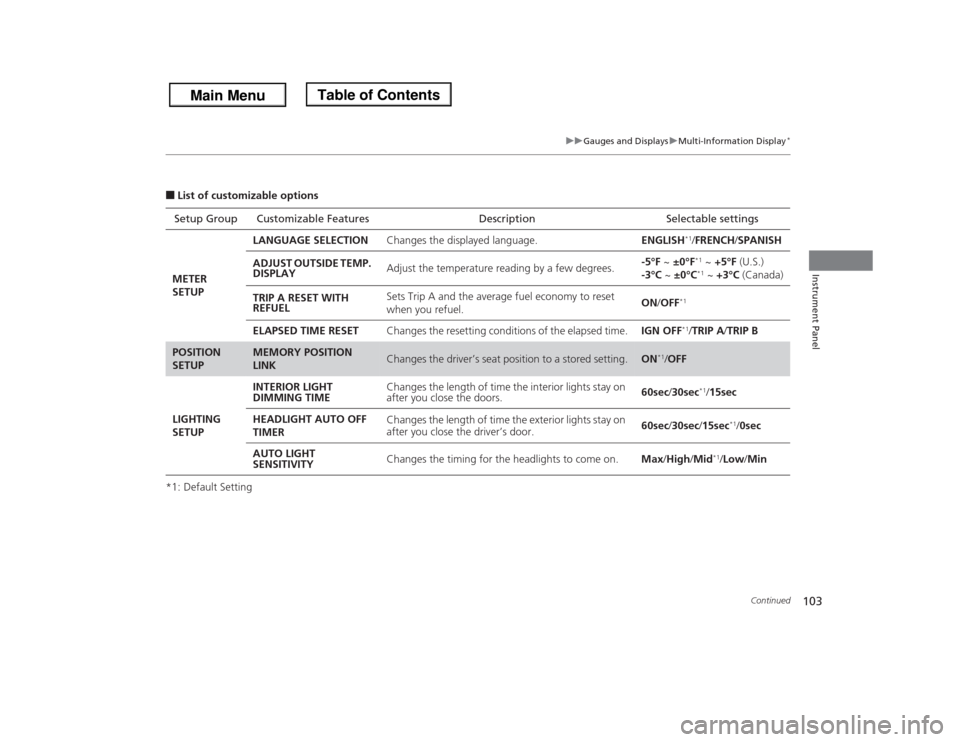
■List of customizable options
*1: Default SettingSetup Group Customizable Features Description Selectable settings
METER
SETUPLANGUAGE SELECTIONChanges the displayed language.ENGLISH
*1/FRENCH/SPANISH
ADJUST OUTSIDE TEMP.
DISPLAYAdjust the temperature reading by a few degrees.-5°F ~ ±0°F*1 ~ +5°F (U.S.)
-3°C ~ ±0°C*1 ~ +3°C (Canada)
TRIP A RESET WITH
REFUELSets Trip A and the average fuel economy to reset
when you refuel.ON/OFF
*1
ELAPSED TIME RESETChanges the resetting conditions of the elapsed time.IGN OFF
*1/TRIP A/TRIP B
POSITION
SETUP
MEMORY POSITION
LINK
Changes the driver’s seat position to a stored setting.
ON
*1/OFF
LIGHTING
SETUPINTERIOR LIGHT
DIMMING TIMEChanges the length of time the interior lights stay on
after you close the doors.60sec/30sec
*1/15sec
HEADLIGHT AUTO OFF
TIMERChanges the length of time the exterior lights stay on
after you close the driver’s door.60sec/30sec/15sec
*1/0sec
AUTO LIGHT
SENSITIVITYChanges the timing for the headlights to come on.Max/High/Mid
*1/Low/Min
Page 105 of 433

104
uuGauges and DisplaysuMulti-Information Display
*
Instrument Panel
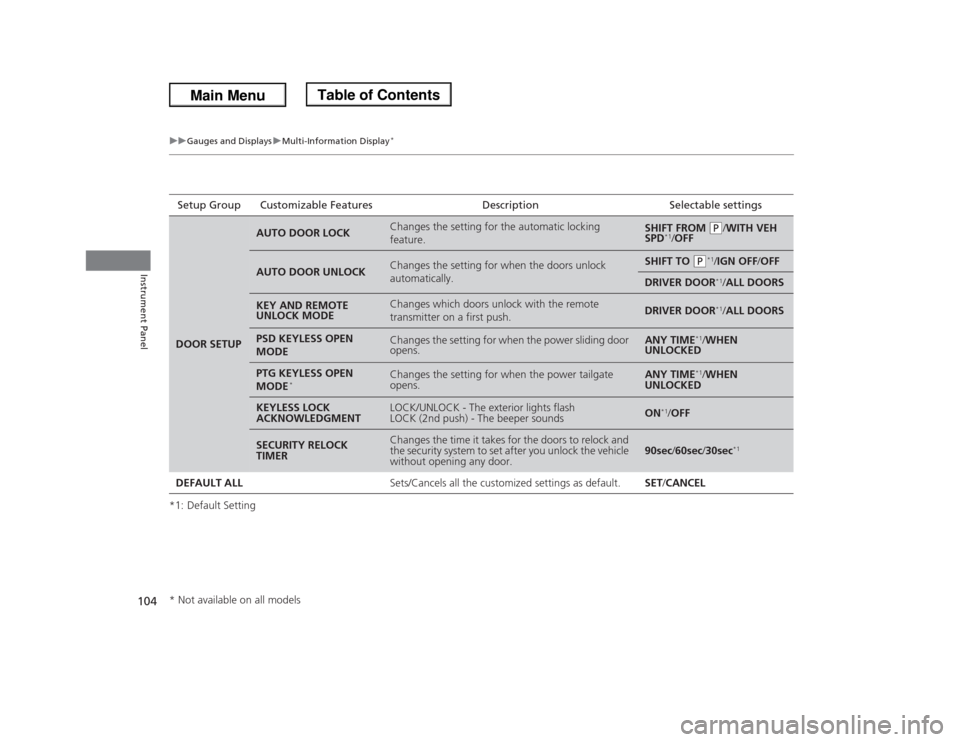
*1: Default SettingSetup Group Customizable Features Description Selectable settingsDOOR SETUP
AUTO DOOR LOCK
Changes the setting for the automatic locking
feature.
SHIFT FROM
(P
/WITH VEH
SPD
*1/OFF
AUTO DOOR UNLOCK
Changes the setting for when the doors unlock
automatically.
SHIFT TO
(P
*1/IGN OFF/OFF
DRIVER DOOR
*1/ALL DOORS
KEY AND REMOTE
UNLOCK MODE
Changes which doors unlock with the remote
transmitter on a first push.
DRIVER DOOR
*1/ALL DOORS
PSD KEYLESS OPEN
MODE
Changes the setting for when the power sliding door
opens.
ANY TIME
*1/WHEN
UNLOCKED
PTG KEYLESS OPEN
MODE
*
Changes the setting for when the power tailgate
opens.
ANY TIME
*1/WHEN
UNLOCKED
KEYLESS LOCK
ACKNOWLEDGMENT
LOCK/UNLOCK - The exterior lights flash
LOCK (2nd push) - The beeper sounds
ON
*1/OFF
SECURITY RELOCK
TIMER
Changes the time it takes for the doors to relock and
the security system to set after you unlock the vehicle
without opening any door.
90sec/60sec/30sec
*1
DEFAULT ALLSets/Cancels all the customized settings as default. SET/CANCEL* Not available on all models