Page 168 of 267

166Audio
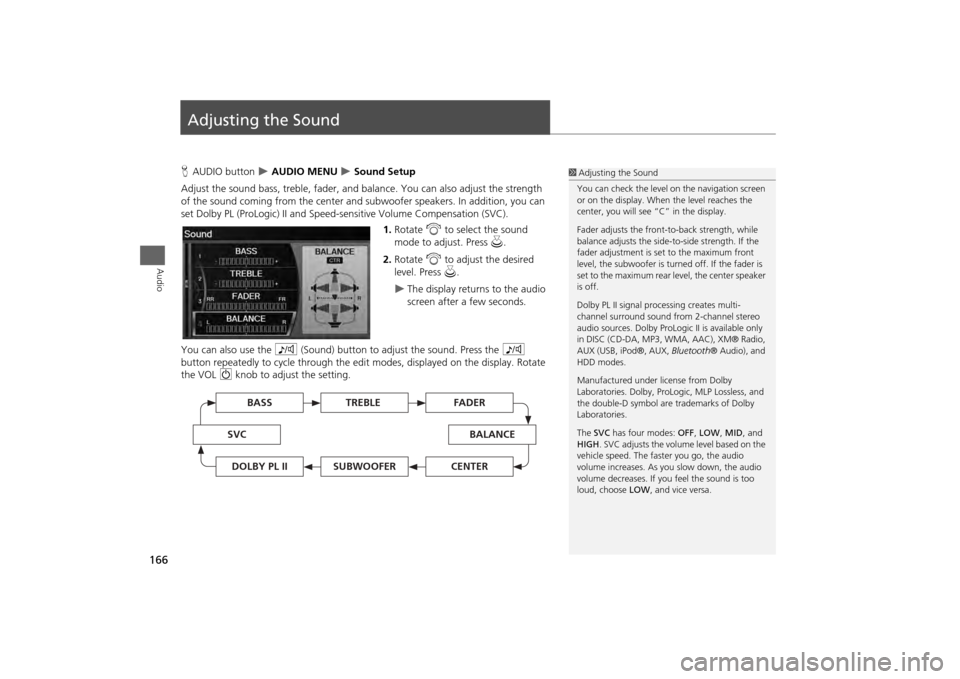
Adjusting the SoundHAUDIO button
AUDIO MENU
Sound Setup
Adjust the sound bass, treble, fader, and ba lance. You can also adjust the strength
of the sound coming from the center and subwoofer speakers. In addition, you can
set Dolby PL (ProLogic) II and Speed-s ensitive Volume Compensation (SVC).
1.Rotate i to select the sound
mode to adjust. Press u.
2. Rotate i to adjust the desired
level. Press u.
The display returns to the audio
screen after a few seconds.
You can also use the 8 (Sound) button to adjust the sound. Press the 8
button repeatedly to cycle through the edit modes, displayed on the display. Rotate
the VOL 9 knob to adjust the setting.
1Adjusting the Sound
You can check the level on the navigation screen
or on the display. When the level reaches the
center, you will see “C” in the display.
Fader adjusts the front-t o-back strength, while
balance adjusts the side-to-side strength. If the
fader adjustment is set to the maximum front
level, the subwoofer is turned off. If the fader is
set to the maximum rear level, the center speaker
is off.
Dolby PL II signal proc essing creates multi-
channel surround sound fro m 2-channel stereo
audio sources. Dolby ProL ogic II is available only
in DISC (CD-DA, MP3, WMA, AAC), XM® Radio,
AUX (USB, iPod®, AUX, Bluetooth® Audio), and
HDD modes.
Manufactured under license from Dolby
Laboratories. Dolby, ProL ogic, MLP Lossless, and
the double-D symbol are trademarks of Dolby
Laboratories.
The SVC has four modes: OFF, LOW , MID, and
HIGH. SVC adjusts the volume level based on the
vehicle speed. The faster you go, the audio
volume increases. As you slow down, the audio
volume decreases. If you feel the sound is too
loud, choose LOW , and vice versa.
TREBLE
BASS
SVC
BALANCE
FADER
SUBWOOFER
DOLBY PL II
CENTER
Page 169 of 267
167Audio
Audio Remote ControlsSteering Wheel ControlsControl basic audio system functions using the controls mounted on the steering
wheel.
Adjusts the volume.
•Press the R (Volume) button to increase the volume.
• Press the U (Volume) button to decrease the volume.
Changes the audio source mode. Press to cycle through all currently connected
media sources.
1 MODE Button
DISC mode appears only when a disc is loaded.
When in AUX mode, the following are operable
from the remote audio controls:•iPod®/USB flash drive connected to the USB
adapter cable•Audio unit plugged into th e auxiliary input jack•Bluetooth® Audio (not all phones support this
function)
Volume button Mode button
Channel button
■ VOL (Volume) Button■MODE Button
FM2
FM1
AUX
XM1
AM
DISC
HDD
XM2
Continued
Page 170 of 267
168
Audio Remote Controls
Steering Wheel Controls
Audio
FM/AM, XM
•Press the N (Channel) button to change to the next preset station (channel).
• Press the B (Channel) button to go to the previous preset station (channel).
• FM/AM: Press and hold for one second to scan for a station with a strong signal.
• XM: Press and hold for one second to go to the next/previous channel in the
current category.
DISC, HDD, iPod®, USB, Bluetooth® Audio (on some phones)
• Press the N button to skip to the end of the current track.
• Press the B button to skip to the beginning of the current track. Press the B
button again to go to the beginning of the previous track.
• Press and hold to skip forward/backward to the first track of the next folder.■CH (Channel) Button
Page 171 of 267
169
Bluetooth® HandsFreeLink®
This section describes how to operate Bluetooth® HandsFreeLink®. You
can place and receive phone calls using your vehicle’s audio system without handling your cell phone.
Bluetooth® HandsFreeLink®............... 170
Pairing a Phone .................................... 172
Importing Phonebook Data .................. 177
Setting Up Speed Dialing...................... 178
Editing User Name and PIN................... 180
Phone Setup ........................................ 181
Making a Call....................................... 182
Receiving a Call .................................... 185
HFL Menus ........................................... 186
Page 172 of 267

170Bluetooth® HandsFreeLink®
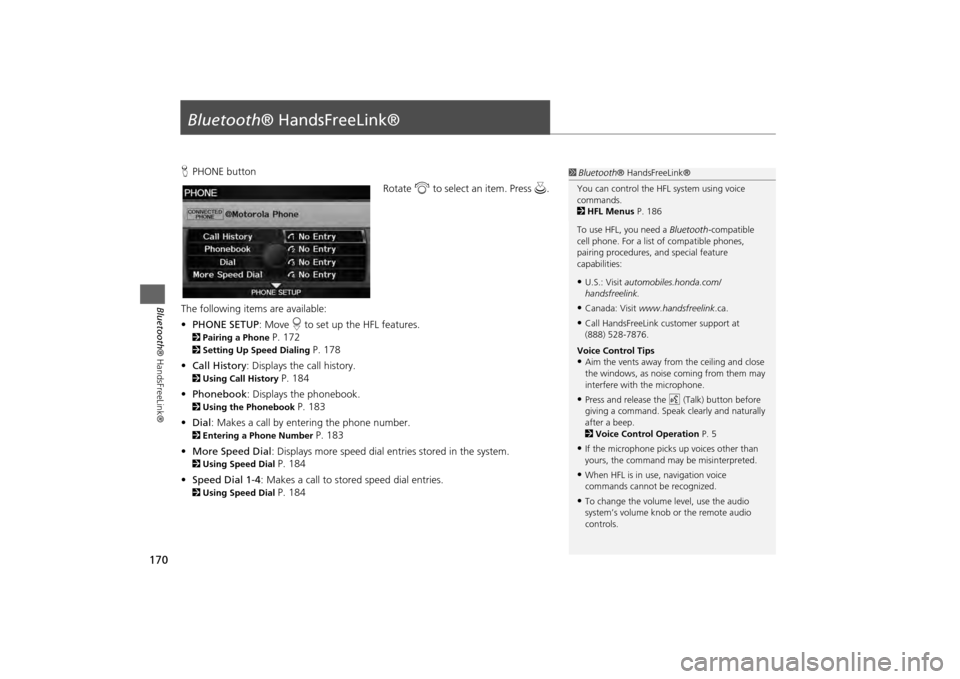
Bluetooth® HandsFreeLink®HPHONE button
Rotate i to select an item. Press u .
The following item s are available:
• PHONE SETUP : Move r to set up the HFL features.2 Pairing a Phone
P. 172
2Setting Up Speed Dialing
P. 178
• Call History : Displays the call history.
2Using Call History
P. 184
• Phonebook : Displays the phonebook.
2Using the Phonebook
P. 183
• Dial : Makes a call by entering the phone number.
2Entering a Phone Number
P. 183
• More Speed Dial : Displays more speed dial en tries stored in the system.
2Using Speed Dial
P. 184
• Speed Dial 1-4 : Makes a call to stored speed dial entries.
2Using Speed Dial
P. 184
1Bluetooth ® HandsFreeLink®
You can control the HFL system using voice
commands.
2 HFL Menus P. 186
To use HFL, you need a Bluetooth-compatible
cell phone. For a list of compatible phones,
pairing procedures, and special feature
capabilities:•U.S.: Visit automobiles.honda.com/
handsfreelink.•Canada: Visit www.handsfreelink .ca.•Call HandsFreeLink customer support at
(888) 528-7876.
Voice Control Tips•Aim the vents away from the ceiling and close
the windows, as noise coming from them may
interfere with the microphone.•Press and release the d (Talk) button before
giving a command. Speak clearly and naturally
after a beep.
2 Voice Control Operation P. 5•If the microphone picks up voices other than
yours, the command may be misinterpreted.•When HFL is in use, navigation voice
commands cannot be recognized.•To change the volume level, use the audio
system’s volume knob or the remote audio
controls.
Page 173 of 267
171
Bluetooth® HandsFreeLink®
Bluetooth® HandsFreeLink®
Say d “Hands-free help” or d “Help” any time to get help or hear a list of
commands.2 Voice Help
P. 5
■Help Features
1 Bluetooth ® HandsFreeLink®
Bluetooth ® Wireless Technology
Bluetooth ® name and logos are registered
trademarks owned by Bluetooth SIG, Inc., and
any use of such marks by Honda Motors Co.,
Ltd., is under license. Other trademarks and
trade names are those of their respective owners.
HFL Limitations
An incoming call on HFL will interrupt
Bluetooth ® Audio when it is playing. Audio will
resume when the call is ended.
Page 187 of 267

185
Bluetooth® HandsFreeLink®
Receiving a Call
Bluetooth® HandsFreeLink®
Receiving a Call
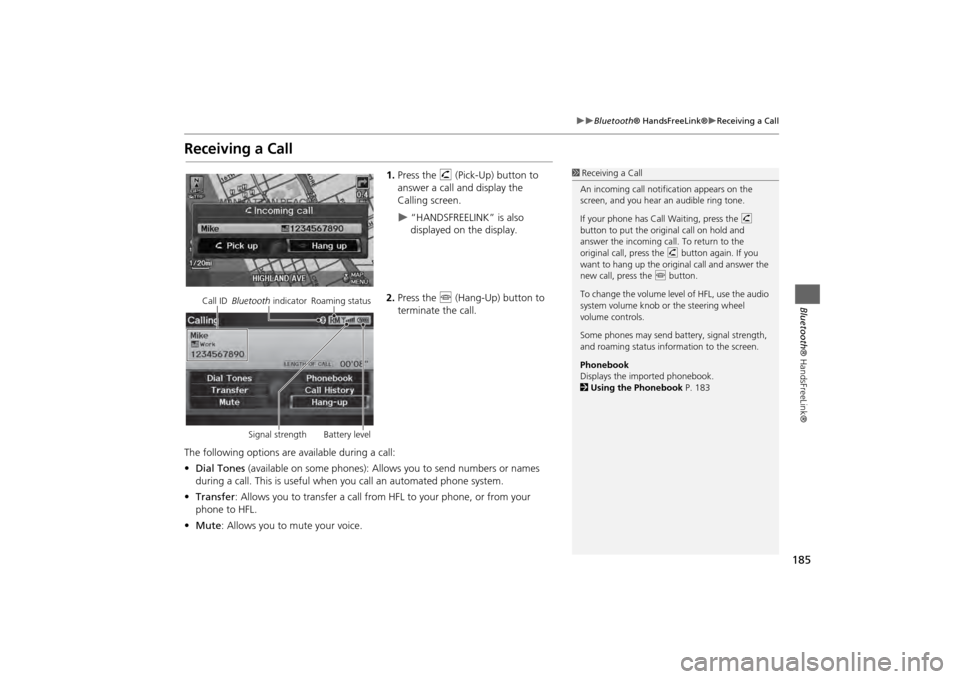
1.Press the h (Pick-Up) button to
answer a call and display the
Calling screen.
“HANDSFREELINK” is also
displayed on the display.
2. Press the j (Hang-Up) button to
terminate the call.
The following options are available during a call:
• Dial Tones (available on some phones): Allo ws you to send numbers or names
during a call. This is useful when you call an automated phone system.
• Transfer: Allows you to transfer a call from HF L to your phone, or from your
phone to HFL.
• Mute : Allows you to mute your voice.
1Receiving a Call
An incoming call notif ication appears on the
screen, and you hear an audible ring tone.
If your phone has Call Waiting, press the h
button to put the origin al call on hold and
answer the incoming call. To return to the
original call, press the h button again. If you
want to hang up the origin al call and answer the
new call, press the j button.
To change the volume leve l of HFL, use the audio
system volume knob or the steering wheel
volume controls.
Some phones may send battery, signal strength,
and roaming status information to the screen.
Phonebook
Displays the imported phonebook.
2 Using the Phonebook P. 183
Call ID Bluetooth indicator Roaming status
Signal strength Battery level
Page 191 of 267

189
Rear Entertainment System
Rear seat passengers can enjoy a completely separate entertainment
source than front passengers, including movies, games, and other audio choices.
Rear Entertainment System..................190
Auxiliary Console Panel .........................190
HDMI Input Jack ...................................191
Rear Control Panel Operation ...............192
Selecting the Audio Source ...................192
Rear DVD Menu ....................................193
Screen and Surround Settings ...............196
DVD Initial Settings ...............................199
Dual Screen Mode (U ltrawide RES only) .200
Replacing the Batteries ..........................202
Front Control Panel Operation .............203
Selecting the Audio Source ...................203
Rear System Setup ................................204
Setting the Rear DVD Menu ..................205 Wireless Headphones
........................... 206
Using the Wireless Headphones ........... 206
Changing the Sound Sour ce (Ultrawide RES
only)................................................... 207
Replacing the Batteries ......................... 208