Page 126 of 573
125
uuOperating the Switches Around the Steering WheeluBrightness Control
Controls
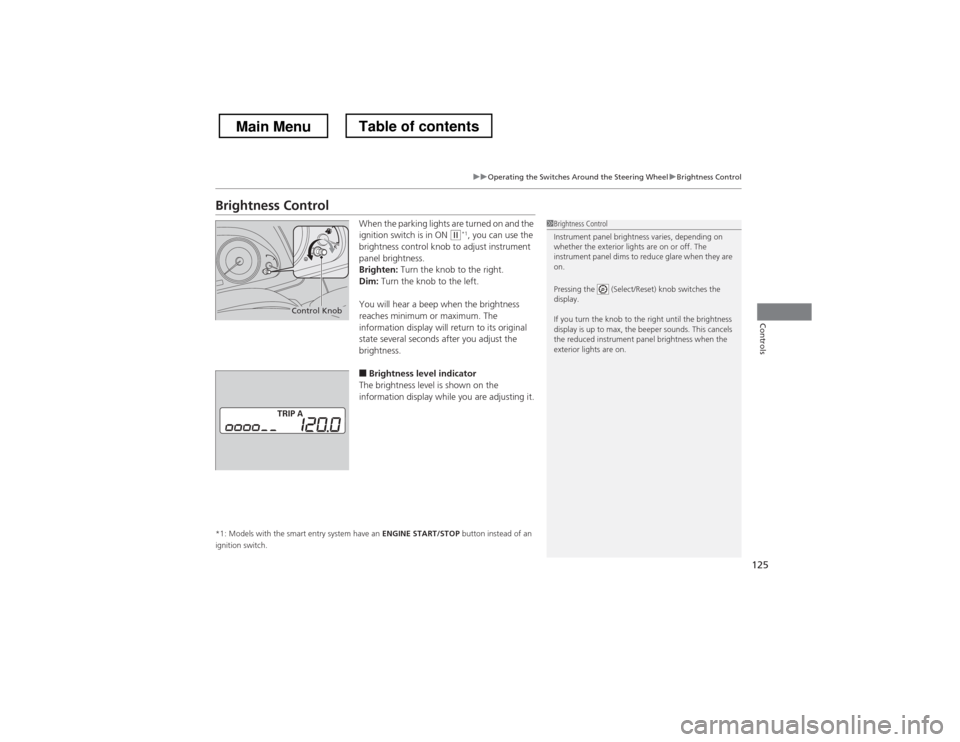
Brightness ControlWhen the parking lights are turned on and the
ignition switch is in ON
(w*1
, you can use the
brightness control knob to adjust instrument
panel brightness.
Brighten: Turn the knob to the right.
Dim: Turn the knob to the left.
You will hear a beep when the brightness
reaches minimum or maximum. The
information display will return to its original
state several seconds after you adjust the
brightness.
■ Brightness level indicator
The brightness level is shown on the
information display while you are adjusting it.
*1: Models with the smart entry system have an ENGINE START/STOP button instead of an
ignition switch.1Brightness Control
Instrument panel brightness varies, depending on
whether the exterior lights are on or off. The
instrument panel dims to reduce glare when they are on.
Pressing the (Select/Reset) knob switches the
display.
If you turn the knob to the right until the brightness
display is up to max, the beeper sounds. This cancels
the reduced instrument panel brightness when the
exterior lights are on.
Control Knob
Main MenuTable of contents
Page 159 of 573

uuClimate Control System*uUsing Automatic Climate Control
158
Controls
Use the system when the engine is running. 1. Press the AUTO button.
2. Adjust the interior temperature using the driver’s side or passenger’s side control
switch.
3. Press the (On/Off) button to cancel.
■ Switching between the recircu lation and fresh air modes
Press the (recirculation) button and switch the mode depending on
environmental conditions.
Recirculation Mode (indicator on): Recirculates air from the vehicle’s interior through the system.
Fresh Air Mode (indicator off): Maintains outside ventilation. Keep the system in
fresh air mode in normal situations.1Using Automatic Climate Control
If any buttons are pressed while using the climate
control system in auto, the function of the button
that was pressed will take priority.
The AUTO indicator will go off, but functions
unrelated to the button that was pressed will be
controlled automatically.
To prevent cold air from blowing in from outside, the
fan may not start immediately when the AUTO
button is pressed.
If the interior is very warm, you can cool it down
more rapidly by partially opening the windows,
turning the system on auto, and setting the
temperature to low. Change the fresh mode to
recirculation mode until the temperature cools down.
When you set the temperature to the lower or upper
limit, Lo or Hi is displayed.
Pressing the button switches the climate
control system between on and off. When turned on,
the system returns to your last selection.
Main MenuTable of contents
Page 166 of 573
165
uuAudio SystemuUSB Adapter Cable
Features
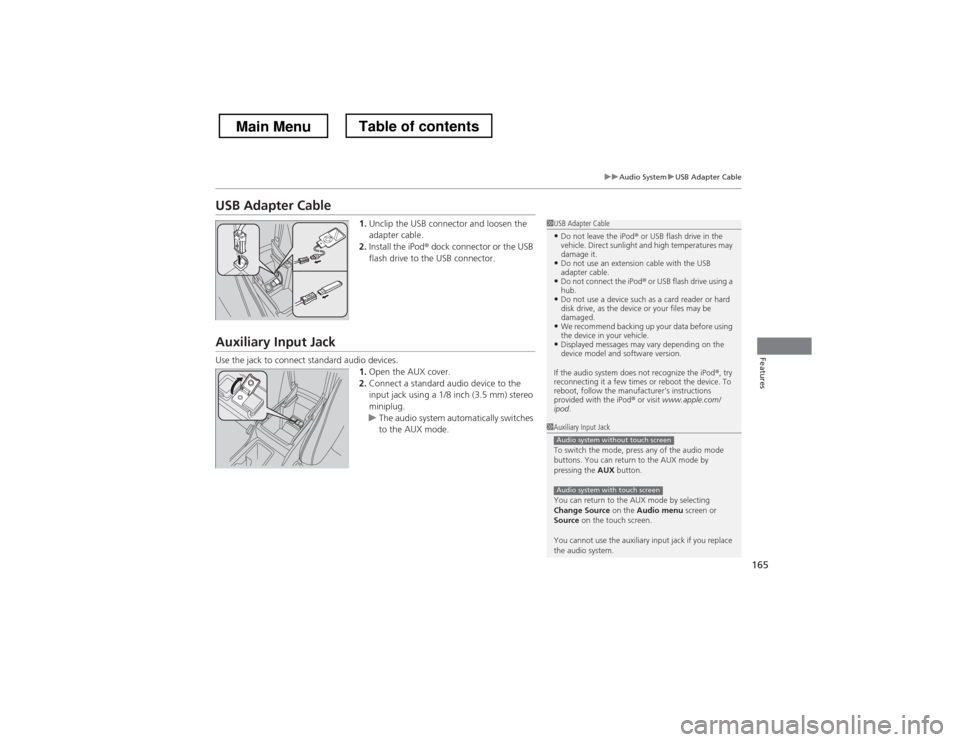
USB Adapter Cable1.Unclip the USB connector and loosen the
adapter cable.
2. Install the iPod ® dock connector or the USB
flash drive to the USB connector.
Auxiliary Input Jack
Use the jack to connect standard audio devices. 1.Open the AUX cover.
2. Connect a standard audio device to the
input jack using a 1/8 inch (3.5 mm) stereo
miniplug.
uThe audio system automatically switches
to the AUX mode.
1USB Adapter Cable
• Do not leave the iPod ® or USB flash drive in the
vehicle. Direct sunlight and high temperatures may damage it.
• Do not use an extension cable with the USB
adapter cable.
• Do not connect the iPod ® or USB flash drive using a
hub.
• Do not use a device such as a card reader or hard
disk drive, as the device or your files may be damaged.
• We recommend backing up your data before using
the device in your vehicle.
• Displayed messages may vary depending on the
device model and software version.
If the audio system does not recognize the iPod ®, try
reconnecting it a few times or reboot the device. To
reboot, follow the manufacturer's instructions provided with the iPod ® or visit www.apple.com/
ipod .
1Auxiliary Input Jack
To switch the mode, press any of the audio mode
buttons. You can return to the AUX mode by
pressing the AUX button.
You can return to the AUX mode by selecting
Change Source on the Audio menu screen or
Source on the touch screen.
You cannot use the auxiliary input jack if you replace
the audio system.
Audio system without touch screen
Audio system with touch screen
Main MenuTable of contents
Page 170 of 573
169
Features
Audio System Basic Operation
To use the audio system function, the ignition switch must be in ACCESSORY (q or
ON (w .
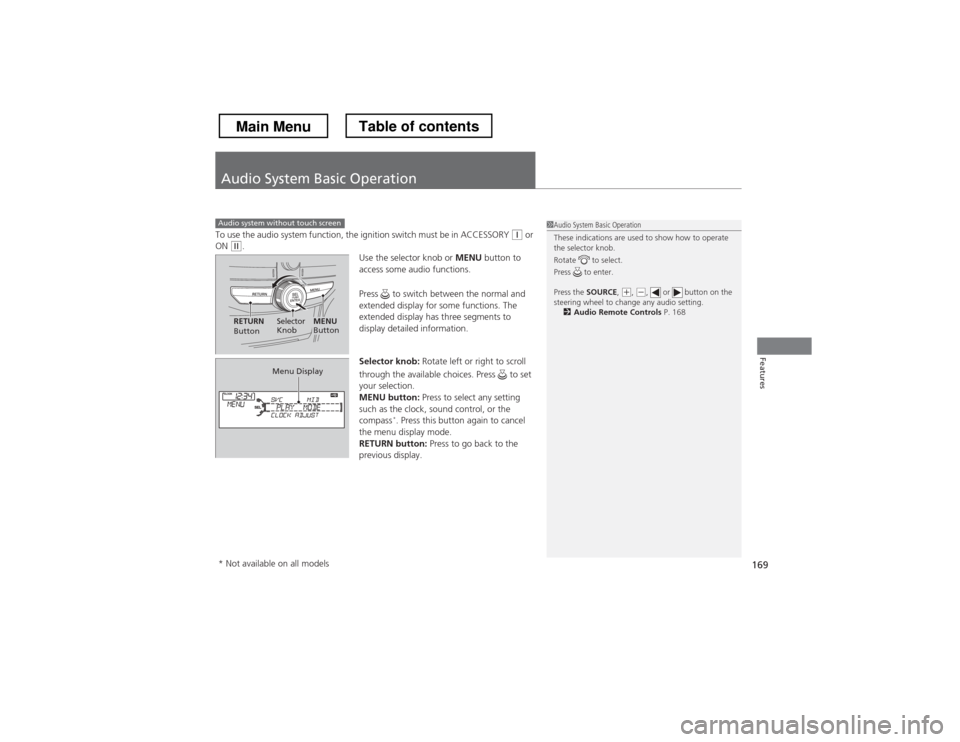
Use the selector knob or MENU button to
access some audio functions.
Press to switch between the normal and
extended display for some functions. The
extended display has three segments to
display detailed information.
Selector knob: Rotate left or right to scroll
through the available choices. Press to set
your selection.
MENU button: Press to select any setting
such as the clock, sound control, or the compass *
. Press this button again to cancel
the menu display mode.
RETURN button: Press to go back to the
previous display.
Audio system without touch screen1Audio System Basic Operation
These indications are used to show how to operate
the selector knob.
Rotate to select.
Press to enter.
Press the SOURCE,
(+, (-, or button on the
steering wheel to change any audio setting. 2 Audio Remote Controls P. 168
RETURN
Button Selector
KnobMENU
Button
Menu Display
* Not available on all models
Main MenuTable of contents
Page 171 of 573
170
uuAudio System Basic OperationuAdjusting the Sound
Features
Adjusting the SoundPress the MENU button, and rotate to
adjust the setting, then press . Rotate to
scroll through the following choices:
1Adjusting the Sound
When the adjustment level reaches the center, you will see C in the display.
The SVC has four modes: OFF, LOW , MID , and
HIGH .
SVC adjusts the volume level based on the vehicle
speed. As you go faster, audio volume increases. As
you slow down, audio volume decreases.
Selector KnobMENU
Button
RETURN
ButtonBASS
TREBLE FADER
BALANCE
SUBWSVC
CLOCK ADJUST
Speed-sensitive
Volume
Compensation Subwoofer
Clock settingFADER is selectable.
Main MenuTable of contents
Page 172 of 573
171
uuAudio System Basic OperationuPlaying the AM/FM Radio
Continued
Features
Playing the AM/FM Radio
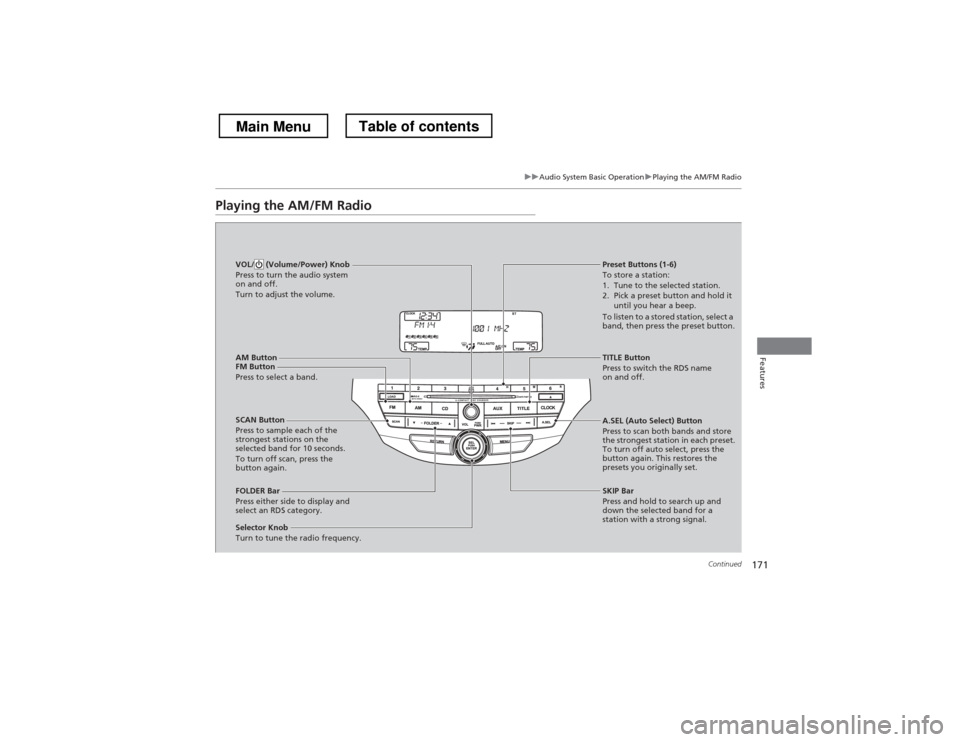
AM Button
FM Button
Press to select a band. SCAN Button
Press to sample each of the
strongest stations on the
selected band for 10 seconds.
To turn off scan, press the
button again.
VOL/ (Volume/Power) Knob
Press to turn the audio system
on and off.
Turn to adjust the volume.
Preset Buttons (1-6) To store a station:
1. Tune to the selected station.
2. Pick a preset button and hold it
until you hear a beep.
To listen to a stored station, select a
band, then press the preset button.
Selector Knob
Turn to tune the radio frequency.
TITLE Button
Press to switch the RDS name
on and off.
FOLDER Bar
Press either side to display and
select an RDS category. SKIP Bar
Press and hold to search up and
down the selected band for a
station with a strong signal.
A.SEL (Auto Select) Button
Press to scan both bands and store
the strongest station in each preset.
To turn off auto select, press the
button again. This restores the
presets you originally set.
Main MenuTable of contents
Page 173 of 573
uuAudio System Basic OperationuPlaying the AM/FM Radio
172
Features
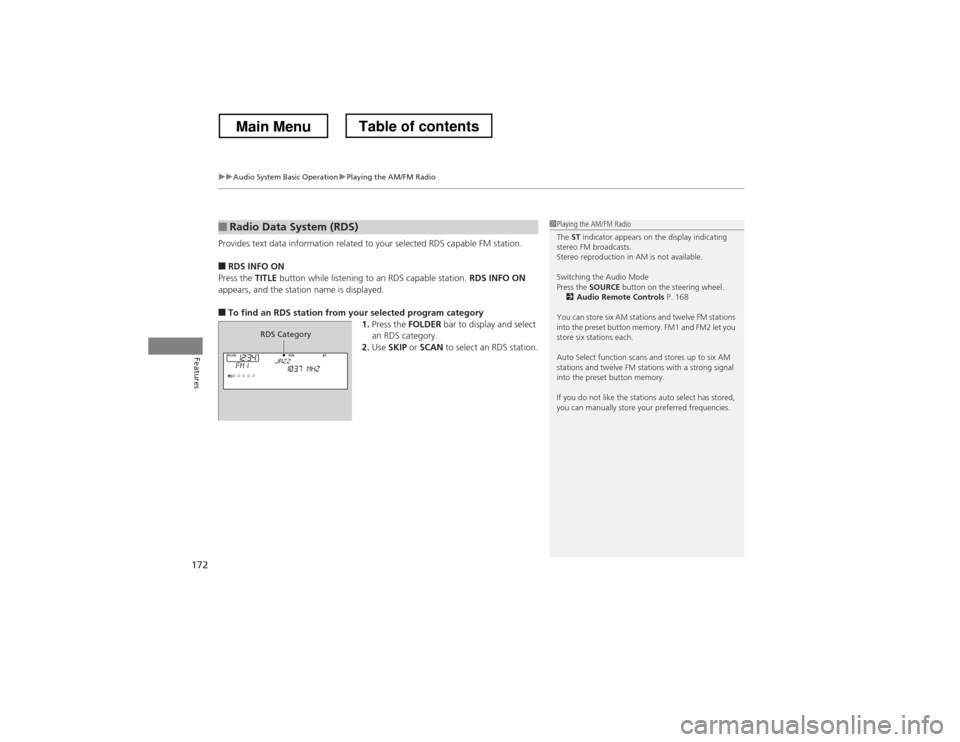
Provides text data information related to your selected RDS capable FM station. ■ RDS INFO ON
Press the TITLE button while listening to an RDS capable station. RDS INFO ON
appears, and the station name is displayed.
■ To find an RDS station from your selected program category
1.Press the FOLDER bar to display and select
an RDS category.
2. Use SKIP or SCAN to select an RDS station.
■Radio Data System (RDS)1Playing the AM/FM Radio
The ST indicator appears on the display indicating
stereo FM broadcasts.
Stereo reproduction in AM is not available.
Switching the Audio Mode
Press the SOURCE button on the steering wheel.
2 Audio Remote Controls P. 168
You can store six AM stations and twelve FM stations
into the preset button memory. FM1 and FM2 let you
store six stations each.
Auto Select function scans and stores up to six AM
stations and twelve FM stations with a strong signal
into the preset button memory.
If you do not like the stations auto select has stored,
you can manually store your preferred frequencies.
RDS Category
Main MenuTable of contents
Page 174 of 573
173
uuAudio System Basic OperationuPlaying a CD
Continued
Features
Playing a CD
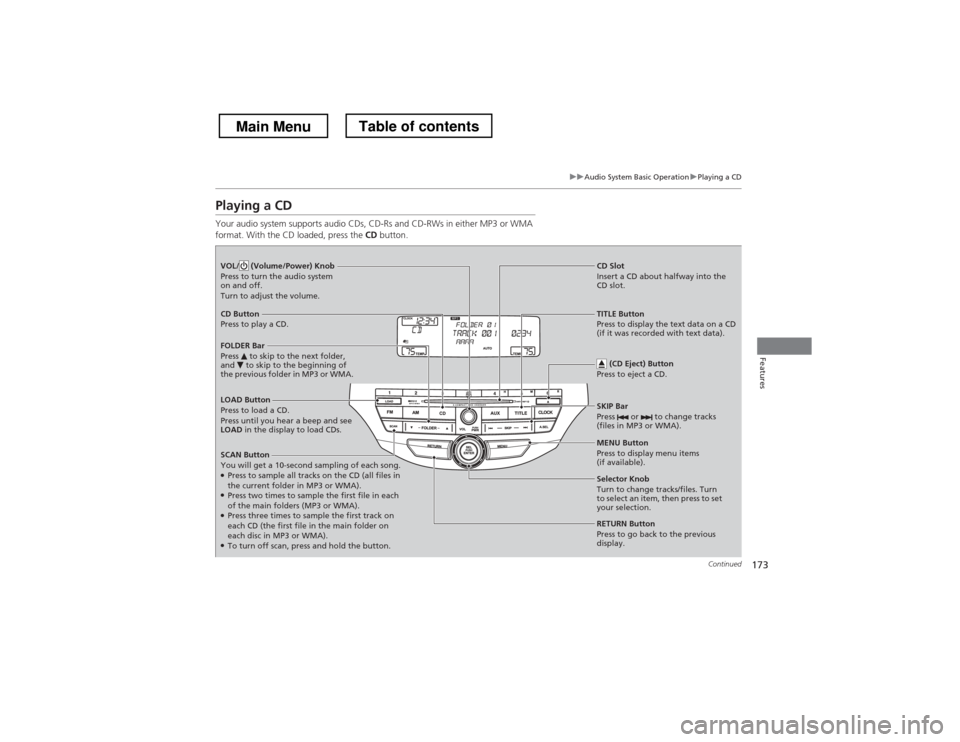
Your audio system supports audio CDs, CD-Rs and CD-RWs in either MP3 or WMA
format. With the CD loaded, press the CD button.
LOAD Button
Press to load a CD. Press until you hear a beep and see
LOAD in the display to load CDs.
SCAN Button
You will get a 10-second sampling of each song. ● Press to sample all tracks on the CD (all files in
the current folder in MP3 or WMA).
● Press two times to sample the first file in each
of the main folders (MP3 or WMA).
● Press three times to sample the first track on
each CD (the first file in the main folder on
each disc in MP3 or WMA).
● To turn off scan, press and hold the button.
VOL/ (Volume/Power) Knob
Press to turn the audio system
on and off.
Turn to adjust the volume.
CD Slot
Insert a CD about halfway into the
CD slot.
SKIP Bar
Press or to change tracks
(files in MP3 or WMA).
CD Button
Press to play a CD.
(CD Eject) Button
Press to eject a CD.
FOLDER Bar
Press to skip to the next folder,
and to skip to the beginning of
the previous folder in MP3 or WMA.
TITLE Button
Press to display the text data on a CD
(if it was recorded with text data).
MENU Button
Press to display menu items (if available).
Selector Knob
Turn to change tracks/files. Turn
to select an item, then press to set
your selection.
RETURN Button
Press to go back to the previous
display.
Main MenuTable of contents