2013 FORD SUPER DUTY lock
[x] Cancel search: lockPage 373 of 563
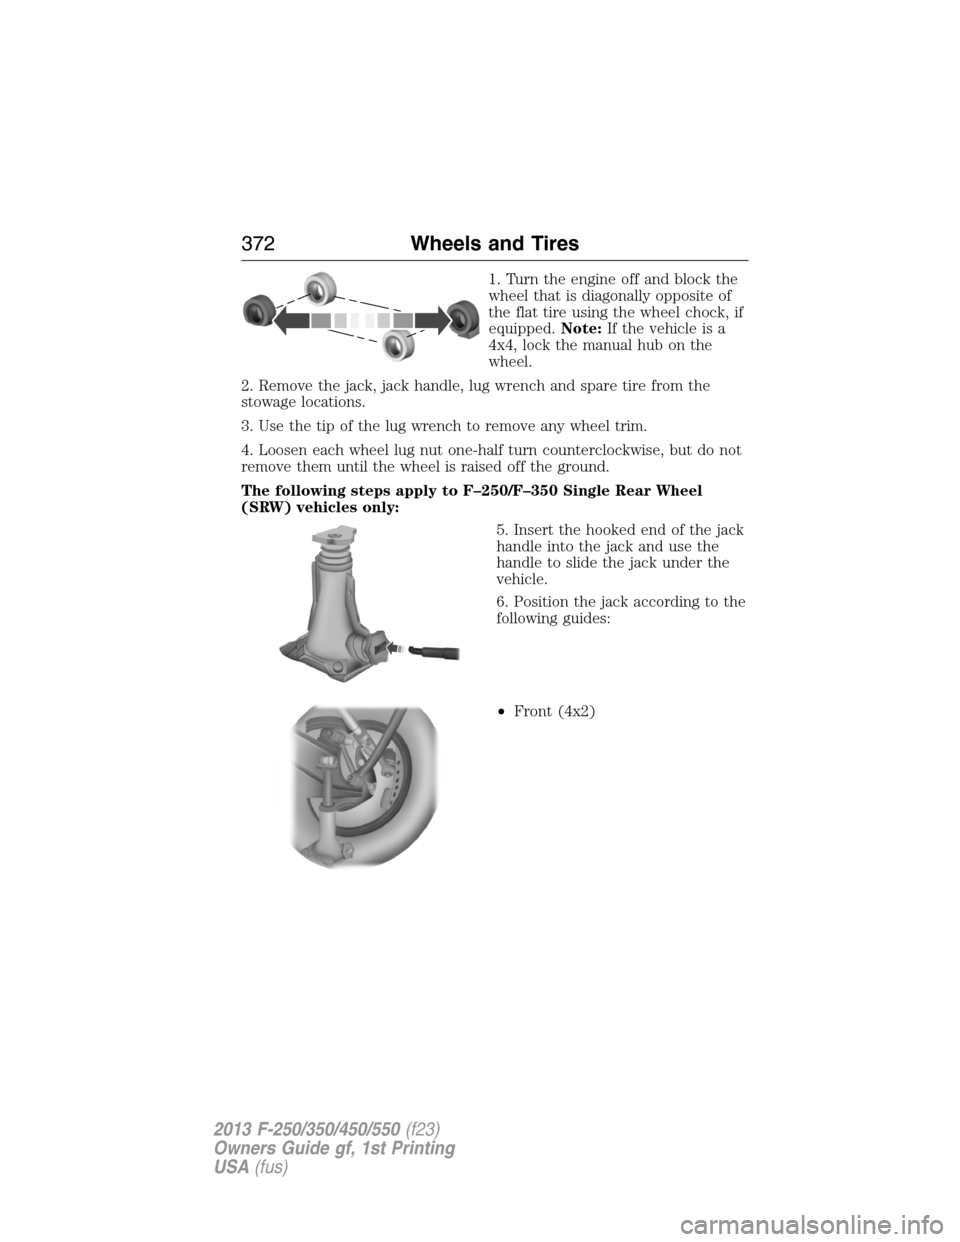
1. Turn the engine off and block the
wheel that is diagonally opposite of
the flat tire using the wheel chock, if
equipped.Note:If the vehicle is a
4x4, lock the manual hub on the
wheel.
2. Remove the jack, jack handle, lug wrench and spare tire from the
stowage locations.
3. Use the tip of the lug wrench to remove any wheel trim.
4. Loosen each wheel lug nut one-half turn counterclockwise, but do not
remove them until the wheel is raised off the ground.
The following steps apply to F–250/F–350 Single Rear Wheel
(SRW) vehicles only:
5. Insert the hooked end of the jack
handle into the jack and use the
handle to slide the jack under the
vehicle.
6. Position the jack according to the
following guides:
•Front (4x2)
372Wheels and Tires
2013 F-250/350/450/550(f23)
Owners Guide gf, 1st Printing
USA(fus)
Page 375 of 563

7. Turn the jack handle clockwise
until the wheel is completely off the
ground and high enough to install
the spare tire.
8. Remove the lug nuts with the lug
wrench.
9. Replace the flat tire with the spare
tire, making sure the valve stem is
facing outward for all front wheels
and single rear wheel vehicles. If
replacing an inboard rear tire on dual rear wheel vehicles, the valve stem
must be facing outward. If replacing the outboard wheel, the valve stem
must be facing inward. Reinstall the lug nuts until the wheel is snug against
the hub. Do not fully tighten the lug nuts until the wheel has been lowered.
10. Lower the wheel by turning the jack handle counterclockwise.
Go to Step 19.
The following steps apply to F–350 Dual Rear Wheel (DRW) and
F–450/F–550 vehicles only:
11. Slide the notched end of the
jack handle over the release valve
and use the handle to slide the jack
under the vehicle. Make sure the
valve is closed by turning it
clockwise.
12. Position the jack according to
the following guides:
•Front (4x2): F–350 DRW
Note:Place the jack directly under
I-beam.
374Wheels and Tires
2013 F-250/350/450/550(f23)
Owners Guide gf, 1st Printing
USA(fus)
Page 377 of 563
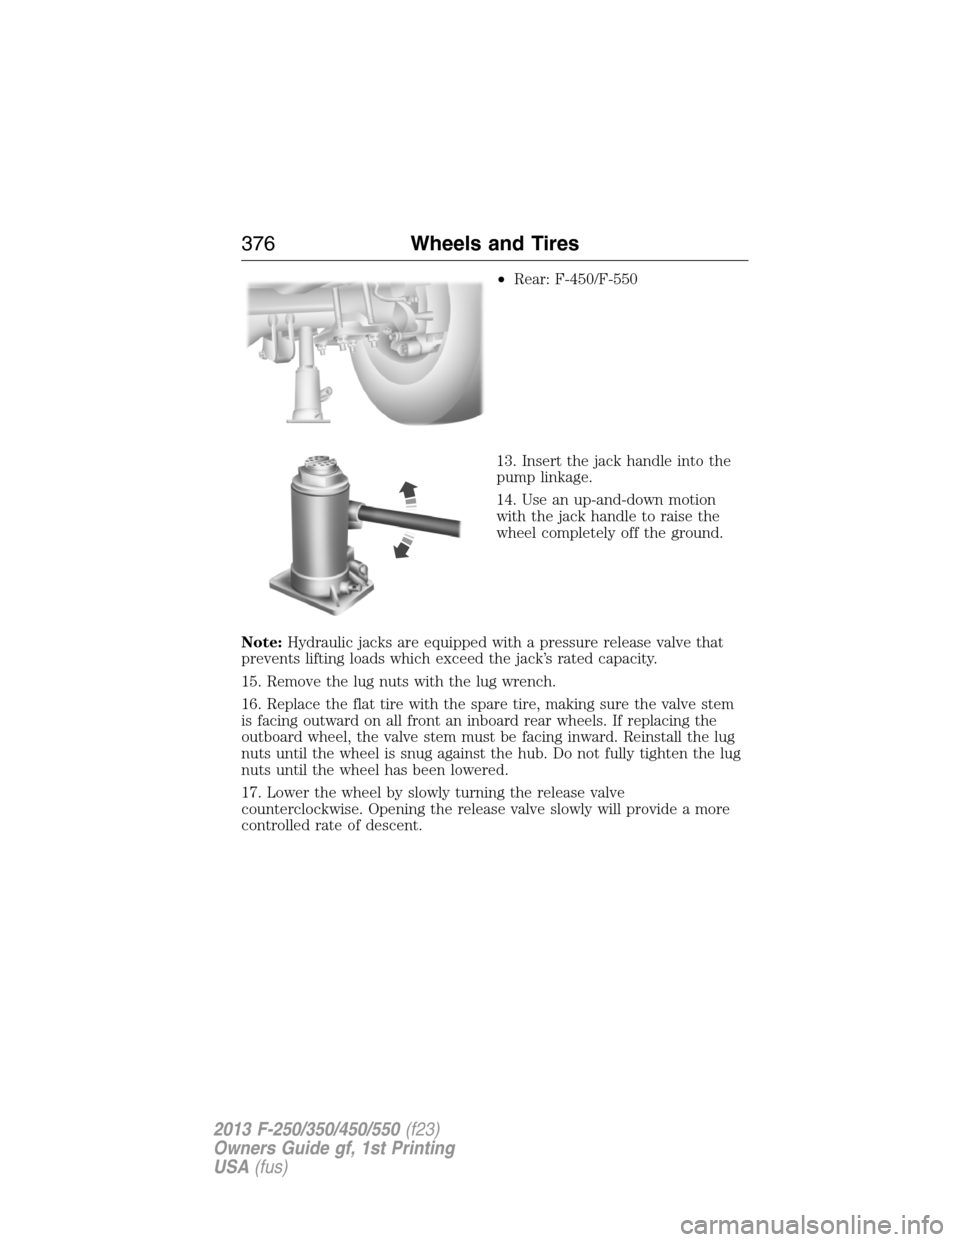
•Rear: F-450/F-550
13. Insert the jack handle into the
pump linkage.
14. Use an up-and-down motion
with the jack handle to raise the
wheel completely off the ground.
Note:Hydraulic jacks are equipped with a pressure release valve that
prevents lifting loads which exceed the jack’s rated capacity.
15. Remove the lug nuts with the lug wrench.
16. Replace the flat tire with the spare tire, making sure the valve stem
is facing outward on all front an inboard rear wheels. If replacing the
outboard wheel, the valve stem must be facing inward. Reinstall the lug
nuts until the wheel is snug against the hub. Do not fully tighten the lug
nuts until the wheel has been lowered.
17. Lower the wheel by slowly turning the release valve
counterclockwise. Opening the release valve slowly will provide a more
controlled rate of descent.
376Wheels and Tires
2013 F-250/350/450/550(f23)
Owners Guide gf, 1st Printing
USA(fus)
Page 378 of 563
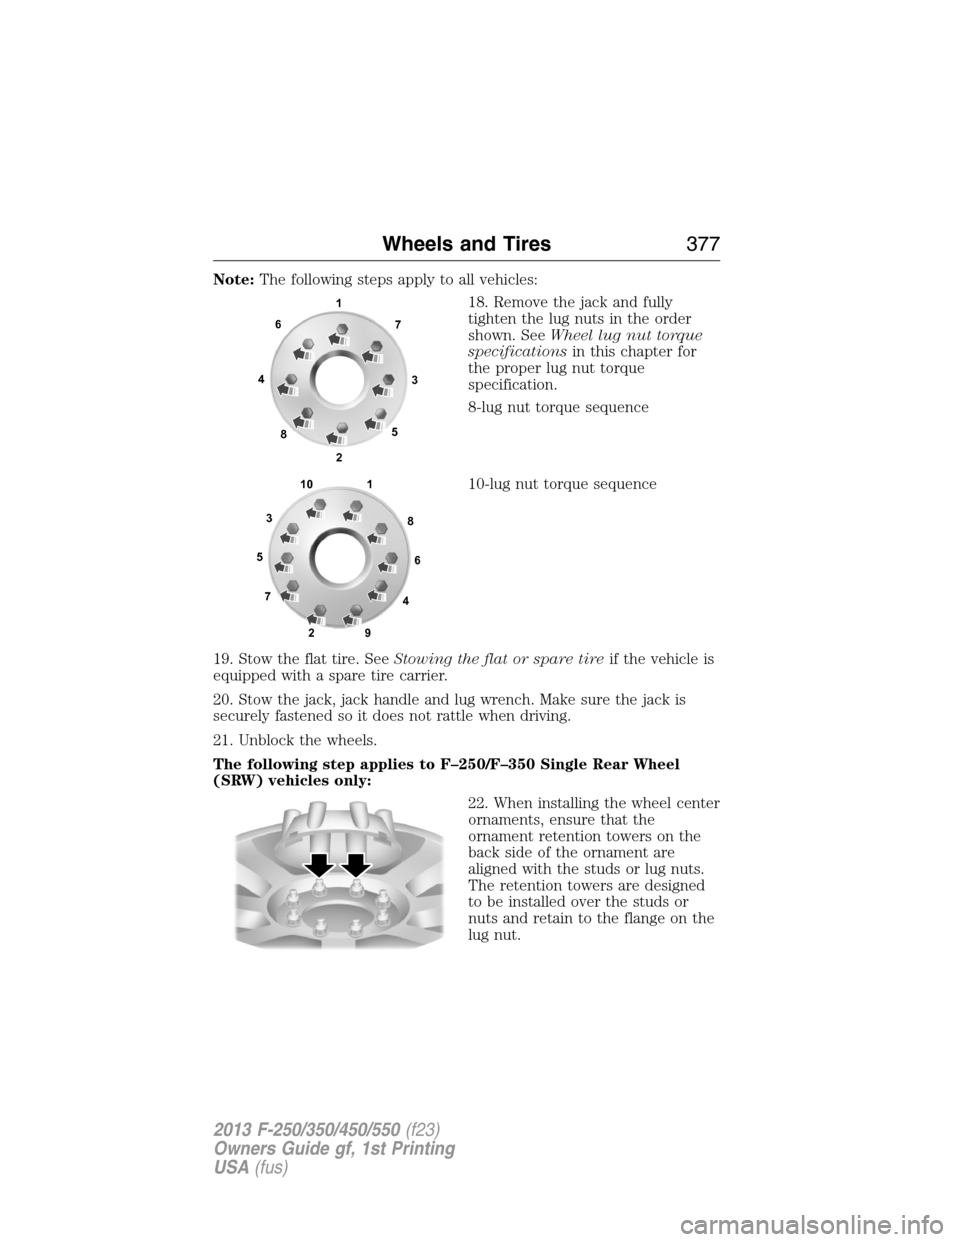
Note:The following steps apply to all vehicles:
18. Remove the jack and fully
tighten the lug nuts in the order
shown. SeeWheel lug nut torque
specificationsin this chapter for
the proper lug nut torque
specification.
8-lug nut torque sequence
10-lug nut torque sequence
19. Stow the flat tire. SeeStowing the flat or spare tireif the vehicle is
equipped with a spare tire carrier.
20. Stow the jack, jack handle and lug wrench. Make sure the jack is
securely fastened so it does not rattle when driving.
21. Unblock the wheels.
The following step applies to F–250/F–350 Single Rear Wheel
(SRW) vehicles only:
22. When installing the wheel center
ornaments, ensure that the
ornament retention towers on the
back side of the ornament are
aligned with the studs or lug nuts.
The retention towers are designed
to be installed over the studs or
nuts and retain to the flange on the
lug nut.
1
3 4
27 6
5
8
1
2 3
4 5
6
78
9 10
Wheels and Tires377
2013 F-250/350/450/550(f23)
Owners Guide gf, 1st Printing
USA(fus)
Page 381 of 563
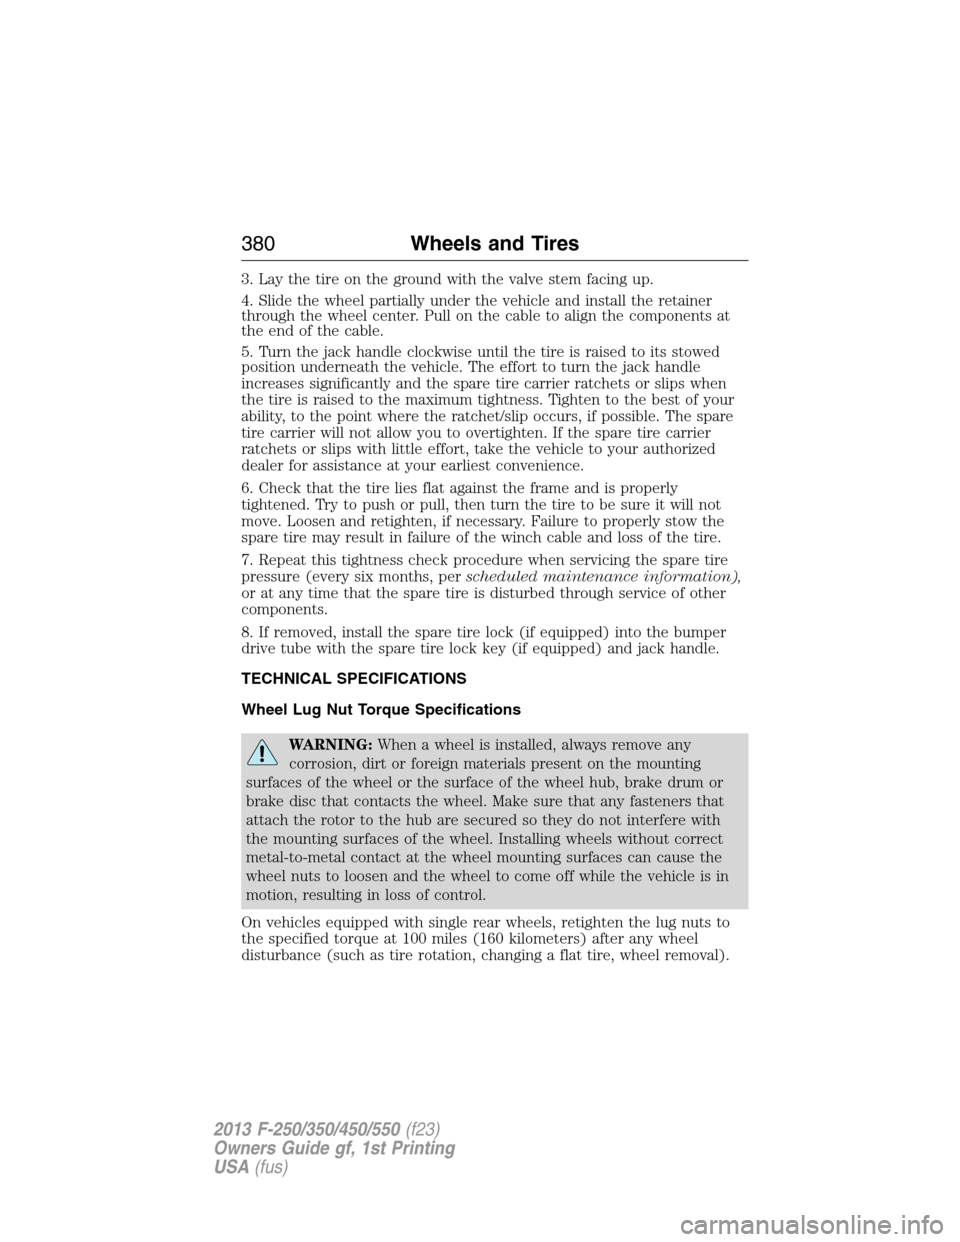
3. Lay the tire on the ground with the valve stem facing up.
4. Slide the wheel partially under the vehicle and install the retainer
through the wheel center. Pull on the cable to align the components at
the end of the cable.
5. Turn the jack handle clockwise until the tire is raised to its stowed
position underneath the vehicle. The effort to turn the jack handle
increases significantly and the spare tire carrier ratchets or slips when
the tire is raised to the maximum tightness. Tighten to the best of your
ability, to the point where the ratchet/slip occurs, if possible. The spare
tire carrier will not allow you to overtighten. If the spare tire carrier
ratchets or slips with little effort, take the vehicle to your authorized
dealer for assistance at your earliest convenience.
6. Check that the tire lies flat against the frame and is properly
tightened. Try to push or pull, then turn the tire to be sure it will not
move. Loosen and retighten, if necessary. Failure to properly stow the
spare tire may result in failure of the winch cable and loss of the tire.
7. Repeat this tightness check procedure when servicing the spare tire
pressure (every six months, perscheduled maintenance information),
or at any time that the spare tire is disturbed through service of other
components.
8. If removed, install the spare tire lock (if equipped) into the bumper
drive tube with the spare tire lock key (if equipped) and jack handle.
TECHNICAL SPECIFICATIONS
Wheel Lug Nut Torque Specifications
WARNING:When a wheel is installed, always remove any
corrosion, dirt or foreign materials present on the mounting
surfaces of the wheel or the surface of the wheel hub, brake drum or
brake disc that contacts the wheel. Make sure that any fasteners that
attach the rotor to the hub are secured so they do not interfere with
the mounting surfaces of the wheel. Installing wheels without correct
metal-to-metal contact at the wheel mounting surfaces can cause the
wheel nuts to loosen and the wheel to come off while the vehicle is in
motion, resulting in loss of control.
On vehicles equipped with single rear wheels, retighten the lug nuts to
the specified torque at 100 miles (160 kilometers) after any wheel
disturbance (such as tire rotation, changing a flat tire, wheel removal).
380Wheels and Tires
2013 F-250/350/450/550(f23)
Owners Guide gf, 1st Printing
USA(fus)
Page 386 of 563
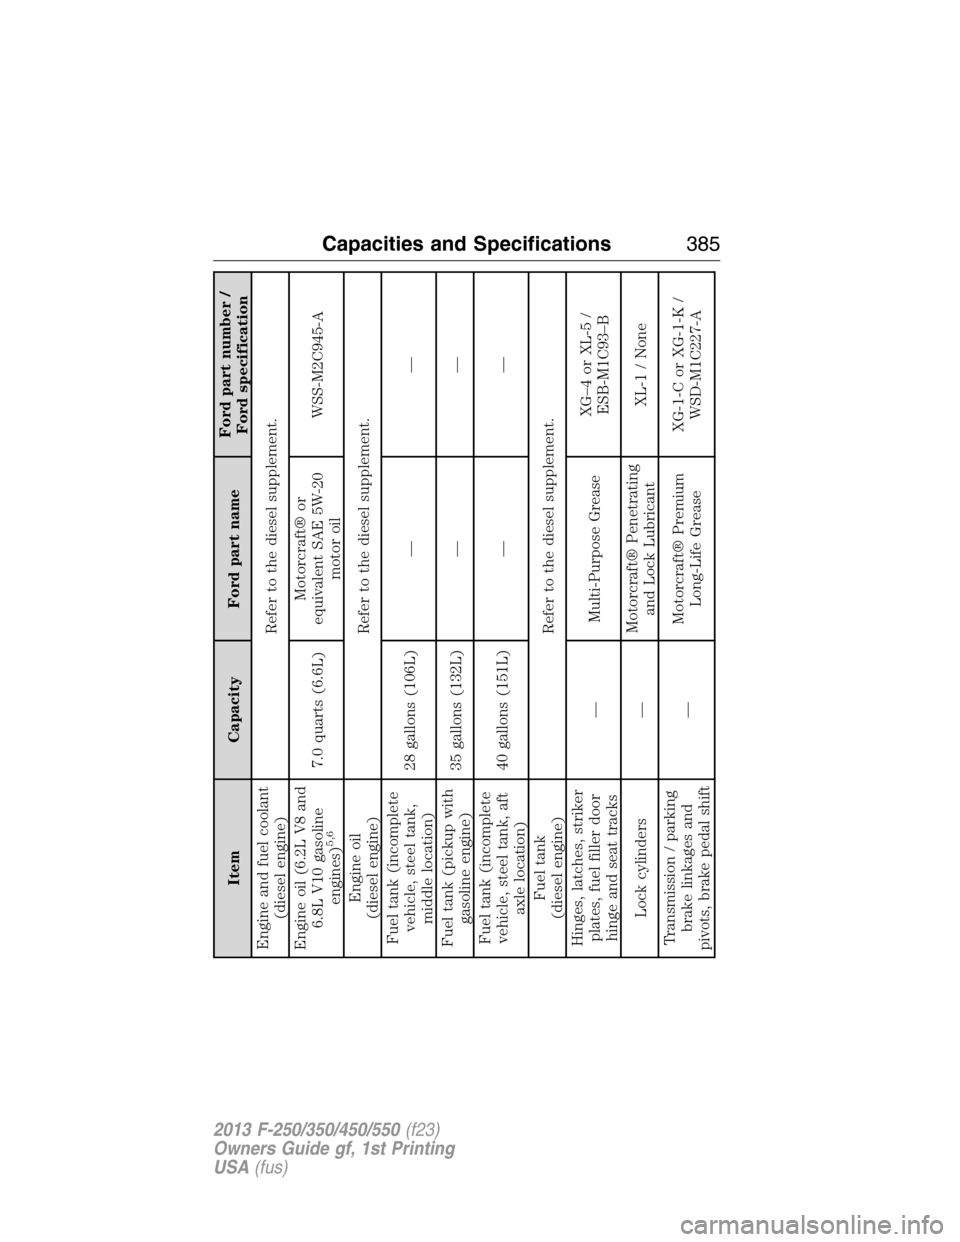
Item Capacity Ford part nameFord part number /
Ford specification
Engine and fuel coolant
(diesel engine)Refer to the diesel supplement.
Engine oil (6.2L V8 and
6.8L V10 gasoline
engines)
5,6
7.0 quarts (6.6L)Motorcraft® or
equivalent SAE 5W-20
motor oilWSS-M2C945-A
Engine oil
(diesel engine)Refer to the diesel supplement.
Fuel tank (incomplete
vehicle, steel tank,
middle location)28 gallons (106L) — —
Fuel tank (pickup with
gasoline engine)35 gallons (132L) — —
Fuel tank (incomplete
vehicle, steel tank, aft
axle location)40 gallons (151L) — —
Fuel tank
(diesel engine)Refer to the diesel supplement.
Hinges, latches, striker
plates, fuel filler door
hinge and seat tracks— Multi-Purpose GreaseXG–4 or XL-5 /
ESB-M1C93–B
Lock cylinders —Motorcraft® Penetrating
and Lock LubricantXL-1 / None
Transmission / parking
brake linkages and
pivots, brake pedal shift—Motorcraft® Premium
Long-Life GreaseXG-1-C or XG-1-K /
WSD-M1C227-A
Capacities and Specifications385
2013 F-250/350/450/550(f23)
Owners Guide gf, 1st Printing
USA(fus)
Page 393 of 563

Peace of mind
•Keyless entry keypad•Back up alarm*
•Remote start•Cable lock*
•Vehicle security systems•Bed hooks*
•Wheel locks•Tool/Cargo boxes*
•Protective seat covers*•Speed/cruise control
•Bumper and hitch mounted parking sensors*
*Ford Licensed Accessories (FLA) are warranted by the accessory
manufacturer’s warranty. Ford Licensed Accessories are fully designed
and developed by the accessory manufacturer and have not been
designed or tested to Ford Motor Company engineering requirements.
Contact your Ford dealer for details regarding the manufacturer’s limited
warranty and/or a copy of the FLA product limited warranty offered by
the accessory manufacturer.
For maximum vehicle performance, keep the following information in
mind when adding accessories or equipment to your vehicle:
•When adding accessories, equipment, passengers and luggage to your
vehicle, do not exceed the total weight capacity of the vehicle or of
the front or rear axle (GVWR or GAWR as indicated on the Safety
Compliance Certification label). Consult your authorized dealer for
specific weight information.
•
The Federal Communications Commission (FCC) and Canadian Radio
Telecommunications Commission (CRTC) regulate the use of mobile
communications systems — such as two-way radios, telephones and
theft alarms - that are equipped with radio transmitters. Any such
equipment installed in your vehicle should comply with FCC or CRTC
regulations and should be installed only by a qualified service technician.
•Mobile communications systems may harm the operation of your vehicle,
particularly if they are not properly designed for automotive use.
•To avoid interference with other vehicle functions, such as anti-lock
braking systems, amateur radio users who install radios and antennas
onto their vehicle should not locate the amateur radio antennas in the
area of the driver’s side hood.
•Any non-Ford custom electrical or electronic accessories or
components that are added to the vehicle by the authorized dealer or
the owner, may adversely affect battery performance and durability,
and may also adversely affect the performance of other electrical
systems in the vehicle.
392Accessories
2013 F-250/350/450/550(f23)
Owners Guide gf, 1st Printing
USA(fus)
Page 394 of 563

FORD ESP EXTENDED SERVICE PLANS (U.S. ONLY)
More than 32 million Ford and Lincoln owners have discovered the
powerful protection of Ford ESP. It is the only extended service plan
backed by Ford Motor Company, and provides “peace of mind”
protection beyond the New Vehicle Limited Warranty coverage.
Up to 500+ Covered Vehicle Components
There are four, new-vehicle Extended Service Plans with different levels
of coverage. Ask your dealer for details.
PremiumCare –Our most comprehensive coverage. With over 500
covered components, this plan is so complete that we generally only
discuss what is not covered!
ExtraCare –Covers 113 components, and includes many high-tech
items.
BaseCare –Covers 84 components.
PowertrainCare –Covers 29 critical components.
Ford ESP is honored by all Ford and Lincoln Dealers in the U.S.
and Canada.It is the only extended service plan authorized and backed
by Ford Motor Company. That means you get:
•Reliable, quality service anywhere you go.
•Factory-trained technicians.
•Ford Authorized Parts used with every covered repair.
Rental Car Reimbursement
If your vehicle is kept overnight for covered repairs,you are
eligible for rental car coverage, including Bumper-to-Bumper warranty
repairs, or manufacturer’s recalls.
Transferable Coverage
If you sell your vehicle before your Ford ESP coverage expires, you can
transfer any remaining coverage to the new owner. Whenever you are
ready to sell your car, prospective buyers may feel better about taking a
risk on your used vehicle. Ford ESP may add resale value!
Plus,exclusive 24/7 roadside assistance,including:
•Towing, flat-tire change and battery jump starts.
•Out-of-fuel and lock-out assistance.
•Travel expense reimbursement for lodging, meals and rental car.
•Destination assistance for taxi, shuttle, rental car coverage and
emergency transportation.
Ford Extended Service Plan393
2013 F-250/350/450/550(f23)
Owners Guide gf, 1st Printing
USA(fus)