2013 FORD SUPER DUTY tow
[x] Cancel search: towPage 293 of 563
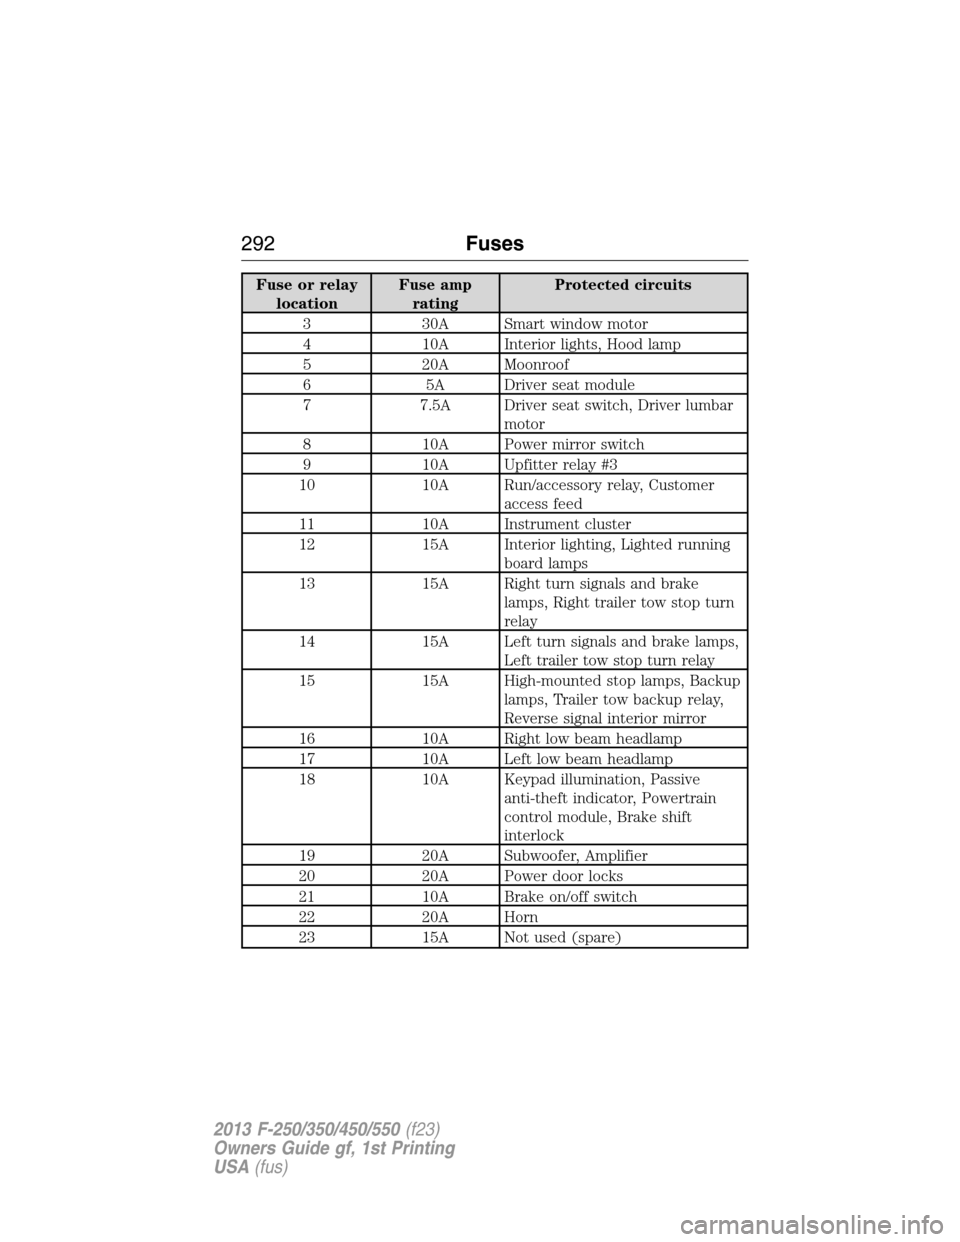
Fuse or relay
locationFuse amp
ratingProtected circuits
3 30A Smart window motor
4 10A Interior lights, Hood lamp
5 20A Moonroof
6 5A Driver seat module
7 7.5A Driver seat switch, Driver lumbar
motor
8 10A Power mirror switch
9 10A Upfitter relay #3
10 10A Run/accessory relay, Customer
access feed
11 10A Instrument cluster
12 15A Interior lighting, Lighted running
board lamps
13 15A Right turn signals and brake
lamps, Right trailer tow stop turn
relay
14 15A Left turn signals and brake lamps,
Left trailer tow stop turn relay
15 15A High-mounted stop lamps, Backup
lamps, Trailer tow backup relay,
Reverse signal interior mirror
16 10A Right low beam headlamp
17 10A Left low beam headlamp
18 10A Keypad illumination, Passive
anti-theft indicator, Powertrain
control module, Brake shift
interlock
19 20A Subwoofer, Amplifier
20 20A Power door locks
21 10A Brake on/off switch
22 20A Horn
23 15A Not used (spare)
292Fuses
2013 F-250/350/450/550(f23)
Owners Guide gf, 1st Printing
USA(fus)
Page 294 of 563

Fuse or relay
locationFuse amp
ratingProtected circuits
24 15A Steering wheel control module,
Diagnostic connector, Power fold
mirror relay, Remote keyless
entry, Electronic finish panel
25 15A Not used (spare)
26 5A Steering wheel control module
27 20A Not used (spare)
28 15A Ignition switch
29 20A SYNC, GPS module, Radio
faceplate
30 15A Parking lamp relay, Trailer tow
parking lamp relay
31 5A Trailer brake controller (brake
signal), Customer access
32 15A Moonroof motor, Telescoping
mirror switch, Auto dimming
mirrors, Power inverter, Driver
and passenger door lock switch
illumination, Rear heated seat
switch illumination
33 10A Restraint control module
34 10A Heated steering wheel module,
Rear heated seats module
35 5A Select shift switch, Reverse park
aid module, Trailer brake control
module
36 10A Fuel tank select switch
37 10A PTC heater
38 10A AM/FM radio faceplate
39 15A High beam headlamps
40 10A Parking lamps (in mirrors), Roof
marker lamps
Fuses293
2013 F-250/350/450/550(f23)
Owners Guide gf, 1st Printing
USA(fus)
Page 306 of 563
You have limited engine power when in the fail-safe mode, so drive the
vehicle with caution. The vehicle will not be able to maintain high-speed
operation and the engine will run rough. Remember that the engine is
capable of completely shutting down automatically to prevent engine
damage; therefore:
1. Pull off the road as soon as safely possible and turn off the engine.
2. Arrange for the vehicle to be taken to an authorized dealer.
3. If this is not possible, wait a short period for the engine to cool.
4. Check the coolant level and replenish if low.
5. Restart the engine and take your vehicle to an authorized dealer.
Engine Fluid Temperature Management (If Equipped)
WARNING:To reduce the risk of collision and injury, be
prepared that the vehicle speed may reduce and the vehicle may
not be able to accelerate with full power until the fluid temperatures
reduce.
Your vehicle has been designed to pull a trailer, but because of the added
load, the vehicle’s engine may temporarily reach higher temperatures
during severe operating conditions such as ascending a long or steep
grade while pulling a trailer in hot ambient temperatures.
At this time, you may notice your engine coolant temperature gauge
needle move toward the H and the POWER REDUCED TO LOWER
TEMP message may appear in the information display.
You may notice a reduction in the vehicle’s speed caused by reduced
engine power. Your vehicle has been designed to enter this mode if
certain high temperature/high load conditions take place in order to
manage the engine’s fluid temperatures. The amount of speed reduction
will depend on the vehicle loading, towing, grade, ambient temperature,
and other factors. If this occurs, there is no need to pull off the road.
The vehicle can continue to be driven while this message is active.
The air conditioning may also cycle on and off during severe operating
conditions to protect overheating of the engine. When the engine coolant
temperature decreases to a more normal operating temperature, the air
conditioning will turn on once again.
Maintenance305
2013 F-250/350/450/550(f23)
Owners Guide gf, 1st Printing
USA(fus)
Page 317 of 563
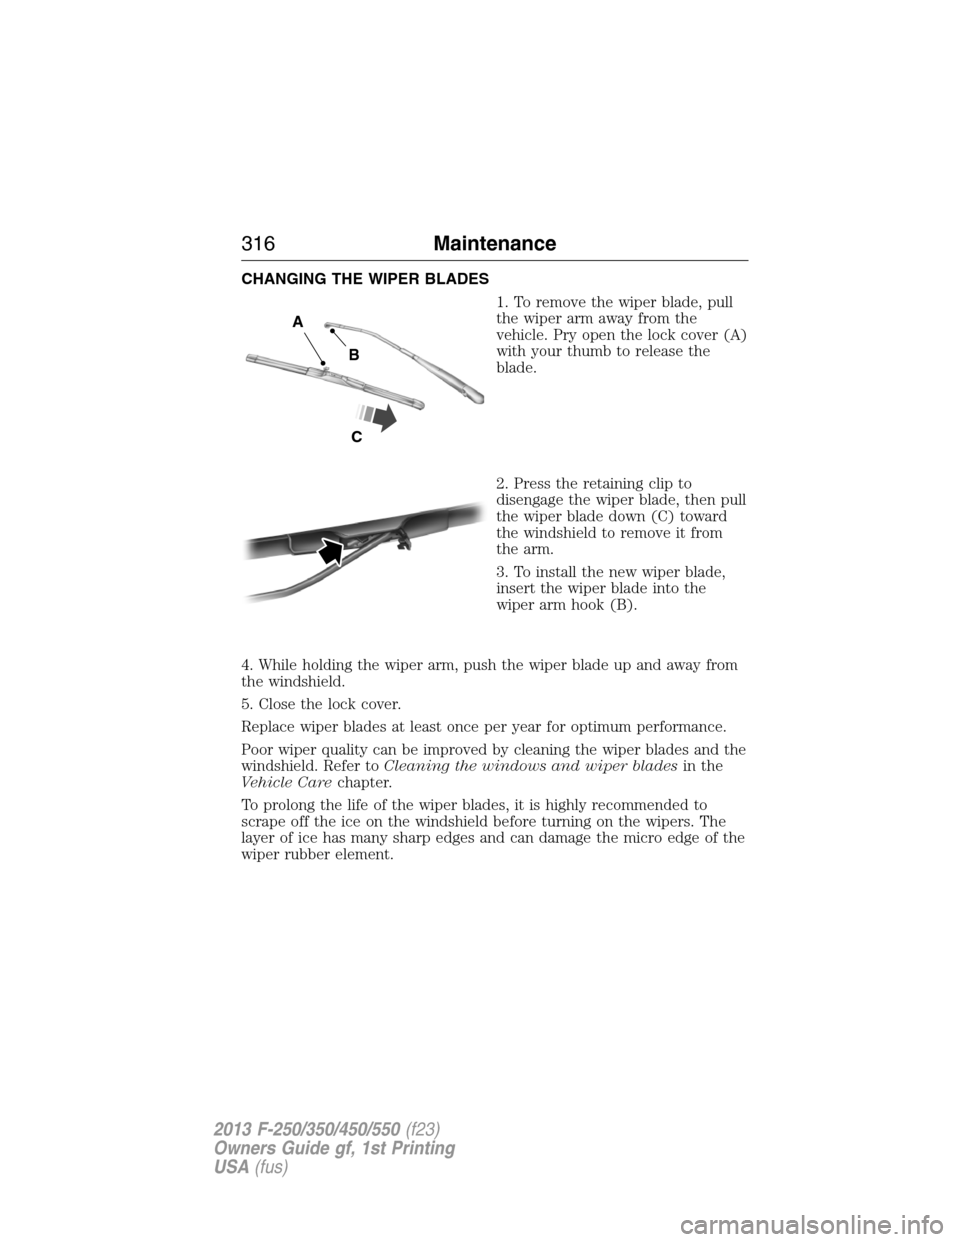
CHANGING THE WIPER BLADES
1. To remove the wiper blade, pull
the wiper arm away from the
vehicle. Pry open the lock cover (A)
with your thumb to release the
blade.
2. Press the retaining clip to
disengage the wiper blade, then pull
the wiper blade down (C) toward
the windshield to remove it from
the arm.
3. To install the new wiper blade,
insert the wiper blade into the
wiper arm hook (B).
4. While holding the wiper arm, push the wiper blade up and away from
the windshield.
5. Close the lock cover.
Replace wiper blades at least once per year for optimum performance.
Poor wiper quality can be improved by cleaning the wiper blades and the
windshield. Refer toCleaning the windows and wiper bladesin the
Vehicle Carechapter.
To prolong the life of the wiper blades, it is highly recommended to
scrape off the ice on the windshield before turning on the wipers. The
layer of ice has many sharp edges and can damage the micro edge of the
wiper rubber element.
A
B
C
316Maintenance
2013 F-250/350/450/550(f23)
Owners Guide gf, 1st Printing
USA(fus)
Page 319 of 563
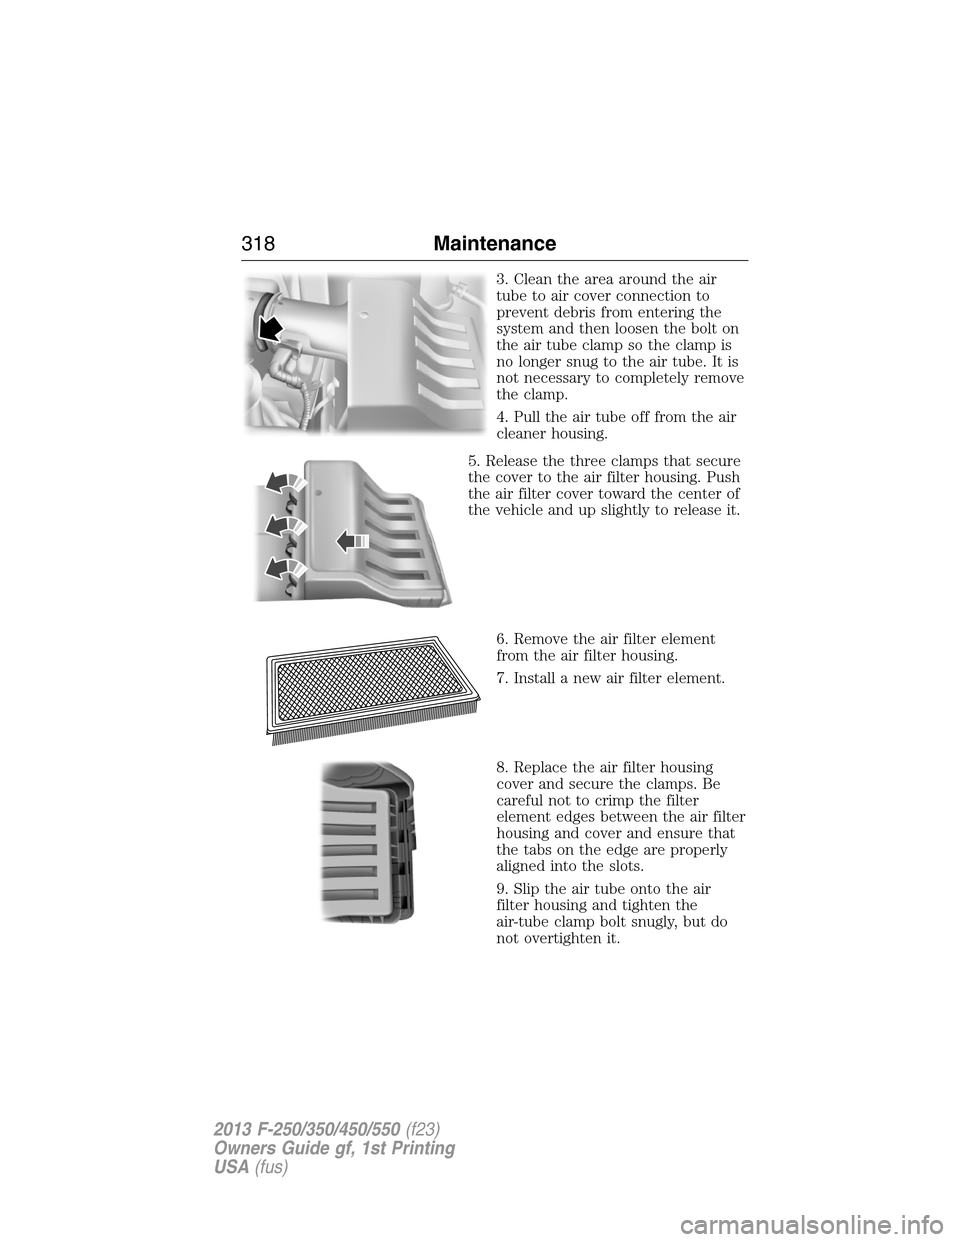
3. Clean the area around the air
tube to air cover connection to
prevent debris from entering the
system and then loosen the bolt on
the air tube clamp so the clamp is
no longer snug to the air tube. It is
not necessary to completely remove
the clamp.
4. Pull the air tube off from the air
cleaner housing.
5. Release the three clamps that secure
the cover to the air filter housing. Push
the air filter cover toward the center of
the vehicle and up slightly to release it.
6. Remove the air filter element
from the air filter housing.
7. Install a new air filter element.
8. Replace the air filter housing
cover and secure the clamps. Be
careful not to crimp the filter
element edges between the air filter
housing and cover and ensure that
the tabs on the edge are properly
aligned into the slots.
9. Slip the air tube onto the air
filter housing and tighten the
air-tube clamp bolt snugly, but do
not overtighten it.
318Maintenance
2013 F-250/350/450/550(f23)
Owners Guide gf, 1st Printing
USA(fus)
Page 321 of 563
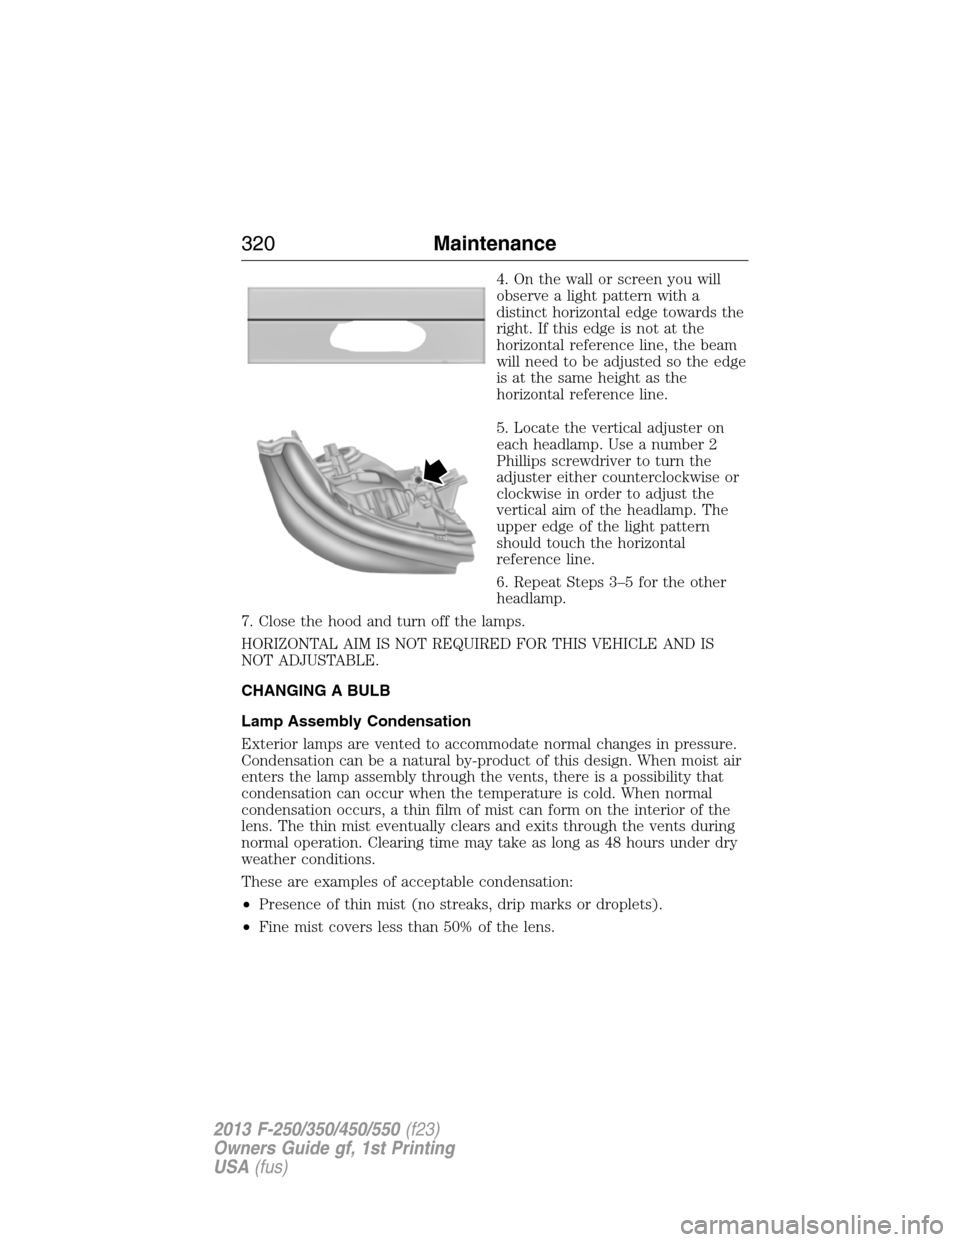
4. On the wall or screen you will
observe a light pattern with a
distinct horizontal edge towards the
right. If this edge is not at the
horizontal reference line, the beam
will need to be adjusted so the edge
is at the same height as the
horizontal reference line.
5. Locate the vertical adjuster on
each headlamp. Use a number 2
Phillips screwdriver to turn the
adjuster either counterclockwise or
clockwise in order to adjust the
vertical aim of the headlamp. The
upper edge of the light pattern
should touch the horizontal
reference line.
6. Repeat Steps 3–5 for the other
headlamp.
7. Close the hood and turn off the lamps.
HORIZONTAL AIM IS NOT REQUIRED FOR THIS VEHICLE AND IS
NOT ADJUSTABLE.
CHANGING A BULB
Lamp Assembly Condensation
Exterior lamps are vented to accommodate normal changes in pressure.
Condensation can be a natural by-product of this design. When moist air
enters the lamp assembly through the vents, there is a possibility that
condensation can occur when the temperature is cold. When normal
condensation occurs, a thin film of mist can form on the interior of the
lens. The thin mist eventually clears and exits through the vents during
normal operation. Clearing time may take as long as 48 hours under dry
weather conditions.
These are examples of acceptable condensation:
•Presence of thin mist (no streaks, drip marks or droplets).
•Fine mist covers less than 50% of the lens.
320Maintenance
2013 F-250/350/450/550(f23)
Owners Guide gf, 1st Printing
USA(fus)
Page 329 of 563
•Dry the vehicle with a chamois or soft, terry cloth towel in order to
eliminate water spotting.
•It is especially important to wash the vehicle regularly during the
winter months, as dirt and road salt are difficult to remove and cause
damage to the vehicle.
•Immediately remove items such as gasoline, diesel fuel, bird droppings
and insect deposits because they can cause damage to the vehicle’s
paintwork and trim over time. Use Motorcraft® Bug and Tar Remover
(ZC-42), which is available from your authorized dealer.
•Remove any exterior accessories, such as antennas, before entering a
car wash.
•Suntan lotions and insect repellents can damage any painted surface;
if these substances come in contact with your vehicle, wash off as
soon as possible.
•If your vehicle is equipped with running boards, use Motorcraft Detail
Wash (ZC-3-A), and, as required, Motorcraft Bug and Tar Remover
(ZC-42), both as per the directions on the products’ labels. To
manually dry, use a clean, dry, lint-free towel. Do not use rubber,
plastic and vinyl protectant products on the running board surface, as
the area may become slippery.
Exterior Chrome
•Wash the vehicle first, using cool or lukewarm water and a neutral pH
shampoo, such as Motorcraft® Detail Wash (ZC-3-A).
•Use Motorcraft® Custom Bright Metal Cleaner (ZC-15), available from
your authorized dealer. Apply the product as you would a wax to
clean bumpers and other chrome parts; allow the cleaner to dry for a
few minutes, then wipe off the haze with a clean, dry rag.
•Never use abrasive materials, such as steel wool or plastic pads, as
they can scratch the chrome surface.
Underbody
Flush the complete underside of your vehicle frequently. Keep body and
door drain holes free from packed dirt.
Rear suspension components may require regular cleaning with a power
washer or a thorough rinse with a strong stream of water if the vehicle is
operated in dusty or muddy environments. Rear leaf springs or other
suspension components may emit squeak or popping noises while
operating the vehicle if particles, such as dirt, rocks, or other debris, are
present in the components.
328Vehicle Care
2013 F-250/350/450/550(f23)
Owners Guide gf, 1st Printing
USA(fus)
Page 333 of 563
If a staining liquid like coffee or juice has been spilled on the instrument
panel or on interior trim surfaces, clean as follows:
1. Wipe up spilled liquid using a clean, white, cotton cloth.
2. Wipe the surface with a damp, clean, white, cotton cloth. For more
thorough cleaning, use a mild soap and water solution. If the spot cannot
be completely cleaned by this method, the area may be cleaned using a
commercially available cleaning product designed for automotive
interiors.
3. If necessary, apply more soap and water solution or cleaning product
to a clean, white, cotton cloth and press the cloth onto the soiled
area–allow this to set at room temperature for 30 minutes.
4. Remove the soaked cloth, and if it is not soiled badly, use this cloth to
clean the area by using a rubbing motion for 60 seconds.
5. Following this, wipe area dry with a clean, white, cotton cloth.
Instrument Panel, Door Panels and Console (FX appearance package)
Your vehicle’s instrument panel, door panels and console are uniquely
painted with both high and low gloss paints that require special care.
The high gloss area is similar to that of the vehicle’s exterior; the low
gloss area is designed to help protect the driver from undesirable
windshield reflection.
High gloss paint area
In order to maintain the finish, the high gloss areas should be treated
similar to the that of exterior paint or glossy plastic surfaces. When
cleaning the high gloss areas:
•Do not usepaper towels or newspaper.
•Do not usesilicone or Teflon® (PTFE)-based products.
Dust the high gloss areas with a clean, dry cloth, or use Motorcraft
Dusting Cloth (ZC-24).
For general cleaning, use mild, soapy water and a soft, damp cloth, then
dry with a clean, dry cloth.
For removal of fine scuffs and scratches, use Scotch-Brite® Microfiber
Cloth or cheese cloth along with Motorcraft Premium Liquid Wax
(ZC-53-A), Motorcraft Paint Sealant (ZC-45), or Motorcraft Custom Clear
Coat Polish (ZC-8-A).Note:Removal of deep scuffs and scratches
should be performed by an authorized dealer or an experienced repair
facility.
332Vehicle Care
2013 F-250/350/450/550(f23)
Owners Guide gf, 1st Printing
USA(fus)