Page 334 of 563

Low gloss paint area
The low gloss area of the instrument panel’s upper dash should be
cleaned with mild, soapy water and a soft, damp cloth, then dried with a
clean, dry cloth. When cleaning the low gloss areas:
•Do not usepaper towels or newspaper.
•Do not usesilicone or Teflon® (PTFE)-based products.
•Do not useexterior paint waxes or sealants.
Dust the low gloss areas with a clean, dry cloth, or use Motorcraft
Dusting Cloth (ZC-24).
CLEANING LEATHER SEATS
(IF EQUIPPED, EXCEPT FOR THE KING RANCH® EDITION)
Note:For the King Ranch® Edition leather seats, refer to a separate
section in this chapter.
•Clean spills and stains as quickly as possible.
•For routine cleaning, wipe the surface with a soft, damp cloth. For
more thorough cleaning, wipe the surface with a mild soap and water
solution. In Canada, use Motorcraft® Vinyl Cleaner (CXC-93). Dry the
area with a soft cloth.
•If the leather cannot be completely cleaned using a mild soap and
water solution, the leather may be cleaned using a commercially
available leather cleaning product designed for automotive interiors.
•To check for compatibility, first test any cleaner or stain remover on
an inconspicuous part of the leather.
•Do not use household cleaning products, alcohol solutions, solvents or
cleaners intended for rubber, vinyl and plastics, or oil/petroleum-based
leather conditioners. These products may cause premature wearing or
damage to the leather.
CLEANING LEATHER SEATS
(IF EQUIPPED WITH THE KING RANCH® EDITION)
Your vehicle is equipped with seating covered in premium, top-grain
leather which is extremely durable, but still requires special care and
maintenance in order to ensure longevity and comfort.
Regular cleaning and conditioning will maintain the appearance of the
leather.
Cleaning
For dirt, use a vacuum cleaner then use a clean, damp cloth or soft brush.
Vehicle Care333
2013 F-250/350/450/550(f23)
Owners Guide gf, 1st Printing
USA(fus)
Page 357 of 563

Important:Remember to replace the wheel valve stems when the road
tires are replaced on your vehicle.
The two front tires or two rear tires should generally be replaced as a pair.
The tire pressure sensors mounted in the wheels are not designed to be
used in aftermarket wheels.
The use of wheels or tires not recommended by Ford Motor Company may
affect the operation of your tire pressure monitoring system(if equipped).
If the tire pressure monitoring system indicator is flashing, the system is
malfunctioning. Your replacement tire might be incompatible with your
tire pressure monitoring system, or some component of the system may
be damaged(if equipped).
Safety Practices
WARNING:If your vehicle is stuck in snow, mud, or sand, do not
rapidly spin the tires. Spinning the tires can tear the tire and cause
an explosion. A tire can explode in as little as three to five seconds.
WARNING:Do not spin the wheels at over 35 mph (56 km/h).
The tires may fail and injure a passenger or bystander.
Driving habits have a great deal to do with your tire mileage and safety.
•Observe posted speed limits.
•Avoid fast starts, stops and turns.
•Avoid potholes and objects on the road.
•Do not run over curbs or hit the tire against a curb when parking.
Highway Hazards
No matter how carefully you drive, there is always the possibility that
you may eventually have a flat tire on the highway. Drive slowly to the
closest safe area out of traffic. This may further damage the flat tire, but
your safety is more important.
If you feel a sudden vibration or ride disturbance while driving, or you
suspect your tire or vehicle has been damaged, immediately reduce your
speed. Drive with caution until you can safely pull off the road. Stop and
inspect the tires for damage. If a tire is under-inflated or damaged,
deflate it, remove the wheel and replace it with your spare tire and
wheel. If you cannot detect a cause, have the vehicle towed to the
nearest repair facility or tire dealer to have the vehicle inspected.
356Wheels and Tires
2013 F-250/350/450/550(f23)
Owners Guide gf, 1st Printing
USA(fus)
Page 368 of 563

Dissimilar Spare Tire and Wheel Assembly Information
WARNING:Failure to follow these guidelines could result in an
increased risk of loss of vehicle control, injury or death.
If you have a dissimilar spare tire and wheel assembly, then it is intended
for temporary use only. This means that if you need to use it, you should
replace it as soon as possible with a road tire and wheel assembly that is
the same size and type as the road tires and wheels that were originally
provided by Ford. If the dissimilar spare tire or wheel is damaged, it
should be replaced rather than repaired.
A dissimilar spare tire and wheel assembly is defined as a spare tire or
wheel that is different in brand, size or appearance from the road tires
and wheels and can be one of three types:
1.T-type mini-spare:This spare tire begins with the letter T for tire
size and may have Temporary Use Only molded in the sidewall.
2.Full-size dissimilar spare with label on wheel:This spare tire has
a label on the wheel that states: THIS TIRE AND WHEEL FOR
TEMPORARY USE ONLY
When driving with one of the dissimilar spare tires listed above, do not:
•exceed 50 mph (80 km/h).
•load the vehicle beyond maximum vehicle load rating listed on the
Safety Compliance Label.
•tow a trailer.
•
use snow chains on the end of the vehicle with the dissimilar spare tire.
•use more than one dissimilar spare tire at a time.
•use commercial car washing equipment.
•try to repair the dissimilar spare tire.
Use of one of the dissimilar spare tires listed above at any one wheel
location can lead to impairment of the following:
•Handling, stability and braking performance
•Comfort and noise
•Ground clearance and parking at curbs
•Winter weather driving capability
•Wet weather driving capability
•All-wheel driving capability
Wheels and Tires367
2013 F-250/350/450/550(f23)
Owners Guide gf, 1st Printing
USA(fus)
Page 369 of 563

3.Full-size dissimilar spare without label on wheel
When driving with the full-size dissimilar spare tire and wheel assembly,
do not:
•exceed 70 mph (113 km/h).
•use more than one dissimilar spare tire and wheel at a time.
•use commercial car washing equipment.
•use snow chains on the end of the vehicle with the dissimilar spare
tire and wheel.
The usage of a full-size dissimilar spare tire and wheel assembly can lead
to impairment of the following:
•Handling, stability and braking performance
•Comfort and noise
•Ground clearance and parking at curbs
•Winter weather driving capability
•Wet weather driving capability
•All-wheel driving capability (if applicable)
•Load leveling adjustment (if applicable)
When driving with the full-size dissimilar spare tire and wheel assembly,
additional caution should be given to:
•towing a trailer.
•driving vehicles equipped with a camper body.
•driving vehicles with a load on the cargo rack.
Drive cautiously when using a full-size dissimilar spare tire and wheel,
and seek service as soon as possible.
Location of the Spare Tire and Tools
If your vehicle is equipped with a spare tire, jack and associated tools,
refer to the following table for their locations:
Tool Location
Spare tire (pick-up trucks only) Under the vehicle, just forward of
the rear bumper
Jack Regular cab and Crew Cab: Fastened
to floor pan behind rearmost seat on
passenger side
SuperCab: Under rear bench seat on
passenger side
368Wheels and Tires
2013 F-250/350/450/550(f23)
Owners Guide gf, 1st Printing
USA(fus)
Page 373 of 563
1. Turn the engine off and block the
wheel that is diagonally opposite of
the flat tire using the wheel chock, if
equipped.Note:If the vehicle is a
4x4, lock the manual hub on the
wheel.
2. Remove the jack, jack handle, lug wrench and spare tire from the
stowage locations.
3. Use the tip of the lug wrench to remove any wheel trim.
4. Loosen each wheel lug nut one-half turn counterclockwise, but do not
remove them until the wheel is raised off the ground.
The following steps apply to F–250/F–350 Single Rear Wheel
(SRW) vehicles only:
5. Insert the hooked end of the jack
handle into the jack and use the
handle to slide the jack under the
vehicle.
6. Position the jack according to the
following guides:
•Front (4x2)
372Wheels and Tires
2013 F-250/350/450/550(f23)
Owners Guide gf, 1st Printing
USA(fus)
Page 378 of 563

Note:The following steps apply to all vehicles:
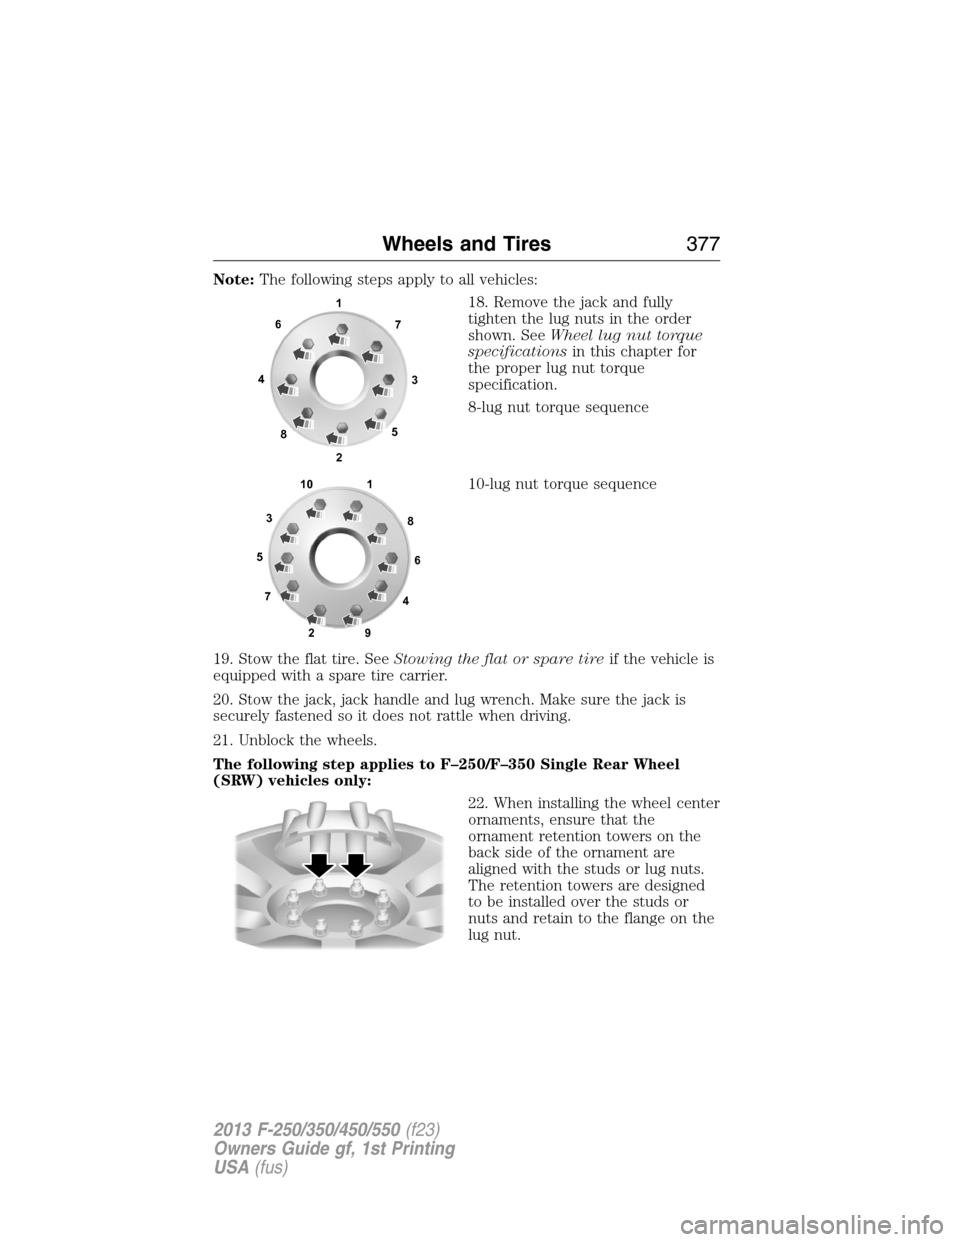
18. Remove the jack and fully
tighten the lug nuts in the order
shown. SeeWheel lug nut torque
specificationsin this chapter for
the proper lug nut torque
specification.
8-lug nut torque sequence
10-lug nut torque sequence
19. Stow the flat tire. SeeStowing the flat or spare tireif the vehicle is
equipped with a spare tire carrier.
20. Stow the jack, jack handle and lug wrench. Make sure the jack is
securely fastened so it does not rattle when driving.
21. Unblock the wheels.
The following step applies to F–250/F–350 Single Rear Wheel
(SRW) vehicles only:
22. When installing the wheel center
ornaments, ensure that the
ornament retention towers on the
back side of the ornament are
aligned with the studs or lug nuts.
The retention towers are designed
to be installed over the studs or
nuts and retain to the flange on the
lug nut.
1
3 4
27 6
5
8
1
2 3
4 5
6
78
9 10
Wheels and Tires377
2013 F-250/350/450/550(f23)
Owners Guide gf, 1st Printing
USA(fus)
Page 379 of 563
If the ornament retention towers
are aligned between the studs or lug
nuts, the ornament is improperly
installed. This improper installation
may appear and sound correct, but
will not keep the ornament on the
vehicle. Ornaments improperly
installed in this manner will fall off
or become loose with minimal force
or impact.
Installing Dual Rear Wheel Ornaments
1. Align the ornament with the lug
nuts.
•(A) is the clip and (B) is the flange.
2. Hold the ornament so that all of
the retention clips are sitting on the
flange of the lug nuts.
3. Use your hand or rubber mallet
to tap the ornament in a star
pattern. There should be an even
gap between the ornament and the
wheel.
AB
A
C
B
D
378Wheels and Tires
2013 F-250/350/450/550(f23)
Owners Guide gf, 1st Printing
USA(fus)
Page 380 of 563
4. Be sure to install all the clips on the nuts over the flanges so that
there is an even gap all around and the retention clips are fully seated.
Stowing the flat/spare tire
Note:Failure to follow spare tire stowage instructions may result in
failure of cable or loss of spare tire.
Note:If you are stowing a tire that requires reattaching it to the vehicle
with a tether, perform these steps first, then proceed with the steps
following.
1. Place the tire on end with the
valve stem facing toward the front
of the vehicle.
2. Place the tether into the bolt
holes in the wheel and attach the
lug nut using the lug winch.
Wheels and Tires379
2013 F-250/350/450/550(f23)
Owners Guide gf, 1st Printing
USA(fus)