2013 FORD SUPER DUTY lock
[x] Cancel search: lockPage 219 of 563
Apply just enough power to the wheels to climb the hill. Too much
power will cause the tires to slip, spin or lose traction, resulting in loss of
vehicle control.
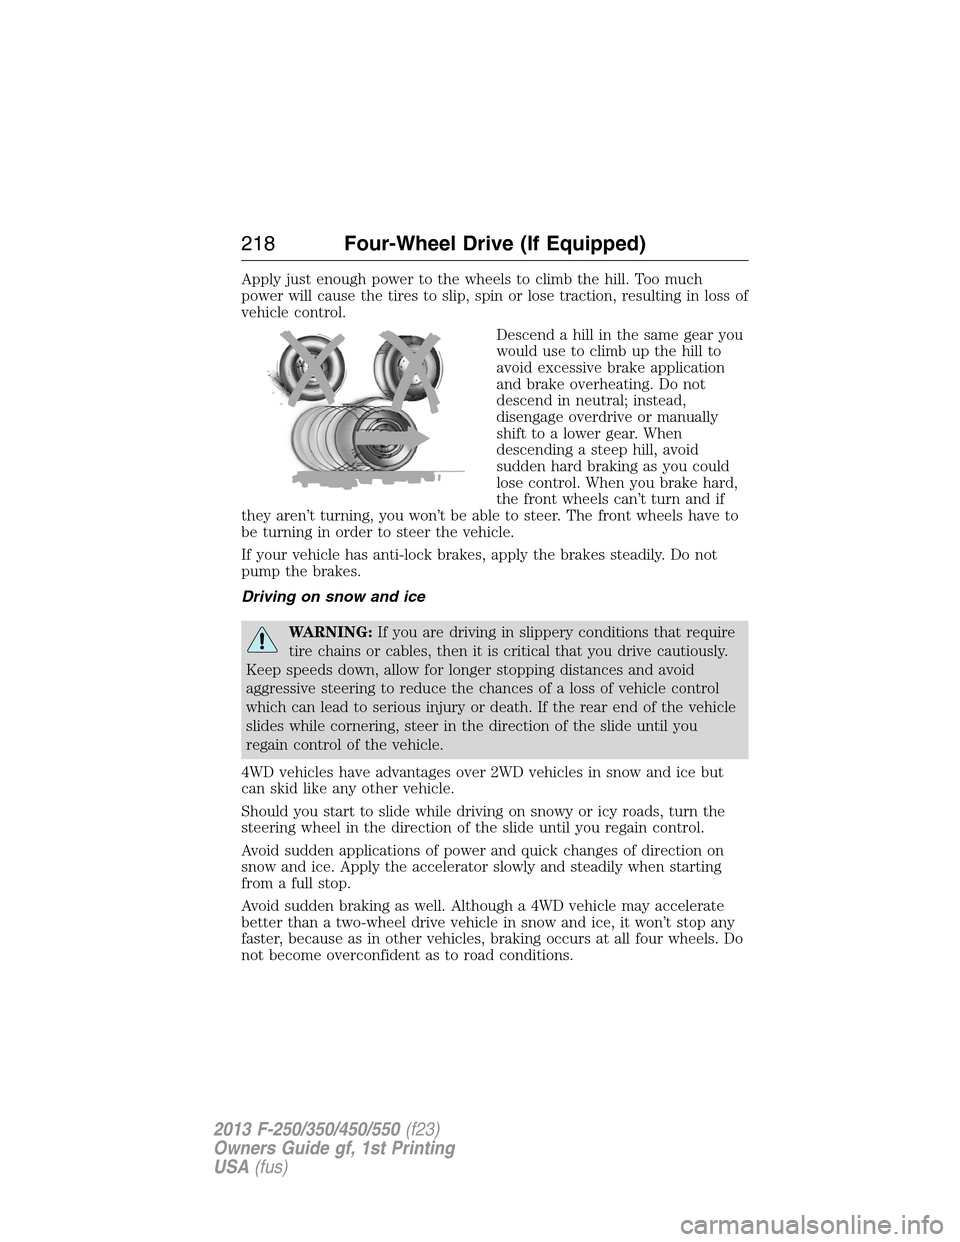
Descend a hill in the same gear you
would use to climb up the hill to
avoid excessive brake application
and brake overheating. Do not
descend in neutral; instead,
disengage overdrive or manually
shift to a lower gear. When
descending a steep hill, avoid
sudden hard braking as you could
lose control. When you brake hard,
the front wheels can’t turn and if
they aren’t turning, you won’t be able to steer. The front wheels have to
be turning in order to steer the vehicle.
If your vehicle has anti-lock brakes, apply the brakes steadily. Do not
pump the brakes.
Driving on snow and ice
WARNING:If you are driving in slippery conditions that require
tire chains or cables, then it is critical that you drive cautiously.
Keep speeds down, allow for longer stopping distances and avoid
aggressive steering to reduce the chances of a loss of vehicle control
which can lead to serious injury or death. If the rear end of the vehicle
slides while cornering, steer in the direction of the slide until you
regain control of the vehicle.
4WD vehicles have advantages over 2WD vehicles in snow and ice but
can skid like any other vehicle.
Should you start to slide while driving on snowy or icy roads, turn the
steering wheel in the direction of the slide until you regain control.
Avoid sudden applications of power and quick changes of direction on
snow and ice. Apply the accelerator slowly and steadily when starting
from a full stop.
Avoid sudden braking as well. Although a 4WD vehicle may accelerate
better than a two-wheel drive vehicle in snow and ice, it won’t stop any
faster, because as in other vehicles, braking occurs at all four wheels. Do
not become overconfident as to road conditions.
218Four-Wheel Drive (If Equipped)
2013 F-250/350/450/550(f23)
Owners Guide gf, 1st Printing
USA(fus)
Page 220 of 563
Make sure you allow sufficient distance between you and other vehicles for
stopping. Drive slower than usual and consider using one of the lower
gears. In emergency stopping situations, apply the brake steadily. Do not
pump the brakes. Refer to theBrakessection of this chapter for additional
information on the operation of the Anti-lock Brake System (ABS).
Parking
WARNING:If the parking brake is fully released, but the brake
warning lamp remains illuminated, the brakes may not be
working properly. See your authorized dealer.
WARNING:Always set the parking brake fully and make sure
the gearshift is latched in P (Park). Turn the ignition to the off
position and remove the key whenever you leave your vehicle.
On some 4WD vehicles, when the transfer case is in the N (Neutral)
position, the engine and transmission are disconnected from the rest of
the driveline. Therefore, the vehicle is free to roll even if the automatic
transmission is in P (Park) or the manual transmission is in gear. Do not
leave the vehicle unattended with the transfer case in the N (Neutral)
position. Always set the parking brake fully and turn off the ignition
when leaving the vehicle.
Maintenance and modifications
The suspension and steering systems on your vehicle have been designed
and tested to provide predictable performance whether loaded or empty
and durable load carrying capability. For this reason, Ford Motor
Company strongly recommends that you do not make modifications such
as adding or removing parts (such as lift kits or stabilizer bars) or by
using replacement parts not equivalent to the original factory equipment.
Any modifications to a vehicle that raise the center of gravity can make
it more likely the vehicle will roll over as a result of a loss of control.
Ford Motor Company recommends that caution be used with any vehicle
equipped with a high load or device (such as ladder racks or pickup box
cover).
Failure to maintain your vehicle properly may void the warranty, increase
your repair cost, reduce vehicle performance and operational capabilities
and adversely affect driver and passenger safety. Frequent inspection of
vehicle chassis components is recommended if the vehicle is subjected to
heavy off-road usage.
Four-Wheel Drive (If Equipped)219
2013 F-250/350/450/550(f23)
Owners Guide gf, 1st Printing
USA(fus)
Page 221 of 563
GENERAL INFORMATION
Note:Occasional brake noise is normal. If a metal-to-metal, continuous
grinding or continuous squeal sound is present, the brake linings may be
worn-out and should be inspected by an authorized dealer. If your
vehicle has continuous vibration or shudder in the steering wheel while
braking, it should be inspected by an authorized dealer.
Note:Brake dust may accumulate on the wheels, even under normal
driving conditions. Some dust is inevitable as the brakes wear and does
not contribute to brake noise. See theVehicle Carechapter for wheel
cleaning instructions.
See theInstrument Clusterchapter for information on the
brake system warning light.
Wet brakes result in reduced braking efficiency. Gently press the brake
pedal a few times when driving from a car wash or standing water to dry
the brakes.
Brake Over Accelerator
If the accelerator pedal becomes stuck or entrapped, apply steady and
firm pressure to the brake pedal to slow your vehicle and reduce engine
power. If you experience this condition, apply the brakes and bring your
vehicle to a safe stop. Turn the engine off, shift to positionPand apply
the parking brake, then inspect the accelerator pedal for any
interferences. If none are found and the condition persists, have your
vehicle towed to the nearest authorized dealer.
Brake Assist
Brake assist detects when you brake heavily by measuring the rate at
which you press the brake pedal. It provides maximum braking efficiency
as long as you press the pedal. Brake assist can reduce stopping
distances in critical situations.
Anti-Lock Brake System
This system helps you maintain steering control during emergency stops
by keeping the brakes from locking.
The anti-lock brake system lamp momentarily illuminates when
the ignition is turned on. If the light does not illuminate during
start-up, remains on or flashes, the anti-lock brake system may
be disabled and may need to be serviced.
220Brakes
2013 F-250/350/450/550(f23)
Owners Guide gf, 1st Printing
USA(fus)
Page 222 of 563
If the anti-lock brake system is disabled, normal braking is still
effective. If the brake warning lamp illuminates with the parking
brake released, have your brake system serviced immediately.
HINTS ON DRIVING WITH ANTI-LOCK BRAKES
When the system is operating, the brake pedal will pulse and may travel
further. Maintain pressure on the brake pedal. You may also hear a noise
from the system. This is normal.
The ABS will not eliminate the dangers inherent when:
•you drive too closely to the vehicle in front of you.
•your vehicle is hydroplaning.
•you take corners too fast.
•the road surface is poor.
PARKING BRAKE
WARNING:Always set the parking brake fully and make sure that
the transmission selector lever is securely latched in positionP.
To set the parking brake, press the parking brake pedal down until the
pedal stops.
The BRAKE warning lamp in the instrument cluster will illuminate and
remains illuminated until the parking brake is released.
To release, pull the brake release lever located at the lower left side of
the instrument panel.
If you are parking your vehicle on a grade or with a trailer, press and
hold the brake pedal down, then set the parking brake. There may be a
little vehicle movement as the parking brake sets to hold the vehicle’s
weight. This is normal and should be no reason for concern. If needed,
press and hold the service brake pedal down, then try reapplying the
parking brake. Chock the wheels if required. If the parking brake cannot
hold the weight of the vehicle, the parking brake may need to be
serviced or the vehicle may be overloaded.
Brakes221
2013 F-250/350/450/550(f23)
Owners Guide gf, 1st Printing
USA(fus)
Page 227 of 563
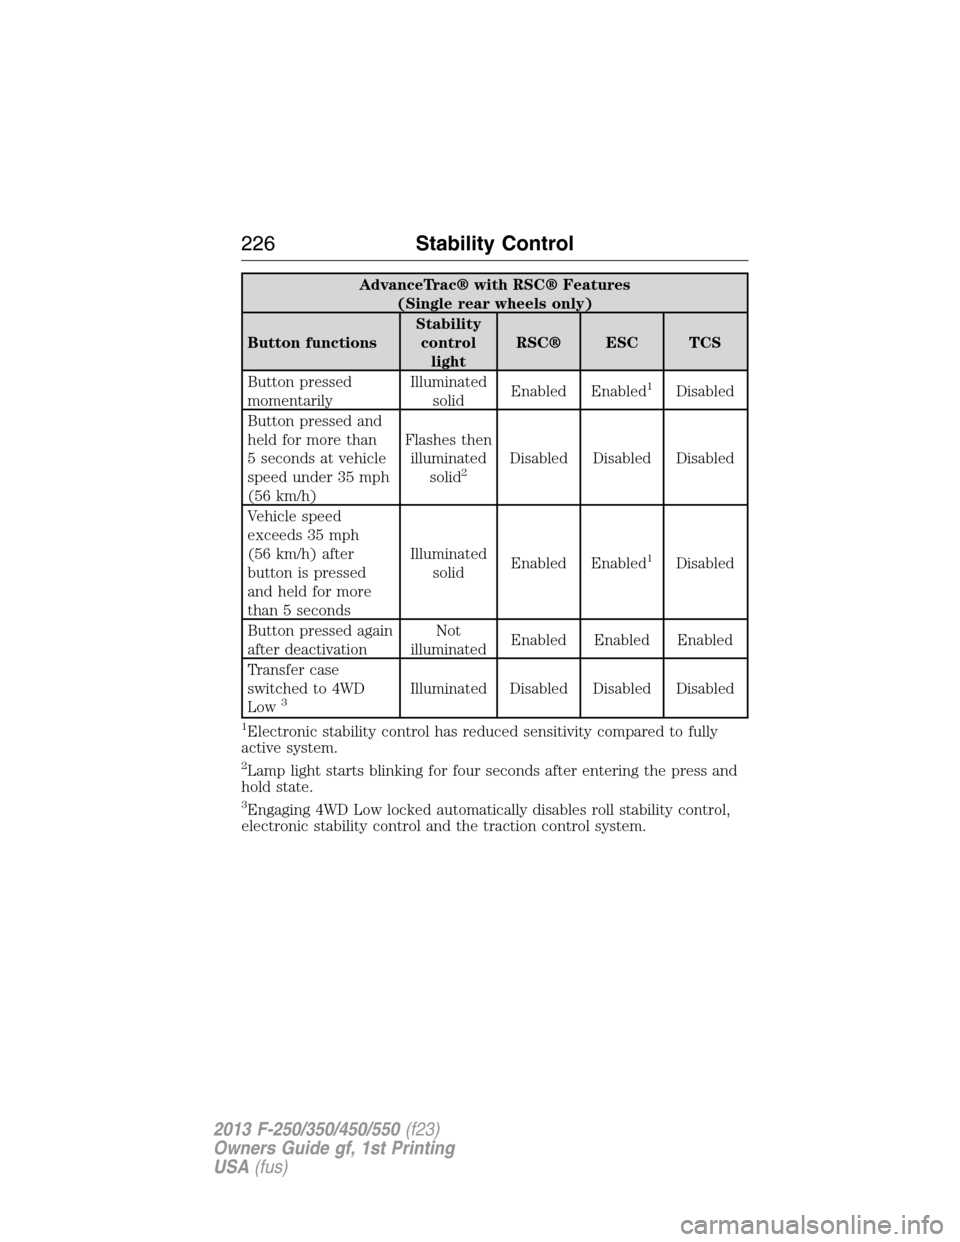
AdvanceTrac® with RSC® Features
(Single rear wheels only)
Button functionsStability
control
lightRSC® ESC TCS
Button pressed
momentarilyIlluminated
solidEnabled Enabled
1Disabled
Button pressed and
held for more than
5 seconds at vehicle
speed under 35 mph
(56 km/h)Flashes then
illuminated
solid
2Disabled Disabled Disabled
Vehicle speed
exceeds 35 mph
(56 km/h) after
button is pressed
and held for more
than 5 secondsIlluminated
solidEnabled Enabled
1Disabled
Button pressed again
after deactivationNot
illuminatedEnabled Enabled Enabled
Transfer case
switched to 4WD
Low
3Illuminated Disabled Disabled Disabled
1Electronic stability control has reduced sensitivity compared to fully
active system.
2Lamp light starts blinking for four seconds after entering the press and
hold state.
3Engaging 4WD Low locked automatically disables roll stability control,
electronic stability control and the traction control system.
226Stability Control
2013 F-250/350/450/550(f23)
Owners Guide gf, 1st Printing
USA(fus)
Page 230 of 563

SENSING SYSTEM (IF EQUIPPED)
WARNING:To help avoid personal injury, please read and
understand the limitations of the system as contained in this
section. Sensing is only an aid for some (generally large and fixed)
objects when moving in reverse on a flat surface at parking speeds.
Traffic control systems, inclement weather, air brakes, and external
motors and fans may also affect the function of the sensing system; this
may include reduced performance or a false activation.
WARNING:To help avoid personal injury, always use caution
when in R (Reverse) and when using the sensing system.
WARNING:This system is not designed to prevent contact with
small or moving objects. The system is designed to provide a
warning to assist the driver in detecting large stationary objects to
avoid damaging the vehicle. The system may not detect smaller objects,
particularly those close to the ground.
WARNING:Certain add-on devices such as large trailer hitches,
bike or surfboard racks and any device that may block the normal
detection zone of the system, may create false beeps.
Note:Keep the sensors (located on the bumper/fascia) free from snow, ice
and large accumulations of dirt. If the sensors are covered, the system’s
accuracy can be affected. Do not clean the sensors with sharp objects.
Note:If your vehicle sustains damage to the bumper/fascia, leaving it
misaligned or bent, the sensing zone may be altered causing inaccurate
measurement of obstacles or false alarms.
Note:If your vehicle is equipped with MyKey®, it is possible to prevent
turning the sensing system off. Refer to theMyKey®chapter.
Note:If your vehicle is equipped with a fully integrated electronic trailer
brake controller (TBC) and a trailer with electric trailer brakes is
connected to your vehicle, the RSS will be disabled. When the vehicle is
shifted into reverse, the message center display will remain in the Rear
Park Aid Off selection. For more information on the TBC, refer to the
Towingchapter.
Parking Aids229
2013 F-250/350/450/550(f23)
Owners Guide gf, 1st Printing
USA(fus)
Page 245 of 563
TAILGATE
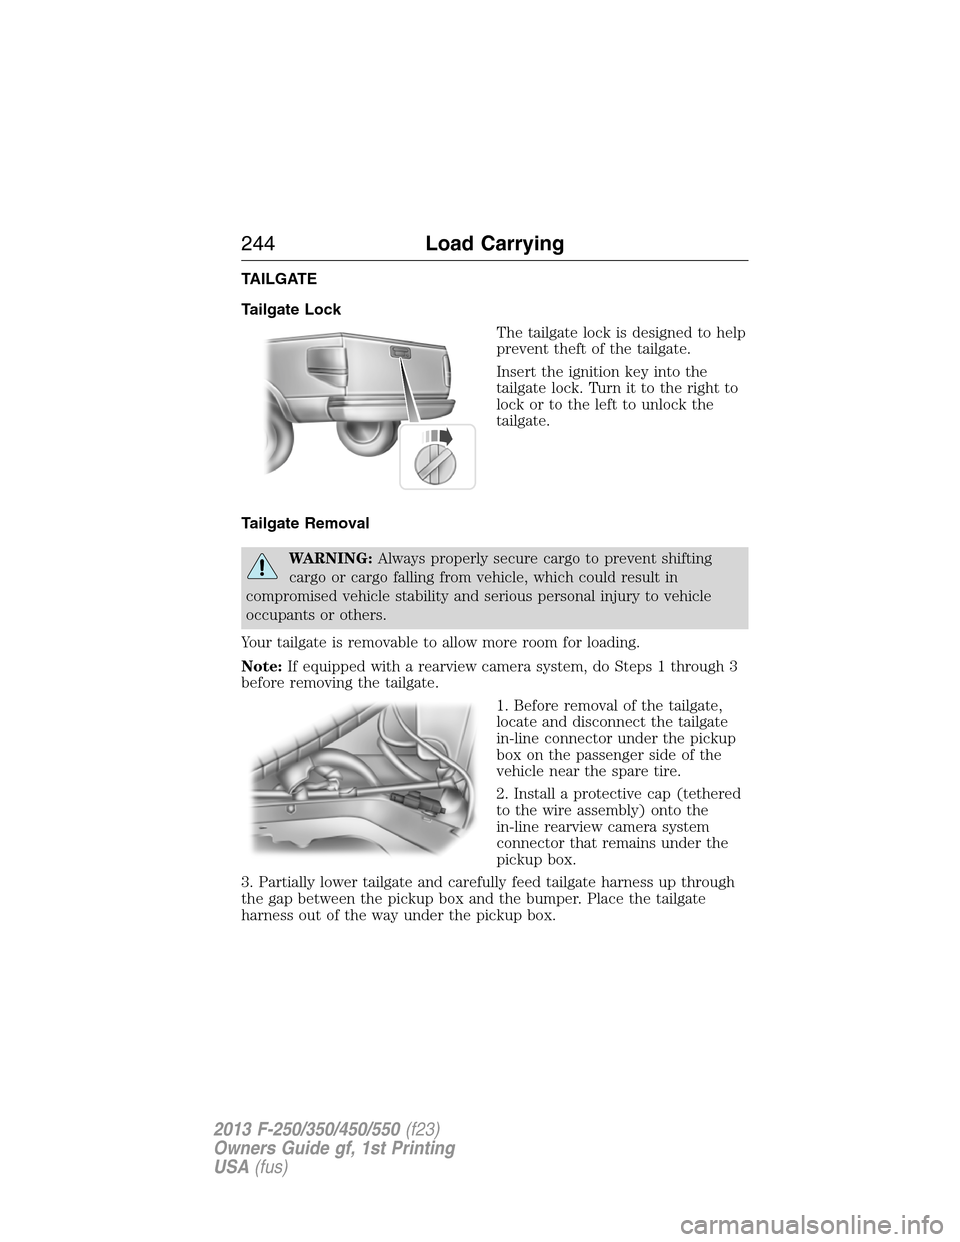
Tailgate Lock
The tailgate lock is designed to help
prevent theft of the tailgate.
Insert the ignition key into the
tailgate lock. Turn it to the right to
lock or to the left to unlock the
tailgate.
Tailgate Removal
WARNING:Always properly secure cargo to prevent shifting
cargo or cargo falling from vehicle, which could result in
compromised vehicle stability and serious personal injury to vehicle
occupants or others.
Your tailgate is removable to allow more room for loading.
Note:If equipped with a rearview camera system, do Steps 1 through 3
before removing the tailgate.
1. Before removal of the tailgate,
locate and disconnect the tailgate
in-line connector under the pickup
box on the passenger side of the
vehicle near the spare tire.
2. Install a protective cap (tethered
to the wire assembly) onto the
in-line rearview camera system
connector that remains under the
pickup box.
3. Partially lower tailgate and carefully feed tailgate harness up through
the gap between the pickup box and the bumper. Place the tailgate
harness out of the way under the pickup box.
244Load Carrying
2013 F-250/350/450/550(f23)
Owners Guide gf, 1st Printing
USA(fus)
Page 247 of 563
Opening the Tailgate Step
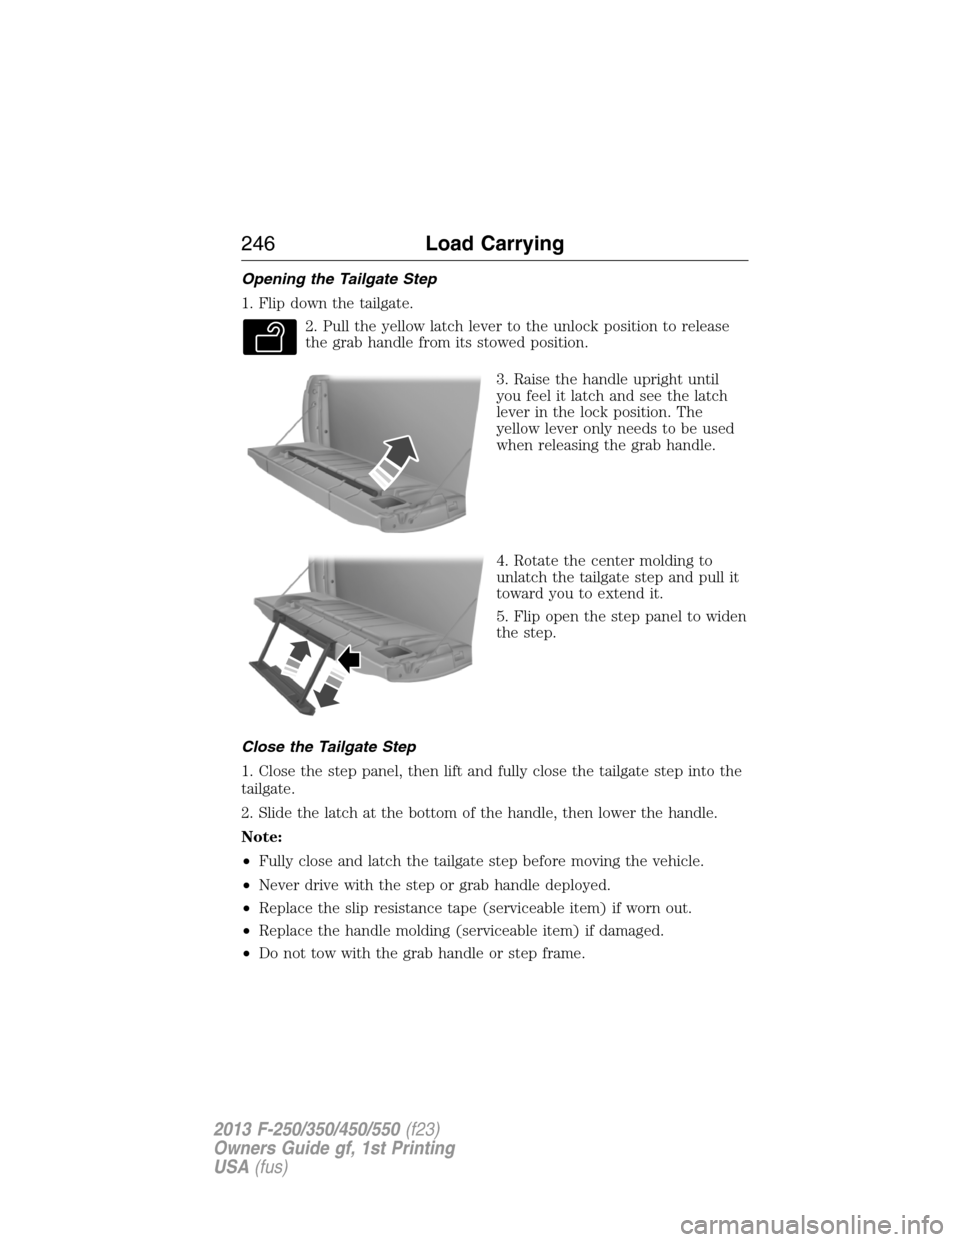
1. Flip down the tailgate.
2. Pull the yellow latch lever to the unlock position to release
the grab handle from its stowed position.
3. Raise the handle upright until
you feel it latch and see the latch
lever in the lock position. The
yellow lever only needs to be used
when releasing the grab handle.
4. Rotate the center molding to
unlatch the tailgate step and pull it
toward you to extend it.
5. Flip open the step panel to widen
the step.
Close the Tailgate Step
1. Close the step panel, then lift and fully close the tailgate step into the
tailgate.
2. Slide the latch at the bottom of the handle, then lower the handle.
Note:
•Fully close and latch the tailgate step before moving the vehicle.
•Never drive with the step or grab handle deployed.
•Replace the slip resistance tape (serviceable item) if worn out.
•Replace the handle molding (serviceable item) if damaged.
•Do not tow with the grab handle or step frame.
246Load Carrying
2013 F-250/350/450/550(f23)
Owners Guide gf, 1st Printing
USA(fus)