Page 424 of 683

All of the Language settings have a special�Other�setting
to accommodate languages other than Japanese or Eng-
lish. These languages are selected using a special four-
digit code.
To enter a new language code, activate the DVD Setup
Menu. To enter DVD Setup Menu stop the DVD, enter
radio disc mode, then DVD setup and follow these
additional instructions:
•Using the remote control Up and Down cursor but-
tons, highlight the Language item you want to edit,
and then press the remote control ENTER/OK button.
•Using the remote control Down cursor button, select
the�Other�setting, then press the remote control’s
Right cursor button to begin editing the setting.
•
Using the remote control Up and Down cursor buttons,
select a digit for the current position. After selecting thedigit, press the remote control’s Right cursor button to
select the next digit. Repeat this digit selection sequence
for all four digits.
•When the entire four-digit code is entered, press the
remote control’s ENTER/OK button. If the language
code is not valid, the numbers all change back to���.
If the digits are visible after this step, then the lan-
guage code is valid.
Here is an abbreviated list of language codes. For more
language codes, please contact the dealer where the
vehicle was purchased.
Language Code Language Code
Dutch 2311 French 1517
German 1304 Italian 1819
Portuguese 2519 Spanish 1418
422 UNDERSTANDING YOUR INSTRUMENT PANEL
Page 426 of 683
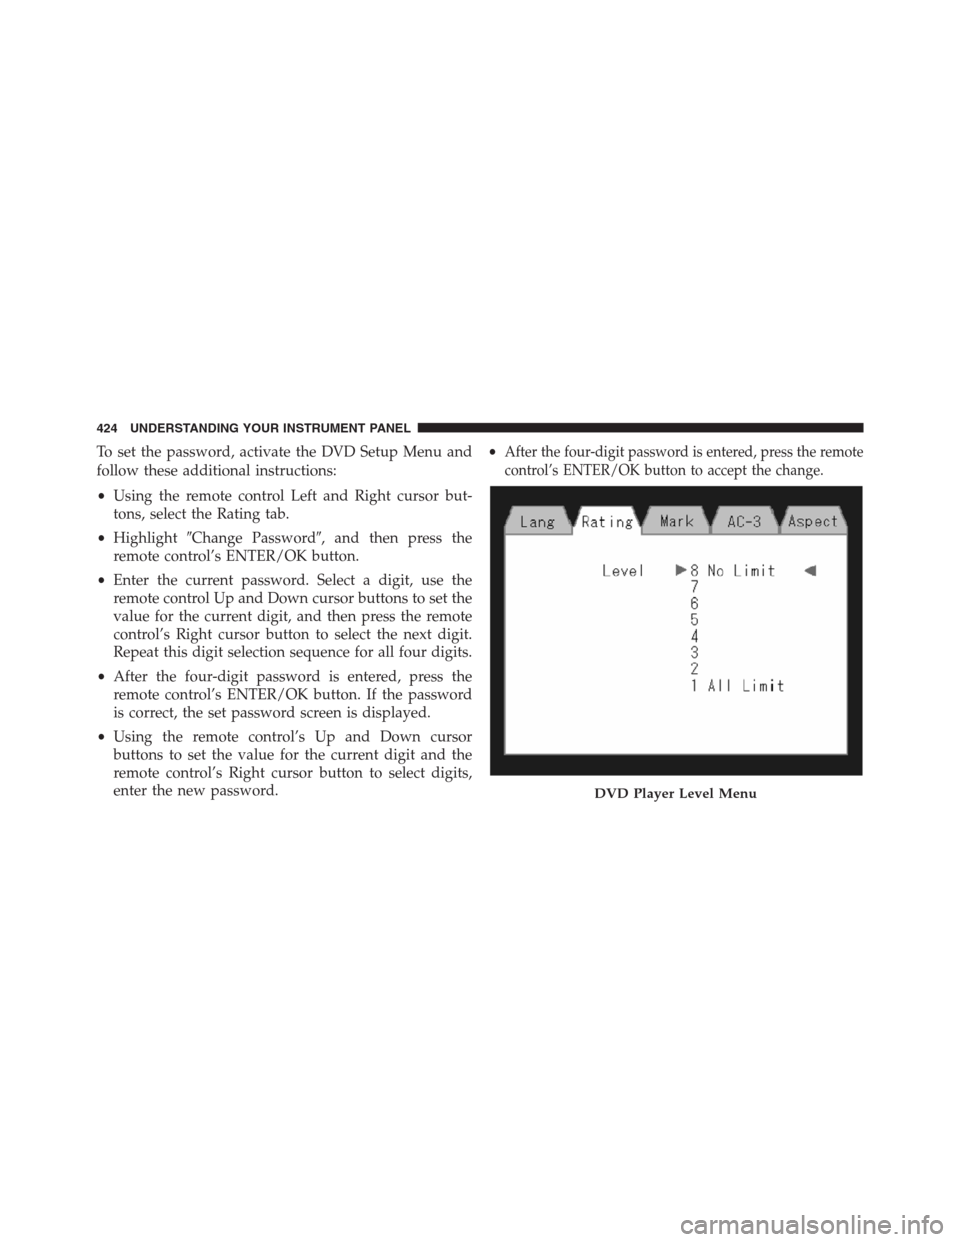
To set the password, activate the DVD Setup Menu and
follow these additional instructions:
•Using the remote control Left and Right cursor but-
tons, select the Rating tab.
•Highlight�Change Password�, and then press the
remote control’s ENTER/OK button.
•Enter the current password. Select a digit, use the
remote control Up and Down cursor buttons to set the
value for the current digit, and then press the remote
control’s Right cursor button to select the next digit.
Repeat this digit selection sequence for all four digits.
•After the four-digit password is entered, press the
remote control’s ENTER/OK button. If the password
is correct, the set password screen is displayed.
•Using the remote control’s Up and Down cursor
buttons to set the value for the current digit and the
remote control’s Right cursor button to select digits,
enter the new password.•After the four-digit password is entered, press the remote
control’s ENTER/OK button to accept the change.
DVD Player Level Menu
424 UNDERSTANDING YOUR INSTRUMENT PANEL
Page 427 of 683
To set the rating, activate the DVD Setup Menu and
follow these additional instructions:
•Using the remote control’s Left and Right cursor
buttons, select the Rating tab.
•Highlight�Change Rating�, and then press the remote
control’s ENTER/OK button.
•Enter the current password. Select a digit, use the
remote control’s Up and Down cursor buttons to set
the value for the current digit, and then press the
remote control’s Right cursor button to select the next
digit. Repeat this digit selection sequence for all four
digits.
•After the four-digit password is entered, press the
remote control’s ENTER/OK button. If the password
is correct, the Rating Level menu is displayed.•Using the remote control’s Up and Down cursor
buttons, select the new rating level, and then press the
remote control’s ENTER/OK button to accept the
change.
Product Agreement
Software
This product contains software licensed under GNU
General Public License (GPL) or GNU Lesser General
Public License (LGPL), etc. You have the right of acqui-
sition, modification, and distribution of the source code
of the GPL/LGPL software. You may download Source
Code from the following website at no charge.
URL: http://www.embedded-carmultimedia.jp/linux/
oss/download/SRC_632_34W821
4
UNDERSTANDING YOUR INSTRUMENT PANEL 425
Page 432 of 683
Radio Operation
Pressing the top of the switch will SEEK up for the next
listenable station, and pressing the bottom of the switch
will SEEK down for the next listenable station.
The button located in the center of the left-hand switch
will tune to the next preset station that you have pro-
grammed in the radio preset pushbutton.
CD Player
Pressing the top of the switch once will go to the next
track on the CD. Pressing the bottom of the switch once
will go to the beginning of the current track, or to the
beginning of the previous track if it is within one second
after the current track begins to play.
If you press the switch up or down twice it plays the
second track; three times, it will play the third, etc.
The button in the center of the left-hand switch has no
function in this mode.
CD/DVD/BLU-RAY DISC MAINTENANCE
To keep a CD/DVD/Blu-ray disc in good condition, take
the following precautions:
1.
Handle the disc by its edge; avoid touching the surface.
2. If the disc is stained, clean the surface with a soft cloth,
wiping from center to edge.
3. Do not apply paper or tape to the disc; avoid scratch-
ing the disc.
4. Do not use solvents such as benzene, thinner, cleaners,
or anti-static sprays.
5. Store the disc in its case after playing.
6. Do not expose the disc to direct sunlight.
7. Do not store the disc where temperatures may become
too high.
430 UNDERSTANDING YOUR INSTRUMENT PANEL
Page 439 of 683
NOTE:There is a difference in temperature (in any
conditions other than full cold or full hot), between the
upper and lower outlets for added comfort. The warmer
air goes to the floor outlets. This feature gives improved
comfort during sunny but cool conditions.
13. Panel Mode Button
Air is directed through the outlets in the instru-
ment panel. These outlets can be adjusted for
direction, and turned on or off to control airflow.
NOTE:For maximum airflow to the rear, the center
instrument panel outlets can be directed toward the rear
seat passengers.
Economy Mode
If ECONOMY mode is desired, press the A/C button to
turn off the indicator light and the A/C compressor.Rotate the temperature control knob to the desired tem-
perature. Also, make sure to select only Panel, Bi-Level or
Floor modes.
Max A/C
For maximum cooling use the A/C and Recirculation
mode buttons at the same time.
Rear Manual Climate Control — If Equipped
The Rear Manual Climate Control system has floor air
outlets at the rear of the right side sliding door, and
overhead outlets at each outboard rear seating position.
The unit provides warm or cool air through the floor and
upper outlets.
The rear blower and temperature controls for the rear
seat passengers are located in the headliner, near the
center of the vehicle.
4
UNDERSTANDING YOUR INSTRUMENT PANEL 437
Page 449 of 683
Panel Mode
Air is directed through the outlets in the instru-
ment panel. These outlets can be adjusted for
direction, and turned on or off to control airflow.
NOTE:For maximum airflow to the rear, the center
instrument panel outlets can be directed toward the rear
seat passengers.
Bi-Level Mode
Air comes from the instrument panel outlets, floor
outlets and defrost outlets. A slight amount of air is
also directed through the side window demister outlets.
NOTE:In many temperature positions, the BI-LEVEL
mode is designed to provide cooler air out of the panel
outlets and warmer air from the floor outlets.Floor Mode
Air comes from the floor outlets. A slight amount
of air is directed through the defrost and side
window demister outlets.
Mix Mode
Air comes from the floor, defrost and side window
demist outlets. This mode works best in cold or
snowy conditions. It allows you to stay comfortable,
while keeping the windshield clear.
Defrost Mode
Air comes from the windshield and side window
demist outlets. Use DEFROST mode with maxi-
mum blower and temperature settings for best wind-
shield and side window defrosting.
4
UNDERSTANDING YOUR INSTRUMENT PANEL 447
Page 460 of 683

�POWER STEERING.....................480
▫Power Steering Fluid Check..............481
�PARKING BRAKE......................481
�ANTI-LOCK BRAKE SYSTEM (ABS).........483
▫Anti-Lock Brake Warning Light............485
�ELECTRONIC BRAKE CONTROL SYSTEM. . . .486
▫Traction Control System (TCS)............486
▫Brake Assist System (BAS)...............487
▫Electronic Stability Control (ESC)..........488
▫Trailer Sway Control (TSC)..............492
▫Hill Start Assist (HSA).................493
�TIRE SAFETY INFORMATION.............496
▫Tire Markings........................496▫Tire Identification Number (TIN)...........499
▫Tire Terminology And Definitions..........501
▫Tire Loading And Tire Pressure...........502
�TIRES — GENERAL INFORMATION.........506
▫Tire Pressure........................506
▫Tire Inflation Pressures.................507
▫Tire Pressures For High Speed Operation. . . .509
▫Radial Ply Tires......................509
▫All Season Tires – If Equipped............510
▫Summer Or Three Season Tires – If Equipped. .510
▫Snow Tires..........................510
▫Spare Tire Matching Original Equipped Tire
And Wheel – If Equipped................511
458 STARTING AND OPERATING
Page 468 of 683
Key Ignition Park Interlock
This vehicle is equipped with a Key Ignition Park Inter-
lock which requires the shift lever to be placed in PARK
before the ignition switch can be turned to the LOCK/
OFF position. The key fob can only be removed from the
ignition when the ignition is in the LOCK/OFF position,
and the shift lever is locked in PARK whenever the
ignition switch is in the LOCK/OFF position.
NOTE:If a malfunction occurs, the system will trap the
key fob in the ignition switch to warn you that this safety
feature is inoperable. The engine can be started and
stopped but the key fob cannot be removed until you
obtain service.
Brake/Transmission Shift Interlock System
This vehicle is equipped with a Brake Transmission Shift
Interlock System (BTSI) that holds the transmission
shifter in PARK unless the brakes are applied. To shift the
transmission out of PARK, the engine must be running
and the brake pedal must be pressed.
In 8-speed vehicles, the brake pedal must also be pressed
to shift from NEUTRAL into DRIVE or REVERSE when
the vehicle is stopped or moving at low speeds.
Fuel Economy (ECON) Mode
The Fuel Economy (ECON) mode can improve the vehi-
cle’s overall fuel economy during normal driving condi-
tions. Press the “econ” switch in the center stack of the
instrument panel and a green light will indicate the
ECON mode is engaged.
466 STARTING AND OPERATING