Page 392 of 683
Dual Video Screen
NOTE:Typically there are two different ways to operate
the features of the Video Entertainment System (VES™).
•The Remote Control
•The Touch-Screen Radio (If Equipped)
Play A DVD Using The Touch-Screen Radio
NOTE:Headunit DVD player does not play Blu-Ray
discs.
1. Press the OPEN/CLOSE or LOAD hard-key on the
radio faceplate (Touch-Screen).
2. Insert the DVD with the label facing up. The radio
automatically selects the appropriate mode after the
disc is recognized and displays the menu screen or
starts playing the first track.3. To watch a DVD on Screen 1 for second row passen-
gers, ensure the Remote Control and Headphone
switch is on Channel 1.
4. To watch a DVD on Screen 2 for third row passengers,
ensure the Remote Control and Headphone switch is
on Channel 2.
Using The Remote Control
1. Press the SOURCE button on the Remote Control.
2. While looking at Screen 1 or 2, highlight DISC by
either pressing Up/Down/Left/Right buttons or by
repeatedly pressing the SOURCE button, then press
ENTER/OK.
390 UNDERSTANDING YOUR INSTRUMENT PANEL
Page 395 of 683
Using The Remote Control
1. Press the SOURCE button on the Remote Control.
2. While looking at Screen 1 or 2, highlight VES DISC by
either pressing Up/Down/Left/Right buttons or by
repeatedly pressing the SOURCE button, then press
ENTER/OK on the Remote Control.NOTE:
•Channel/Screen 1 select mode information is shown
on the left side of the screen.
•Channel/Screen 2 select mode information is shown
on the right side of the screen.
•
The VES™ will retain the last setting when turned off.
Select VES DISC Mode On The VES Screen
4
UNDERSTANDING YOUR INSTRUMENT PANEL 393
Page 397 of 683
NOTE:
•To view a DVD on the radio press the RADIO/MEDIA
hard-key, on the radio faceplate, then touch the DISC
tab soft-key and then the VIEW VIDEO soft-key.
•Viewing a DVD on the Touch-Screen radio screen is
not available in all states/provinces, and the vehicle
must be stopped, and the shift lever must be in the
PARK position for vehicles with automatic transmis-
sion. In vehicles with manual transmission the parking
brake must be engaged.
Play A Blu-ray Disc Using The Blu-ray Player
(If Equipped)
1. Insert the Blu-ray disc with the label facing up. The
Blu-ray player automatically selects the appropriate
mode after the disc is recognized and starts playing
the Blu-ray disc.NOTE:The Blu-ray player has basic control functions
such as Menu, Play, Pause, FF, RW and Stop.
2. To watch a Blu-ray disc on Screen 1 for second row
passengers, ensure the Remote Control and Head-
phone switch is on Channel 1.
3. To watch a Blu-ray disc on Screen 2 for third row
passengers, ensure the Remote Control and Head-
phone switch is on Channel 2.
Using The Remote Control
1. Press the SOURCE button on the Blu-ray player Re-
mote Control.
2. While looking at Screen 1 or 2, highlight Blu-ray by
either pressing Up/Down/Left/Right buttons or by
repeatedly pressing the SOURCE button, then press
OK on the Remote Control.
4
UNDERSTANDING YOUR INSTRUMENT PANEL 395
Page 399 of 683
Listen To An Audio Source While A Video Is
Playing
Ensure the Remote Control and Headphone switch are on
the same channel. If watching a video on Screen 1
(second row), then Channel 2 could be used for audio. If
watching a video on Screen 2 (third row), then Channel 1
could be used for audio.
Using The Remote Control
1. Press the SOURCE button on the Remote Control and
the Mode Select Screen will display, unless a video is
playing then only a small banner will appear on the
bottom of the screen.
2. While looking at the video screen, either press Up/
Down/Left/Right on the Remote Control to highlight
the desired audio source or repeatedly press the
SOURCE button on the remote until the desired audio
source appears on the screen.
Select FM Mode On The VES Screen
4
UNDERSTANDING YOUR INSTRUMENT PANEL 397
Page 402 of 683
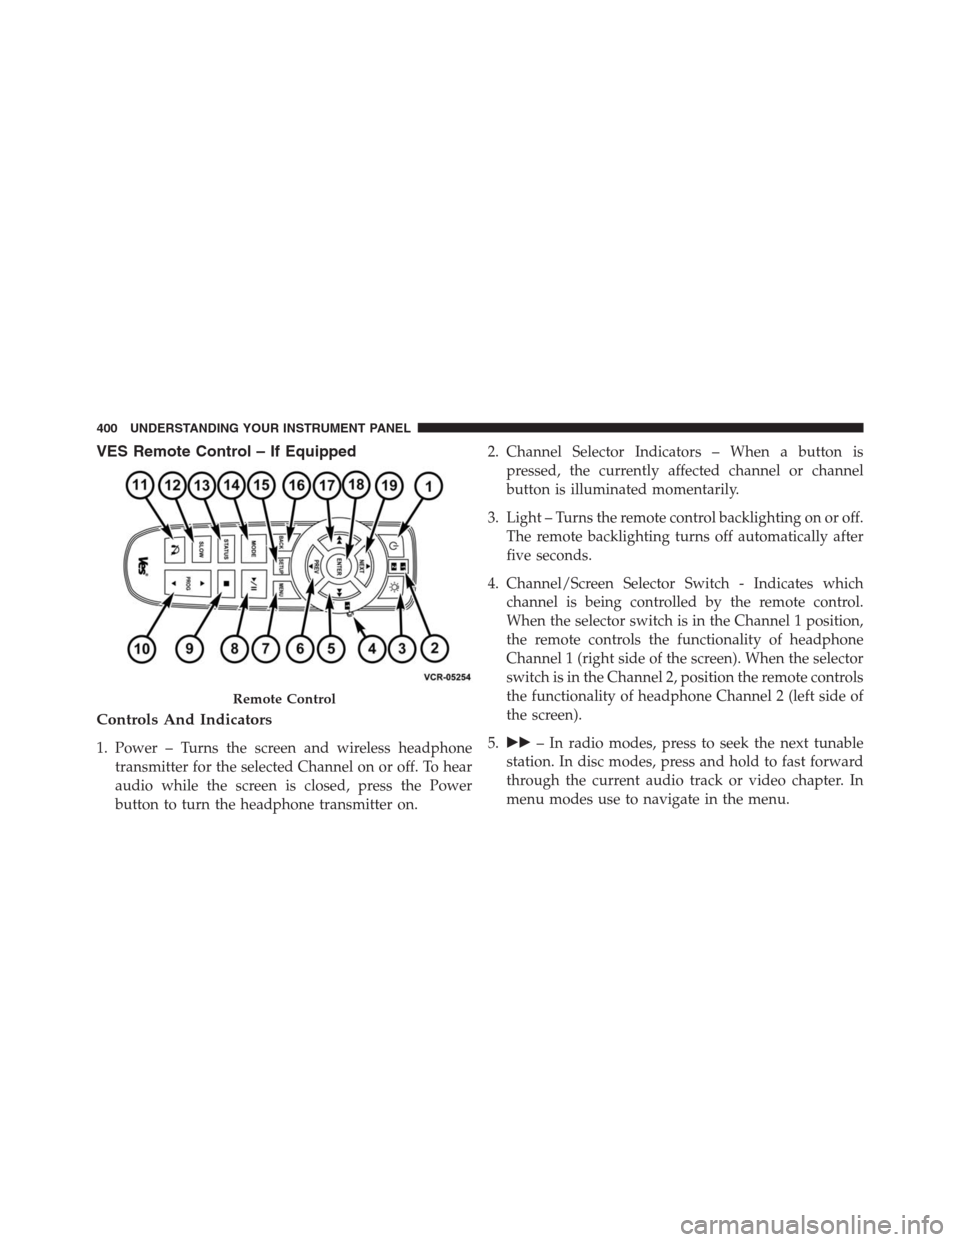
VES Remote Control – If Equipped
Controls And Indicators
1. Power – Turns the screen and wireless headphone
transmitter for the selected Channel on or off. To hear
audio while the screen is closed, press the Power
button to turn the headphone transmitter on.2. Channel Selector Indicators – When a button is
pressed, the currently affected channel or channel
button is illuminated momentarily.
3. Light – Turns the remote control backlighting on or off.
The remote backlighting turns off automatically after
five seconds.
4. Channel/Screen Selector Switch - Indicates which
channel is being controlled by the remote control.
When the selector switch is in the Channel 1 position,
the remote controls the functionality of headphone
Channel 1 (right side of the screen). When the selector
switch is in the Channel 2, position the remote controls
the functionality of headphone Channel 2 (left side of
the screen).
5.��– In radio modes, press to seek the next tunable
station. In disc modes, press and hold to fast forward
through the current audio track or video chapter. In
menu modes use to navigate in the menu.
Remote Control
400 UNDERSTANDING YOUR INSTRUMENT PANEL
Page 404 of 683
15. SETUP – When in a video mode, press the SETUP
button to access the display settings (see the display
settings section) to access the DVD setup menu, select
the menu button on the radio. When a disc is loaded
in the DVD player (if equipped) and the VES™ mode
is selected and the disc is stopped, press the SETUP
button to access the DVD Setup menu. (see the DVD
Setup Menu of this manual.)
16. BACK – When navigating in menu mode, press to
return to the previous screen. When navigating a
DVDs disc menu, the operation depends on the disc’s
contents.17.��– In radio modes, press to seek to the previous
tunable station. In disc modes, press and hold to fast
rewind through the current audio track or video
chapter. In menu modes use to navigate in the menu.
18. ENTER/OK – Press to select the highlighted option
in a menu.
19.�/ NEXT – In radio modes, press to select to the
next station. In disc modes, press to advance to the
next audio track or video chapter. In menu modes,
use to navigate in the menu.
402 UNDERSTANDING YOUR INSTRUMENT PANEL
Page 406 of 683
5.�– Press to navigate menus.
6. SETUP – Press to access the Blu-ray Setup menu
screen. When a disc is loaded in the Blu-ray player (if
equipped) and the VES™ mode is selected and the
disc is stopped, press the SETUP button to access the
Blu-ray Setup menu.
7.���– Press and release to jump to the next available
audio track or video chapter. Press and hold to fast
forward through the current audio track or video
chapter.
8.�/�(Play/Pause) – Begin/resume or pause disc play.
9. Four Colored Buttons – Press to access Blu-ray disc
features.
10. POPUP/MENU – Press to access the Blu-ray main
menu when in Blu-ray or DVD mode. Press to start
Scan or start Random track functions in CD or HDD
modes.11. KEYPAD – Press to navigate chapters or titles.
12.▪(Stop) – Stops disc play.
13.���– Press and release to jump to the previous
audio track or video chapter. Press and hold to fast
rewind through the current audio track or video
chapter.
14. Mutes headphone audio.
15. BACK – Press to exit out of menus or return to source
selection screen.
16.�– Press to navigate menus.
17. OK – Press to select the highlighted option in a menu.
18.�– Press to navigate menus.
19.�– Press to navigate menus.
404 UNDERSTANDING YOUR INSTRUMENT PANEL
Page 416 of 683
Numeric Keypad MenuWhen the display for either Channel 1 or Channel 2
shows DIRECT TUNE, pressing the remote control’s OK
button activates a numeric keypad menu. This screen
makes it easy to enter a specific tuner frequency, satellite
channel, or track number. To enter the desired digit:
1. Press the remote control’s navigation buttons (�,�,
�,�) to navigate to the desired digit.
2. When the digit is highlighted, press the remote con-
trol’s ENTER/OK button to select the digit. Repeat
these steps until all digits are entered.
3. To delete the last digit, navigate to the Del button and
press the remote control’s ENTER/OK button.
4. After all of the digits are entered, navigate to the Go
button and press the remote control’s ENTER/OK
button.
Numeric Keypad Menu
414 UNDERSTANDING YOUR INSTRUMENT PANEL