Page 89 of 140
 transfer case, which provides conve-
nient full-time all-wheel drive.")
ALL-WHEEL DRIVE OPERATION
Single-Speed Operating Instructions/Precautions
•
This system contains a single-speed (HI range only) transfer case, which provides conve-
nient full-time all-wheel drive. No driver interaction is required. The Brake Traction Control
(BTC) System, which combines standard ABS and Traction Control, provides resistance to
any wheel that is slipping to allow additional torque transfer to wheels with traction.
NOTE:
This system is not appropriate for conditions where AWD LOW range is recommended. Refer to
“Off-Road Driving Tips” in “Starting and Operating” on the DVD for further information.
Electronically Shifted Transfer Case (Three-Position Switch)
•
This is an electronic shift transfer case and
is operated by the AWD Control Switch
(Transfer Case Switch), which is located on
the center console.
• This electronically shifted transfer case provides three mode positions:• All-wheel drive automatic range
(AWD AUTO)
• All-wheel drive low range (LOW RANGE)
• Neutral (NEUTRAL)
•
When additional traction is required, the
LOW RANGE position can be used to lock
the front and rear driveshafts together
forcing the front and rear wheels to rotate
at the same speed. The LOW RANGE posi-
tion are designed for loose, slippery road surfaces only. Driving in the LOW RANGE positions
on dry hard surfaced roads may cause increased tire wear and damage to the driveline
components.
• When operating your vehicle in LOW RANGE, the engine speed is approximately three times that of the AWD HI position at a given road speed. Take care not to overspeed the
engine and do not exceed 25 mph (40 km/h).
NOTE:
The “SERV AWD Warning Light” monitors the electronic shift all-wheel drive system. If this
light remains on after engine start up or illuminates during driving, it means that the
all-wheel drive system is not functioning properly and that service is required.
OFF-ROAD CAPABILITIES
87
Page 90 of 140

Shifting Procedures
AWD AUTO To LOW RANGE
NOTE:
When shifting into or out of LOW RANGE some gear noise may be heard. This noise is
normal and is not detrimental to the vehicle or occupants.
• Shifting can be performed with the vehicle rolling 2 to 3 mph (3 to 5 km/h) or completelystopped. Use either of the following procedures:
Preferred Procedure
• With the engine running, slow the vehicle to 2 to 3 mph (3 to 5 km/h).
• Shift the transmission into NEUTRAL.
• While still rolling, rotate the transfer case control switch to the desired position.
• After the desired position indicator light is ON (not flashing), shift the transmission back into gear.
Alternate Procedure
• Bring the vehicle to complete stop.
• With the ignition switch in the ON position and the engine either OFF or running, shift the transmission into NEUTRAL.
• Rotate the transfer case control switch to the desired position.
• After the desired position indicator light is ON (not flashing), shift the transmission back into gear.
NOTE:
• If Steps 1 or 2 of either the Preferred or Alternate Procedure are not satisfied prior to attempting the shift or if they no longer are being met while the shift attempt is in
process, the desired position indicator light will flash continuously while the original
position indicator light is ON, until all requirements have been met.
• The ignition switch must be in the ON position for a shift to take place and for the position indicator lights to be operable. If the ignition switch is not in the ON position, then the
shift will not take place and no position indicator lights will be on or flashing.
WARNING!
• Always engage the parking brake when powering down the vehicle if the “SERV AWD
Warning Light” is illuminated. Not engaging the parking brake may allow the vehicle
to roll which may cause personal injury.
•
You or others could be injured if you leave the vehicle unattended with the transfer case
in the NEUTRAL position without first fully engaging the parking brake. The transfer case
NEUTRAL position disengages both the front and rear driveshafts from the powertrain
and will allow the vehicle to move regardless of the transmission position. The parking
brake should always be applied when the driver is not in the vehicle.
OFF-ROAD CAPABILITIES
88
Page 91 of 140
ROOF LUGGAGE RACK
• The crossbars on your vehicle are delivered stowed within the roof rack side rails. Wheninstalled, the roof rack can hold a maximum of 150 lbs (68 kg) of evenly distributed
weight.
Installing The Crossbars
• To install the crossbars, completely loosen the thumb screws at both ends and lift the crossbar from its stowed position.
• Bend the pivot points at each end of the crossbar and slide the thumb screw down.
• Set the crossbars into position and tighten the thumb screws.
NOTE:
Position the crossbars across the roof making sure the letters on the crossbar align with the
matching letters on the side rail.
• Refer to the Owner's Manual on the DVD for further details.
UTILITY
89
Page 92 of 140

Engine Model GCWR (Gross Combined Wt.Rating)Frontal Area Max. GTW (Gross
Trailer Wt.)Max. Trailer Tongue
Wt. (See Note)
3.6L RWD 11,600 lbs (5 2")
TRAILER TOWING WEIGHTS (MAXIMUM TRAILER WEIGHT RATINGS)
Engine Model GCWR (Gross Combined Wt.Rating)Frontal Area Max. GTW (Gross
Trailer Wt.)Max. Trailer Tongue
Wt. (See Note)
3.6L RWD 11,600 lbs (5 262 kg) 40 sq ft (3.72 sq m) 6,200 lbs (2 812 kg) 620 lbs (281 kg)
3.6L AWD 11,600 lbs (5 262 kg) 40 sq ft (3.72 sq m) 6,200 lbs (2 812 kg) 620 lbs (281 kg) 5.7L RWD 13,100 lbs (5 942 kg) 60 sq ft (5.57 sq m) 7,200 lbs (3 266 kg) 720 lbs (327 kg)
5.7L AWD 13,100 lbs (5 942 kg) 60 sq ft (5.57 sq m) 7,200 lbs (3 266 kg) 720 lbs (327 kg) Refer to local laws for maximum trailer towing speeds.
NOTE: The trailer tongue weight must be considered as part of the combined weight of occupants and cargo, and should never exceed the
weight referenced on the Tire and Loading Information placard. The addition of passengers and cargo may require reducing trailer tongue load and Gross Trailer Weight (GTW). Redistributing cargo (to the trailer) may be necessary to avoid exceeding Rear Gross Axle Weight Rating (GAWR) of 3,900 lbs (1 769 kg).
• If the gross trailer weight is 3,500 lbs (1587 kg) or more, it is mandatory to use a weight-distributing hitch to ensure stable handling of yourvehicle.
NOTE:
Vehicles not factory equipped with trailer tow package are limited to 3,500 lbs (350 lbs tongue weight).
UTILITY
90
Page 93 of 140

TOW/HAUL MODE
• When driving in hilly areas, towing a trailer, carrying a heavy load, etc., and frequenttransmission shifting occurs, press the TOW/HAUL switch to select TOW/HAUL mode.
This will improve performance and reduce the potential for transmission overheating or
failure due to excessive shifting. When operating in TOW/HAUL mode, transmission
upshifts are delayed, and the transmission will automatically downshift (for engine
braking) during steady braking maneuvers.
•
The “TOW/HAUL Indicator Light” will illumi-
nate in the instrument cluster to indicate
that TOW/HAUL mode has been activated.
Pressing the switch a second time restores
normal operation. If the TOW/HAUL mode
is desired, the switch must be pressed each
time the engine is started.
RECREATIONAL TOWING (BEHIND MOTORHOME, ETC.)
Rear-Wheel Drive Models
• Recreational towing is not allowed.
All-Wheel Drive Models (Single-Speed Transfer Case)
• Recreational towing is not allowed. This model does not have a NEUTRAL position in the
transfer case.
All-Wheel Drive Models (Two-Speed Transfer Case)
NOTE:
The transfer case must be in the NEUTRAL position, and the transmission must be in the
PARK position for recreational towing.
UTILITY
91
Page 94 of 140

Shifting Into NEUTRAL
Use the following procedure to prepare your vehicle for recreational towing.
• Bring the vehicle to a complete stop and shift the transmission to PARK.
• Turn the engine off.
• For vehicles with Keyless Enter-N-Go, remove the Keyless Enter-N-Go button and use theKey Fob to complete this procedure.
• Turn the ignition switch to the ON/RUN position, but do not start the engine.
• Press and hold the brake pedal and shift the transmission into NEUTRAL.
• Press and hold the transfer case N (Neutral) button for four seconds, until the light next to the N symbol starts to blink, indicating shift in progress. The light will stop blinking
(stay on solid) when the shift to N (Neutral) is complete.
• Start the engine and shift the transmission into REVERSE.
• Release the brake pedal for five seconds and ensure that there is no vehicle movement.
• Turn the engine off and firmly apply the parking brake.
• Shift the transmission into PARK and remove the Key Fob.
• Attach the vehicle to the tow vehicle using a suitable tow bar and release the parking brake.
CAUTION!
•Towing with the rear wheels on the ground will cause severe transmission damage.
Damage from improper towing is not covered under the New Vehicle Limited Warranty.
• Front or rear wheel lifts should not be used. Internal damage to the transmission or
transfer case will occur if a front or rear wheel lift is used when recreational towing.
• It is necessary to follow these steps to be certain that the transfer case is fully in NEUTRAL before recreational towing to prevent damage to internal parts.
WARNING!
You or others could be injured if you leave the vehicle unattended with the transfer case
in the NEUTRAL position without first fully engaging the parking brake. The transfer case
NEUTRAL position disengages both the front and rear driveshafts from the powertrain
and will allow the vehicle to move even if the transmission is in PARK. The parking brake
should always be applied when the driver is not in the vehicle.
UTILITY
92
Page 95 of 140

ROADSIDE ASSISTANCE
•Dial toll-free 1-800-521-2779 for U.S. Residents or 1-800-363-4869 for Canadian Residents.
•Provide your name, vehicle identification number, license plate number, and your location,
including the telephone number from which you are calling.
• Briefly describe the nature of the problem and answer a few simple questions.
• You will be given the name of the service provider and an estimated time of arrival. If you feel you are in an “unsafe situation”, please let us know. With your consent, we will
contact local police or safety authorities.
INSTRUMENT CLUSTER WARNING LIGHTS
- Tire Pressure Monitoring System (TPMS) Light
• Each tire, including the spare (if provided), should be checked monthly, when cold and inflated to the inflation pressure recommended by the vehicle manufacturer on the
vehicle placard or tire inflation pressure label. (If your vehicle has tires of a different size
than the size indicated on the vehicle placard or tire inflation pressure label, you should
determine the proper tire inflation pressure for those tires.)
• As an added safety feature, your vehicle has been equipped with a Tire Pressure Moni- toring System (TPMS) which display in the Electronic Vehicle Information Center (EVIC)
when one or more of your tires is significantly under-inflated. Accordingly, when the low
tire pressure EVIC display illuminates, you should stop and check your tires as soon as
possible, and inflate them to the proper pressure. Driving on a significantly under-
inflated tire causes the tire to overheat and can lead to tire failure. Under-inflation also
reduces fuel efficiency and tire tread life, and may affect the vehicle’s handling and
stopping ability.
•
IF THE LIGHT STARTS FLASHING INDICATING A LOW TIRE PRESSURE, ADJUST THE AIR
PRESSURE IN THE LOW TIRE TO THE AIR PRESSURE SHOWN ON THE VEHICLE PLACARD
OR TIRE INFLATION PRESSURE LABEL LOCATED ON THE DRIVER'S DOOR. NOTE: AFTER
INFLATION, THE VEHICLE MAY NEED TO BE DRIVEN FOR 20 MINUTES BEFORE THE
FLASHING LIGHT WILL TURN OFF.
• Please note that the TPMS is not a substitute for proper tire maintenance, and it is the driver’s responsibility to maintain correct tire pressure, even if under-inflation has not
reached the level to trigger illumination of the TPMS low EVIC display.
•
Your vehicle has also been equipped with a TPMS malfunction indicator to indicate when the
system is not operating properly. The TPMS malfunction indicator is combined with the low
tire pressure telltale. When the system detects a malfunction, the telltale will flash for
approximately one minute and then remain continuously illuminated. This sequence will
continue each time the vehicle is restarted as long as the malfunction exists.
WHAT TO DO IN EMERGENCIES
93
Page 96 of 140

•When the malfunction indicator is illuminated, the system may not be able to detect or signal
low tire pressure as intended. TPMS malfunctions may occur for a variety of reasons, including
the installation of replacement or alternate tires or wheels on the vehicle that prevent the
TPMS from functioning properly. Always check the TPMS malfunction telltale after replacing
one or more tires or wheels on your vehicle, to ensure that the replacement or alternate tires
and wheels allow the TPMS to continue to function properly.
NOTE:
Tire pressures change by approximately 1 psi (7 kPa) per 12° F (7° C) of air temperature
change. Keep this in mind when checking tire pressure inside a garage, especially in the
Winter. Example: If garage temperature is 68°F (20°C) and the outside temperature is 32°F
(0°C), then the cold tire inflation pressure should be increased by 3 psi (21 kPa), which equals
1 psi (7 kPa) for every 12°F (7°C) for this outside temperature condition.
CAUTION!
The TPMS has been optimized for the original equipment tires and wheels. TPMS
pressures and warning have been established for the tire size equipped on your vehicle.
Undesirable system operation or sensor damage may result when using replacement
equipment that is not of the same size, type, and/or style. Aftermarket wheels can cause
sensor damage. Do not use tire sealant from a can, or balance beads if your vehicle is
equipped with a TPMS, as damage to the sensors may result.
BRAKE- Brake Warning Light
• The Brake Warning light illuminates when there is either a system malfunction or the parking brake is applied. If the light is on and the parking brake is not applied, it indicates
a possible brake hydraulic malfunction, brake booster problem or an Anti-Lock Brake
System problem.
• Please have your vehicle serviced immediately.
WARNING!
Driving a vehicle with the red brake light on is dangerous. Part of the brake system may
have failed. It will take longer to stop the vehicle. You could have a collision. Have the
vehicle checked immediately.
- Malfunction Indicator Light (MIL)
• Certain conditions, such as a loose or missing gas cap, poor fuel quality, etc., may illuminate the MIL after engine start. The vehicle should be serviced if the light stays on
through several typical driving cycles. In most situations, the vehicle will drive normally
and not require towing.
• If the MIL flashes when the engine is running, serious conditions may exist that could lead to immediate loss of power or severe catalytic converter damage. We recommend
you do not operate the vehicle. Have the vehicle serviced immediately.
WHAT TO DO IN EMERGENCIES
94
 1
1 2
2 3
3 4
4 5
5 6
6 7
7 8
8 9
9 10
10 11
11 12
12 13
13 14
14 15
15 16
16 17
17 18
18 19
19 20
20 21
21 22
22 23
23 24
24 25
25 26
26 27
27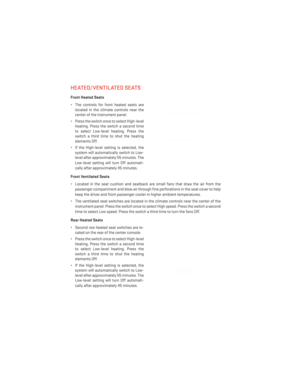 28
28 29
29 30
30 31
31 32
32 33
33 34
34 35
35 36
36 37
37 38
38 39
39 40
40 41
41 42
42 43
43 44
44 45
45 46
46 47
47 48
48 49
49 50
50 51
51 52
52 53
53 54
54 55
55 56
56 57
57 58
58 59
59 60
60 61
61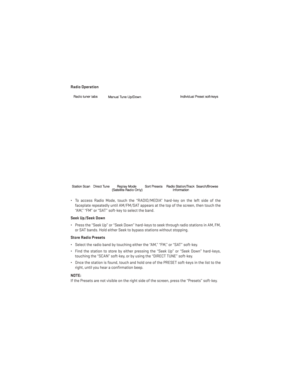 62
62 63
63 64
64 65
65 66
66 67
67 68
68 69
69 70
70 71
71 72
72 73
73 74
74 75
75 76
76 77
77 78
78 79
79 80
80 81
81 82
82 83
83 84
84 85
85 86
86 87
87 88
88 89
89 90
90 91
91 92
92 93
93 94
94 95
95 96
96 97
97 98
98 99
99 100
100 101
101 102
102 103
103 104
104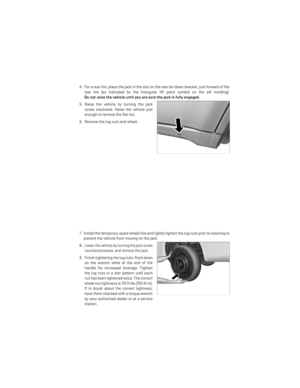 105
105 106
106 107
107 108
108 109
109 110
110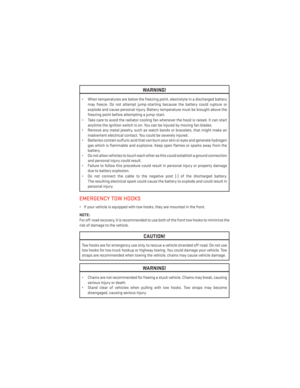 111
111 112
112 113
113 114
114 115
115 116
116 117
117 118
118 119
119 120
120 121
121 122
122 123
123 124
124 125
125 126
126 127
127 128
128 129
129 130
130 131
131 132
132 133
133 134
134 135
135 136
136 137
137 138
138 139
139 of evenly distributed
weigh")