Page 25 of 132
 in
your vehicle.
• Drive moderately during the first 300 miles (500 km")
ENGINE BREAK-IN RECOMMENDATIONS
•A long break-in period is not required for the engine and drivetrain (transmission and axle) in
your vehicle.
• Drive moderately during the first 300 miles (500 km). After the initial 60 miles (100 km), speeds up to 50 or 55 mph (80 or 90 km/h) are desirable.
• While cruising, brief full-throttle acceleration within the limits of local traffic laws contributes to a good break-in. Wide-open throttle acceleration in low gear can be
detrimental and should be avoided.
• The engine oil installed in the engine at the factory is a high-quality energy conserving type lubricant. Oil changes should be consistent with anticipated climate conditions
under which vehicle operations will occur. For the recommended viscosity and quality
grades, refer to “Maintaining Your Vehicle”.
NOTE:
A new engine may consume some oil during its first few thousand miles (kilometers) of
operation. This should be considered a normal part of the break-in and not interpreted as an
indication to an engine problem or malfunction.
CAUTION!
Never use Non-Detergent Oil or Straight Mineral Oil in the engine or damage may result.
ENGINE BREAK-IN RECOMMENDATION — SRT8 VERSION
• A long break-in period is not required for the drivetrain (engine, transmission, and rear axle) in your new vehicle.
• Drive moderately during the first 500 miles (800 km). After the initial 60 miles (100 km), speeds up to 50 or 55 mph (80 or 90 km/h) are desirable.
• While cruising, brief full-throttle acceleration within the limits of local traffic laws contributes to a good break-in. However, wide-open throttle acceleration in low gear can
be detrimental and should be avoided.
• The engine oil is a high performance synthetic lubricant, the transmission fluid, and axle lubricant installed at the factory is high-quality and energy-conserving. Oil, fluid, and
lubricant changes should be consistent with anticipated climate and conditions under
which vehicle operations will occur. For the recommended viscosity and quality grades,
refer to “Maintaining Your Vehicle”.
NOTE:
A new engine may consume some oil during its first few thousand miles (kilometers) of
operation. This should be considered a normal part of the break-in and not interpreted as an
indication of difficulty.
CAUTION!
Never use Non-Detergent Oil or Straight Mineral Oil in the engine or damage may result.
OPERATING YOUR VEHICLE
23
Page 26 of 132
 will flash three times andautomatically turn off.
Front Wi")
TURN SIGNAL/WIPER/WASHER/HIGH BEAM LEVER
Turn Signal/Lane Change Assist
• Tap the lever up or down once and the turn signal (right or left) will flash three times andautomatically turn off.
Front Wipers
Intermittent, Low And High Operation
• Rotate the end of the lever to the first detent position for one of four intermittent settings, the second detent for low wiper operation and the third detent for high wiper operation.
Mist
• Rotate the end of the lever downward when a single wipe is desired.
NOTE:
The mist feature does not activate the washer pump; therefore, no washer fluid will be
sprayed on the windshield. The wash function must be activated in order to spray the
windshield with washer fluid.
Washer Operation
• Push the end of the lever inward and hold for as long as spray is desired.
Rain Sensing Wipers
• This feature senses moisture on the vehicle's windshield and automatically activates the wipers for the driver when the switch is in the intermittent position. Rotate the end of the
lever to one of four settings to activate this feature and adjust sensitivity.
• Rain Sensing can be turned on and off using the Uconnect® System, refer to the Owner's Manual on the DVD for further details.
OPERATING YOUR VEHICLE
24
Page 27 of 132

High Beam Operation
•
Push the lever forward to activate the high beams. Pull the lever toward you for flash to pass.
NOTE:
For safe driving, turn off the high beams when oncoming traffic is present to prevent headlight
glare and as a courtesy to other motorists.
HEADLIGHT SWITCH
Automatic Headlights/Parking Lights/Headlights
• Rotate the headlight switch, located onthe instrument panel to the left of the
steering wheel, to the first detent from the
off position for parking light
and to
the second detent for headlight
.
• With the parking lights or low beam head- lights on, press the headlight switch for
front fog lights. Pressing the switch a
second time will deactivate the front fog
lights. Turning the headlight switch off
will also deactivate the front fog lights.
• Rotate the headlight switch to “AUTO” for AUTO headlights.
• When set to AUTO, the system automati- cally turns the headlights on or off based
on ambient light levels.
SmartBeams™
• This system automatically controls the use of the headlight high beams. Refer to Programmable Features in Electronics for further details.
Instrument Panel Dimmer
• Rotate the dimmer control to the extreme bottom position to fully dim the instrument panel lights and prevent the interior lights from illuminating when a door is opened.
• Rotate the dimmer control up to increase the brightness of the instrument panel and cupholders when the parking lights or headlights are on.
• Rotate the dimmer control up to the next detent position to fully brighten the odometer and radio when the parking lights or headlights are on. Refer to your Uconnect®/Radio
User Manual on the DVD for display dimming.
• Rotate the dimmer control up to the last detent position to turn on the interior lighting.
Ambient Light Dimmer
• Rotate the ambient light control up or down to increase or decrease the brightness of the release handle, map pocket (if equipped), overhead and floor lighting when the parking
lights or headlights are on.
OPERATING YOUR VEHICLE
25
Page 28 of 132

SPEED CONTROL
• The speed control switches are locatedon the steering wheel.
Cruise ON/OFF
• Push the ON/OFF button to activate the Speed Control.
• CRUISE READY
will appear on the
instrument cluster to indicate the Speed
Control is on.
• Push the ON/OFF button a second time to turn the system off.
SET
• With the Speed Control on, push and re- lease the SET – button to set a desired
speed.
Accel/Decel
• Once a speed is set, pushing the RES + button once or the SET – button once will increase or decrease the set speed approximately 1 mph (2 km/h).
• Push and hold the RES + button to accelerate in 5 mph (8 km/h) increments or push and hold the SET – button to decelerate in 5 mph (8 km/h) increments; release the button to
save the new set speed.
Resume
• To resume a previously selected set speed in memory, push the RES + button and release.
Cancel
• Push the CANCEL button, or apply the brakes to cancel the set speed and maintain the set speed memory.
• Push the ON/OFF button to turn the system off and erase the set speed memory.
OPERATING YOUR VEHICLE
26
Page 29 of 132

• If your vehicle is equipped with adaptive cruise control the controls operate exactly thesame as the standard cruise control with one difference. You can set a specif")
Adaptive Cruise Control (ACC)
• If your vehicle is equipped with adaptive cruise control the controls operate exactly thesame as the standard cruise control with one difference. You can set a specified distance
you would like to maintain between you and the vehicle in front of you.
• If the ACC sensor detects a vehicle ahead, ACC will apply limited braking or acceleration automatically to maintain a preset following distance, while matching the speed of the
vehicle ahead.
• If the sensor does not detect a vehicle directly ahead of you, it functions like a standard cruise control system, maintaining the speed you set.
Distance Setting (ACC Only)
• The specified following distance for ACC can be set by varying the distance setting between 3 (long), 2 (medium), and 1 (short). Using this distance setting and the vehicle
speed, ACC calculates and sets the distance to the vehicle ahead. This distance setting
displays in the EVIC.
• To set or change the distance setting, press the Distance button and release. Each time the button is pressed, the distance setting adjusts between long (3), medium (2), and
short (1). The distance setting will default to the last set mode the next time the vehicle is
restarted and the ACC system is turned on.
Mode (ACC Only)
• If desired, the Adaptive Cruise Control mode can be turned off and the system can be operated as a standard (fixed speed) Cruise Control. When in the standard (fixed speed)
Cruise Control mode the distance setting feature will be disabled and the system will
maintain the speed you set.
• To change modes, press the MODE button when the system is in either the OFF, READY, or SET position. “Cruise Ready” will be displayed if the system was in ACC READY or ACC
SET position. “Cruise Off” will be displayed if the system was in the ACC OFF position. To
switch back to Adaptive Cruise Control mode, press the MODE button a second time.
• Refer to your Owner's Manual on the DVD for further information.
Forward Collision Warning
• The Forward Collision Warning (FCW) system provides the driver with audible and visual warnings (within the EVIC) when it detects a potential frontal collision. The warnings are
intended to provide the driver with enough time to react and avoid the potential collision.
OPERATING YOUR VEHICLE
27
Page 30 of 132

Changing FCW Status
• The FCW feature has three settings and can be changed within the Uconnect® System:•Far
• Near
• Off
NOTE:
The FCW settings can only be changed when the vehicle is in PARK.
Far
• The default status of FCW is the “Far” setting.
• The far setting provides warnings for potential collisions more distant in front of the vehicle, allowing the driver to have the most reaction time to avoid a collision.
• This setting is designed to provide early warnings per NHTSA (National Highway Traffic Safety Administration) recommendations.
• More cautious drivers that do not mind frequent warnings may prefer this setting.
NOTE:
This setting gives you the most reaction time.
Near
• Changing the FCW status to the “Near” setting, allows the system to warn you of a potential frontal collision when you are much closer.
• This setting provides less reaction time than the “Far” setting, which allows for a more dynamic driving experience.
• More dynamic or aggressive drivers that want to avoid frequent warnings may prefer this setting.
Off
• Changing the FCW status to “Off” prevents the system from warning you of a potential frontal collision.
NOTE:
• If FCW is set to “Off”, “FCW OFF” will be displayed in the EVIC.
• Refer to the Owner's Manual on the DVD for further details.
OPERATING YOUR VEHICLE
28
Page 31 of 132

WARNING!
• Leaving the Electronic or Adaptive Speed Control system on when not in use isdangerous. You could accidentally set the system or cause it to go faster than you
want. You could lose control and have a collision. Always leave the Electronic or
Adaptive Speed Control system off when you are not using it.
• Electronic Speed Control can be dangerous where the system cannot maintain a constant speed. Your vehicle could go too fast for the conditions, and you could lose
control. A collision could be the result. Do not use Electronic Speed Control in heavy
traffic or on roads that are winding, icy, snow-covered or slippery.
• Adaptive Cruise Control (ACC) is a convenience system. It is not a substitute for active driving involvement. Pay attention to road, traffic, and weather conditions,
vehicle speed, distance to the vehicle ahead, and brake operation to ensure safe
operation of the vehicle under all road conditions. Your attention is always required
while driving to maintain safe control of your vehicle. Failure to follow these warnings
can result in a collision or serious personal injury.
The ACC system:
• Does not react to pedestrians, oncoming vehicles, and stationary objects (i.e., a
stopped vehicle in a traffic jam or a disabled vehicle).
• Cannot take street, traffic, and weather conditions into account, and may be limited
upon adverse sight distance conditions.
• Does not predict the lane curvature or the movement of preceding vehicles and will
not compensate for such changes.
• Does not always fully recognize complex driving conditions, which can result in
wrong or missing distance warnings.
• Can only apply a maximum of 25% of the vehicle’s braking capability, and will not
bring the vehicle to a complete stop.
You should switch off the ACC system:
• When driving in fog, heavy rain, heavy snow, sleet, heavy traffic, and complex driving
situations (i.e., in highway construction zones).
• When entering a turn lane or highway off ramp; when driving on roads that are
winding, icy, snow-covered, slippery, or have steep uphill or downhill slopes; and
when towing a trailer.
• When circumstances do not allow safe driving at a constant speed.
• Failure to follow these warnings can result in a collision.
• Forward Collision Warning (FCW) is not intended to avoid a collision on its own. The
driver has the responsibility to avoid a collision by controlling the vehicle via braking
and steering. Failure to follow this warning could lead to serious injury or death.
OPERATING YOUR VEHICLE
29
Page 32 of 132

ELECTRONIC SHIFTER – 3.6L ENGINE
• Your new vehicle is equipped with a stateof the art, fuel efficient 8 speed transmis-
sion. The electronic shift lever in this ve-
hicle does not slide like a conventional
shifter. Instead, the shift lever is spring
loaded and moves forward and rearward,
always returning to the center position
after each gear is selected.
•
The transmission gear (PRND) is displayed
both on the shift lever and in the Electronic
Vehicle Information Center (EVIC).
Shifting From PARK to DRIVE
• Firmly depress the brake pedal, press the lock button on the shift lever, then pull
and hold the shift lever fully rearward until
“D” is displayed in the EVIC.
• To shift back into PARK from DRIVE, bring the vehicle to a complete stop, fully de-
press the brake pedal, press the lock but-
ton on the shift lever, then push and hold
the shift lever fully forward until “P” is
displayed in the EVIC.
Shifting From REVERSE to NEUTRAL
• Pull the shift lever rearward to the first detent and release. “N” will display in the
EVIC.
• To shift back into REVERSE from NEU- TRAL, firmly depress the brake pedal, press the lock button on the shift lever, then push
the shift lever forward to the first detent and release. “R” will display in the EVIC.
OPERATING YOUR VEHICLE
30
 1
1 2
2 3
3 4
4 5
5 6
6 7
7 8
8 9
9 10
10 11
11 12
12 13
13 14
14 15
15 16
16 17
17 18
18 19
19 20
20 21
21 22
22 23
23 24
24 25
25 26
26 27
27 28
28 29
29 30
30 31
31 32
32 33
33 34
34 35
35 36
36 37
37 38
38 39
39 40
40 41
41 42
42 43
43 44
44 45
45 46
46 47
47 48
48 49
49 50
50 51
51 52
52 53
53 54
54 55
55 56
56 57
57 58
58 59
59 60
60 61
61 62
62 63
63 64
64 65
65 66
66 67
67 68
68 69
69 70
70 71
71 72
72 73
73 74
74 75
75 76
76 77
77 78
78 79
79 80
80 81
81 82
82 83
83 84
84 85
85 86
86 87
87 88
88 89
89 90
90 91
91 92
92 93
93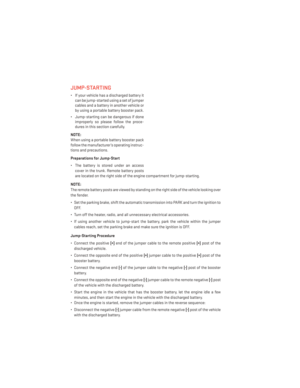 94
94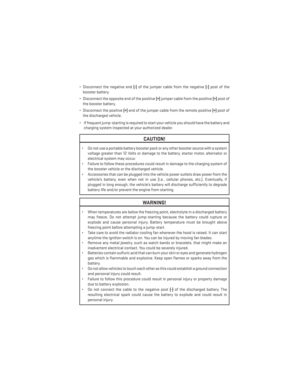 95
95 96
96 97
97 98
98 99
99 100
100 101
101 102
102 103
103 104
104 105
105 106
106 107
107 108
108 109
109 110
110 111
111 112
112 113
113 114
114 115
115 116
116 117
117 118
118 119
119 120
120 121
121 122
122 123
123 124
124 125
125 126
126 127
127 128
128 129
129 130
130 131
131