Page 73 of 132

AUTOSTICK®
Steering Wheel Mounted Paddle Shifters Or Console Mounted Shifter
• AutoStick® is a driver-interactive trans- mission feature that offers manual gear
shifting to provide you with more control
of the vehicle. AutoStick® allows you to
maximize engine braking, and improve
overall vehicle performance.
•
This system can also provide you with
more control during passing, city driving,
cold slippery conditions, mountain driving,
trailer towing, and many other situations.
Operation
• When the shift lever is in the DRIVE posi- tion, the transmission will operate auto-
matically, shifting between the five avail-
able gears. To engage AutoStick®, simply
move the shift lever to the right or left (+/-) while in the DRIVE position, or press one of the
steering wheel mounted shift paddles (+/-). When AutoStick® is active, the current
transmission gear is displayed in the Electronic Vehicle Information Center (EVIC) por-
tion of the instrument cluster. In AutoStick® mode, the transmission will shift when
manually selected by the driver (using the shift lever, or the shift paddles), unless an
engine lugging or overspeed condition would result. It will remain in the selected gear
until another upshift or downshift is chosen, except as described below:• The transmission will automatically downshift as the vehicle slows (to prevent engine
lugging) and will display the current gear.
• The transmission will automatically downshift to first gear when coming to a stop.
• You can start out in first or second gear. Tapping (+) (at a stop) will allow starting in second gear. Starting out in second gear is helpful in snowy or icy conditions.
• The system will ignore attempts to upshift at too low of a vehicle speed.
• Transmission shifting will be more noticeable when AutoStick® is engaged. To disen- gage AutoStick® mode, hold the shift lever to the right or press and hold the (+) shift
paddle until “D” is once again displayed in the instrument cluster. You can shift in or out
of the AutoStick® mode at any time without taking your foot off the accelerator pedal.
SRT8
71
Page 74 of 132

ELECTRONIC CONTROL DAMPING SYSTEM
• This vehicle may be equipped with an electronic controlled damping system. This systemreduces body roll and pitch in many driving situations including cornering, acceleration
and braking. There are three modes of operation:
Automatic (Auto) Mode
•
This is the default position when vehicle
ignition is first turned on. This mode will
give a sporty, but comfortable ride. Within
this mode, the suspension will adapt to the
vehicle inputs, including vehicle speed,
steering inputs, braking, and acceleration.
• If AutoStick® is engaged while in “Auto” mode, the transmission will automati-
cally shift up if maximum engine speed is
reached.
• Heavily pressing the accelerator pedal may generate an automatic downshift for
improved acceleration.
• This mode should be used for most driving situations.
Sport Mode
SPORT
• This mode is driver selectable when the vehicle is placed in SPORT mode (press
the CONTROLS button and then the
SPORT button on the display screen). This
mode will set suspension for maximum
performance handling and is intended for
spirited driving.
• When SPORT mode is enabled, a flag will light up in the instrument cluster.
NOTE:
The SPORT setting will provide a firmer ride.
Track Mode
• In track mode, the transmission has a sportier, more aggressive shift pattern.
•
This mode includes SPORT Suspension
and affects transmission shifting in either
Auto or Manual mode.
•If AutoStick (console shifter or paddle
shifters) is engaged while in “Track” mode,
the transmission will remain in the selected
gear even when maximum engine speed is
reached.
SRT8
72
Page 75 of 132

• Engine overspeed protection is achieved through fuel cut off at or near redline.
• This mode will provide aggressive shifting and is intended for spirited driving.
• The system will return to SPORT mode when the ignition switch is cycled from RUN toOFF, and back to RUN again, if this mode is selected.
PERFORMANCE FEATURES
Electronic Vehicle Information Center (EVIC)
• The EVIC can be used to view or changethe following Performance Features.
Press the UP
or DOWN button
until System Setup displays, then press
the SELECT
button. Scroll through
the settings using the UP or DOWN but-
tons. Press the SELECT
button to
change the setting. Press the BACK but-
ton to scroll back to a previous menu or
sub menu.
• 0-60 mph (0-100 km/h) • Instantaneous G-Force
• Braking Distance • Peak G-Force
• 1/8 Mile • Digital Speedometer
• 1/4 Mile
0-60 mph (0-100 km/h)
• When selected, this screen displays the time it takes for the vehicle to go from 0 to 60 mph (0 to 100 km/h) within 10 seconds.
Braking Distance
• When selected, this screen displays the vehicle's braking distance and the speed at which the brake pedal was depressed.
1/8 Mile, 1/4 Mile
• When selected, this screen displays the time it takes the vehicle to travel 1/8 mile (1/4 mile) within 30 seconds and the vehicle's speed when it reaches 1/8 mile (1/4 mile).
Instantaneous G-Force
• When selected, this screen displays the current G-Force (lateral and longitudinal) along with a friction circle that displays the directions of the forces.
Peak G-Force
•
When selected, this screen displays all four G-Force values (two lateral and two longitudinal).
SRT8
73
Page 76 of 132

Uconnect® SRT8 Performance Features
• To access the SRT8 Performance Features, touch the “More” soft-key then touch the“SRT” soft-key. Press the UP or DOWN soft-key to cycle through the features. Press the
feature soft-key to select that feature.
• The Performance Page include the following:
• Timers • 1/8 Mile
• Engine Values • 1/4 Mile
• Digital Gauge Displays • Instantaneous G-Force
• 0-60 mph (0-100 km/h) • Peak G-Force
• Braking Distance • Digital Speedometer
Timers
0-60 mph (0-100 km/h), 1/8 Mile, 1/4 Mile
• When selected, this screen displays the time it takes for the vehicle to go from 0 to 60 mph (0 to 100 km/h), 1/8 mile or 1/4 mile.
Braking Distance
• When selected, this screen displays the vehicle's braking distance and the speed atwhich the brake pedal was depressed.
G-Force
• When selected, this screen displays all four G-Force values (two lateral and two longitu-dinal) as well as steering angle.
Gauges 1
• Oil Temperature
• Oil Pressure
• Battery Voltage
Gauges 2
• Coolant Temperature
• Oil Temperature
• Transmission Temperature
• Intake Air Temperature
• Oil Pressure
• Battery Voltage
SRT8
74
Page 77 of 132
, horsepower (hp), torque (ft/lb),oil pressure (psi) and gear selector values.
Handling
• When selected, this screen displays peak")
Engine
• When selected, this screen displays miles per hour (mph), horsepower (hp), torque (ft/lb),oil pressure (psi) and gear selector values.
Handling
• When selected, this screen displays peak g-force, instantaneous g-force, steering andyaw angles.
Options
• When selected, this screen allows you to choose a standard or custom display for yourSRT home page.
WARNING!
Measurement of vehicle statistics with the Performance Features is intended for off-
highway or off-road use only and should not be done on any public roadways. It is
recommended that these features be used in a controlled environment and within the
limits of the law. The capabilities of the vehicle as measured by the performance pages
must never be exploited in a reckless or dangerous manner, which can jeopardize the
user’s safety or the safety of others. Only a safe, attentive, and skillful driver can prevent
accidents.
SUMMER/THREE-SEASON TIRES
• This vehicle may be equipped with wheels and tires to enhance traction in both wet anddry conditions.
• Summer tires are not intended to be driven in snow or on ice.
• Use summer tires only in sets of four.
NOTE:
Summer tires will not contain the all season designation or mountain/snowflake symbol on
the sidewall of the tire.
WARNING!
Do not use summer tires in snow/ice conditions. You could lose control, resulting in
severe injury or death.
SRT8
75
Page 78 of 132

ROADSIDE ASSISTANCE
•Dial toll-free 1-800-521-2779 for U.S. Residents or 1-800-363-4869 for Canadian Residents.
•Provide your name, vehicle identification number, license plate number, and your location,
including the telephone number from which you are calling.
• Briefly describe the nature of the problem and answer a few simple questions.
•
You will be given the name of the service provider and an estimated time of arrival. If you feel
you are in an “unsafe situation”, please let us know. With your consent, we will contact local
police or safety authorities.
INSTRUMENT CLUSTER WARNING LIGHTS
- Electronic Stability Control (ESC) Activation/Malfunction Indicator Light
• The “ESC Activation/Malfunction Indicator Light” in the instrument cluster will come on when the ignition switch is turned to the ON/RUN position. It should go out with the
engine running. If the “ESC Activation/Malfunction Indicator Light” comes on continu-
ously with the engine running, a malfunction has been detected in the ESC system.
• If this light remains on after several ignition cycles, and the vehicle has been driven several miles (kilometers) at speeds greater than 30 mph (48 km/h), we recommend you
drive to the nearest service center and have the vehicle serviced immediately.
- Tire Pressure Monitoring System (TPMS) Light
• Each tire, including the spare (if provided), should be checked monthly, when cold and inflated to the inflation pressure recommended by the vehicle manufacturer on the
vehicle placard or tire inflation pressure label. (If your vehicle has tires of a different size
than the size indicated on the vehicle placard or tire inflation pressure label, you should
determine the proper tire inflation pressure for those tires.)
• As an added safety feature, your vehicle has been equipped with a Tire Pressure Moni- toring System (TPMS) that illuminates a low tire pressure telltale when one or more of
your tires is significantly under-inflated. Accordingly, when the low tire pressure telltale
illuminates, you should stop and check your tires as soon as possible, and inflate them to
the proper pressure. Driving on a significantly under-inflated tire causes the tire to
overheat and can lead to tire failure. Under-inflation also reduces fuel efficiency and tire
tread life, and may affect the vehicle’s handling and stopping ability.
• IF THE LIGHT STARTS FLASHING INDICATING A LOW TIRE PRESSURE, ADJUST THE AIR
PRESSURE IN THE LOW TIRE TO THE AIR PRESSURE SHOWN ON THE VEHICLE PLAC-
ARD OR TIRE INFLATION PRESSURE LABEL LOCATED ON THE DRIVER'S DOOR.
NOTE:
AFTER INFLATION, THE VEHICLE MAY NEED TO BE DRIVEN FOR 20 MINUTES BEFORE THE
FLASHING LIGHT WILL TURN OFF.
• Please note that the TPMS is not a substitute for proper tire maintenance, and it is the driver’s responsibility to maintain correct tire pressure, even if under-inflation has not
reached the level to trigger illumination of the TPMS low tire pressure telltale.
WHAT TO DO IN EMERGENCIES
76
Page 79 of 132

•Your vehicle has also been equipped with a TPMS malfunction indicator to indicate when the
system is not operating properly. The TPMS malfunction indicator is combined with the low
tire pressure telltale. When the system detects a malfunction, the telltale will flash for
approximately one minute and then remain continuously illuminated. This sequence will
continue each time the vehicle is restarted as long as the malfunction exists.
•When the malfunction indicator is illuminated, the system may not be able to detect or
signal low tire pressure as intended. TPMS malfunctions may occur for a variety of reasons,
including the installation of replacement or alternate tires or wheels on the vehicle that
prevent the TPMS from functioning properly. Always check the TPMS malfunction telltale
after replacing one or more tires or wheels on your vehicle, to ensure that the replacement or
alternate tires and wheels allow the TPMS to continue to function properly.
NOTE:
Tire pressures change by approximately 1 psi (7 kPa) per 12° F (7° C) of air temperature
change. Keep this in mind when checking tire pressure inside a garage, especially in the
Winter. Example: If garage temperature is 68°F (20°C) and the outside temperature is 32°F
(0°C), then the cold tire inflation pressure should be increased by 3 psi (21 kPa), which equals
1 psi (7 kPa) for every 12°F (7°C) for this outside temperature condition.
CAUTION!
The TPMS has been optimized for the original equipment tires and wheels. TPMS
pressures and warning have been established for the tire size equipped on your vehicle.
Undesirable system operation or sensor damage may result when using replacement
equipment that is not of the same size, type, and/or style. Aftermarket wheels can cause
sensor damage. Do not use tire sealant from a can, or balance beads if your vehicle is
equipped with a TPMS, as damage to the sensors may result.
- Engine Temperature Warning Light
• This light warns of an overheated engine condition.
• If the light turns on or flashes continuously while driving, safely pull over and stop the vehicle. If the A/C system is on, turn it off. Also, shift the transmission into NEUTRAL and
idle the vehicle. If the temperature reading does not return to normal, turn the engine off
immediately.
• We recommend that you do not operate the vehicle or engine damage will occur. Have the vehicle serviced immediately.
WARNING!
A hot engine cooling system is dangerous. You or others could be badly burned by steam
or boiling coolant. You may want to call an authorized dealer for service if your vehicle
overheats.
WHAT TO DO IN EMERGENCIES
77
Page 80 of 132

BRAKE- Brake Warning Light
• The Brake Warning light illuminates when there is either a system malfunction or the parking brake is applied. If the light is on and the parking brake is not applied, it indicates
a possible brake hydraulic malfunction, brake booster problem or an Anti-Lock Brake
System problem.
• Please have your vehicle serviced immediately.
WARNING!
Driving a vehicle with the red brake light on is dangerous. Part of the brake system may
have failed. It will take longer to stop the vehicle. You could have a collision. Have the
vehicle checked immediately.
- Malfunction Indicator Light (MIL)
• Certain conditions, such as a poor fuel quality, etc., may illuminate the MIL after engine start. The vehicle should be serviced if the light stays on through several typical driving
cycles. In most situations, the vehicle will drive normally and not require towing.
• If the MIL flashes when the engine is running, serious conditions may exist that could lead to immediate loss of power or severe catalytic converter damage. We recommend
you do not operate the vehicle. Have the vehicle serviced immediately.
- Electronic Stability Control (ESC) OFF Indicator Light
• This light indicates the Electronic Stability Control (ESC) is off.
- Charging System Light
•
This light shows the status of the electrical charging system. If the charging system light
remains on, it means that the vehicle is experiencing a problem with the charging system.
• We recommend you do not continue driving if the charging system light is on. Have the vehicle serviced immediately.
- Oil Pressure Warning Light
• This light indicates low engine oil pressure. If the light turns on while driving, stop the vehicle and shut off the engine as soon as possible. A chime will sound when this light
turns on.
• We recommend you do not operate the vehicle or engine damage will occur. Have the vehicle serviced immediately.
- Anti-Lock Brake (ABS) Light
• This light monitors the Anti-Lock Brake System (ABS).
• If the light is not on during starting, stays on, or turns on while driving, we recommend you drive to the nearest service center and have the vehicle serviced immediately.
WHAT TO DO IN EMERGENCIES
78
 1
1 2
2 3
3 4
4 5
5 6
6 7
7 8
8 9
9 10
10 11
11 12
12 13
13 14
14 15
15 16
16 17
17 18
18 19
19 20
20 21
21 22
22 23
23 24
24 25
25 26
26 27
27 28
28 29
29 30
30 31
31 32
32 33
33 34
34 35
35 36
36 37
37 38
38 39
39 40
40 41
41 42
42 43
43 44
44 45
45 46
46 47
47 48
48 49
49 50
50 51
51 52
52 53
53 54
54 55
55 56
56 57
57 58
58 59
59 60
60 61
61 62
62 63
63 64
64 65
65 66
66 67
67 68
68 69
69 70
70 71
71 72
72 73
73 74
74 75
75 76
76 77
77 78
78 79
79 80
80 81
81 82
82 83
83 84
84 85
85 86
86 87
87 88
88 89
89 90
90 91
91 92
92 93
93 94
94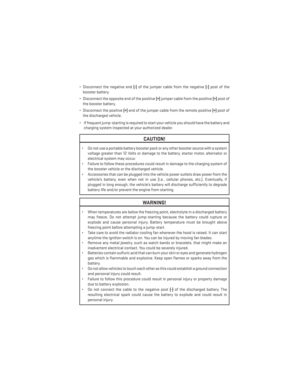 95
95 96
96 97
97 98
98 99
99 100
100 101
101 102
102 103
103 104
104 105
105 106
106 107
107 108
108 109
109 110
110 111
111 112
112 113
113 114
114 115
115 116
116 117
117 118
118 119
119 120
120 121
121 122
122 123
123 124
124 125
125 126
126 127
127 128
128 129
129 130
130 131
131