Page 81 of 234

EASE OF USE and COMFORT
3
79
Practical information
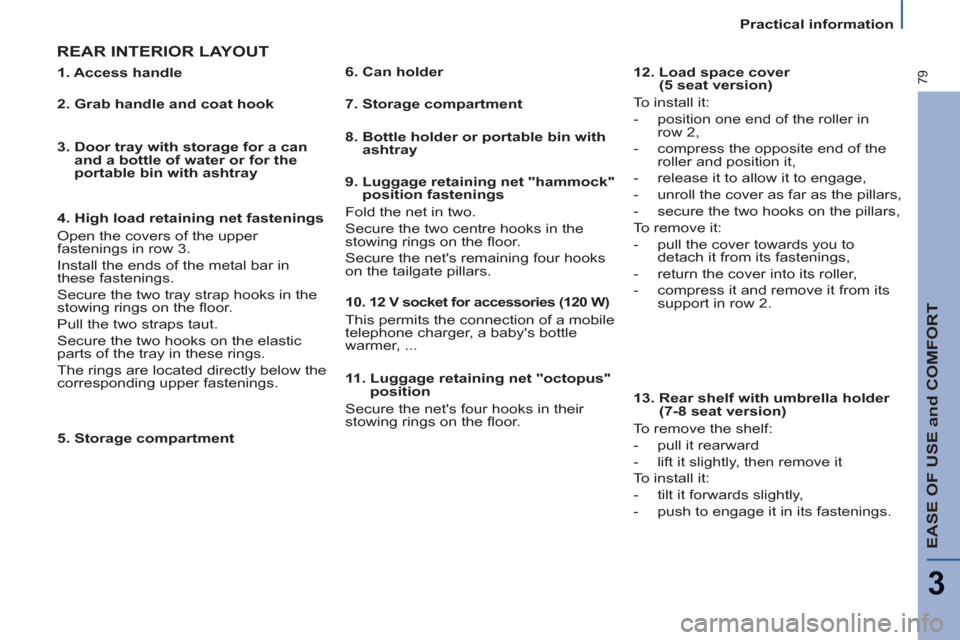
REAR INTERIOR LAYOUT
5. Storage compartment
11. Luggage retaining net "octopus"
position
Secure the net's four hooks in their
stowing rings on the fl oor.
1. Access handle
2. Grab handle and coat hook
3. Door tray with storage for a can
and a bottle of water or for the
portable bin with ashtray
4. High load retaining net fastenings
Open the covers of the upper
fastenings in row 3.
Install the ends of the metal bar in
these fastenings.
Secure the two tray strap hooks in the
stowing rings on the fl oor.
Pull the two straps taut.
Secure the two hooks on the elastic
parts of the tray in these rings.
The rings are located directly below the
corresponding upper fastenings.
6. Can holder
7. Storage compartment
8. Bottle holder or portable bin with
ashtray
9. Luggage retaining net "hammock"
position fastenings
Fold the net in two.
Secure the two centre hooks in the
stowing rings on the fl oor.
Secure the net's remaining four hooks
on the tailgate pillars.
10. 1
2 V socket for accessories (120 W)
This permits the connection of a mobile
telephone charger, a baby's bottle
warmer, ...
12. Load space cover
(5 seat version)
To install it:
- position one end of the roller in
row 2,
- compress the opposite end of the
roller and position it,
- release it to allow it to engage,
- unroll the cover as far as the pillars,
- secure the two hooks on the pillars,
To remove it:
- pull the cover towards you to
detach it from its fastenings,
- return the cover into its roller,
- compress it and remove it from its
support in row 2.
13. Rear shelf with umbrella holder
(7-8 seat version)
To remove the shelf:
- pull it rearward
- lift it slightly, then remove it
To install it:
- tilt it forwards slightly,
- push to engage it in its fastenings.
Page 82 of 234
80
Practical information
Front courtesy light
Automatic switching on/off
The front courtesy light comes on
when the key is removed from the
ignition, when the vehicle is unlocked,
when one of the front doors is opened
or for location of the vehicle using the
remote control.
It switches off gradually after the
ignition is switched on and when the
vehicle is locked. Permanently on, ignition on.
Front: comes on when one
of the front or rear doors is
opened.
Permanently off.
Individual reading light
Rear courtesy light rows 2 and 3
These are switched on and off by
means of a manual switch.
COURTESY LIGHTS
Rows 2 and 3: comes on
when one of the rear doors is
opened. Rear courtesy light
Page 83 of 234
EASE OF USE and COMFORT
3
81
Practical information
AREAS FOR TOLL CARDS/
CAR PARK TICKETS
The athermic windscreen has two non-
refl ective zones located either side of
the base of the interior mirror.
They are intended for affi xing toll cards
and/or car park tickets.
SUN VISOR WITH ILLUMINATED
COURTESY MIRROR
With the ignition on, the mirror is
illuminated automatically when the
concealing fl ap is raised.
SIDE BLINDS
Side blinds are available in
rows 2 and/or 3.
Pull the side blind by the tab(s).
Position the blind’s attachment(s) on
the corresponding hook(s).
Ensure that the tabs are hooked
correctly to prevent any damage to
the blind when the corresponding
sliding side door is opened.
Page 84 of 234

82
Mirrors and windows
Manual rear view mirror
The rear view mirror has two positions:
- day (normal),
- night (anti-dazzle).
To change from one to the other, push
or pull the lever on the lower edge of
the mirror.
Automatic day/night interior
mirror
This automatically and gradually
changes between the day and night
positions. To prevent dazzling,
the glass of the mirror darkens
automatically depending on the
intensity of the light from behind.
It clears as the light (headlamps of
following vehicles, sunlight) decreases,
ensuring maximum visibility.
Special feature
To ensure maximum visibility during
manoeuvres, the mirror clears
automatically when reverse gear is
engaged.
MIRRORS
MIRRORS AND WINDOWS
Electric exterior mirrors
-
Move switch A
to the right or to
the left to select the corresponding
mirror.
-
Move knob B
in all four directions
to adjust.
-
Return switch A
to the centre
position
.
When parked, the mirrors can be
folded back manually, or electrically by
pulling switch A
rearwards.
Electric unfolding of the mirrors is
possible with the key on unlocking the
vehicle.
Page 85 of 234

EASE OF USE and COMFORT
3
83
Mirrors and windows
ELECTRIC WINDOWS
4.
Rear left electric window switch.
5.
Rear electric windows disarming
switch (child safety).
- red strip visible: the rear switches
are activated.
- red strip covered: the rear switches
are disarmed. You have two options:
The electrical functions of the
electric windows are disarmed
one minute after switching off the
ignition.
Disarming the rear controls
For the safety of your children, press
switch 5
to disarm all of the electrical
controls in the rear:
- electric windows,
- sliding side doors,
- sunroofs.
1.
Driver's electric window switch.
2.
Passenger electric window
switch.
3.
Rear right electric window
switch.
Manual operation:
- press or pull switch 1
, without going
beyond the point of resistance. The
window stops when the switch is
released.
Automatic operation:
- press or pull switch 1
, beyond the
point of resistance: the window
opens or closes completely when
the switch is released. Pressing the
switch again stops the movement
of the window.
Page 86 of 234

84
Mirrors and windows
REAR WINDOWS
To partially open the rear windows, tilt
the lever and push it fully to lock the
windows in the open position.
Safety auto-reverse
When the window rises and meets an
obstacle, it stops and partially lowers
again.
In the event of contact during operation
of the windows, you must reverse the
movement of the window. To do this,
press the switch concerned.
Reinitialising the window
In the event of unwanted opening of
the window on closing (for example, in
the presence of ice), in the event of a
malfunction or following reconnection of the
battery, the window must be reinitialised:
- press the switch until the window is
fully open,
- then pull it again until the window is
fully closed,
- continue to hold the switch for
approximately one second after the
window has closed.
The safety auto-reverse function is
not active during these operations. Always remove the key from the
ignition when leaving the vehicle,
even for a short time.
The driver must ensure that:
- no one is preventing correct closing
of the windows,
- the passengers use the electric
windows correctly,
- children do not hinder the
movement of the windows.
Page 87 of 234
Page 88 of 234

86
Driving safely
HANDBRAKE
HAZARD WARNING LIGHTS
Press the button, the direction
indicators fl ash.
They can operate with the ignition off.
Automatic lighting of hazard
warning lights
Equipment conditioned according
to country: when braking in an
emergency, depending on the
deceleration, the hazard warning lights
come on automatically. They switch
off automatically the fi rst time you
accelerate.
It is also possible to switch them off by
pressing the button.
DRIVING SAFELY
Applying
When parking, pull the handbrake to
immobilize your vehicle. When parking
on a slope, direct your wheels towards
the pavement and pull the handbrake.
Releasing
Pull on the handle and press the button
to release the handbrake. Pull the button located at the end of the
handbrake forwards.
The handbrake lever lowers.
You can now pivot the seat.
To return to normal operation, pull the
lever upwards until a click is heard.
If the handbrake is still on or has
not been released properly, this is
indicated by:
Disengaging
If your vehicle is fi tted with a version
with a rotating front seat, apply the
handbrake. a warning light which comes
on on the instrument panel,
an audible signal,
a message on the display.