2013 CHEVROLET CORVETTE roof
[x] Cancel search: roofPage 1 of 414

Black plate (1,1)Chevrolet Corvette Owner Manual - 2013 - crc2 - 11/8/12
2013 Chevrolet Corvette Owner ManualM
In Brief. . . . . . . . . . . . . . . . . . . . . . . . 1-1
Instrument Panel . . . . . . . . . . . . . . 1-2
Initial Drive Information . . . . . . . . 1-4
Vehicle Features . . . . . . . . . . . . . 1-15
Performance and Maintenance . . . . . . . . . . . . . . . . 1-20
Keys, Doors, and Windows . . . . . . . . . . . . . . . . . . . . 2-1
Keys and Locks . . . . . . . . . . . . . . . 2-1
Doors . . . . . . . . . . . . . . . . . . . . . . . . 2-10
Vehicle Security . . . . . . . . . . . . . . 2-12
Exterior Mirrors . . . . . . . . . . . . . . . 2-15
Interior Mirrors . . . . . . . . . . . . . . . . 2-16
Windows . . . . . . . . . . . . . . . . . . . . . 2-16
Roof . . . . . . . . . . . . . . . . . . . . . . . . . . 2-18
Seats and Restraints . . . . . . . . . 3-1
Head Restraints . . . . . . . . . . . . . . . 3-2
Front Seats . . . . . . . . . . . . . . . . . . . . 3-2
Safety Belts . . . . . . . . . . . . . . . . . . . . 3-8
Airbag System . . . . . . . . . . . . . . . . 3-14
Child Restraints . . . . . . . . . . . . . . 3-26 Storage
. . . . . . . . . . . . . . . . . . . . . . . 4-1
Storage Compartments . . . . . . . . 4-1
Additional Storage Features . . . 4-2
Instruments and Controls . . . . 5-1
Controls . . . . . . . . . . . . . . . . . . . . . . . 5-2
Warning Lights, Gauges, and
Indicators . . . . . . . . . . . . . . . . . . . . 5-8
Information Displays . . . . . . . . . . 5-25
Vehicle Messages . . . . . . . . . . . . 5-34
Vehicle Personalization . . . . . . . 5-51
Universal Remote System . . . . 5-60
Lighting . . . . . . . . . . . . . . . . . . . . . . . 6-1
Exterior Lighting . . . . . . . . . . . . . . . 6-1
Interior Lighting . . . . . . . . . . . . . . . . 6-6
Lighting Features . . . . . . . . . . . . . . 6-6
Infotainment System . . . . . . . . . 7-1
Introduction . . . . . . . . . . . . . . . . . . . . 7-1
Radio . . . . . . . . . . . . . . . . . . . . . . . . . . 7-6
Audio Players . . . . . . . . . . . . . . . . 7-12
Phone . . . . . . . . . . . . . . . . . . . . . . . . 7-17
Trademarks and License Agreements . . . . . . . . . . . . . . . . . 7-25 Climate Controls
. . . . . . . . . . . . . 8-1
Climate Control Systems . . . . . . 8-1
Air Vents . . . . . . . . . . . . . . . . . . . . . . . 8-6
Maintenance . . . . . . . . . . . . . . . . . . . 8-6
Driving and Operating . . . . . . . . 9-1
Driving Information . . . . . . . . . . . . . 9-2
Starting and Operating . . . . . . . 9-17
Engine Exhaust . . . . . . . . . . . . . . 9-24
Automatic Transmission . . . . . . 9-25
Manual Transmission . . . . . . . . . 9-29
Brakes . . . . . . . . . . . . . . . . . . . . . . . 9-32
Ride Control Systems . . . . . . . . 9-34
Cruise Control . . . . . . . . . . . . . . . . 9-42
Fuel . . . . . . . . . . . . . . . . . . . . . . . . . . 9-45
Towing . . . . . . . . . . . . . . . . . . . . . . . 9-50
Conversions and Add-Ons . . . 9-50
Vehicle Care . . . . . . . . . . . . . . . . . 10-1
General Information . . . . . . . . . . 10-2
Vehicle Checks . . . . . . . . . . . . . . . 10-6
Headlamp Aiming . . . . . . . . . . . 10-41
Bulb Replacement . . . . . . . . . . 10-41
Electrical System . . . . . . . . . . . . 10-44
Wheels and Tires . . . . . . . . . . . 10-52
Jump Starting . . . . . . . . . . . . . . . 10-75
Page 7 of 414

Black plate (1,1)Chevrolet Corvette Owner Manual - 2013 - crc2 - 11/8/12
In Brief 1-1
In Brief
Instrument Panel
Instrument Panel . . . . . . . . . . . . . . 1-2
Initial Drive Information
Initial Drive Information . . . . . . . . 1-4
Remote Keyless Entry (RKE)System . . . . . . . . . . . . . . . . . . . . . . 1-4
Door Locks . . . . . . . . . . . . . . . . . . . 1-4
Trunk Release . . . . . . . . . . . . . . . . 1-6
Windows . . . . . . . . . . . . . . . . . . . . . . 1-7
Seat Adjustment . . . . . . . . . . . . . . 1-7
Memory Features . . . . . . . . . . . . . 1-9
Safety Belts . . . . . . . . . . . . . . . . . . . 1-9
Passenger Sensing System . . . 1-9
Mirror Adjustment . . . . . . . . . . . . 1-10
Steering Wheel Adjustment . . . . . . . . . . . . . . . . . 1-11
Interior Lighting . . . . . . . . . . . . . . 1-11
Exterior Lighting . . . . . . . . . . . . . 1-12
Windshield Wiper/Washer . . . . 1-12
Climate Controls . . . . . . . . . . . . . 1-13
Transmission . . . . . . . . . . . . . . . . 1-14
Vehicle Features
Radio(s) . . . . . . . . . . . . . . . . . . . . . 1-15
Satellite Radio . . . . . . . . . . . . . . . 1-16 Portable Audio Devices . . . . . . 1-16
Bluetooth
®. . . . . . . . . . . . . . . . . . . 1-16
Steering Wheel Controls . . . . . 1-16
Cruise Control . . . . . . . . . . . . . . . 1-17
Navigation System . . . . . . . . . . . 1-17
Driver Information Center (DIC) . . . . . . . . . . . . . . . 1-18
Power Outlets . . . . . . . . . . . . . . . 1-19
Universal Remote System . . . 1-19
Roof Panel . . . . . . . . . . . . . . . . . . 1-19
Convertible . . . . . . . . . . . . . . . . . . 1-20
Performance and Maintenance
Traction Control System (TCS) . . . . . . . . . . . . . . 1-20
Tire Pressure Monitor . . . . . . . . 1-21
Performance Information (Z06, ZR1, manual transmission
Grand Sport Coupe, and 427
Convertible) . . . . . . . . . . . . . . . . 1-21
Engine Oil Life System . . . . . . 1-22
Driving for Better Fuel Economy . . . . . . . . . . . . . . . . . . . 1-22
Battery . . . . . . . . . . . . . . . . . . . . . . . 1-23
Roadside Assistance Program . . . . . . . . . . . . . . . . . . . . 1-23
OnStar
®. . . . . . . . . . . . . . . . . . . . . 1-23
Website Information . . . . . . . . . 1-23
Page 25 of 414
Black plate (19,1)Chevrolet Corvette Owner Manual - 2013 - crc2 - 11/8/12
In Brief 1-19
Power Outlets
The accessory power outlet can be
used to plug in electrical equipment,
such as a cell phone or MP3 player.
The accessory power outlet is
located inside the center console
storage compartment, on the
forward left side.
Remove the cover to access and
replace when not in use.
SeePower Outlets on page 5‑6.
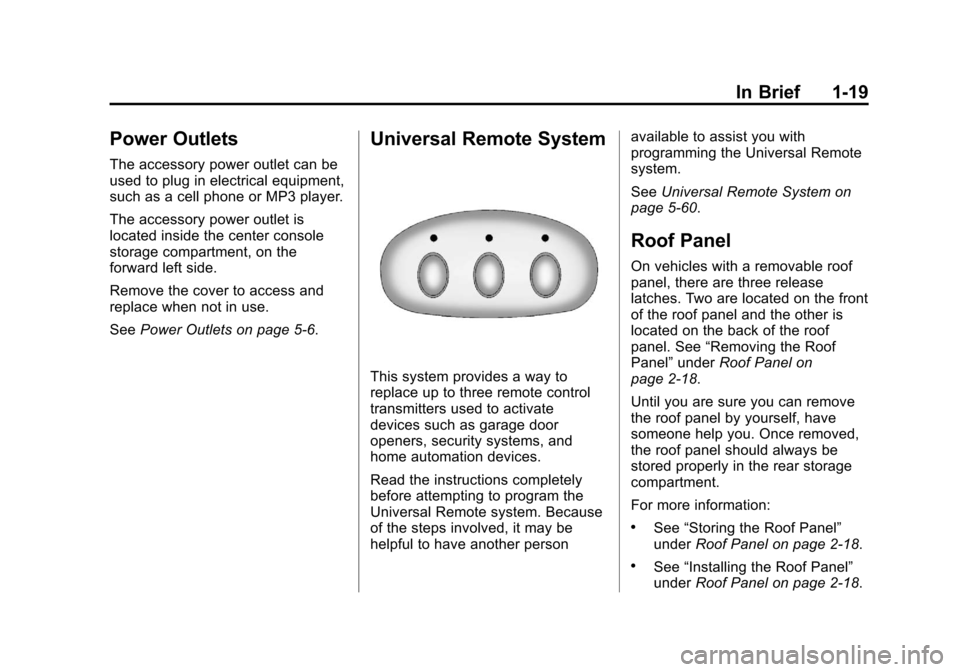
Universal Remote System
This system provides a way to
replace up to three remote control
transmitters used to activate
devices such as garage door
openers, security systems, and
home automation devices.
Read the instructions completely
before attempting to program the
Universal Remote system. Because
of the steps involved, it may be
helpful to have another person available to assist you with
programming the Universal Remote
system.
See
Universal Remote System on
page 5‑60.
Roof Panel
On vehicles with a removable roof
panel, there are three release
latches. Two are located on the front
of the roof panel and the other is
located on the back of the roof
panel. See “Removing the Roof
Panel” underRoof Panel on
page 2‑18.
Until you are sure you can remove
the roof panel by yourself, have
someone help you. Once removed,
the roof panel should always be
stored properly in the rear storage
compartment.
For more information:
.See “Storing the Roof Panel”
under Roof Panel on page 2‑18.
.See“Installing the Roof Panel”
under Roof Panel on page 2‑18.
Page 31 of 414

Black plate (1,1)Chevrolet Corvette Owner Manual - 2013 - crc2 - 11/8/12
Keys, Doors, and Windows 2-1
Keys, Doors, and
Windows
Keys and Locks
Keys . . . . . . . . . . . . . . . . . . . . . . . . . . 2-1
Remote Keyless Entry (RKE)System . . . . . . . . . . . . . . . . . . . . . . 2-2
Remote Keyless Entry (RKE) System Operation . . . . . . . . . . . 2-3
Door Locks . . . . . . . . . . . . . . . . . . . 2-7
Power Door Locks . . . . . . . . . . . . 2-8
Automatic Door Locks . . . . . . . . . 2-9
Lockout Protection . . . . . . . . . . . . 2-9
Doors
Hatch . . . . . . . . . . . . . . . . . . . . . . . . 2-10
Vehicle Security
Vehicle Security . . . . . . . . . . . . . . 2-12
Vehicle Alarm System . . . . . . . 2-12
Immobilizer . . . . . . . . . . . . . . . . . . 2-13
Immobilizer Operation . . . . . . . 2-14
Exterior Mirrors
Convex Mirrors . . . . . . . . . . . . . . 2-15
Power Mirrors . . . . . . . . . . . . . . . . 2-15
Folding Mirrors . . . . . . . . . . . . . . . 2-15
Heated Mirrors . . . . . . . . . . . . . . . 2-15
Automatic Dimming Mirror . . . 2-15
Interior Mirrors
Automatic Dimming Rearview Mirror . . . . . . . . . . . . . . . . . . . . . . . 2-16
Windows
Windows . . . . . . . . . . . . . . . . . . . . . 2-16
Power Windows . . . . . . . . . . . . . 2-17
Sun Visors . . . . . . . . . . . . . . . . . . . 2-17
Roof
Roof Panel . . . . . . . . . . . . . . . . . . 2-18
Convertible Top . . . . . . . . . . . . . . 2-22
Keys and Locks
Keys
{WARNING
Leaving children in a vehicle with
a Remote Keyless Entry (RKE)
transmitter is dangerous and
children or others could be
seriously injured or killed. They
could operate the power windows
or other controls or make the
vehicle move. The windows will
function with the RKE transmitter
in the vehicle, and children or
others could be caught in the path
of a closing window. Do not leave
children in a vehicle with an RKE
transmitter.
Page 48 of 414
Black plate (18,1)Chevrolet Corvette Owner Manual - 2013 - crc2 - 11/8/12
2-18 Keys, Doors, and Windows
Roof
Roof Panel
On vehicles with a removable roof
panel, follow the procedures when
removing or installing it.
Removing the Roof Panel
{WARNING
Do not try to remove a roof panel
while the vehicle is moving.
Trying to remove the roof panel
while the vehicle is moving could
cause an accident. The panel
could fall into the vehicle and
cause you to lose control, or it
could fly off and strike another
vehicle. You or others could be
injured. Remove the roof panel
only when the vehicle is parked.Until you are sure you can remove
the panel alone, have someone
help you.
Notice:
If you drop or rest a roof
panel on its edges, the roof panel,
paint, and/or weatherstripping
may be damaged. Always place
the roof panel in the stowage
receivers after removing it from
the vehicle.
1. Park on a level surface and set the parking brake. Shift an
automatic transmission into
P (Park). Shift a manual
transmission into Neutral.
2. Make sure the ignition is off.
3. Lower both sun visors.
4. Open the rear hatch and remove any items that may interfere with
proper storage of the roof panel. 5. Lower the windows.
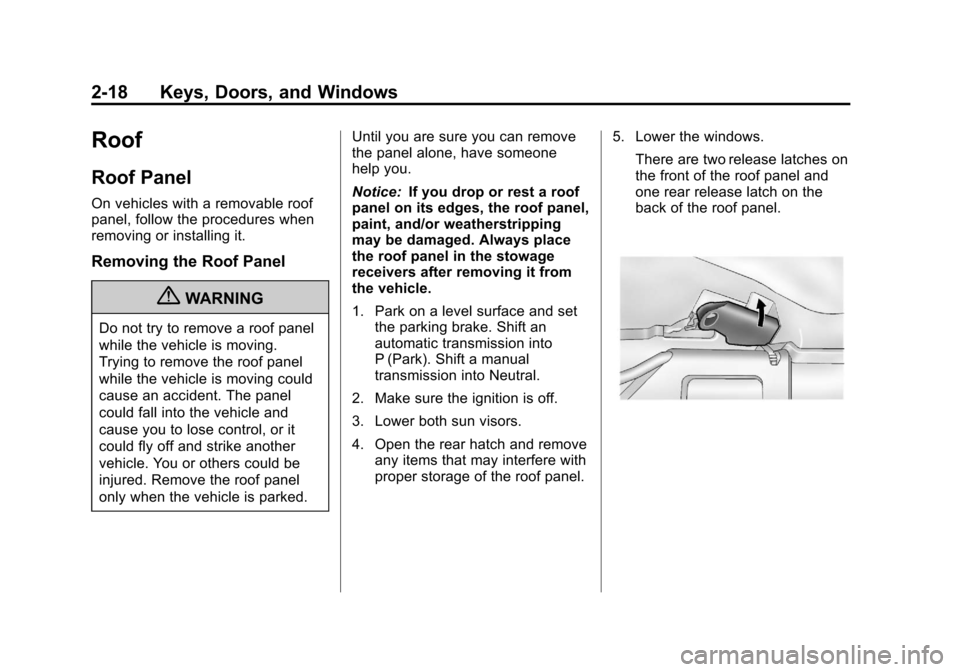
There are two release latches on
the front of the roof panel and
one rear release latch on the
back of the roof panel.
Page 49 of 414
Black plate (19,1)Chevrolet Corvette Owner Manual - 2013 - crc2 - 11/8/12
Keys, Doors, and Windows 2-19
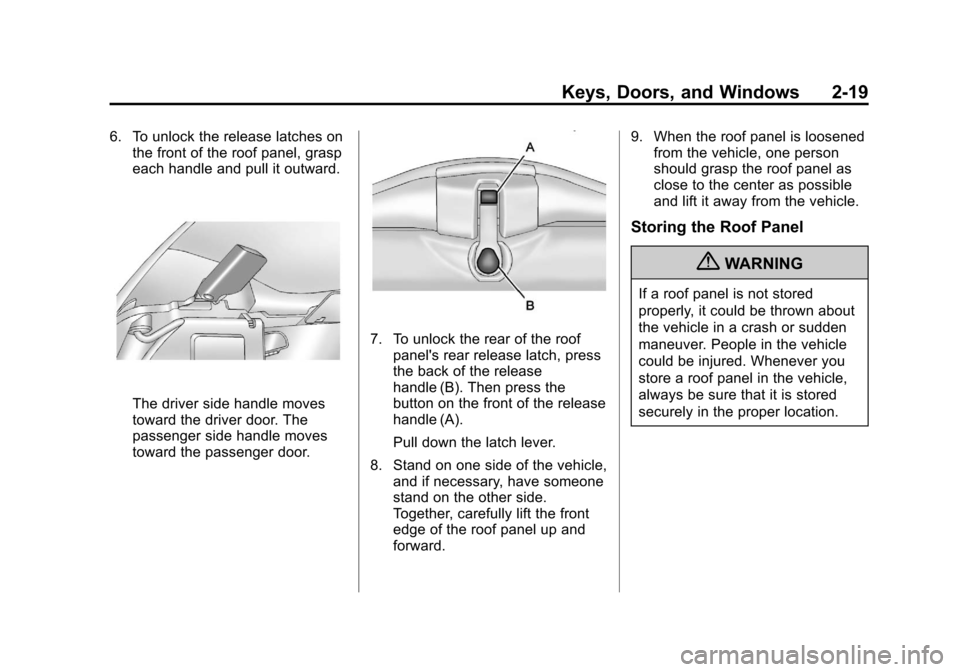
6. To unlock the release latches onthe front of the roof panel, grasp
each handle and pull it outward.
The driver side handle moves
toward the driver door. The
passenger side handle moves
toward the passenger door.
7. To unlock the rear of the roof
panel's rear release latch, press
the back of the release
handle (B). Then press the
button on the front of the release
handle (A).
Pull down the latch lever.
8. Stand on one side of the vehicle, and if necessary, have someone
stand on the other side.
Together, carefully lift the front
edge of the roof panel up and
forward. 9. When the roof panel is loosened
from the vehicle, one person
should grasp the roof panel as
close to the center as possible
and lift it away from the vehicle.
Storing the Roof Panel
{WARNING
If a roof panel is not stored
properly, it could be thrown about
the vehicle in a crash or sudden
maneuver. People in the vehicle
could be injured. Whenever you
store a roof panel in the vehicle,
always be sure that it is stored
securely in the proper location.
Page 50 of 414
Black plate (20,1)Chevrolet Corvette Owner Manual - 2013 - crc2 - 11/8/12
2-20 Keys, Doors, and Windows
Notice:If you drop or rest a roof
panel on its edges, the roof panel,
paint, and/or weatherstripping
may be damaged. Always place
the roof panel in the stowage
receivers after removing it from
the vehicle.
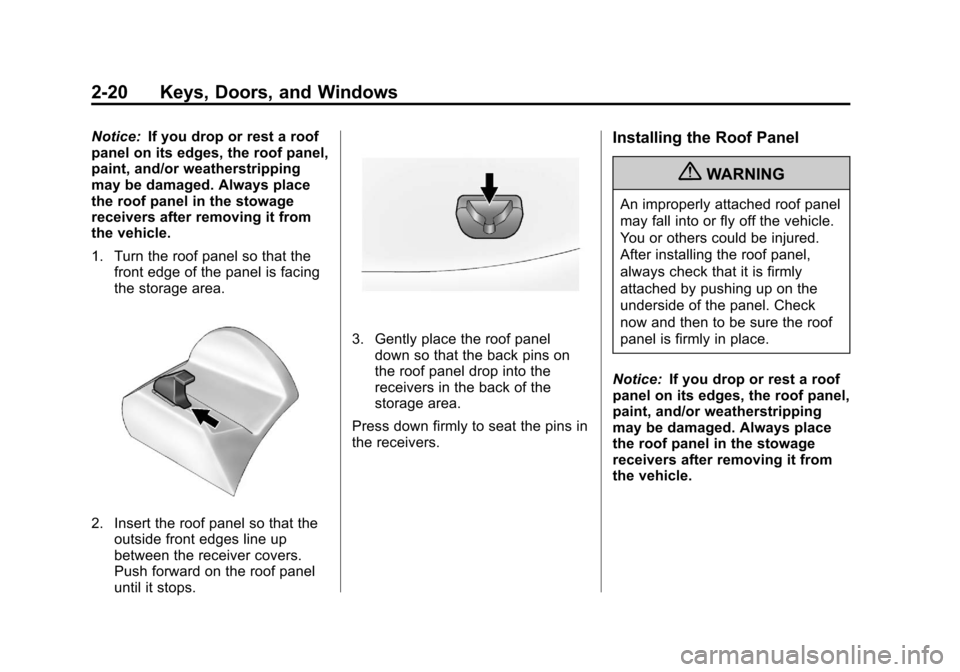
1. Turn the roof panel so that the front edge of the panel is facing
the storage area.
2. Insert the roof panel so that theoutside front edges line up
between the receiver covers.
Push forward on the roof panel
until it stops.
3. Gently place the roof panel
down so that the back pins on
the roof panel drop into the
receivers in the back of the
storage area.
Press down firmly to seat the pins in
the receivers.
Installing the Roof Panel
{WARNING
An improperly attached roof panel
may fall into or fly off the vehicle.
You or others could be injured.
After installing the roof panel,
always check that it is firmly
attached by pushing up on the
underside of the panel. Check
now and then to be sure the roof
panel is firmly in place.
Notice: If you drop or rest a roof
panel on its edges, the roof panel,
paint, and/or weatherstripping
may be damaged. Always place
the roof panel in the stowage
receivers after removing it from
the vehicle.
Page 51 of 414
Black plate (21,1)Chevrolet Corvette Owner Manual - 2013 - crc2 - 11/8/12
Keys, Doors, and Windows 2-21
In most cases, it makes it easier if
two people install the roof panel.
1. Park on a level surface and setthe parking brake. Shift an
automatic transmission into
P (Park). Shift a manual
transmission into Neutral.
2. Check that the front release latches and the rear release
latch on the vehicle's roof
opening are in their opened
positions before attempting to
install the roof panel.
3. To remove the roof panel from the rear storage area of the
vehicle, pull up on the rear edge
and remove it from the
storage area.
4. Carefully place the roof panel over the top of the vehicle.
5. Position the rear edge of the roof panel to the weatherstrip on the
back of the roof opening. Then
align and fit the pins at the rear
of the roof panel inside the
openings in the rear overhead weatherstrip. Gently lower the
front edge of the roof panel to
the front of the roof opening.
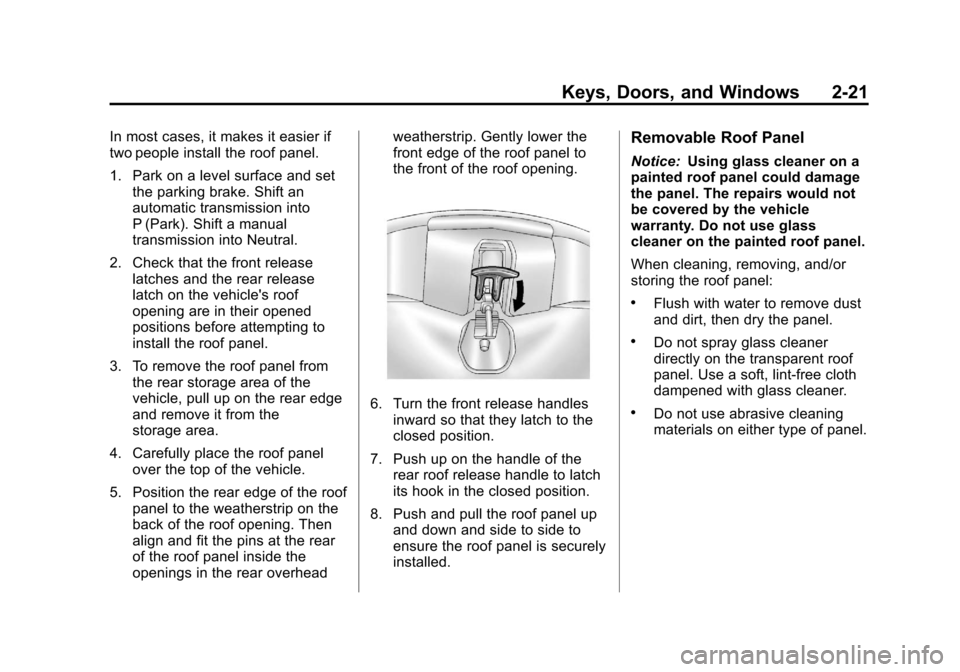
6. Turn the front release handles
inward so that they latch to the
closed position.
7. Push up on the handle of the rear roof release handle to latch
its hook in the closed position.
8. Push and pull the roof panel up and down and side to side to
ensure the roof panel is securely
installed.
Removable Roof Panel
Notice: Using glass cleaner on a
painted roof panel could damage
the panel. The repairs would not
be covered by the vehicle
warranty. Do not use glass
cleaner on the painted roof panel.
When cleaning, removing, and/or
storing the roof panel:
.Flush with water to remove dust
and dirt, then dry the panel.
.Do not spray glass cleaner
directly on the transparent roof
panel. Use a soft, lint-free cloth
dampened with glass cleaner.
.Do not use abrasive cleaning
materials on either type of panel.