2013 CHEVROLET CORVETTE battery
[x] Cancel search: batteryPage 101 of 414
Black plate (1,1)Chevrolet Corvette Owner Manual - 2013 - crc2 - 11/8/12
Storage 4-1
Storage
Storage Compartments
Glove Box . . . . . . . . . . . . . . . . . . . . 4-1
Cupholders . . . . . . . . . . . . . . . . . . . 4-1
Rear Storage . . . . . . . . . . . . . . . . . 4-1
Center Console Storage . . . . . . 4-2
Additional Storage Features
Cargo Cover . . . . . . . . . . . . . . . . . . 4-2
Convenience Net . . . . . . . . . . . . . 4-3
Storage
Compartments
Glove Box
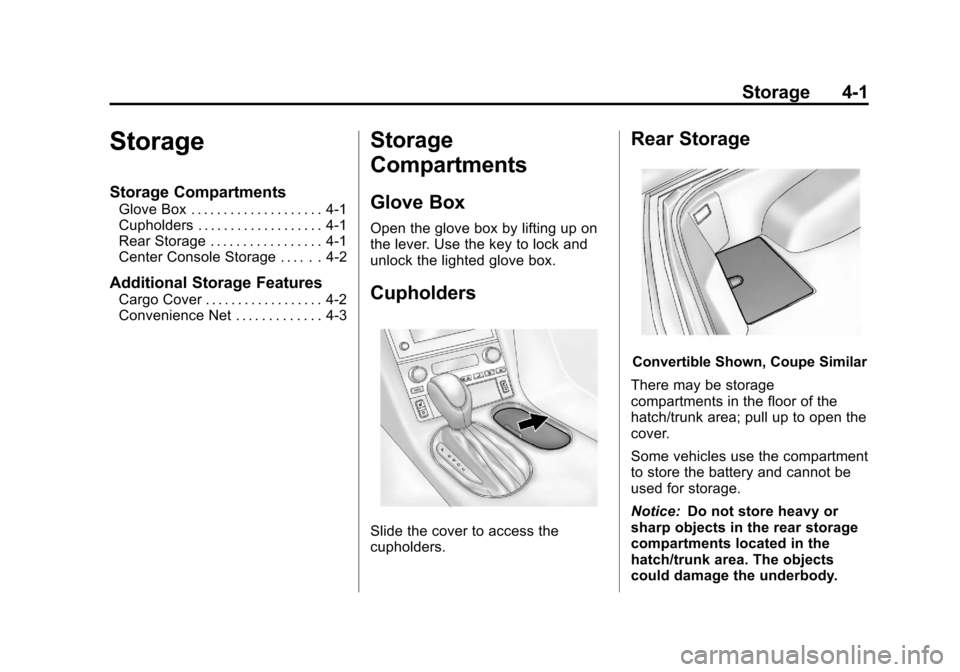
Open the glove box by lifting up on
the lever. Use the key to lock and
unlock the lighted glove box.
Cupholders
Slide the cover to access the
cupholders.
Rear Storage
Convertible Shown, Coupe Similar
There may be storage
compartments in the floor of the
hatch/trunk area; pull up to open the
cover.
Some vehicles use the compartment
to store the battery and cannot be
used for storage.
Notice: Do not store heavy or
sharp objects in the rear storage
compartments located in the
hatch/trunk area. The objects
could damage the underbody.
Page 105 of 414
Black plate (1,1)Chevrolet Corvette Owner Manual - 2013 - crc2 - 11/8/12
Instruments and Controls 5-1
Instruments and
Controls
Controls
Steering Wheel Adjustment . . . 5-2
Steering Wheel Controls . . . . . . 5-3
Horn . . . . . . . . . . . . . . . . . . . . . . . . . . 5-4
Windshield Wiper/Washer . . . . . 5-4
Compass . . . . . . . . . . . . . . . . . . . . . 5-5
Clock . . . . . . . . . . . . . . . . . . . . . . . . . 5-6
Power Outlets . . . . . . . . . . . . . . . . . 5-6
Cigarette Lighter . . . . . . . . . . . . . . 5-7
Ashtrays . . . . . . . . . . . . . . . . . . . . . . 5-7
Warning Lights, Gauges, and
Indicators
Warning Lights, Gauges, andIndicators . . . . . . . . . . . . . . . . . . . . 5-8
Instrument Cluster . . . . . . . . . . . . 5-9
Speedometer . . . . . . . . . . . . . . . . 5-12
Odometer . . . . . . . . . . . . . . . . . . . . 5-12
Tachometer . . . . . . . . . . . . . . . . . . 5-12
Fuel Gauge . . . . . . . . . . . . . . . . . . 5-12
Boost Gauge (ZR1) . . . . . . . . . . 5-13
Engine Oil Pressure Gauge . . . . . . . . . . . . . . . . . . . . . . 5-14 Engine Coolant Temperature
Gauge . . . . . . . . . . . . . . . . . . . . . . 5-15
Voltmeter Gauge . . . . . . . . . . . . . 5-16
Safety Belt Reminders . . . . . . . 5-16
Airbag Readiness Light . . . . . . 5-16
Passenger Airbag Status Indicator . . . . . . . . . . . . . . . . . . . . 5-17
Malfunction Indicator Lamp . . . . . . . . . . . . . 5-18
Brake System Warning Light . . . . . . . . . . . . . . . . . . . . . . . 5-20
Antilock Brake System (ABS) Warning Light . . . . . . . . . . . . . . 5-21
One-to-Four Shift Light (Manual Transmission) . . . . . 5-21
Traction Off Light . . . . . . . . . . . . 5-22
StabiliTrak
®OFF Light . . . . . . . 5-22
Active Handling System Light . . . . . . . . . . . . . . . . . . . . . . . 5-23
Tire Pressure Light . . . . . . . . . . 5-23
Security Light . . . . . . . . . . . . . . . . 5-24
High-Beam On Light . . . . . . . . . 5-24
Front Fog Lamp Light . . . . . . . . 5-24
Lamps On Reminder . . . . . . . . . 5-25
Information Displays
Driver Information Center (DIC) . . . . . . . . . . . . . . . 5-25
Head-Up Display (HUD) . . . . . 5-30
Vehicle Messages
Vehicle Messages . . . . . . . . . . . 5-34
Battery Voltage and Charging Messages . . . . . . . . . . . . . . . . . . 5-34
Brake System Messages . . . . 5-35
Convertible Top Messages . . . 5-36
Cruise Control Messages . . . . 5-37
Door Ajar Messages . . . . . . . . . 5-37
Engine Cooling System Messages . . . . . . . . . . . . . . . . . . 5-38
Engine Oil Messages . . . . . . . . 5-39
Engine Power Messages . . . . 5-39
Fuel System Messages . . . . . . 5-40
Key and Lock Messages . . . . . 5-40
Lamp Messages . . . . . . . . . . . . . 5-42
Ride Control System Messages . . . . . . . . . . . . . . . . . . 5-42
Safety Belt Messages . . . . . . . 5-46
Service Vehicle Messages . . . 5-47
Starting the Vehicle Messages . . . . . . . . . . . . . . . . . . 5-47
Tire Messages . . . . . . . . . . . . . . . 5-48
Transmission Messages . . . . . 5-50
Vehicle Reminder Messages . . . . . . . . . . . . . . . . . . 5-51
Washer Fluid Messages . . . . . 5-51
Vehicle Personalization
Vehicle Personalization . . . . . . 5-51
Page 110 of 414

Black plate (6,1)Chevrolet Corvette Owner Manual - 2013 - crc2 - 11/8/12
5-6 Instruments and Controls
2. Press and holdPuntil a Z and
a zone number displays. The
compass is now in zone mode.
3. Once the zone number displays, press
Prepeatedly until you
reach the correct zone number.
Stop pressing
Pand the mirror
returns to normal operation.
Clock
To set the clock:
1. Press and hold H until the correct hour displays.
2. Press and hold M until the correct minute displays.
The clock mode automatically times
out with the changed display format
set as the current default setting.
To set the clock on a navigation
system, see the navigation manual.
Power Outlets
The accessory power outlet can be
used to plug in electrical equipment,
such as a cell phone or MP3 player.
The accessory power outlet is
located inside the center console
storage compartment, on the
forward left side.
Remove the cover to access and
replace when not in use.
{WARNING
Power is always supplied to the
outlets. Do not leave electrical
equipment plugged in when the
vehicle is not in use because the
vehicle could catch fire and cause
injury or death.
Notice: Leaving electrical
equipment plugged in for an
extended period of time while the
vehicle is off will drain the
battery. Always unplug electrical
equipment when not in use and
do not plug in equipment that
exceeds the maximum 20 ampere
rating.
Certain electrical accessories may
not be compatible with the
accessory power outlet and could
overload vehicle or adapter fuses.
If a problem is experienced, see
your dealer.
Page 120 of 414
Black plate (16,1)Chevrolet Corvette Owner Manual - 2013 - crc2 - 11/8/12
5-16 Instruments and Controls
Voltmeter Gauge
All Except ZR1
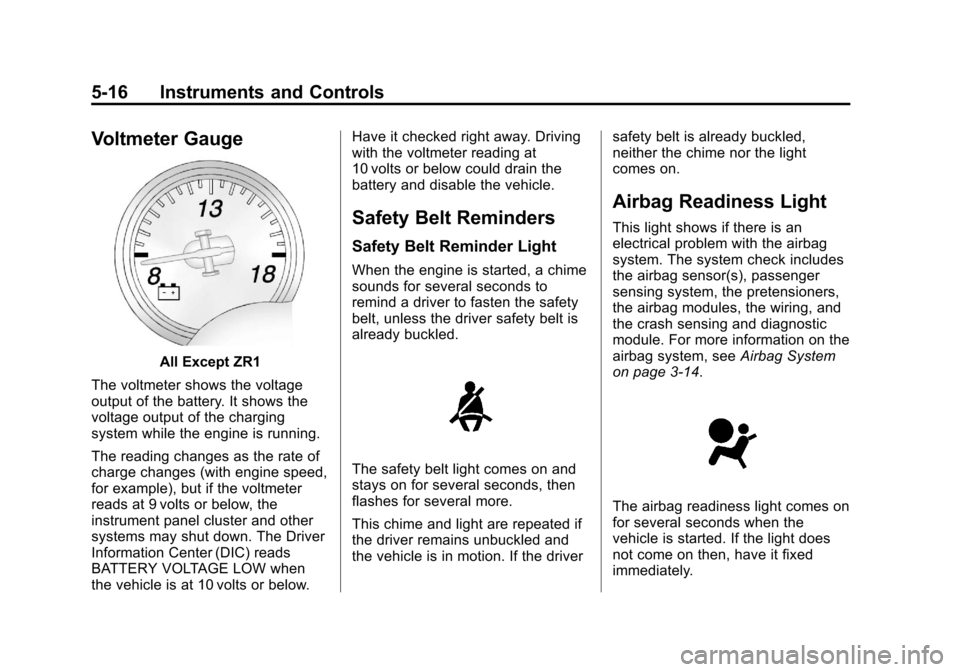
The voltmeter shows the voltage
output of the battery. It shows the
voltage output of the charging
system while the engine is running.
The reading changes as the rate of
charge changes (with engine speed,
for example), but if the voltmeter
reads at 9 volts or below, the
instrument panel cluster and other
systems may shut down. The Driver
Information Center (DIC) reads
BATTERY VOLTAGE LOW when
the vehicle is at 10 volts or below. Have it checked right away. Driving
with the voltmeter reading at
10 volts or below could drain the
battery and disable the vehicle.
Safety Belt Reminders
Safety Belt Reminder Light
When the engine is started, a chime
sounds for several seconds to
remind a driver to fasten the safety
belt, unless the driver safety belt is
already buckled.
The safety belt light comes on and
stays on for several seconds, then
flashes for several more.
This chime and light are repeated if
the driver remains unbuckled and
the vehicle is in motion. If the driver
safety belt is already buckled,
neither the chime nor the light
comes on.
Airbag Readiness Light
This light shows if there is an
electrical problem with the airbag
system. The system check includes
the airbag sensor(s), passenger
sensing system, the pretensioners,
the airbag modules, the wiring, and
the crash sensing and diagnostic
module. For more information on the
airbag system, see
Airbag System
on page 3‑14.
The airbag readiness light comes on
for several seconds when the
vehicle is started. If the light does
not come on then, have it fixed
immediately.
Page 124 of 414

Black plate (20,1)Chevrolet Corvette Owner Manual - 2013 - crc2 - 11/8/12
5-20 Instruments and Controls
The DLC is under the instrument
panel to the left of the steering
wheel. See your dealer if assistance
is needed.
The vehicle may not pass
inspection if:
.The malfunction indicator lamp is
on with the engine running, or if
the vehicle is placed in Service
Only Mode and the malfunction
indicator lamp does not come
on. See your dealer for
assistance in verifying proper
operation of the malfunction
indicator lamp.
.The OBD II (On-Board
Diagnostics) system determines
that critical emission control
systems have not been
completely diagnosed. The
vehicle would be considered notready for inspection. This can
happen if the 12-volt battery has
recently been replaced or run
down. The diagnostic system is
designed to evaluate critical
emission control systems during
normal driving. This can take
several days of routine driving.
If this has been done and the
vehicle still does not pass the
inspection for lack of OBD II
system readiness, your dealer
can prepare the vehicle for
inspection.
Brake System Warning
Light
The vehicle brake system consists
of two hydraulic circuits. If one
circuit is not working, the remaining
circuit can still work to stop the
vehicle. For normal braking
performance, both circuits need to
be working.
MetricEnglish
This light comes on briefly while
starting the engine. If it does not
come on, have it fixed so it is ready
to warn if there is a problem.
{WARNING
The brake system might not be
working properly if the brake
system warning light is on.
Driving with the brake system
warning light on can lead to a
crash. If the light is still on after
the vehicle has been pulled off
the road and carefully stopped,
have the vehicle towed for
service.
Page 130 of 414
Black plate (26,1)Chevrolet Corvette Owner Manual - 2013 - crc2 - 11/8/12
5-26 Instruments and Controls
2(Gauges):Press this button to
display gauge information like oil
pressure and temperature, coolant
temperature, automatic transmission
fluid temperature, if equipped,
battery voltage, and front/rear tire
pressures.
TRIP: Press this button to display
your total and trip distance driven,
the elapsed time function, your
average speed, and the engine
oil life.
OPTION: Press this button to
choose personal options that are
available on your vehicle,
depending on the options your
vehicle is equipped with, such as
door locks, easy entry seats, and
language.
RESET: Press this button, used
along with the other buttons, to
reset system functions, select
personal options, and turn off or
acknowledge messages on the DIC.Fuel Button
The fuel button displays average
fuel economy and instantaneous
fuel economy, calculated for your
specific driving conditions, and
range information.
Average Fuel Economy: The
average fuel economy is viewed as
a long-term approximation of your
overall driving conditions. You
should reset the average fuel
economy display every time you
refuel. If you press the RESET
button in this mode while you are
driving, the system will reset this
display and begin figuring fuel
economy from that point in time.
Press the fuel button to display
average fuel economy, such as:
.AVERAGE FUEL ECONOMY
11.7 L/100 km or
.AVERAGE FUEL ECONOMY
20.1 MPG Instantaneous Fuel Economy:
Instantaneous fuel economy reflects
only the fuel economy that the
vehicle has right now and will
change frequently as driving
conditions change. Unlike average
fuel economy, this menu item
cannot be reset.
Press the fuel button again to
display instantaneous fuel economy,
such as:
.INSTANT FUEL ECONOMY
11.7 L/100 km or
.INSTANT FUEL ECONOMY
20.1 MPG
Fuel Range: The range calculates
the remaining distance you can
drive without refueling. It is based
on fuel economy and the fuel
remaining in the tank.
Press the fuel button again to
display the range, such as:
.RANGE 48 km or
.RANGE 30 MI
Page 131 of 414
Black plate (27,1)Chevrolet Corvette Owner Manual - 2013 - crc2 - 11/8/12
Instruments and Controls 5-27
If the LOW FUEL warning is
displayed or if RANGE is less than
64 km (40 miles), the display will
read RANGE LOW.
The fuel economy data used to
determine fuel range is an average
of recent driving conditions. As your
driving conditions change, this data
is gradually updated automatically.
If the vehicle has been idling for a
long time, the range displayed on
the DIC could be abnormally low.
The vehicle must be driven
8 to 16 km (5 to 10 miles) to get an
accurate reading.
Gauges Button
The gauges button displays oil
pressure, oil temperature, coolant
temperature, transmission fluid
temperature for automatic
transmission vehicles only, battery
voltage, and tire pressure
information.Oil Pressure:
This display shows
the oil pressure.
Press the gauges button to display
the oil pressure, such as:
.OIL PRESSURE 276 kPa or
.OIL PRESSURE 40 PSI
Oil Temperature: This display
shows the oil temperature.
Press the gauges button again to
display the oil temperature, such as:
.OIL TEMPERATURE 112°C or
.OIL TEMPERATURE 234°F
If the oil temperature is low, the
display will show OIL
TEMPERATURE LOW. If the oil
temperature is high, the display will
show OIL TEMPERATURE HIGH.
Coolant Temperature: This display
shows the engine coolant
temperature. Press the gauges button again to
display the coolant temperature,
such as:
.COOLANT TEMPERATURE
51°C or
.COOLANT
TEMPERATURE 123°F
If the coolant temperature is low, the
display will show COOLANT
TEMPERATURE LOW. If the
coolant temperature is high, the
display will show COOLANT
TEMPERATURE HIGH.
Transmission Fluid
Temperature: If you have an
automatic transmission vehicle, this
display shows the automatic
transmission fluid temperature.
Press the gauges button again to
display the automatic transmission
fluid temperature, such as:
.TRANS FLUID TEMP 51°C or
.TRANS FLUID TEMP 123°F
Page 132 of 414
Black plate (28,1)Chevrolet Corvette Owner Manual - 2013 - crc2 - 11/8/12
5-28 Instruments and Controls
If the transmission fluid temperature
is low, the display will show TRANS
FLUID TEMP LOW. If the
transmission fluid temperature is
high, the display will show TRANS
FLUID TEMP HIGH.
Battery Voltage:This display
shows the current battery voltage.
Press the gauges button again to
display the battery voltage, such as:
.BATTERY VOLTAGE
13.5 VOLTS
Tire Pressure: This display shows
the tire pressure for each tire.
Press the gauges button again to
display the tire pressure for the front
tires, such as:
.FRONT TIRE PRESSURES
L 234 kPa R 228 kPa or
.FRONT TIRE PRESSURES
L 34 PSI R 33 PSI Press the gauges button again to
display the tire pressure for the rear
tires, such as:
.REAR TIRE PRESSURES
L 234 kPa R 228 kPa or
.REAR TIRE PRESSURES
L 34 PSI R 33 PSI
TRIP Button
The TRIP button displays the
odometer, trip distance, elapsed
time, average speed, and oil life
remaining information.
Odometer:
The odometer shows
how far your vehicle has been
driven in either kilometers or miles.
Press the TRIP button to display
odometer readings, such as:
.ODOMETER 20008 km or
.ODOMETER 12345 MI
You can also display the odometer
by turning on the parking lamps. Trip Odometers:
There are two trip
odometers. Press the TRIP button
to display TRIP ODOMETER A
readings and press the button again
to display TRIP ODOMETER B
readings, such as:
.TRIP ODOMETER A 209.9 km or
.TRIP ODOMETER A 130.5 MI
.TRIP ODOMETER B 483.5 km or
.TRIP ODOMETER B 300.5 MI
Both of the trip odometers can be
used simultaneously. The trip
odometers can be reset by pressing
the RESET button on the DIC.
The trip odometers are able to
display up to 3217.9 km (1999.9 mi).
This display will roll over to 0.0 if the
maximum displayed miles or
kilometers are reached.
There is also a miles since last
ignition feature that displays the
number of kilometers (miles) driven
since you last started the vehicle.
Press and hold the RESET button
for three seconds, then release it.