2013 CHEVROLET CAPTIVA SPORT length
[x] Cancel search: lengthPage 74 of 374

Black plate (32,1)Chevrolet Captiva Sport Owner Manual - 2013 - crc - 11/12/12
3-32 Seats and Restraints
Child Restraints Older Children
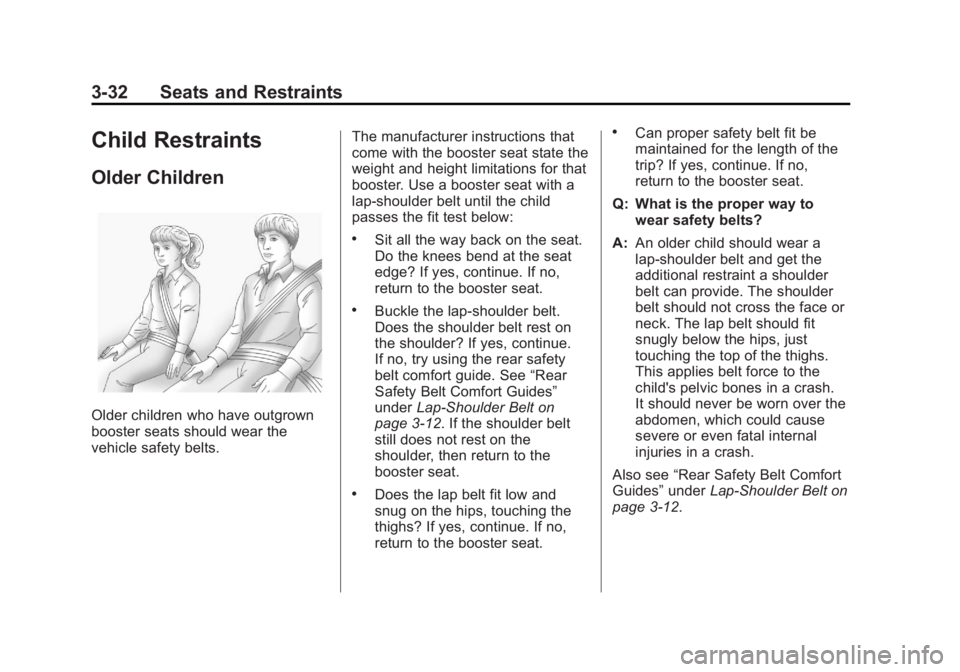
Older children who have outgrown
booster seats should wear the
vehicle safety belts. The manufacturer instructions that
come with the booster seat state the
weight and height limitations for that
booster. Use a booster seat with a
lap-shoulder belt until the child
passes the fit test below: .
Sit all the way back on the seat.
Do the knees bend at the seat
edge? If yes, continue. If no,
return to the booster seat. .
Buckle the lap-shoulder belt.
Does the shoulder belt rest on
the shoulder? If yes, continue.
If no, try using the rear safety
belt comfort guide. See “ Rear
Safety Belt Comfort Guides ”
under Lap-Shoulder Belt on
page 3 ‑ 12 . If the shoulder belt
still does not rest on the
shoulder, then return to the
booster seat. .
Does the lap belt fit low and
snug on the hips, touching the
thighs? If yes, continue. If no,
return to the booster seat. .
Can proper safety belt fit be
maintained for the length of the
trip? If yes, continue. If no,
return to the booster seat.
Q: What is the proper way to
wear safety belts?
A: An older child should wear a
lap-shoulder belt and get the
additional restraint a shoulder
belt can provide. The shoulder
belt should not cross the face or
neck. The lap belt should fit
snugly below the hips, just
touching the top of the thighs.
This applies belt force to the
child's pelvic bones in a crash.
It should never be worn over the
abdomen, which could cause
severe or even fatal internal
injuries in a crash.
Also see “ Rear Safety Belt Comfort
Guides ” under Lap-Shoulder Belt on
page 3 ‑ 12 .
Page 165 of 374

Black plate (17,1)Chevrolet Captiva Sport Owner Manual - 2013 - crc - 11/12/12
Infotainment System 7-17Compressed Audio
The radio also plays discs that
contain both uncompressed CD
audio (.CDA files) and MP3 files. By
default the radio reads only the
uncompressed audio and ignores
the MP3 files. Pressing the CAT
(category) button toggles between
compressed and uncompressed
audio format.
MP3 Supported File and Folder
Structure
To burn an MP3 disc on a personal
computer: .
Make sure the MP3 files are
recorded on a CD-R or
CD-RW disc. .
Do not mix standard audio and
MP3 files on one disc. .
The CD player is able to read
and play a maximum of
50 folders, 50 playlists, and
255 files. .
Create a folder structure that
makes it easy to find songs
while driving. Organize songs by
albums using one folder for each
album. Each folder or album
should contain 18 songs or less. .
Avoid subfolders. The system
can support up to
eight subfolders deep; however,
keep the total number of folders
to a minimum in order to reduce
the complexity and confusion in
trying to locate a particular folder
during playback. .
Make sure playlists have a .m3u
or .wpl extension; other file
extensions may not work. .
Minimize the length of the file,
folder, or playlist names. Long
file, folder, or playlist names,
or a combination of a large
number of files, folders,
or playlists can cause the player
to be unable to play up to the
maximum number of files,
folders, playlists, or sessions. To
play a large number of files,
folders, playlists or sessions, minimize the length of the file,
folder, or playlist name. Long
names also take up more space
on the display, potentially getting
cut off. .
Finalize the audio disc before
burning it. Trying to add music to
an existing disc can cause the
disc not to function in the player.
Playlists can be changed by using
S c and
c T , the tune knob,
or the SEEK arrows. An MP3 CD-R
or CD-RW that was recorded using
no file folders can also be played.
If a CD-R or CD-RW contains more
than the maximum of 50 folders, 50
playlists, and 255 files, the player
can access and navigate up to the
maximum, but all items over the
maximum are not accessible.
Root Directory
The root directory of the CD-R or
CD-RW is treated as a folder. If the
root directory has compressed audio
files, the directory displays as F1
ROOT. All files contained directly
under the root directory are
Page 183 of 374

Black plate (5,1)Chevrolet Captiva Sport Owner Manual - 2013 - crc - 11/12/12
Climate Controls 8-5not cover the sensor on the top of
the instrument panel near the
windshield, or the sensor grille
below the climate control faceplate.
These two sensors help regulate the
inside air temperature.
AUTO (Automatic Fan): Turn the
fan knob to AUTO for the system to
automatically adjust the fan speed
to reach the desired inside
temperature.
Temperature Control: Select the
desired cabin air temperature
between 16-32°C (60-90°F).
Choosing the coldest or warmest
temperature setting does not cause
the system to heat or cool any
faster.
AUTO (Automatic Air Delivery
Mode): Turn the air delivery mode
knob to AUTO for the system to
automatically control the direction of
the airflow to help reach the desired
inside temperature.
The system automatically controls
the air inlet to supply the outside air
or recirculated inside air needed to heat or cool the vehicle faster. The
@ button indicator light is lit
whenever the recirculation mode
is on.
Press the
8 button to change to
outside air. However, the
recirculation mode may turn back on
automatically.
In cold weather, if the fan and air
delivery modes are in automatic, the
system starts at lower fan speeds to
avoid directing cold air into the
vehicle until warmer air is available.
The climate control system directs
air to the floor, but may
automatically change modes as the
vehicle warms up to maintain the
chosen temperature setting. The
length of time needed to warm the
interior depends on the outside
temperature and inside temperature
of the vehicle.
Manual Operation
9 (Fan Control): Turn clockwise
or counterclockwise to increase or
decrease the fan speed. To turn the fan off, turn the left knob to the
9 position. In any setting other than
off, the fan runs continuously with
the ignition on. The fan must be
turned on to run the air conditioning
compressor. There will be some
airflow noticeable from the various
outlets when driving, even with the
fan in the off position. To turn off the
air completely, turn the fan to
9 and select the @ button.
Temperature Control: Turn
clockwise or counterclockwise to
increase or decrease the
temperature. Select the desired
cabin air temperature between
16-32°C (60-90°F). Typically, the
best setting is near 23°C (75°F).
Choosing the coldest or warmest
temperature setting does not cause
the system to heat or cool any
faster.
Air Delivery Mode Control: Turn
clockwise or counterclockwise to
change the current airflow mode.
Page 259 of 374

Black plate (25,1)Chevrolet Captiva Sport Owner Manual - 2013 - crc - 11/12/12
Vehicle Care 10-25pressure from the regular brake
pedal. Do this until the vehicle is
held by the parking brake only. .
To check the P (Park)
mechanism's holding ability:
With the engine running, shift to
P (Park). Then release the
parking brake followed by the
regular brake.
Contact your dealer if service is
required.
Wiper Blade Replacement Windshield wiper blades should be
inspected for wear and cracking.
See Maintenance Schedule on
page 11 ‑ 3 .
Replacement blades come in
different types and are removed in
different ways. For proper type and
length, see Maintenance
Replacement Parts on page 11 ‑ 14 .
Notice: Allowing the wiper arm to
touch the windshield when no
wiper blade is installed could
damage the windshield. Any damage that occurs would not be
covered by your warranty. Do not
allow the wiper arm to touch the
windshield.
Front Wiper Blade
Replacement To replace the windshield wiper
blade:
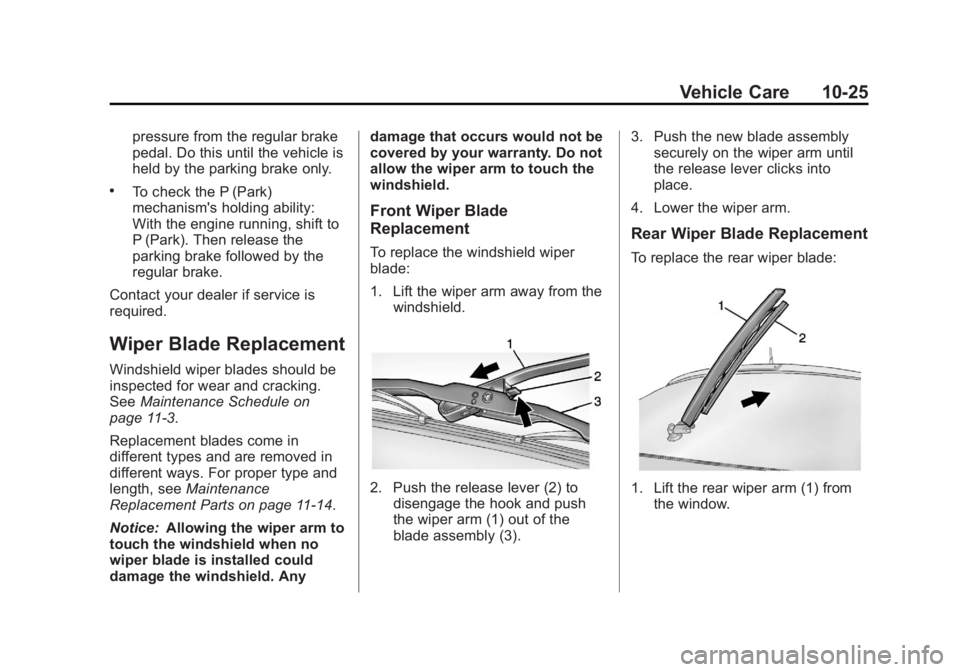
1. Lift the wiper arm away from the
windshield.
2. Push the release lever (2) to
disengage the hook and push
the wiper arm (1) out of the
blade assembly (3). 3. Push the new blade assembly
securely on the wiper arm until
the release lever clicks into
place.
4. Lower the wiper arm.
Rear Wiper Blade Replacement To replace the rear wiper blade:
1. Lift the rear wiper arm (1) from
the window.