2013 CHEVROLET CAPTIVA SPORT keyless
[x] Cancel search: keylessPage 5 of 374

Black plate (1,1)Chevrolet Captiva Sport Owner Manual - 2013 - crc - 11/12/12
In Brief 1-1
In Brief Instrument Panel Instrument Panel Overview . . . . 1-2
Initial Drive Information Initial Drive Information . . . . . . . . 1-4
Remote Keyless Entry (RKE)
System . . . . . . . . . . . . . . . . . . . . . . 1-4
Remote Vehicle Start . . . . . . . . . 1-4
Door Locks . . . . . . . . . . . . . . . . . . . 1-5
Liftgate . . . . . . . . . . . . . . . . . . . . . . . . 1-6
Windows . . . . . . . . . . . . . . . . . . . . . . 1-6
Seat Adjustment . . . . . . . . . . . . . . 1-7
Second Row Seats . . . . . . . . . . . 1-9
Heated Seats . . . . . . . . . . . . . . . . . 1-9
Head Restraint
Adjustment . . . . . . . . . . . . . . . . . 1-10
Safety Belts . . . . . . . . . . . . . . . . . . 1-10 Passenger Sensing System
(United States) . . . . . . . . . . . . . 1-10
Mirror Adjustment . . . . . . . . . . . . 1-11
Steering Wheel
Adjustment . . . . . . . . . . . . . . . . . 1-12
Interior Lighting . . . . . . . . . . . . . . 1-12
Exterior Lighting . . . . . . . . . . . . . 1-13
Windshield Wiper/Washer . . . . 1-13
Climate Controls . . . . . . . . . . . . . 1-14
Transmission . . . . . . . . . . . . . . . . 1-15
Vehicle Features Radio(s) . . . . . . . . . . . . . . . . . . . . . 1-16
Satellite Radio . . . . . . . . . . . . . . . 1-16
Portable Audio Devices . . . . . . 1-17
Bluetooth ®
. . . . . . . . . . . . . . . . . . . 1-17
Steering Wheel Controls . . . . . 1-17
Cruise Control . . . . . . . . . . . . . . . 1-17
Driver Information
Center (DIC) . . . . . . . . . . . . . . . 1-18 Rear Vision
Camera (RVC) . . . . . . . . . . . . . 1-18
Ultrasonic Parking Assist . . . . 1-18
Power Outlets . . . . . . . . . . . . . . . 1-19
Universal Remote System . . . 1-19
Performance and Maintenance Traction Control
System (TCS) . . . . . . . . . . . . . . 1-19
StabiliTrak ®
System . . . . . . . . . 1-20
Tire Pressure Monitor . . . . . . . . 1-20
Engine Oil Life System . . . . . . 1-20
Fuel E85 (85% Ethanol) . . . . . 1-21
Driving for Better Fuel
Economy . . . . . . . . . . . . . . . . . . . 1-21
Roadside Assistance
Program . . . . . . . . . . . . . . . . . . . . 1-21
OnStar ®
. . . . . . . . . . . . . . . . . . . . . 1-22
Page 8 of 374

Black plate (4,1)Chevrolet Captiva Sport Owner Manual - 2013 - crc - 11/12/12
1-4 In Brief
Initial Drive
Information This section provides a brief
overview about some of the
important features that may or may
not be on your specific vehicle.
For more detailed information, refer
to each of the features which can be
found later in this owner manual.
Remote Keyless Entry
(RKE) System The RKE transmitter functions work
up to 20 m (65 ft) away from the
vehicle. Without Remote Start Shown, with
Remote Start Similar
Q : Press to lock all the doors,
including the liftgate.
K : Press once to unlock the driver
door. If
K is pressed again within
five seconds, all remaining doors
unlock.
L : Press and release to locate
the vehicle. Press and hold
L to
activate the panic alarm. Press
Lagain to turn off the alarm. See Keys on page 2 ‑ 1 and Remote
Keyless Entry (RKE) System
Operation on page 2 ‑ 2 .
Remote Vehicle Start This vehicle may have a remote
starting feature that starts the
engine from outside of the vehicle.
Starting the Engine Using
Remote Start To start the vehicle:
1. Aim the RKE transmitter at the
vehicle.
2. Press and release
Q on the
RKE transmitter.
3. Immediately after completing
Step 2, press and hold
/ until
the parking lamps flash. If the
vehicle's lights can not be seen,
press and hold
/ for at least
four seconds.
Page 9 of 374
Black plate (5,1)Chevrolet Captiva Sport Owner Manual - 2013 - crc - 11/12/12
In Brief 1-5When the vehicle starts, the parking
lamps will turn on and remain on as
long as the engine is running. The
doors will be locked and the climate
control system will operate at the
same setting as when the vehicle
was last turned off.
After entering the vehicle during a
remote start, insert and turn the key
to the ON/RUN position to drive the
vehicle.
If the vehicle is left running, it
automatically shuts off after
10 minutes unless a time extension
has been done.
Shutting the Engine Off After a
Remote Start To manually shut off a remote start: .
Aim the RKE transmitter at the
vehicle and press
/ until the
parking lamps turn off. .
Turn on the hazard warning
flashers. .
Turn the ignition switch on and
then off.
See Remote Vehicle Start on
page 2 ‑ 4 .
Door Locks From the outside, lock or unlock the
door using the key or the Remote
Keyless Entry (RKE) transmitter.
See Remote Keyless Entry (RKE)
System Operation on page 2 ‑ 2 .
From the inside, push or pull the
manual door lock on each door.
Use the power door lock switch on
the front doors.
Q : Press to lock the doors.
K : Press to unlock the doors.
See Door Locks on page 2 ‑ 6 and
Power Door Locks on page 2 ‑ 6 .
Safety Locks
The vehicle has rear door security
locks to prevent passengers from
opening the rear doors from the
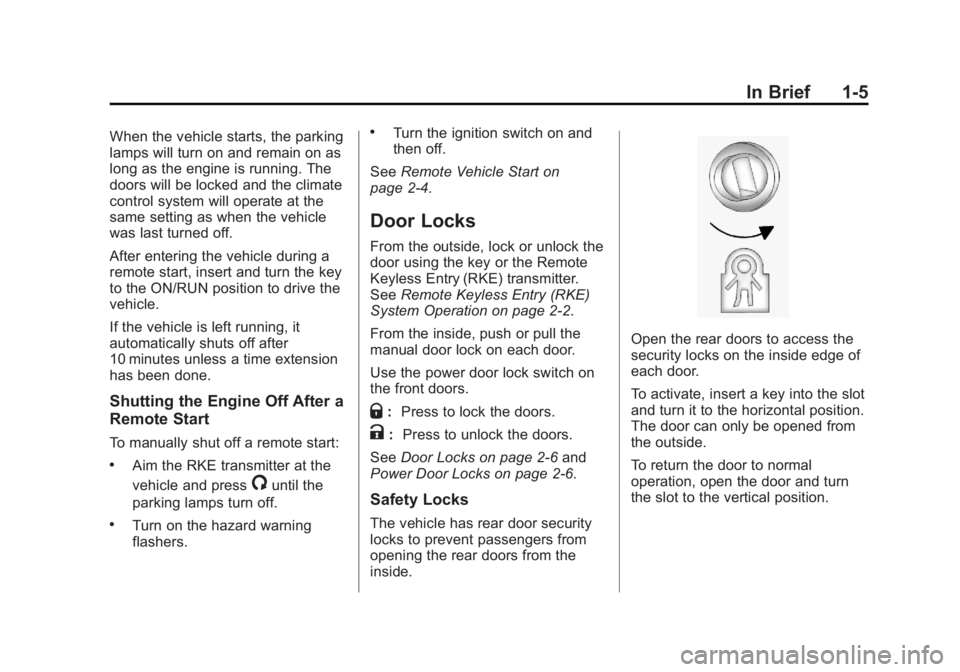
inside. Open the rear doors to access the
security locks on the inside edge of
each door.
To activate, insert a key into the slot
and turn it to the horizontal position.
The door can only be opened from
the outside.
To return the door to normal
operation, open the door and turn
the slot to the vertical position.
Page 10 of 374
Black plate (6,1)Chevrolet Captiva Sport Owner Manual - 2013 - crc - 11/12/12
1-6 In Brief
Liftgate To lock or unlock the liftgate from
outside the vehicle, press
Q or
Ktwice on the Remote Keyless
Entry (RKE) transmitter. See
Remote Keyless Entry (RKE)
System Operation on page 2 ‑ 2 .
To lock or unlock the liftgate from
inside the vehicle, press
Q or
K on
the power door lock switch.
To open the liftgate, press the touch
pad on the underside of the liftgate
handle and pull up.
To close the liftgate, pull down using
the handle and close until it latches.
See Liftgate on page 2 ‑ 8 . Windows
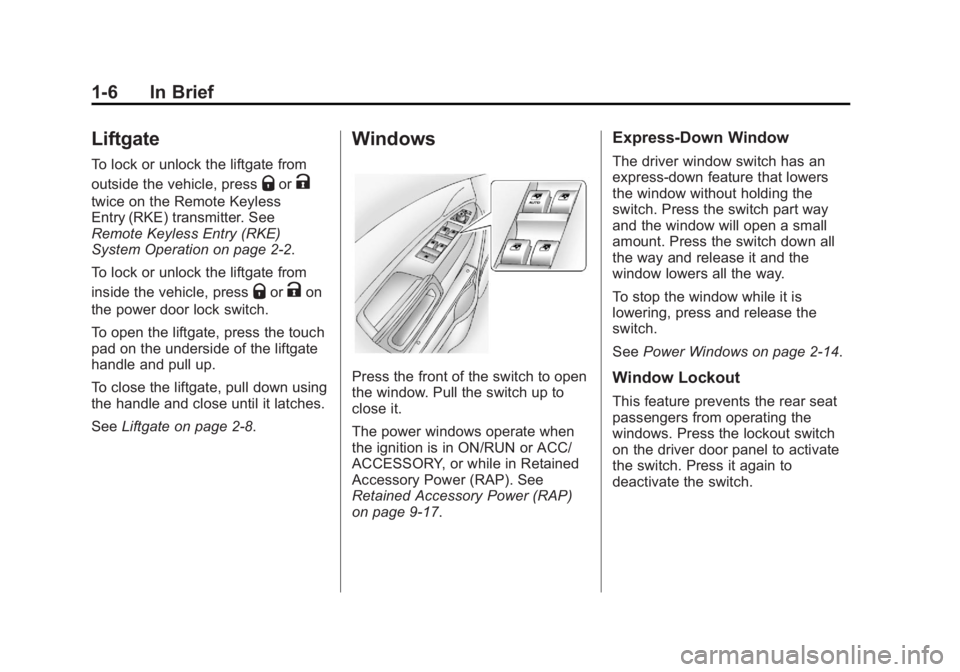
Press the front of the switch to open
the window. Pull the switch up to
close it.
The power windows operate when
the ignition is in ON/RUN or ACC/
ACCESSORY, or while in Retained
Accessory Power (RAP). See
Retained Accessory Power (RAP)
on page 9 ‑ 17 . Express-Down Window The driver window switch has an
express-down feature that lowers
the window without holding the
switch. Press the switch part way
and the window will open a small
amount. Press the switch down all
the way and release it and the
window lowers all the way.
To stop the window while it is
lowering, press and release the
switch.
See Power Windows on page 2 ‑ 14 .
Window Lockout This feature prevents the rear seat
passengers from operating the
windows. Press the lockout switch
on the driver door panel to activate
the switch. Press it again to
deactivate the switch.
Page 18 of 374
Black plate (14,1)Chevrolet Captiva Sport Owner Manual - 2013 - crc - 11/12/12
1-14 In Brief 3 : Sets a delay between wipes.
Move the switch on top of the lever
left for less frequent wipes or right
for more frequent wipes.
a : Slow wipes.
1 : Fast wipes.
Windshield Washer
Pull the windshield wiper lever to
spray windshield washer fluid and
activate the wipers. The wipers will
continue until the lever is released
or the maximum wash time is
reached.
Rear Window Wiper/Washer
The rear wiper and rear wash button
is on the instrument panel above the
climate control system.
= : Press to wash and wipe the
rear window.
5 : Press to turn the delayed
wiping on or off.
See Windshield Wiper/Washer on
page 5 ‑ 3 and Rear Window Wiper/
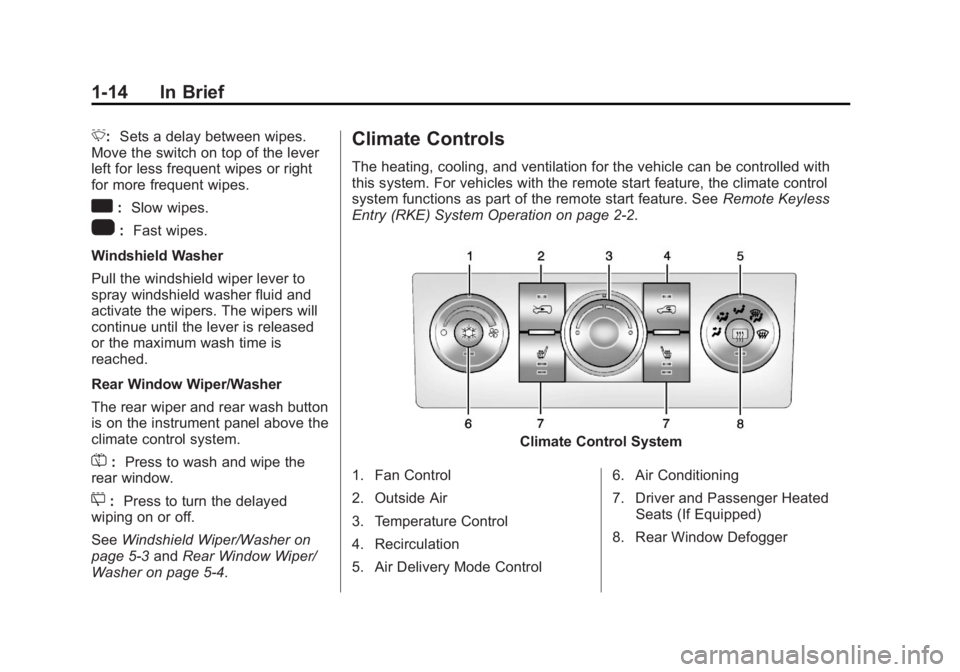
Washer on page 5 ‑ 4 . Climate Controls The heating, cooling, and ventilation for the vehicle can be controlled with
this system. For vehicles with the remote start feature, the climate control
system functions as part of the remote start feature. See Remote Keyless
Entry (RKE) System Operation on page 2 ‑ 2 .
Climate Control System
1. Fan Control
2. Outside Air
3. Temperature Control
4. Recirculation
5. Air Delivery Mode Control 6. Air Conditioning
7. Driver and Passenger Heated
Seats (If Equipped)
8. Rear Window Defogger
Page 27 of 374
Black plate (1,1)Chevrolet Captiva Sport Owner Manual - 2013 - crc - 11/12/12
Keys, Doors, and Windows 2-1
Keys, Doors, and
Windows Keys and Locks Keys . . . . . . . . . . . . . . . . . . . . . . . . . . 2-1
Remote Keyless Entry (RKE)
System . . . . . . . . . . . . . . . . . . . . . . 2-2
Remote Keyless Entry (RKE)
System Operation . . . . . . . . . . . 2-2
Remote Vehicle Start . . . . . . . . . 2-4
Door Locks . . . . . . . . . . . . . . . . . . . 2-6
Power Door Locks . . . . . . . . . . . . 2-6
Delayed Locking . . . . . . . . . . . . . . 2-6
Automatic Door Locks . . . . . . . . . 2-6
Lockout Protection . . . . . . . . . . . . 2-7
Safety Locks . . . . . . . . . . . . . . . . . . 2-7
Doors Liftgate . . . . . . . . . . . . . . . . . . . . . . . . 2-8 Vehicle Security Vehicle Security . . . . . . . . . . . . . . . 2-9
Vehicle Alarm System . . . . . . . . . 2-9
Immobilizer . . . . . . . . . . . . . . . . . . 2-10
Immobilizer Operation . . . . . . . 2-10
Exterior Mirrors Convex Mirrors . . . . . . . . . . . . . . 2-12
Power Mirrors . . . . . . . . . . . . . . . . 2-12
Folding Mirrors . . . . . . . . . . . . . . . 2-12
Heated Mirrors . . . . . . . . . . . . . . . 2-13
Interior Mirrors Manual Rearview Mirror . . . . . . 2-13
Automatic Dimming Rearview
Mirror . . . . . . . . . . . . . . . . . . . . . . . 2-13
Windows Windows . . . . . . . . . . . . . . . . . . . . . 2-14
Power Windows . . . . . . . . . . . . . 2-14
Sun Visors . . . . . . . . . . . . . . . . . . . 2-15
Roof Sunroof . . . . . . . . . . . . . . . . . . . . . . 2-15 Keys and Locks Keys
{ WARNINGLeaving children in a vehicle with
the ignition key is dangerous and
children or others could be
seriously injured or killed. They
could operate the power windows
or other controls or make the
vehicle move. The windows will
function with the keys in the
ignition, and children or others
could be caught in the path of a
closing window. Do not leave
children in a vehicle with the
ignition key.
Page 28 of 374
Black plate (2,1)Chevrolet Captiva Sport Owner Manual - 2013 - crc - 11/12/12
2-2 Keys, Doors, and Windows
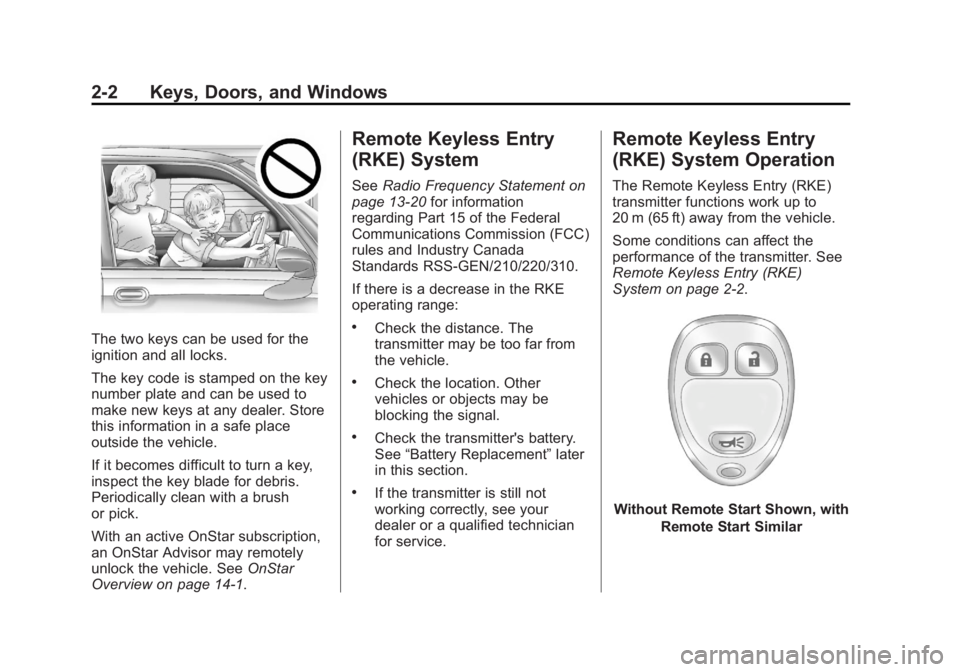
The two keys can be used for the
ignition and all locks.
The key code is stamped on the key
number plate and can be used to
make new keys at any dealer. Store
this information in a safe place
outside the vehicle.
If it becomes difficult to turn a key,
inspect the key blade for debris.
Periodically clean with a brush
or pick.
With an active OnStar subscription,
an OnStar Advisor may remotely
unlock the vehicle. See OnStar
Overview on page 14 ‑ 1 . Remote Keyless Entry
(RKE) System See Radio Frequency Statement on
page 13 ‑ 20 for information
regarding Part 15 of the Federal
Communications Commission (FCC)
rules and Industry Canada
Standards RSS-GEN/210/220/310.
If there is a decrease in the RKE
operating range: .
Check the distance. The
transmitter may be too far from
the vehicle. .
Check the location. Other
vehicles or objects may be
blocking the signal. .
Check the transmitter's battery.
See “ Battery Replacement ” later
in this section. .
If the transmitter is still not
working correctly, see your
dealer or a qualified technician
for service. Remote Keyless Entry
(RKE) System Operation The Remote Keyless Entry (RKE)
transmitter functions work up to
20 m (65 ft) away from the vehicle.
Some conditions can affect the
performance of the transmitter. See
Remote Keyless Entry (RKE)
System on page 2 ‑ 2 .
Without Remote Start Shown, with
Remote Start Similar
Page 30 of 374

Black plate (4,1)Chevrolet Captiva Sport Owner Manual - 2013 - crc - 11/12/12
2-4 Keys, Doors, and Windows
To replace the battery:
1. Separate the transmitter with a
flat, thin object inserted into the
notch on the side.
2. Remove the old battery. Do not
use a metal object.
3. Insert the new battery, positive
side facing down. Replace with a
CR2032 or equivalent battery.
4. Reassemble the transmitter. Remote Vehicle Start This vehicle may have a remote
starting feature that starts the
engine from outside of the vehicle.
/ (Remote Start): This button is
on the RKE transmitter if the vehicle
has remote start.
Laws in some communities may
restrict the use of remote starters.
For example, some laws may
require a person using the remote
start to have the vehicle in view
when doing so. Check local
regulations for any requirements on
remote starting of vehicles.
Do not use the remote start feature
if the vehicle is low on fuel. The
vehicle could run out of fuel.
The Remote Keyless Entry (RKE)
range may be less while the vehicle
is running.
Other conditions can affect the
performance of the transmitter. See
Remote Keyless Entry (RKE)
System on page 2 ‑ 2 . Starting the Engine Using
Remote Start To start the vehicle:
1. Aim the RKE transmitter at the
vehicle.
2. Press and release
Q on the
RKE transmitter.
3. Immediately after completing
Step 2, press and hold
/ until
the parking lamps flash. If the
vehicle's lights can not be seen,
press and hold
/ for at least
four seconds.
When the vehicle starts, the parking
lamps will turn on and remain on as
long as the engine is running. The
doors will be locked and the climate
control system will operate at the
same setting as when the vehicle
was last turned off.
After entering the vehicle during a
remote start, insert and turn the key
to the ON/RUN position to drive the
vehicle.