2013 CHEVROLET CAPTIVA SPORT keyless
[x] Cancel search: keylessPage 179 of 374
Black plate (1,1)Chevrolet Captiva Sport Owner Manual - 2013 - crc - 11/12/12
Climate Controls 8-1
Climate Controls Climate Control Systems Climate Control Systems . . . . . . 8-1
Automatic Climate Control
System . . . . . . . . . . . . . . . . . . . . . . 8-4
Air Vents Air Vents . . . . . . . . . . . . . . . . . . . . . . 8-8
Maintenance Passenger Compartment Air
Filter . . . . . . . . . . . . . . . . . . . . . . . . . 8-8 Climate Control Systems The heating, cooling, and ventilation for the vehicle can be controlled with
this system. For vehicles with the remote start feature, the climate control
system functions as part of the remote start feature. See Remote Keyless
Entry (RKE) System Operation on page 2 ‑ 2 .
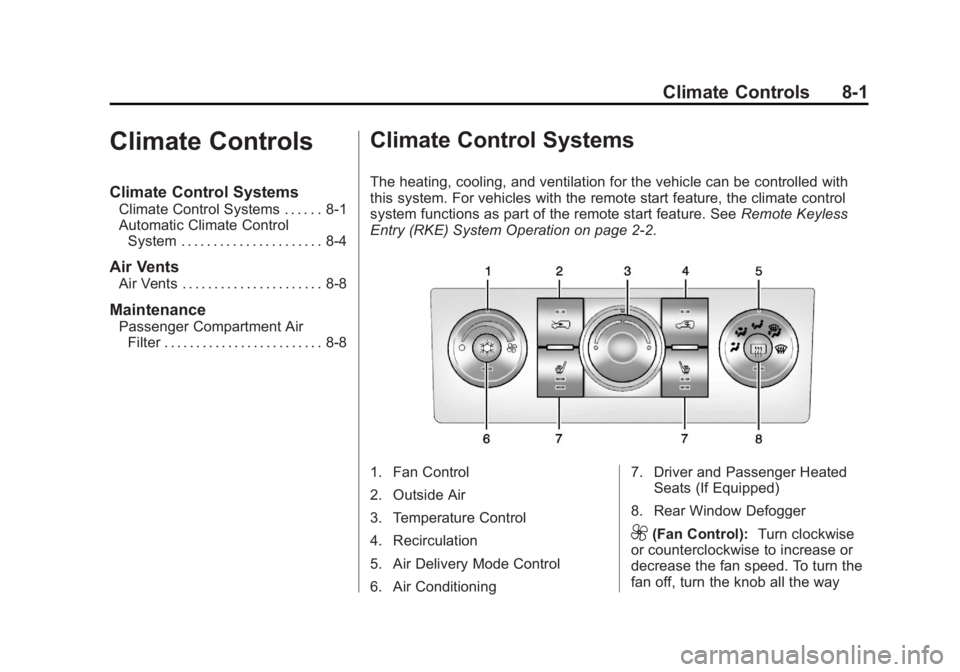
1. Fan Control
2. Outside Air
3. Temperature Control
4. Recirculation
5. Air Delivery Mode Control
6. Air Conditioning 7. Driver and Passenger Heated
Seats (If Equipped)
8. Rear Window Defogger
9 (Fan Control): Turn clockwise
or counterclockwise to increase or
decrease the fan speed. To turn the
fan off, turn the knob all the way
Page 182 of 374
Black plate (4,1)Chevrolet Captiva Sport Owner Manual - 2013 - crc - 11/12/12
8-4 Climate Controls stay on continuously. The defogger
can also be turned off by turning off
the engine.
Notice: Do not use anything
sharp on the inside of the rear
window. If you do, you could cut
or damage the warming grid, and
the repairs would not be covered
by the vehicle warranty. Do not
attach a temporary vehicle
license, tape, a decal, or anything
similar to the defogger grid.
Heated Front Seats (If Equipped)
L or
M : Press to heat the driver
or passenger seat cushion and
seatback. To turn off, press the
button until the indicator lights turn
off. See Heated Front Seats on
page 3 ‑ 6 .
Remote Start Climate Control
Operation
For vehicles with the remote start
feature, when it is activated, the
climate control system heats and
cools the inside of the vehicle using
the modes that were set before the
vehicle was turned off. Automatic Climate Control System The heating, cooling, and ventilation for the vehicle can be controlled with
this system. For vehicles with the remote start feature, the climate control
system functions as part of the remote start feature. See Remote Keyless
Entry (RKE) System Operation on page 2 ‑ 2 .
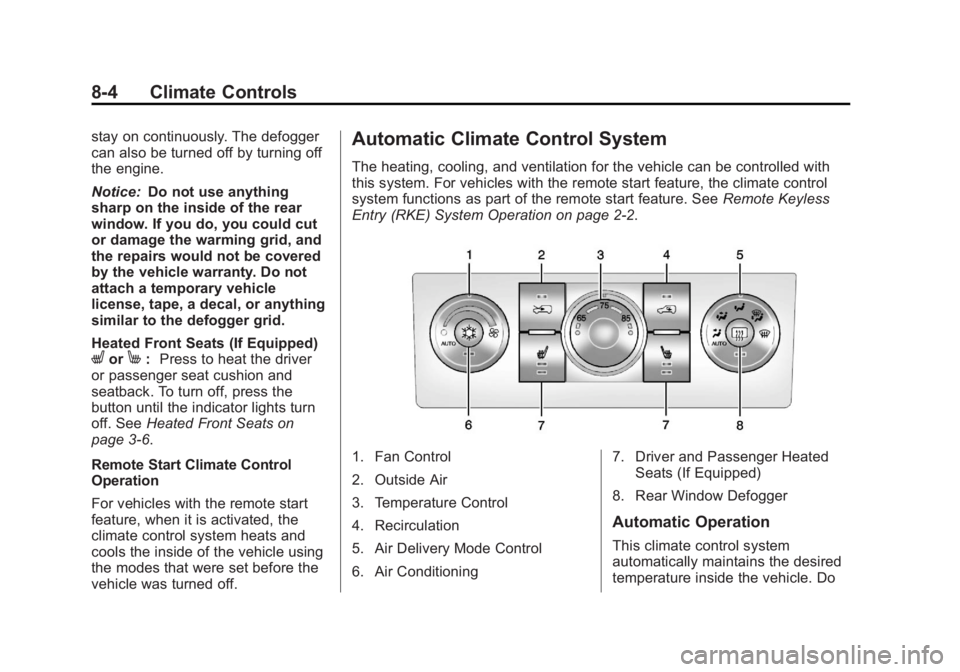
1. Fan Control
2. Outside Air
3. Temperature Control
4. Recirculation
5. Air Delivery Mode Control
6. Air Conditioning 7. Driver and Passenger Heated
Seats (If Equipped)
8. Rear Window Defogger
Automatic Operation
This climate control system
automatically maintains the desired
temperature inside the vehicle. Do
Page 226 of 374
Black plate (38,1)Chevrolet Captiva Sport Owner Manual - 2013 - crc - 11/12/12
9-38 Driving and Operating The tethered fuel cap is located
behind a hinged fuel door on the
driver side of the vehicle. On some
vehicles with Remote Keyless Entry,
the fuel door is locked and unlocked
when the vehicle doors are locked
and unlocked.
To remove the fuel cap, turn it
slowly counterclockwise. The fuel
cap has a spring in it; if the cap is
released too soon, it will spring back
to the right. To avoid fuel contact on
the painted surface of the vehicle
when filling the fuel tank, place the
tethered cap on the fuel filler door.
Be careful not to spill fuel. Do not
top off or overfill the tank and wait a
few seconds after you have finished
pumping before removing the
nozzle. Clean fuel from painted
surfaces as soon as possible. See
Exterior Care on page 10 ‑ 72 .
When replacing the fuel cap, turn it
clockwise until it clicks. Make sure
the cap is fully installed. The
diagnostic system can determine if
the fuel cap has been left off or improperly installed. This would
allow fuel to evaporate into the
atmosphere. See Malfunction
Indicator Lamp on page 5 ‑ 14 .
{ WARNINGIf a fire starts while you are
refueling, do not remove the
nozzle. Shut off the flow of fuel by
shutting off the pump or by
notifying the station attendant.
Leave the area immediately.
Notice: If a new fuel cap is
needed, be sure to get the right
type of cap from your dealer. The
wrong type of fuel cap might not
fit properly, might cause the
malfunction indicator lamp to
light, and could damage the fuel
tank and emissions system. See
Malfunction Indicator Lamp on
page 5 ‑ 14 . Filling a Portable Fuel
Container
{ WARNINGFilling a portable fuel container
while it is in the vehicle can cause
fuel vapors that can ignite either
by static electricity or other
means. You or others could be
badly burned and the vehicle
could be damaged. Always: .
Use approved fuel
containers. .
Remove the container from
the vehicle, trunk, or pickup
bed before filling. .
Place the container on the
ground.
(Continued)
Page 302 of 374
Black plate (68,1)Chevrolet Captiva Sport Owner Manual - 2013 - crc - 11/12/12
10-68 Vehicle Care 6. Connect the red positive (+)
cable to the positive (+) terminal
on the vehicle with the dead
battery. Use a remote
positive (+) terminal if the vehicle
has one.
7. Do not let the other end touch
metal. Connect it to the
positive (+) terminal of the good
battery. Use a remote
positive (+) terminal if the vehicle
has one.
8. Now connect the black
negative ( − ) cable to the
negative ( − ) terminal of the good
battery. Use a remote
negative ( − ) terminal if the
vehicle has one.
Do not let the other end touch
anything until the next step. The
other end of the negative ( − )
cable does not go to the dead
battery. It goes to a heavy,
unpainted metal engine part or
to a remote negative ( − ) terminal
on the vehicle with the dead
battery. 9. Connect the other end of the
negative ( − ) cable away from the
dead battery, but not near
engine parts that move. The
electrical connection is just as
good there, and the chance of
sparks getting back to the
battery is much less.
10. Now start the vehicle with the
good battery and run the
engine for a while.
11. Press the unlock symbol on the
remote keyless entry
transmitter to disarm your
security system, if equipped.
12. Try to start the vehicle that had
the dead battery. If it will not
start after a few tries, it
probably needs service. Notice: If the jumper cables are
connected or removed in the
wrong order, electrical shorting
may occur and damage the
vehicle. The repairs would not be
covered by the vehicle warranty.
Always connect and remove the
jumper cables in the correct
order, making sure that the
cables do not touch each other or
other metal.
Jumper Cable Removal
Reverse the sequence exactly when
removing the jumper cables.
Page 354 of 374
Black plate (20,1)Chevrolet Captiva Sport Owner Manual - 2013 - crc - 11/12/12
13-20 Customer Information GM will not access this data or
share it with others except: with the
consent of the vehicle owner or,
if the vehicle is leased, with the
consent of the lessee; in response
to an official request by police or
similar government office; as part of
GM's defense of litigation through
the discovery process; or, as
required by law. Data that GM
collects or receives may also be
used for GM research needs or may
be made available to others for
research purposes, where a need is
shown and the data is not tied to a
specific vehicle or vehicle owner.
OnStar ®
If the vehicle is equipped with
OnStar ®
and has an active
subscription, additional data may be
collected through the OnStar
system. This includes information
about the vehicle ’ s operation; about
collisions involving the vehicle; the
use of the vehicle and its features; and, in certain situations, the
location and approximate GPS
speed of the vehicle. Refer to the
OnStar Terms and Conditions and
Privacy Statement on the OnStar
website.
Radio Frequency
Identification (RFID) RFID technology is used in some
vehicles for functions such as tire
pressure monitoring and ignition
system security, as well as in
connection with conveniences such
as Remote Keyless Entry (RKE)
transmitters for remote door locking/
unlocking and starting, and
in-vehicle transmitters for garage
door openers. RFID technology in
GM vehicles does not use or record
personal information or link with any
other GM system containing
personal information. Radio Frequency
Statement This vehicle has systems that
operate on a radio frequency that
comply with Part 15 of the Federal
Communications Commission (FCC)
rules and with Industry Canada
Standards RSS ‐ GEN/210/220/310.
Operation is subject to the following
two conditions:
1. The device may not cause
harmful interference.
2. The device must accept any
interference received, including
interference that may cause
undesired operation of the
device.
Changes or modifications to any of
these systems by other than an
authorized service facility could void
authorization to use this equipment.
Page 368 of 374
Black plate (6,1)Chevrolet Captiva Sport Owner Manual - 2013 - crc - 11/12/12
i-6 INDEX
IIgnition Positions . . . . . . . . . . . . . . 9-14
Ignition Transmission Lock
Check . . . . . . . . . . . . . . . . . . . . . . . 10-24
Immobilizer . . . . . . . . . . . . . . . . . . . . 2-10
Infants and Young Children,
Restraints . . . . . . . . . . . . . . . . . . . . 3-34
Infotainment . . . . . . . . . . . . . . . . . . . . 7-1
Instrument Cluster . . . . . . . . . . . . . . 5-9
Instrument Panel
Storage Area . . . . . . . . . . . . . . . . . . 4-1
Instrument Panel Overview . . . . . 1-2
Introduction . . . . . . . . . . . . . . . . . . . . . . . iii
JJump Starting . . . . . . . . . . . . . . . . . 10-65
KKey and Lock Messages . . . . . . . 5-32
Keyless Entry
Remote (RKE) System . . . . . . . . 2-2
Keys . . . . . . . . . . . . . . . . . . . . . . . . . . . . 2-1 L Labeling, Tire Sidewall . . . . . . . . 10-38
Lamps
Daytime Running (DRL) . . . . . . . 6-2
Dome . . . . . . . . . . . . . . . . . . . . . . . . . . 6-5
Exterior Controls . . . . . . . . . . . . . . . 6-1
Front Turn Signal and
Parking Lamps . . . . . . . . . . . . 10-27
License Plate . . . . . . . . . . . . . . . 10-29
Malfunction Indicator . . . . . . . . . 5-14
Messages . . . . . . . . . . . . . . . . . . . . 5-32
Reading . . . . . . . . . . . . . . . . . . . . . . . 6-5
Lap-Shoulder Belt . . . . . . . . . . . . . 3-12
LATCH System
Replacing Parts after a
Crash . . . . . . . . . . . . . . . . . . . . . . . 3-44
LATCH, Lower Anchors and
Tethers for Children . . . . . . . . . . 3-39
Liftgate
Carbon Monoxide . . . . . . . . . . . . . . 2-8
Lighting
Entry . . . . . . . . . . . . . . . . . . . . . . . . . . 6-6
Illumination Control . . . . . . . . . . . . 6-4 Lights
Airbag Readiness . . . . . . . . . . . . . 5-12
All-Wheel Drive . . . . . . . . . . . . . . . 5-18
Antilock Brake System
(ABS) Warning . . . . . . . . . . . . . . 5-18
Brake System Warning . . . . . . . 5-16
Charging System . . . . . . . . . . . . . 5-13
Cruise Control . . . . . . . . . . . . . . . . 5-22
Door Ajar . . . . . . . . . . . . . . . . . . . . . 5-22
Electric Parking Brake . . . . . . . . 5-17
Engine Coolant
Temperature Warning . . . . . . . 5-20
Flash-to-Pass . . . . . . . . . . . . . . . . . . 6-2
Front Fog Lamp . . . . . . . . . . . . . . 5-22
Fuel Economy . . . . . . . . . . . . . . . . 5-20
Gate Ajar . . . . . . . . . . . . . . . . . . . . . 5-23
High-Beam On . . . . . . . . . . . . . . . . 5-22
High/Low Beam Changer . . . . . . 6-2
Low Fuel Warning . . . . . . . . . . . . 5-21
Low Washer Fluid Warning . . . 5-22
Reduced Engine Power . . . . . . 5-21
Safety Belt Reminders . . . . . . . . 5-11
Security . . . . . . . . . . . . . . . . . . . . . . 5-21
Service Vehicle Soon . . . . . . . . . 5-16
StabiliTrak ®
Indicator . . . . . . . . . 5-19
Page 371 of 374
Black plate (9,1)Chevrolet Captiva Sport Owner Manual - 2013 - crc - 11/12/12
INDEX i-9Rearview Mirrors . . . . . . . . . . . . . . 2-13
Automatic Dimming . . . . . . . . . . . 2-13
Reclining Seatbacks . . . . . . . . . . . . 3-5
Recommended
Fuel . . . . . . . . . . . . . . . . . . . . . . . . . . 9-35
Recommended Fluids and
Lubricants . . . . . . . . . . . . . . . . . . . 11-12
Records
Maintenance . . . . . . . . . . . . . . . . .11-15
Recreational Vehicle
Towing . . . . . . . . . . . . . . . . . . . . . . 10-69
Reduced Engine Power
Light . . . . . . . . . . . . . . . . . . . . . . . . . 5-21
Reimbursement Program,
GM Mobility . . . . . . . . . . . . . . . . . . 13-7
Remote Keyless Entry (RKE)
System . . . . . . . . . . . . . . . . . . . . . . . . 2-2
Remote Vehicle Start . . . . . . . . . . . 2-4
Replacement Bulbs . . . . . . . . . . . 10-29
Replacement Parts
Airbags . . . . . . . . . . . . . . . . . . . . . . . 3-31
Maintenance . . . . . . . . . . . . . . . . .11-14
Replacing Airbag System . . . . . . 3-31
Replacing LATCH System
Parts after a Crash . . . . . . . . . . . 3-44 Replacing Safety Belt
System Parts after a Crash . . . 3-17
Reporting Safety Defects
Canadian Government . . . . . . 13-18
General Motors . . . . . . . . . . . . . 13-18
U.S. Government . . . . . . . . . . . 13-17
Restraints
Where to Put . . . . . . . . . . . . . . . . . 3-37
Retained Accessory
Power (RAP) . . . . . . . . . . . . . . . . . 9-17
Ride Control Systems
Messages . . . . . . . . . . . . . . . . . . . . 5-32
Roads
Driving, Wet . . . . . . . . . . . . . . . . . . . 9-6
Roadside Assistance
Program . . . . . . . . . . . . . . . 13-7, 13-11
Roof
Sunroof . . . . . . . . . . . . . . . . . . . . . . . 2-15
Roof Rack System . . . . . . . . . . . . . . 4-3
Rotation, Tires . . . . . . . . . . . . . . . . 10-49
Routing, Engine Drive Belt . . . . . 12-4
Running the Vehicle While
Parked . . . . . . . . . . . . . . . . . . . . . . . 9-20 S Safety Belts . . . . . . . . . . . . . . . . . . . . 3-9
Care . . . . . . . . . . . . . . . . . . . . . . . . . . 3-16
Extender . . . . . . . . . . . . . . . . . . . . . . 3-16
How to Wear Safety Belts
Properly . . . . . . . . . . . . . . . . . . . . . 3-11
Lap-Shoulder Belt . . . . . . . . . . . . 3-12
Reminders . . . . . . . . . . . . . . . . . . . . 5-11
Replacing after a Crash . . . . . . 3-17
Use During Pregnancy . . . . . . . . 3-15
Safety Defects Reporting
Canadian Government . . . . . . 13-18
General Motors . . . . . . . . . . . . . 13-18
U.S. Government . . . . . . . . . . . 13-17
Safety Locks . . . . . . . . . . . . . . . . . . . . 2-7
Safety System Check . . . . . . . . . . 3-16
Satellite Radio . . . . . . . . . . . . . . . . . . 7-6
Scheduling Appointments . . . . . 13-12
Seats
Adjustment, Front . . . . . . . . . . . . . . 3-3
Folding Seatback . . . . . . . . . . . . . . 3-7
Head Restraints . . . . . . . . . . . . . . . 3-2
Heated Front . . . . . . . . . . . . . . . . . . 3-6
Lumbar Adjustment, Front . . . . . 3-4