Page 88 of 374
Black plate (46,1)Chevrolet Captiva Sport Owner Manual - 2013 - crc - 11/12/12
3-46 Seats and Restraints
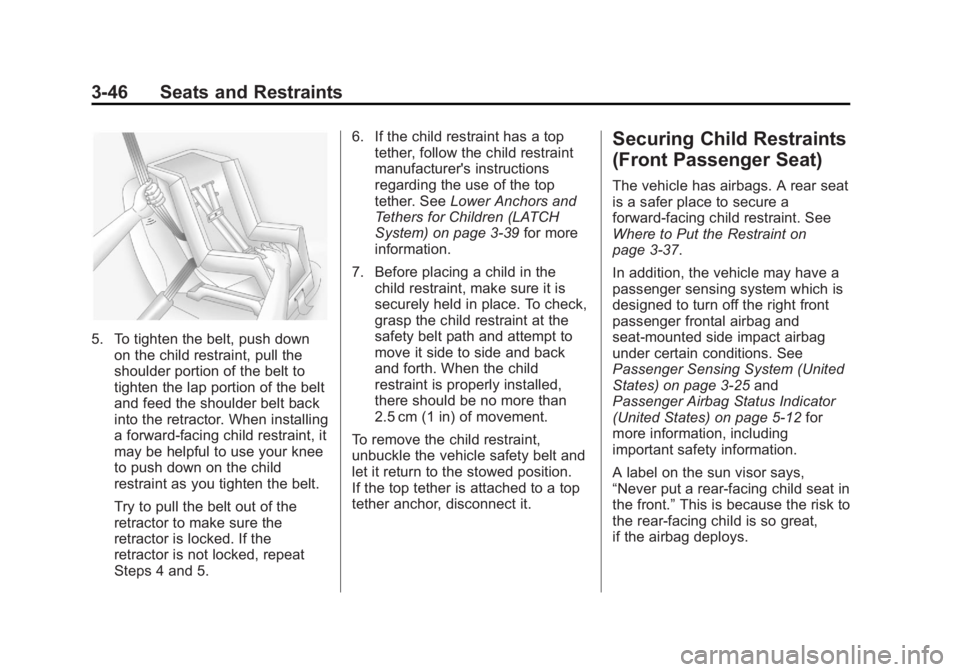
5. To tighten the belt, push down
on the child restraint, pull the
shoulder portion of the belt to
tighten the lap portion of the belt
and feed the shoulder belt back
into the retractor. When installing
a forward-facing child restraint, it
may be helpful to use your knee
to push down on the child
restraint as you tighten the belt.
Try to pull the belt out of the
retractor to make sure the
retractor is locked. If the
retractor is not locked, repeat
Steps 4 and 5. 6. If the child restraint has a top
tether, follow the child restraint
manufacturer's instructions
regarding the use of the top
tether. See Lower Anchors and
Tethers for Children (LATCH
System) on page 3 ‑ 39 for more
information.
7. Before placing a child in the
child restraint, make sure it is
securely held in place. To check,
grasp the child restraint at the
safety belt path and attempt to
move it side to side and back
and forth. When the child
restraint is properly installed,
there should be no more than
2.5 cm (1 in) of movement.
To remove the child restraint,
unbuckle the vehicle safety belt and
let it return to the stowed position.
If the top tether is attached to a top
tether anchor, disconnect it. Securing Child Restraints
(Front Passenger Seat) The vehicle has airbags. A rear seat
is a safer place to secure a
forward-facing child restraint. See
Where to Put the Restraint on
page 3 ‑ 37 .
In addition, the vehicle may have a
passenger sensing system which is
designed to turn off the right front
passenger frontal airbag and
seat-mounted side impact airbag
under certain conditions. See
Passenger Sensing System (United
States) on page 3 ‑ 25 and
Passenger Airbag Status Indicator
(United States) on page 5 ‑ 12 for
more information, including
important safety information.
A label on the sun visor says,
“ Never put a rear-facing child seat in
the front. ” This is because the risk to
the rear-facing child is so great,
if the airbag deploys.
Page 91 of 374
Black plate (49,1)Chevrolet Captiva Sport Owner Manual - 2013 - crc - 11/12/12
Seats and Restraints 3-49
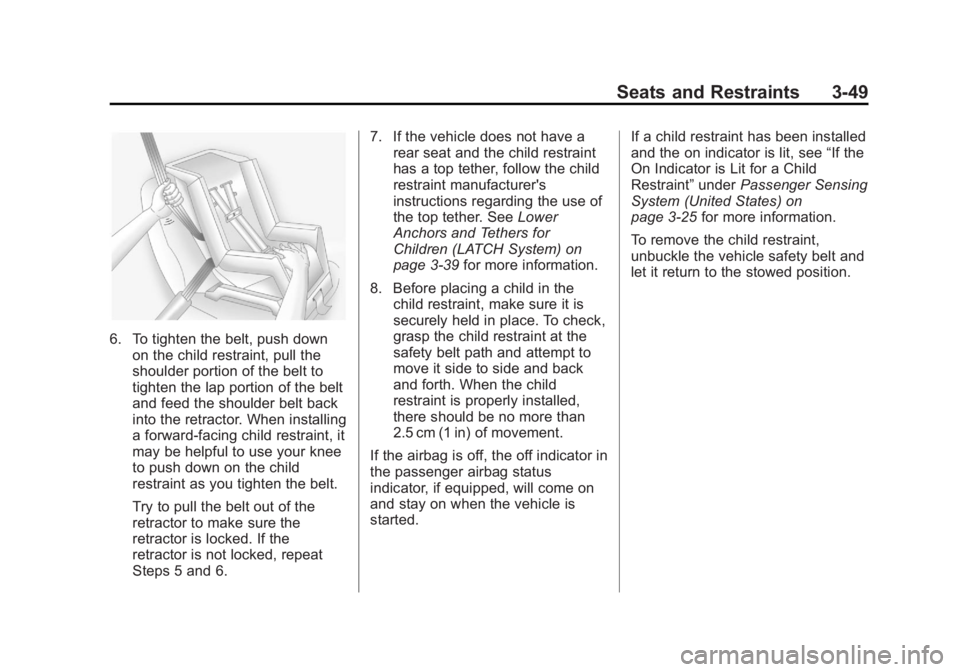
6. To tighten the belt, push down
on the child restraint, pull the
shoulder portion of the belt to
tighten the lap portion of the belt
and feed the shoulder belt back
into the retractor. When installing
a forward-facing child restraint, it
may be helpful to use your knee
to push down on the child
restraint as you tighten the belt.
Try to pull the belt out of the
retractor to make sure the
retractor is locked. If the
retractor is not locked, repeat
Steps 5 and 6. 7. If the vehicle does not have a
rear seat and the child restraint
has a top tether, follow the child
restraint manufacturer's
instructions regarding the use of
the top tether. See Lower
Anchors and Tethers for
Children (LATCH System) on
page 3 ‑ 39 for more information.
8. Before placing a child in the
child restraint, make sure it is
securely held in place. To check,
grasp the child restraint at the
safety belt path and attempt to
move it side to side and back
and forth. When the child
restraint is properly installed,
there should be no more than
2.5 cm (1 in) of movement.
If the airbag is off, the off indicator in
the passenger airbag status
indicator, if equipped, will come on
and stay on when the vehicle is
started. If a child restraint has been installed
and the on indicator is lit, see “ If the
On Indicator is Lit for a Child
Restraint ” under Passenger Sensing
System (United States) on
page 3 ‑ 25 for more information.
To remove the child restraint,
unbuckle the vehicle safety belt and
let it return to the stowed position.
Page 185 of 374
Black plate (7,1)Chevrolet Captiva Sport Owner Manual - 2013 - crc - 11/12/12
Climate Controls 8-7@ (Recirculation): Press to turn
on the recirculation mode. An
indicator light comes on to show
that recirculation is on. This mode
recirculates and helps to quickly
cool or heat the air inside the
vehicle. It can be used to prevent
outside air and odors from entering
the vehicle. Avoid using the
recirculation mode during high
periods of humidity and cool outside
temperatures since this may result
in increased window fogging.
If window fogging is experienced,
select the defrost mode.
Recirculation mode is not available
in floor, defog, or defrost modes and
will shut off automatically and
change to outside air. If the button is
selected in any of these modes, the
indicator will flash. This helps
prevent window fogging and
moisture building up inside the
vehicle. Rear Window Defogger The rear window defogger uses a
warming grid to remove fog from the
rear window.
The rear window defogger only
works when the ignition is in
ON/RUN.
1 (Rear Window Defogger):
Press to turn the rear window
defogger on or off. An indicator light
on the button comes on to show that
it is activated.
The rear window defogger stays on
for approximately 10 minutes after
the button is pressed, unless the
ignition is turned to ACC/
ACCESSORY or LOCK/OFF.
If turned on again, the defogger only
runs for approximately five minutes
before turning off. At higher vehicle
speeds, the defogger may stay on
continuously. The defogger can also
be turned off by turning off the
engine. Notice: Do not use anything
sharp on the inside of the rear
window. If you do, you could cut
or damage the warming grid, and
the repairs would not be covered
by the vehicle warranty. Do not
attach a temporary vehicle
license, tape, a decal, or anything
similar to the defogger grid.
L or
M Heated Front Seats (If
Equipped): Press to heat the driver
or passenger seat cushion and
seatback. To turn off, press the
button until the indicator lights turn
off. See Heated Front Seats on
page 3 ‑ 6 .
Remote Start Climate Control
Operation
For vehicles with the remote start
feature, when it is activated, the
climate control system heats and
cools the inside of the vehicle using
the modes that were set before the
vehicle was turned off.
Page 186 of 374
Black plate (8,1)Chevrolet Captiva Sport Owner Manual - 2013 - crc - 11/12/12
8-8 Climate Controls
Air Vents Move the louvers on the air outlets
up or down to change the direction
of the airflow. The louvers do
not turn.
Use the thumbwheels near each
vent to open and close off the
airflow.
Operation Tips .
Clear away any ice, snow,
or leaves from the air inlets at
the base of the vehicle that may
block the flow of air into the
vehicle. .
Do not use any non-GM
approved hood deflectors that
could adversely affect the
performance of the system. .
Keep the path under the front
seats clear of objects to help
circulate the air inside of the
vehicle more effectively. .
Do not insert objects into the air
outlets. This may affect the
operation of the outlet. Maintenance Passenger Compartment
Air Filter The filter removes dust, pollen, and
other airborne irritants from outside
air that is pulled into the vehicle.
The filter should be replaced as part
of routine scheduled maintenance.
See Maintenance Schedule on
page 11 ‑ 3 for replacement intervals.
To find out what type of filter to use,
see Maintenance Replacement
Parts on page 11 ‑ 14 .
The passenger compartment air
filter can be accessed by removing
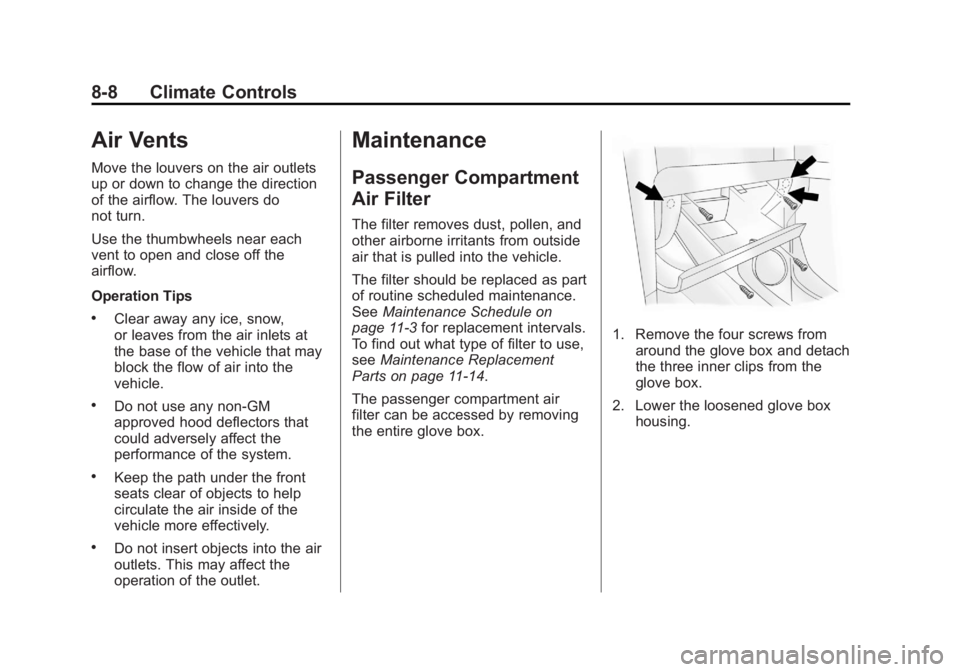
the entire glove box. 1. Remove the four screws from
around the glove box and detach
the three inner clips from the
glove box.
2. Lower the loosened glove box
housing.