2013 BMW X1 XDRIVE 28I change time
[x] Cancel search: change timePage 179 of 291
Music search by voice
Instructions for voice activation system, refer to
page 25.1. Press the button on the steering
wheel.2.›Music search‹3.Open the desired category, e. g., ›Select
artist‹.4.Say the desired entry in the list.5.Select other categories if you wish.
To select a track directly: ›Title ...‹
Say the voice command and the name of the
desired track in a single command.
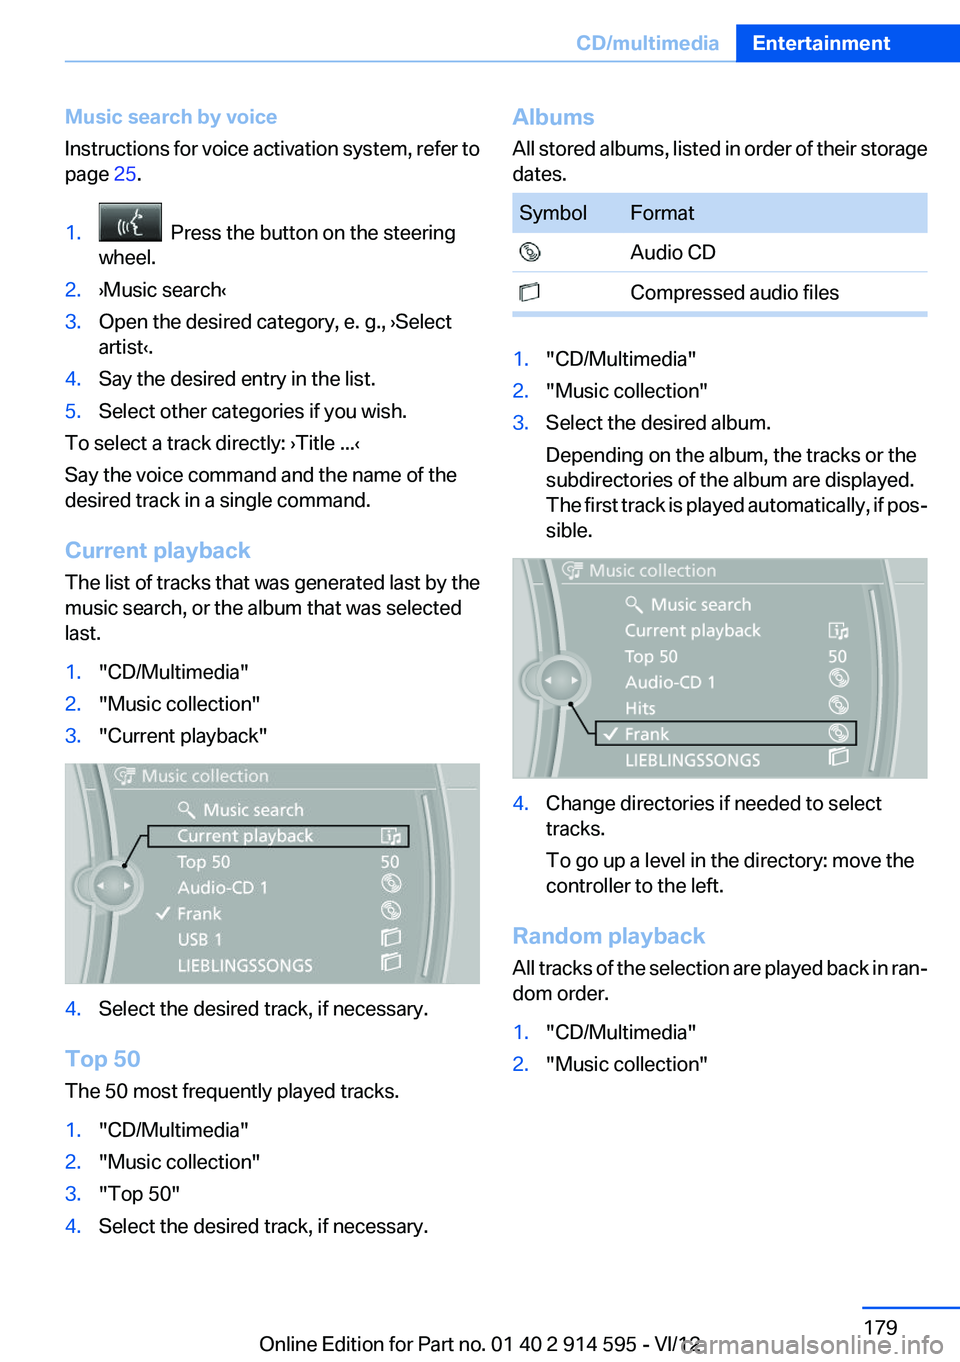
Current playback
The list of tracks that was generated last by the
music search, or the album that was selected
last.
1."CD/Multimedia"2."Music collection"3."Current playback"4.Select the desired track, if necessary.
Top 50
The 50 most frequently played tracks.
1."CD/Multimedia"2."Music collection"3."Top 50"4.Select the desired track, if necessary.Albums
All stored albums, listed in order of their storage
dates.SymbolFormat Audio CD Compressed audio files1."CD/Multimedia"2."Music collection"3.Select the desired album.
Depending on the album, the tracks or the
subdirectories of the album are displayed.
The first track is played automatically, if pos‐
sible.4.Change directories if needed to select
tracks.
To go up a level in the directory: move the
controller to the left.
Random playback
All tracks of the selection are played back in ran‐
dom order.
1."CD/Multimedia"2."Music collection"Seite 179CD/multimediaEntertainment179
Online Edition for Part no. 01 40 2 914 595 - VI/12
Page 180 of 291
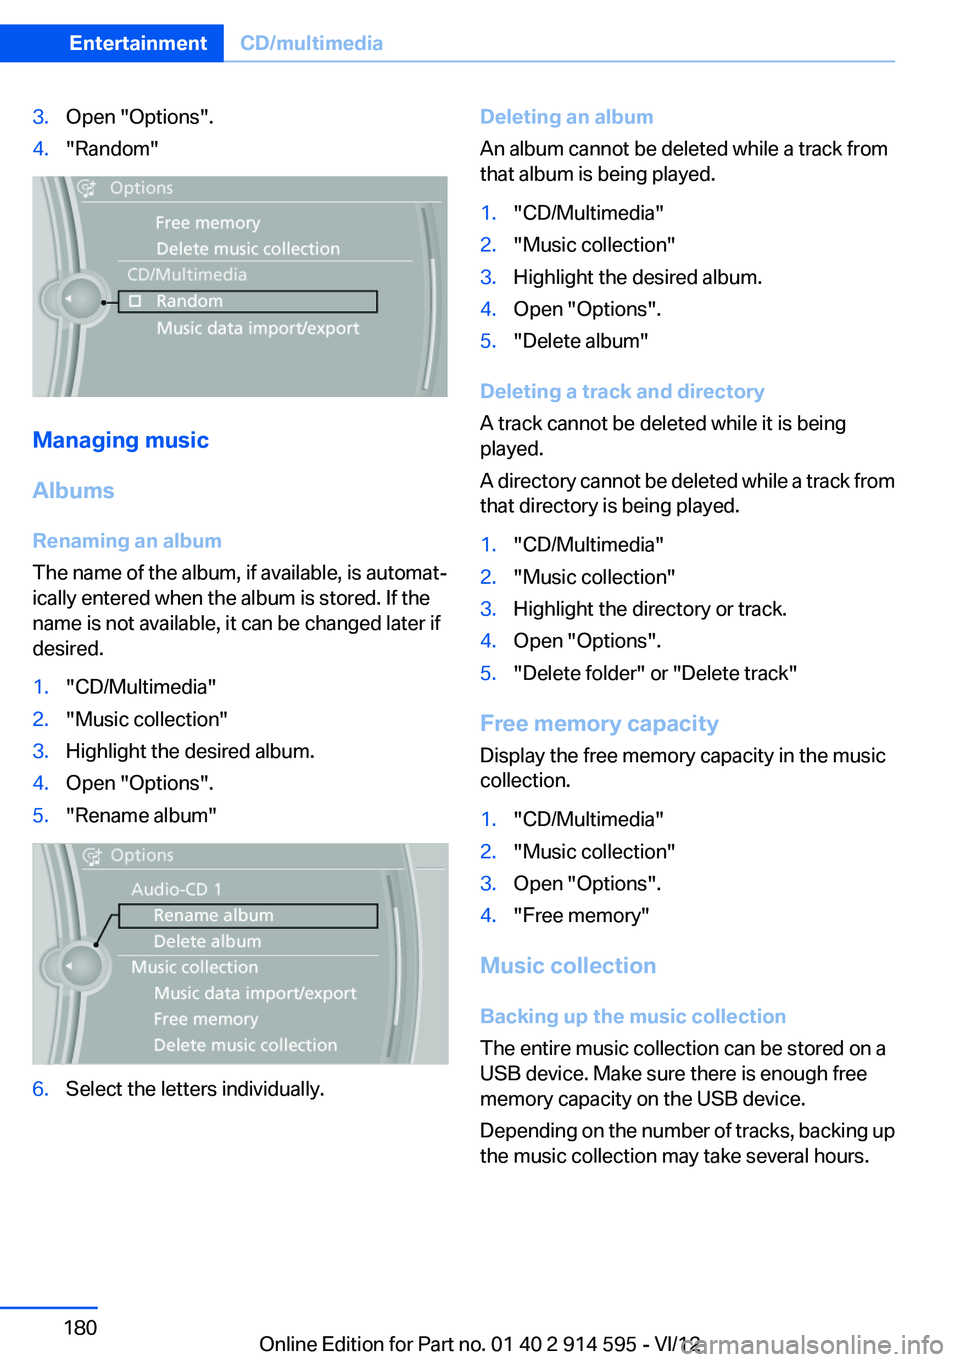
3.Open "Options".4."Random"
Managing music
Albums
Renaming an album
The name of the album, if available, is automat‐
ically entered when the album is stored. If the
name is not available, it can be changed later if
desired.
1."CD/Multimedia"2."Music collection"3.Highlight the desired album.4.Open "Options".5."Rename album"6.Select the letters individually.Deleting an album
An album cannot be deleted while a track from
that album is being played.1."CD/Multimedia"2."Music collection"3.Highlight the desired album.4.Open "Options".5."Delete album"
Deleting a track and directory
A track cannot be deleted while it is being
played.
A directory cannot be deleted while a track from
that directory is being played.
1."CD/Multimedia"2."Music collection"3.Highlight the directory or track.4.Open "Options".5."Delete folder" or "Delete track"
Free memory capacity
Display the free memory capacity in the music
collection.
1."CD/Multimedia"2."Music collection"3.Open "Options".4."Free memory"
Music collection
Backing up the music collection
The entire music collection can be stored on a
USB device. Make sure there is enough free
memory capacity on the USB device.
Depending on the number of tracks, backing up
the music collection may take several hours.
Seite 180EntertainmentCD/multimedia180
Online Edition for Part no. 01 40 2 914 595 - VI/12
Page 186 of 291

You are prompted by the iDrive or device to
enter the same Bluetooth passkey.7.Enter the passkey and confirm.8.Select the desired functions with which the
device is to be connected, for instance
"Audio".9."OK"
If pairing was successful, the device is displayed
as connected.
White symbol
: the device is active as an audio
source.
If pairing was unsuccessful: What to do if..., refer
to page 187.
Connecting a specific device
A device that has already been paired can be
connected as an active audio source.
Connecting is not possible when data is ex‐
changed via a mobile phone connected via Blue‐
tooth.
Requirements
If necessary, activate the audio connection of
the desired device from the list of paired devi‐
ces.1."CD/Multimedia"2."Bluetooth® (audio)"3.If necessary, "Bluetooth® audio".4.Select the desired device from the list of
paired devices.5.Open "Options".6."Configure phone"7.Activate "Audio".8."OK"
Connecting the device
1."CD/Multimedia"2."Bluetooth® (audio)"3.If necessary, "Bluetooth® audio".4.Select the desired device from the list of
paired devices.
White symbol : the device is active as an audio
source.
Playback
General information
▷The display of music track information de‐
pends on the device.▷Operation can takes place on the device or
iDrive.Seite 186EntertainmentCD/multimedia186
Online Edition for Part no. 01 40 2 914 595 - VI/12
Page 187 of 291
▷Playback is interrupted when data is ex‐
changed via a mobile phone connected via
Bluetooth.
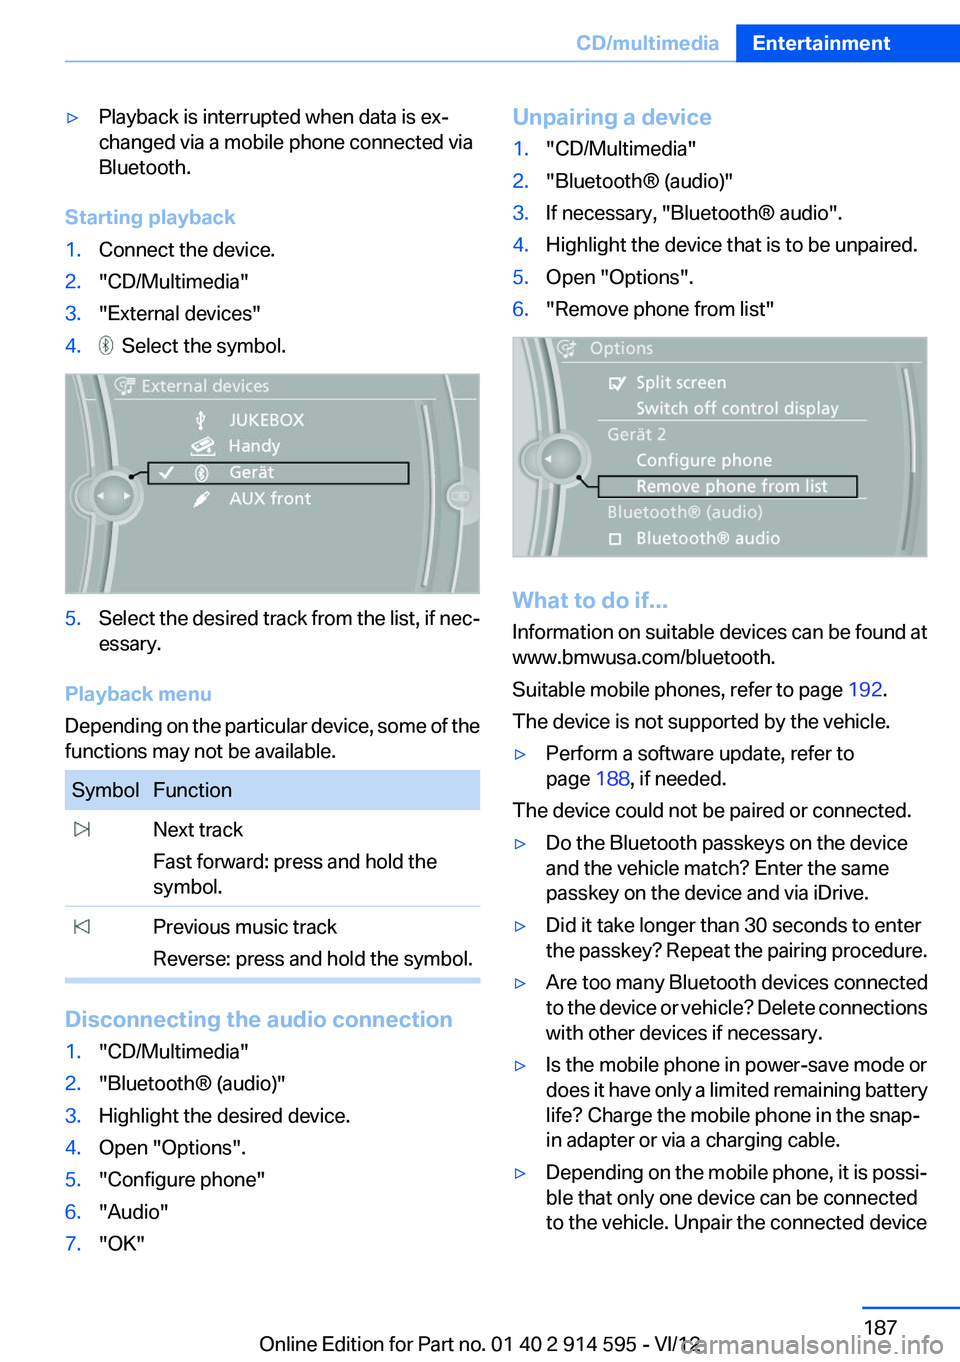
Starting playback
1.Connect the device.2."CD/Multimedia"3."External devices"4. Select the symbol.5.Select the desired track from the list, if nec‐
essary.
Playback menu
Depending on the particular device, some of the
functions may not be available.
SymbolFunction Next track
Fast forward: press and hold the
symbol. Previous music track
Reverse: press and hold the symbol.
Disconnecting the audio connection
1."CD/Multimedia"2."Bluetooth® (audio)"3.Highlight the desired device.4.Open "Options".5."Configure phone"6."Audio"7."OK"Unpairing a device1."CD/Multimedia"2."Bluetooth® (audio)"3.If necessary, "Bluetooth® audio".4.Highlight the device that is to be unpaired.5.Open "Options".6."Remove phone from list"
What to do if...
Information on suitable devices can be found at
www.bmwusa.com/bluetooth.
Suitable mobile phones, refer to page 192.
The device is not supported by the vehicle.
▷Perform a software update, refer to
page 188, if needed.
The device could not be paired or connected.
▷Do the Bluetooth passkeys on the device
and the vehicle match? Enter the same
passkey on the device and via iDrive.▷Did it take longer than 30 seconds to enter
the passkey? Repeat the pairing procedure.▷Are too many Bluetooth devices connected
to the device or vehicle? Delete connections
with other devices if necessary.▷Is the mobile phone in power-save mode or
does it have only a limited remaining battery
life? Charge the mobile phone in the snap-
in adapter or via a charging cable.▷Depending on the mobile phone, it is possi‐
ble that only one device can be connected
to the vehicle. Unpair the connected deviceSeite 187CD/multimediaEntertainment187
Online Edition for Part no. 01 40 2 914 595 - VI/12
Page 246 of 291
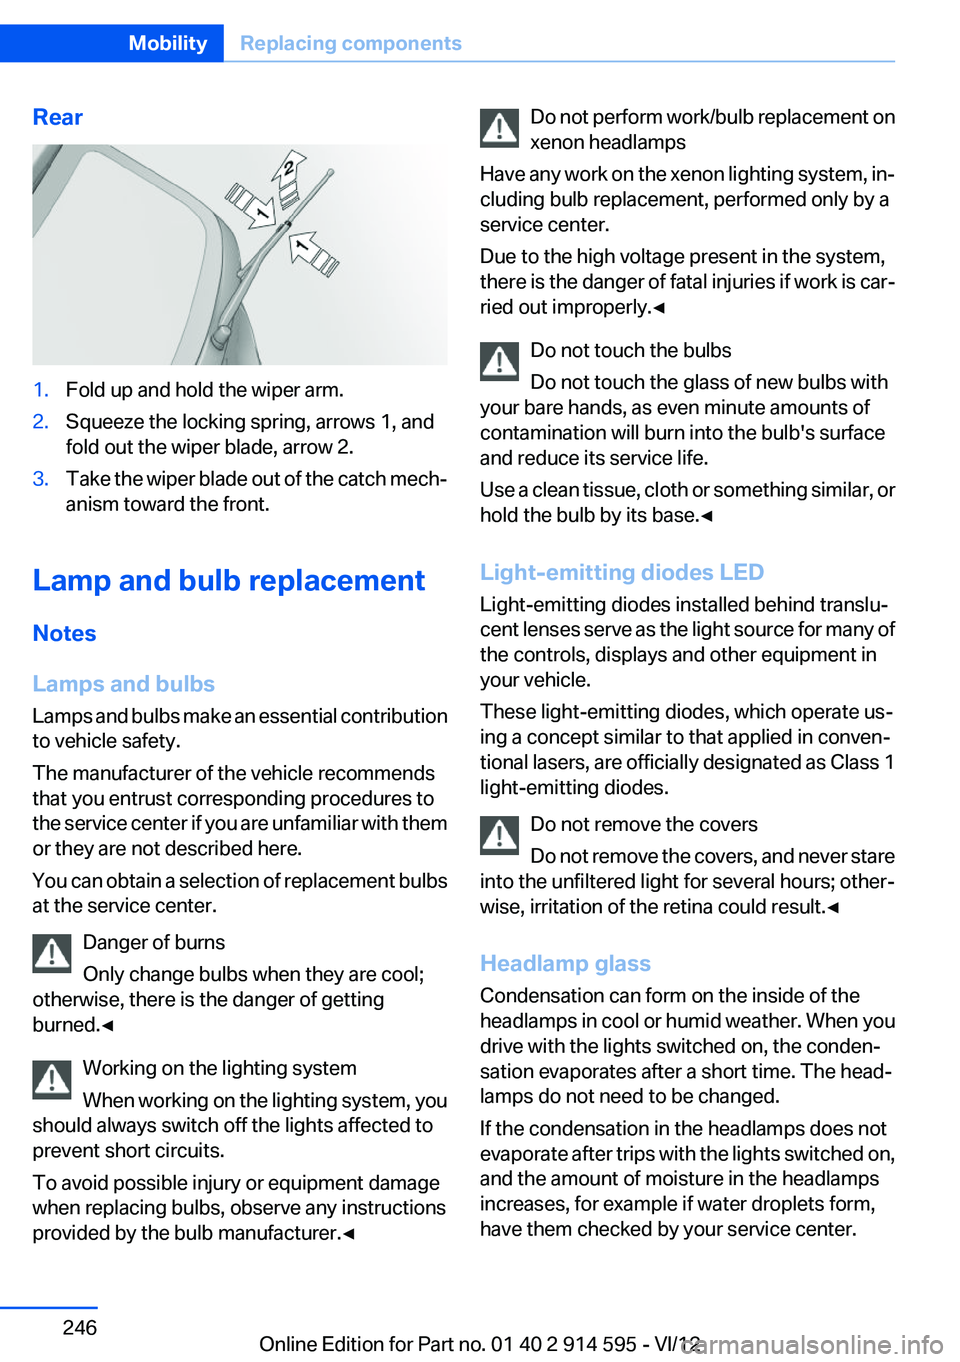
Rear1.Fold up and hold the wiper arm.2.Squeeze the locking spring, arrows 1, and
fold out the wiper blade, arrow 2.3.Take the wiper blade out of the catch mech‐
anism toward the front.
Lamp and bulb replacement
Notes
Lamps and bulbs
Lamps and bulbs make an essential contribution
to vehicle safety.
The manufacturer of the vehicle recommends
that you entrust corresponding procedures to
the service center if you are unfamiliar with them
or they are not described here.
You can obtain a selection of replacement bulbs
at the service center.
Danger of burns
Only change bulbs when they are cool;
otherwise, there is the danger of getting
burned.◀
Working on the lighting system
When working on the lighting system, you
should always switch off the lights affected to
prevent short circuits.
To avoid possible injury or equipment damage
when replacing bulbs, observe any instructions
provided by the bulb manufacturer.◀
Do not perform work/bulb replacement on
xenon headlamps
Have any work on the xenon lighting system, in‐
cluding bulb replacement, performed only by a
service center.
Due to the high voltage present in the system,
there is the danger of fatal injuries if work is car‐
ried out improperly.◀
Do not touch the bulbs
Do not touch the glass of new bulbs with
your bare hands, as even minute amounts of
contamination will burn into the bulb's surface
and reduce its service life.
Use a clean tissue, cloth or something similar, or
hold the bulb by its base.◀
Light-emitting diodes LED
Light-emitting diodes installed behind translu‐
cent lenses serve as the light source for many of
the controls, displays and other equipment in
your vehicle.
These light-emitting diodes, which operate us‐
ing a concept similar to that applied in conven‐
tional lasers, are officially designated as Class 1
light-emitting diodes.
Do not remove the covers
Do not remove the covers, and never stare
into the unfiltered light for several hours; other‐
wise, irritation of the retina could result.◀
Headlamp glass
Condensation can form on the inside of the
headlamps in cool or humid weather. When you
drive with the lights switched on, the conden‐
sation evaporates after a short time. The head‐
lamps do not need to be changed.
If the condensation in the headlamps does not
evaporate after trips with the lights switched on,
and the amount of moisture in the headlamps
increases, for example if water droplets form,
have them checked by your service center.Seite 246MobilityReplacing components246
Online Edition for Part no. 01 40 2 914 595 - VI/12
Page 248 of 291
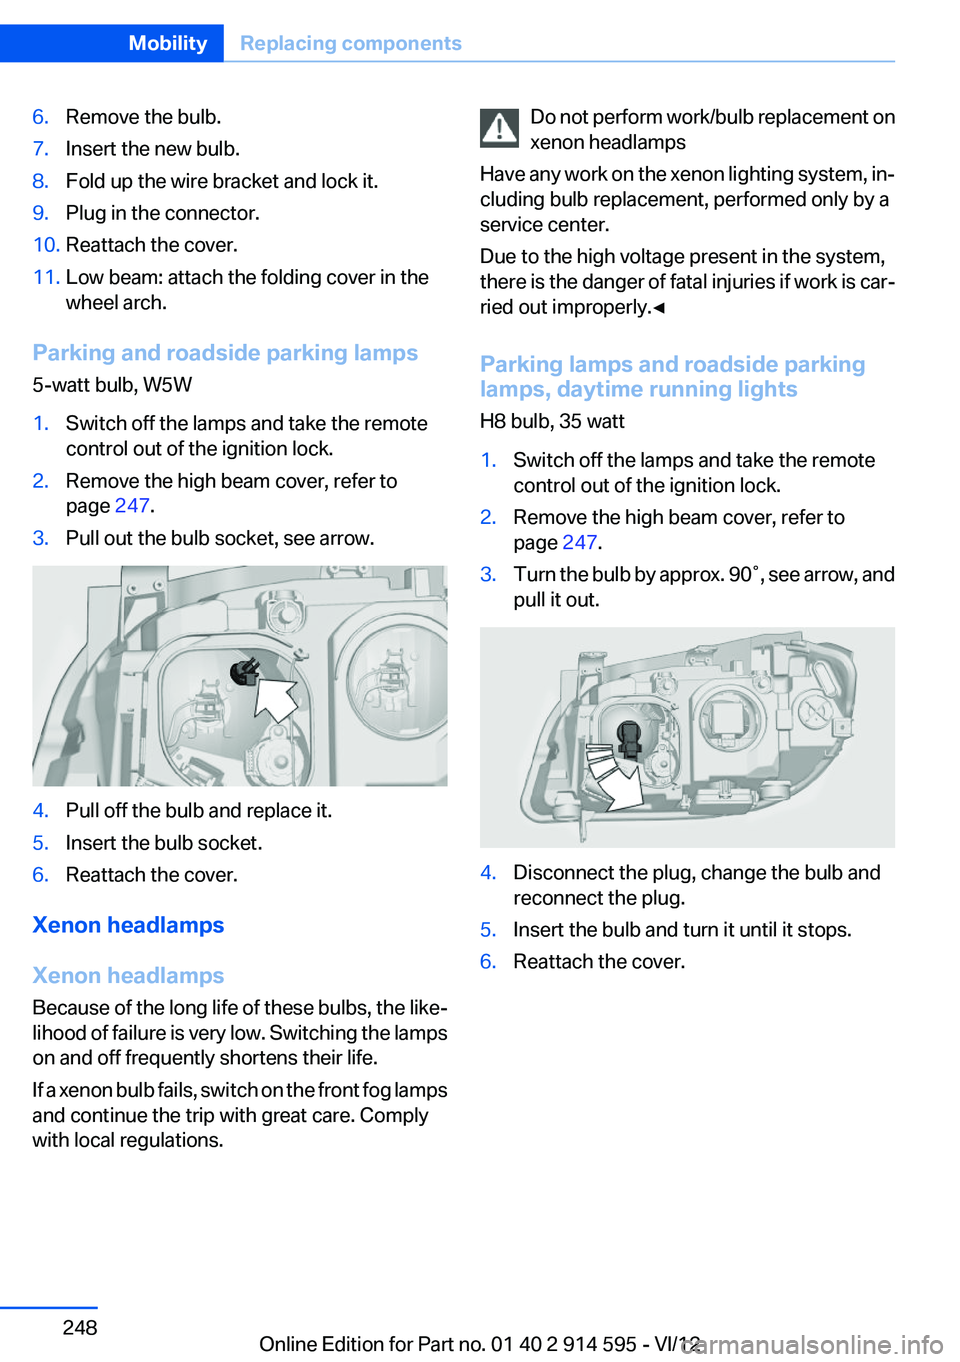
6.Remove the bulb.7.Insert the new bulb.8.Fold up the wire bracket and lock it.9.Plug in the connector.10.Reattach the cover.11.Low beam: attach the folding cover in the
wheel arch.
Parking and roadside parking lamps
5-watt bulb, W5W
1.Switch off the lamps and take the remote
control out of the ignition lock.2.Remove the high beam cover, refer to
page 247.3.Pull out the bulb socket, see arrow.4.Pull off the bulb and replace it.5.Insert the bulb socket.6.Reattach the cover.
Xenon headlamps
Xenon headlamps
Because of the long life of these bulbs, the like‐
lihood of failure is very low. Switching the lamps
on and off frequently shortens their life.
If a xenon bulb fails, switch on the front fog lamps
and continue the trip with great care. Comply
with local regulations.
Do not perform work/bulb replacement on
xenon headlamps
Have any work on the xenon lighting system, in‐
cluding bulb replacement, performed only by a
service center.
Due to the high voltage present in the system,
there is the danger of fatal injuries if work is car‐
ried out improperly.◀
Parking lamps and roadside parking
lamps, daytime running lights
H8 bulb, 35 watt1.Switch off the lamps and take the remote
control out of the ignition lock.2.Remove the high beam cover, refer to
page 247.3.Turn the bulb by approx. 90˚, see arrow, and
pull it out.4.Disconnect the plug, change the bulb and
reconnect the plug.5.Insert the bulb and turn it until it stops.6.Reattach the cover.Seite 248MobilityReplacing components248
Online Edition for Part no. 01 40 2 914 595 - VI/12
Page 278 of 291

Carpet, care 261
Car phone, installation loca‐ tion, refer to Center arm‐
rest 120
Car phone, refer to Tele‐ phone 192
Car vacuum cleaner, connect‐ ing, refer to Connecting elec‐
trical devices 114
Car wash 259
Catalytic converter, refer to Hot exhaust system 126
CBS Condition Based Serv‐ ice 243
CD/DVD 170
CD/DVD notes 175
CD changer 174
CDs, storing 176
Cell phone 192
Cell phone, installation loca‐ tion, refer to Center arm‐
rest 120
Center armrest, front 120
Center armrest, rear 121
Center brake lamp, bulb re‐ placement 250
Center console, refer to Around the center con‐
sole 16
Central locking– Comfort Access 36– From the inside 34– Setting the unlocking char‐
acteristics 32
Central locking system
– From the outside 31– Principle 31
Central screen, refer to Control
Display 18
Changes, technical, refer to Safety 6
Changing wheels/tires 235
Check Control 77
Children, transporting 50
Child restraint fixing system LATCH 51
Child restraint fixing sys‐
tems 50
Child restraint fixing systems, mounting 50
Child safety locks 53
Child seat, mounting 50
Child seats, refer to Transport‐ ing children safely 50
Chrome parts, care 261
Cigarette lighter, connecting electrical devices 114
Cigarette lighter, refer to Lighter 114
Cigarette lighter socket 114
Circulation of air, refer to Re‐ circulated air mode 107
Cleaning, displays 262
Cleaning your BMW, refer to Care 259
Clock 68
Clock– 12h/24h format 73– Setting the time and date 73
Closing
– From the inside 34– From the outside 32
Clothes hooks 122
Cockpit 12
Cold start, refer to Starting the engine 55
Combination instrument, refer to Instrument cluster 14
Combination switch, refer to Turn signal/high beams/
headlamp flasher 59
Combination switch, refer to Washer/wiper system 59
Comfort Access
– Battery replacement 38
Comfort area, refer to Around
the center console 16
Compact wheel, inflation pres‐ sure 228
Compartment for remote con‐ trol, refer to Ignition lock 54
Compartment in floor 118
Compartments, refer to Stor‐
age compartments 120, 121
Compass, digital 112
Computer 70
Computer, displaying informa‐ tion 70
Computer, displays on the Control Display 70
Concierge service 216
Condensation under the vehi‐ cle 128
Condition Based Service CBS 243
Confirmation signals for lock‐ ing/unlocking the vehicle 33
ConnectedDrive 215
Connecting, mobile phone, re‐ fer to Pairing the mobile
phone 193
Consumption, refer to Aver‐ age fuel consumption 70
Contacts 205, 213
Control Display 18
Control Display, care 262
Control Display, settings 74
Controller 19
Controls and displays 12
Control systems, driving sta‐ bility 94
Convenient operation– Glass sunroof 32– Window 32
Coolant 242
Coolant, checking the level 242
Coolant temperature 69
Cooling function, switching on and off 107
Cooling, maximum 106
Cooling system, refer to Cool‐ ant 242
Corrosion on brake discs 128
Courtesy lamps, refer to Inte‐ rior lamps 84
Cradle for telephone or mobile phone, refer to Snap-in
adapter 202
Seite 278ReferenceEverything from A to Z278
Online Edition for Part no. 01 40 2 914 595 - VI/12
Page 281 of 291
Fuse 252
G
Garage door opener, refer to Universal Garage Door
Opener 110
Gasoline 226
Gasoline gauge, refer to Fuel gauge 69
Gasoline quality 226
Gas station recommenda‐ tion 151
Gear change– Automatic transmission with
Steptronic 62
Gear change, automatic trans‐
mission with Steptronic 66
Gear change, via shift pad‐ dles 66
Gear display, automatic trans‐ mission with Steptronic 62
General driving notes 126
Glass sunroof, electric
– Convenient operation 32– Remote control 32
Glass sunroof, refer to Panor‐
amic glass sunroof 41
Glove compartment 120
Glove compartment
– USB interface 120
Glove compartment, light‐
ing 120
GPS navigation, refer to Navi‐ gation system 138
Gross vehicle weight, refer to Weights 267
H
Halogen headlamps
– Bulb replacement 247
Hand-held transmitter, alter‐
nating code 111
Hands-free microphone 16
Hazard warning sys‐ tem 16, 253
HDC Hill Descent Control 96
HD Radio 163
Head airbags 85
Headlamp control, auto‐ matic 80, 81
Headlamp courtesy delay fea‐ ture 81
Headlamp cover, remov‐ ing 247
Headlamp flasher 59, 82
Headlamp flasher, indicator lamp 15
Headlamps 80
Headlamps– Bulb replacement 247
Headlamps, care 260
Headlamps, cleaning 60
Headlamps, cleaning, washer fluid 62
Headliner 17
Head restraints 46
Head restraints
– Adjusting the height 46– Removing 47
Heating
– Rear window 107– Seats 45
Heating, mirrors 49
Heavy cargo, refer to Stowing cargo 131
Height adjustment
– Seats 43
Height, refer to Dimen‐
sions 266
High-beam Assistant 82
High beams 82
High beams
– Bulb replacement 247
High beams/low beams, auto‐
matic, refer to High-beam
Assistant 82
High beams, indicator lamp 15
High-pressure washers 259
Hill Descent Control HDC 96
Hill drive-off assistant, refer to Drive-off assistant 97
Hills 128
Holder for beverages 122
Holder for remote control, re‐ fer to Ignition lock 54
Homepage 6
Hood 238
Hood, opening 238
Horn 12
Hot exhaust system 126
Hotline 218
House number, entering for navigation 141
Hydraulic brake assistant 94
Hydroplaning 127
I
Ice warning, refer to External temperature warning 68
Icy roads, refer to External temperature warning 68
Identification marks, tires 233
Identification number, refer to Engine compartment 238
iDrive 18
iDrive– Changing settings 74– Changing the date and
time 73– Changing the language 74– Changing the units of meas‐
ure and display format 72– Setting the brightness 75
Ignition 54
Ignition key position 1, refer to Radio ready state 54
Ignition key position 2, refer to Ignition on 54
Ignition key, refer to Remote control with integrated
key 30
Ignition lock 54
Ignition, switched off 55
Ignition, switched on 54
Indication of a flat tire 89, 91
Indicator and warning lamps 15
Seite 281Everything from A to ZReference281
Online Edition for Part no. 01 40 2 914 595 - VI/12