2013 BMW X1 XDRIVE 28I center console
[x] Cancel search: center consolePage 16 of 291

All around the center console1Headliner 172Control Display 183Air vent 1084Hazard warning system 253Central locking system 345Automatic climate control 1056Glove compartment 1207Radio and CD/DVD drive 162
Programmable memory buttons 238PDC Park Distance Control 100
Backup camera 102HDC Hill Descent Control 96Deactivate the Automatic Engine
Start/Stop Function 56DSC Dynamic Stability Con‐
trol 94
DTC Dynamic Traction Con‐
trol 95ECO PRO 1349Selector lever with automatic transmis‐
sion 6210Controller with buttons 18Seite 16At a glanceCockpit16
Online Edition for Part no. 01 40 2 914 595 - VI/12
Page 114 of 291
Ashtray/cigarette lighter
Opening
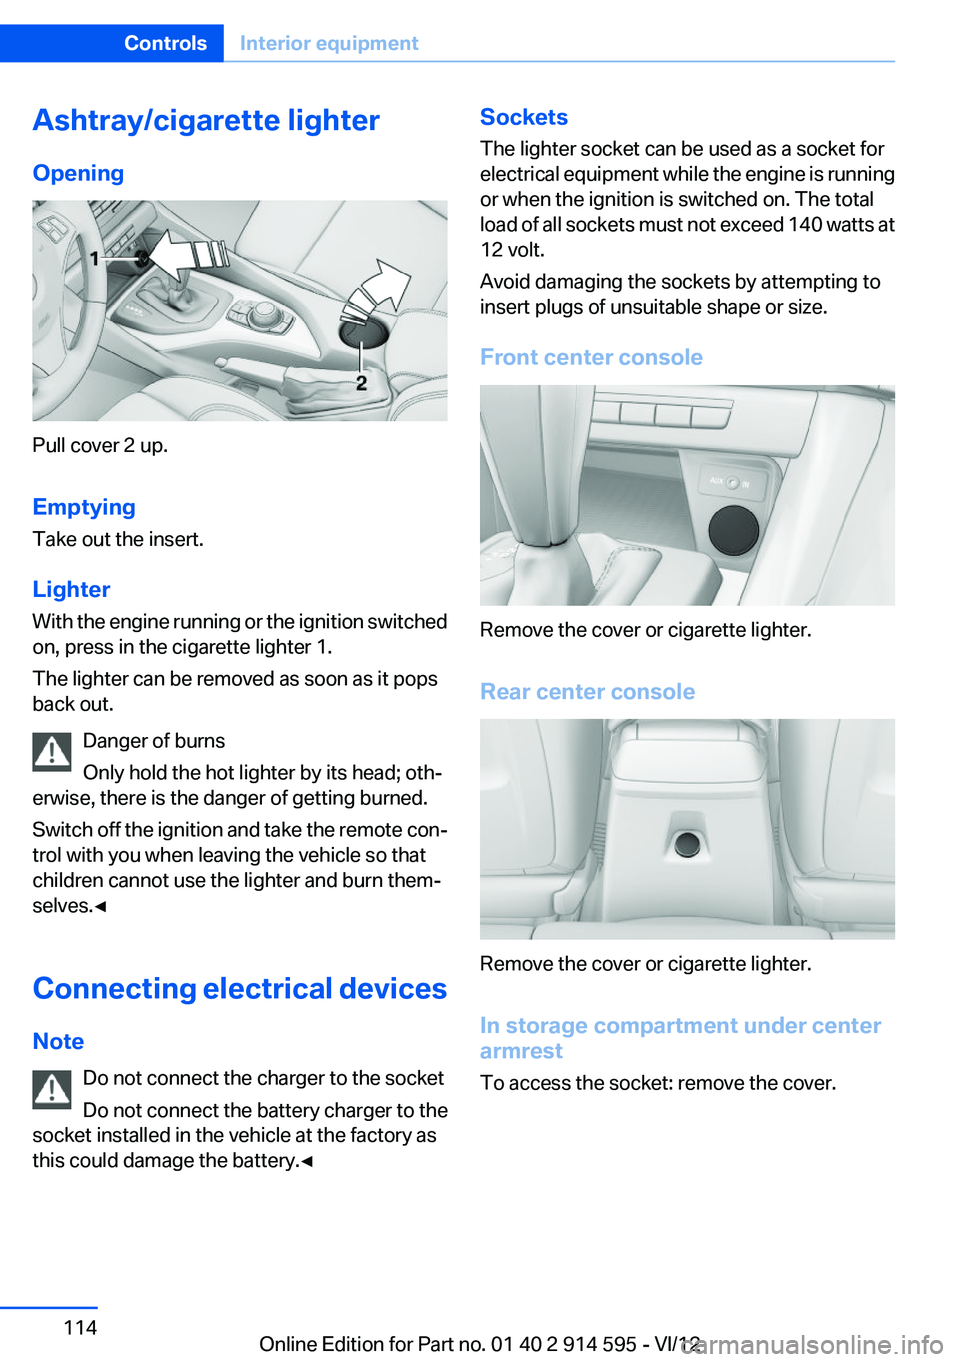
Pull cover 2 up.
Emptying
Take out the insert.
Lighter
With the engine running or the ignition switched
on, press in the cigarette lighter 1.
The lighter can be removed as soon as it pops
back out.
Danger of burns
Only hold the hot lighter by its head; oth‐
erwise, there is the danger of getting burned.
Switch off the ignition and take the remote con‐
trol with you when leaving the vehicle so that
children cannot use the lighter and burn them‐
selves.◀
Connecting electrical devices
Note Do not connect the charger to the socket
Do not connect the battery charger to the
socket installed in the vehicle at the factory as
this could damage the battery.◀
Sockets
The lighter socket can be used as a socket for
electrical equipment while the engine is running
or when the ignition is switched on. The total
load of all sockets must not exceed 140 watts at
12 volt.
Avoid damaging the sockets by attempting to
insert plugs of unsuitable shape or size.
Front center console
Remove the cover or cigarette lighter.
Rear center console
Remove the cover or cigarette lighter.
In storage compartment under center
armrest
To access the socket: remove the cover.
Seite 114ControlsInterior equipment114
Online Edition for Part no. 01 40 2 914 595 - VI/12
Page 121 of 291
cover for the snap-in adapter, depending on the
version.
Details on this mobile phone cradle, refer to
page 202.
Opening
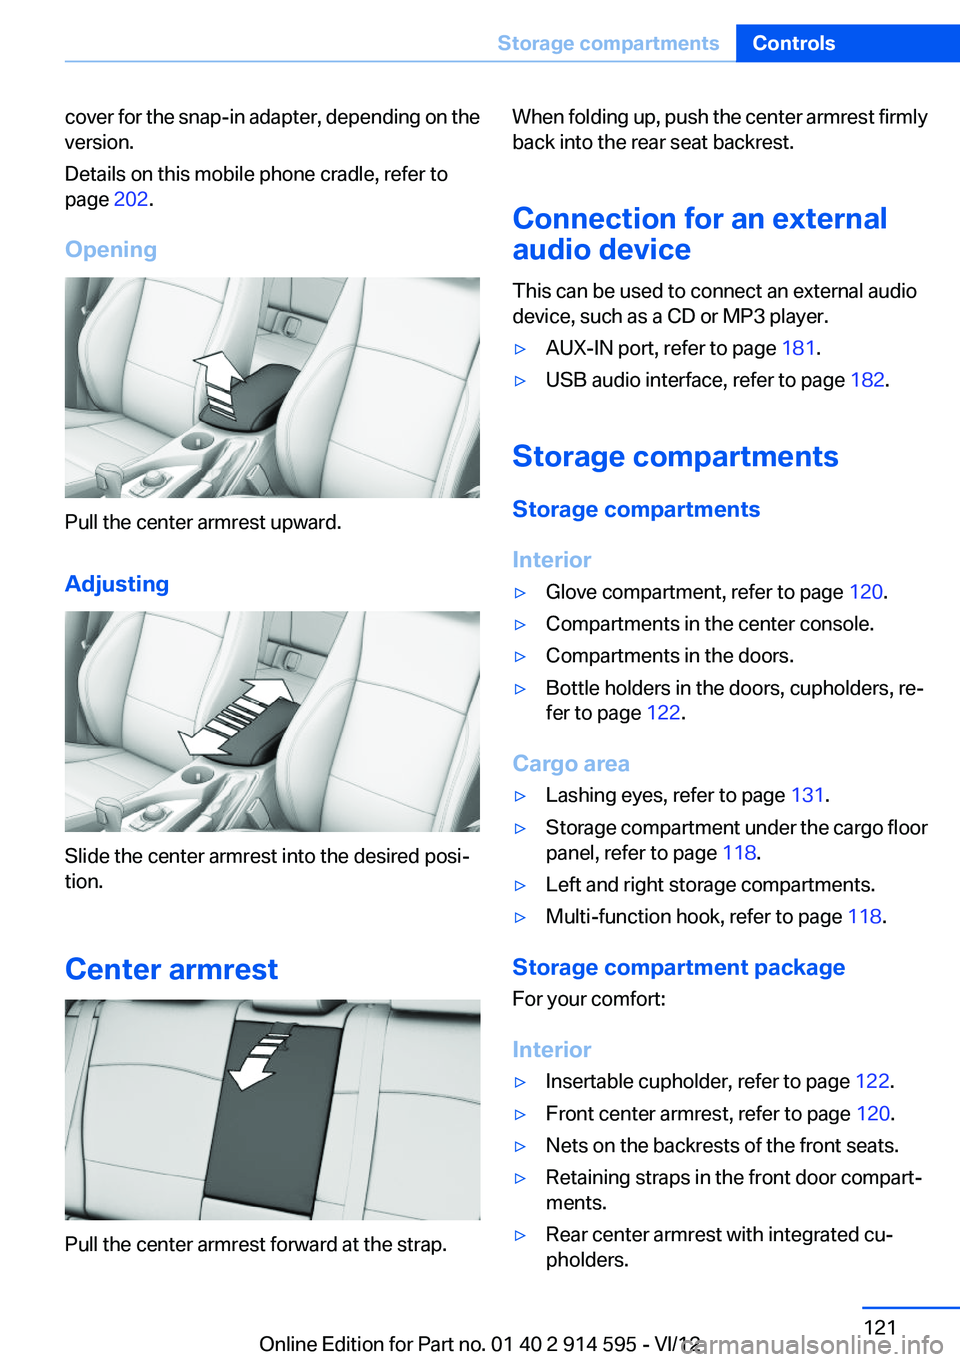
Pull the center armrest upward.
Adjusting
Slide the center armrest into the desired posi‐
tion.
Center armrest
Pull the center armrest forward at the strap.
When folding up, push the center armrest firmly
back into the rear seat backrest.
Connection for an external
audio device
This can be used to connect an external audio
device, such as a CD or MP3 player.▷AUX-IN port, refer to page 181.▷USB audio interface, refer to page 182.
Storage compartments
Storage compartments
Interior
▷Glove compartment, refer to page 120.▷Compartments in the center console.▷Compartments in the doors.▷Bottle holders in the doors, cupholders, re‐
fer to page 122.
Cargo area
▷Lashing eyes, refer to page 131.▷Storage compartment under the cargo floor
panel, refer to page 118.▷Left and right storage compartments.▷Multi-function hook, refer to page 118.
Storage compartment package
For your comfort:
Interior
▷Insertable cupholder, refer to page 122.▷Front center armrest, refer to page 120.▷Nets on the backrests of the front seats.▷Retaining straps in the front door compart‐
ments.▷Rear center armrest with integrated cu‐
pholders.Seite 121Storage compartmentsControls121
Online Edition for Part no. 01 40 2 914 595 - VI/12
Page 122 of 291
Cargo area▷Retaining strap on the left side panel for se‐
curing small items.▷Retaining straps on the cargo area floor.▷Insertable partition elements for the storage
compartment under the cargo floor panel,
used to variably subdivide the storage com‐
partment.
With partition net: arrange the partition ele‐
ments in such a way that there is enough
space at the rear of the storage compart‐
ment for the partition net.▷Storage net next to the storage compart‐
ment on the right in the cargo area.
Clothes hooks
The clothes hooks are located at the grab han‐
dles in the rear.
Do not obstruct view
When suspending clothing from the
hooks, ensure that it will not obstruct the driver's
vision.◀
No heavy objects
Do not hang heavy objects from the hooks;
otherwise, they may present a danger to pas‐
sengers during braking and evasive maneu‐
vers.◀
Cupholders
Notes Shatter-proof containers and no hot
drinks
Use light and shatter-proof containers and do
not transport hot drinks. Otherwise, there is the
increased danger of injury in an accident.◀
Unsuitable containers
Do not forcefully push unsuitable contain‐
ers into the cupholders. This may result in dam‐
age.◀
Front▷In the front door compartments as a bottle
holder for 1-quart/1 liter bottles, for exam‐
ple.
Insert the bottle into the bottle holder with
the bottom slanted toward the front.▷In the center console.
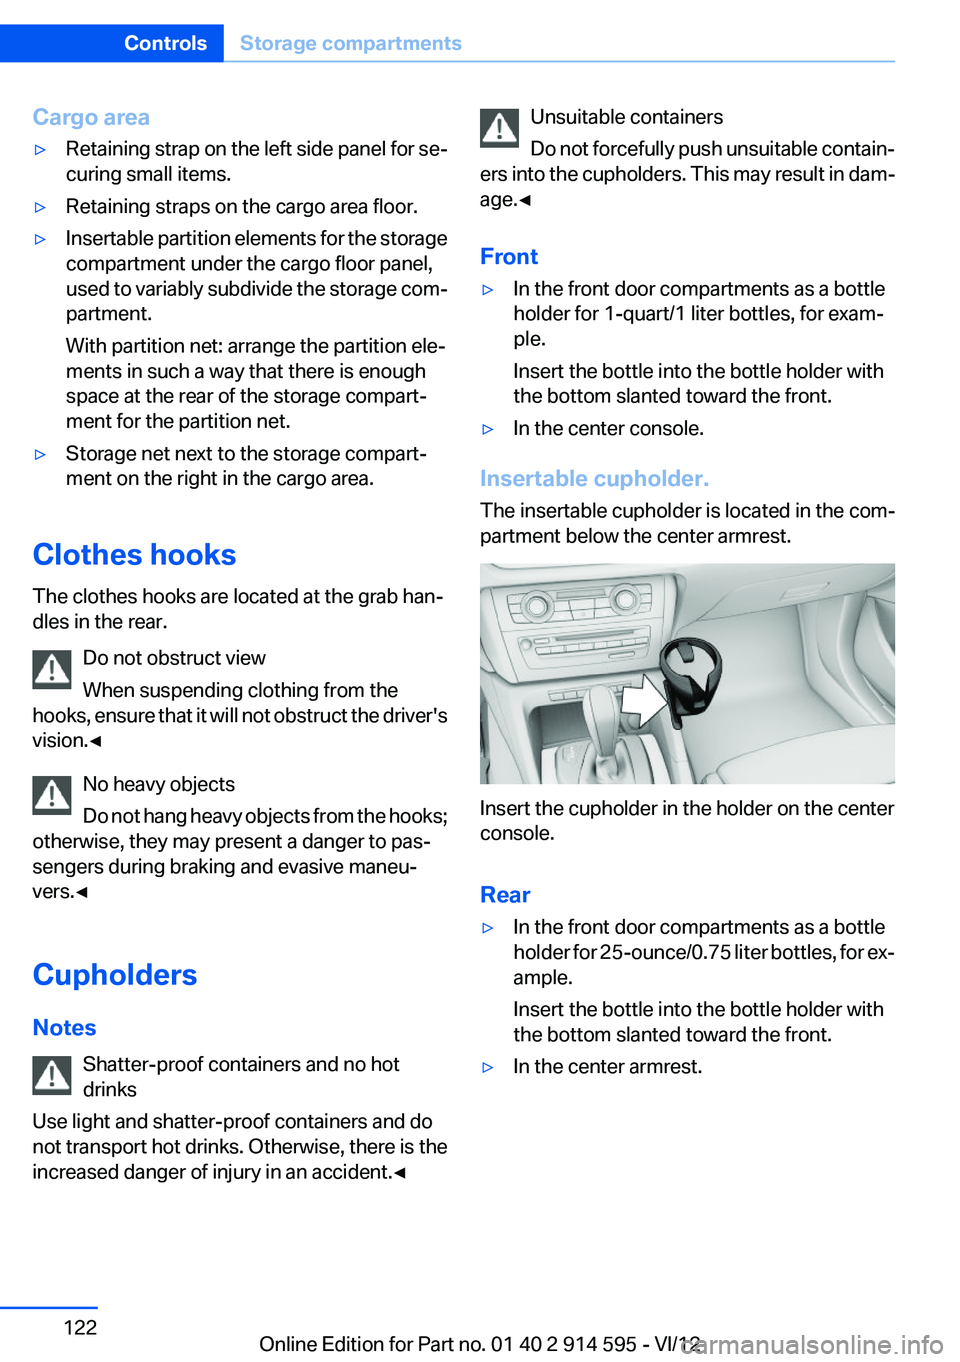
Insertable cupholder.
The insertable cupholder is located in the com‐
partment below the center armrest.
Insert the cupholder in the holder on the center
console.
Rear
▷In the front door compartments as a bottle
holder for 25-ounce/0.75 liter bottles, for ex‐
ample.
Insert the bottle into the bottle holder with
the bottom slanted toward the front.▷In the center armrest.Seite 122ControlsStorage compartments122
Online Edition for Part no. 01 40 2 914 595 - VI/12
Page 181 of 291
Therefore, it is best to perform the backup dur‐
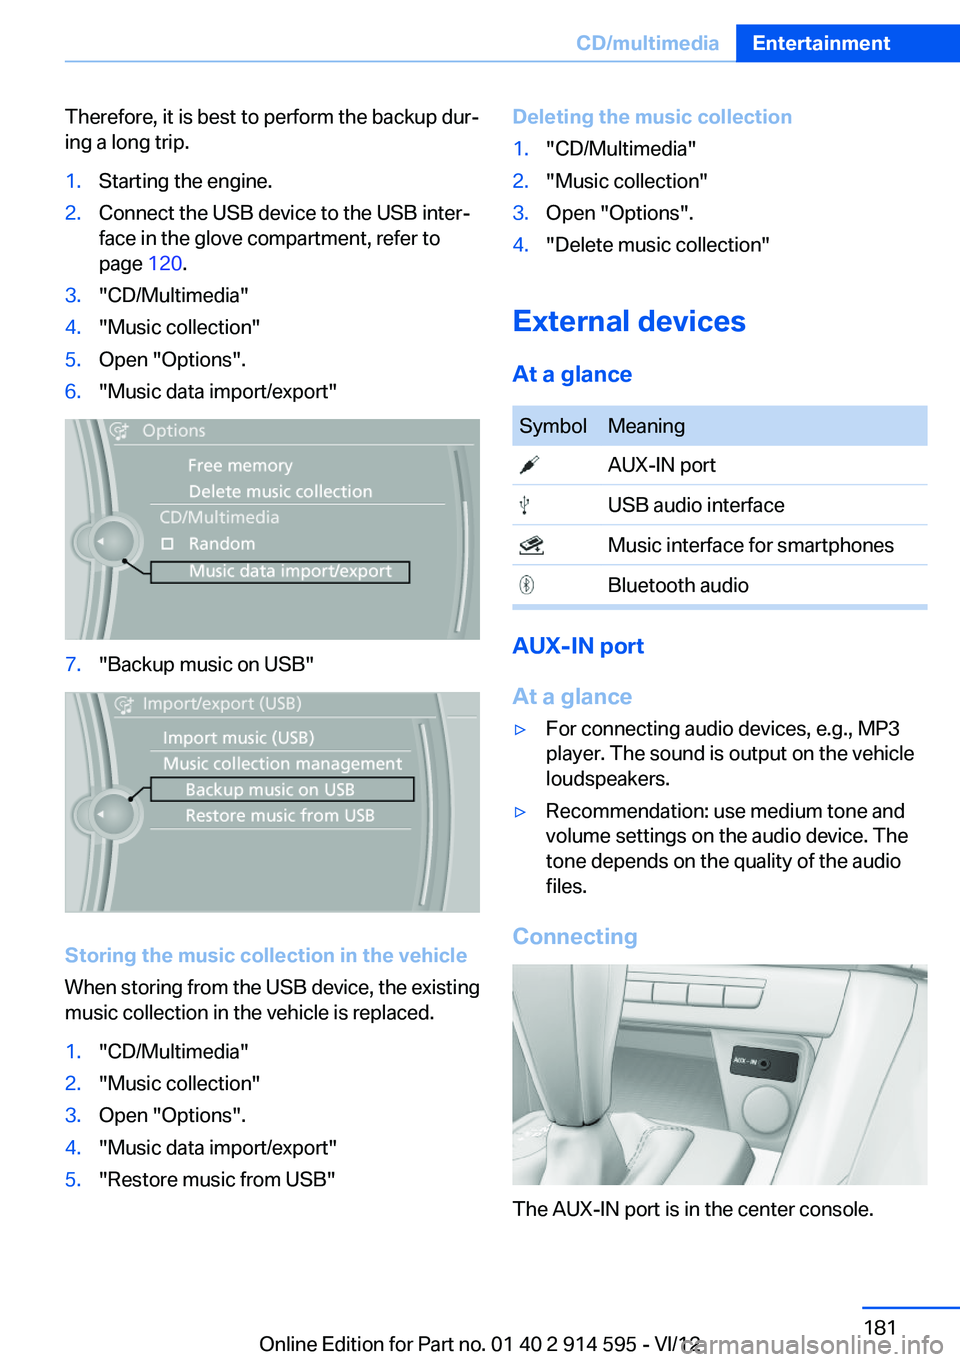
ing a long trip.1.Starting the engine.2.Connect the USB device to the USB inter‐
face in the glove compartment, refer to
page 120.3."CD/Multimedia"4."Music collection"5.Open "Options".6."Music data import/export"7."Backup music on USB"
Storing the music collection in the vehicle
When storing from the USB device, the existing
music collection in the vehicle is replaced.
1."CD/Multimedia"2."Music collection"3.Open "Options".4."Music data import/export"5."Restore music from USB"Deleting the music collection1."CD/Multimedia"2."Music collection"3.Open "Options".4."Delete music collection"
External devices
At a glance
SymbolMeaning AUX-IN port USB audio interface Music interface for smartphones Bluetooth audio
AUX-IN port
At a glance
▷For connecting audio devices, e.g., MP3
player. The sound is output on the vehicle
loudspeakers.▷Recommendation: use medium tone and
volume settings on the audio device. The
tone depends on the quality of the audio
files.
Connecting
The AUX-IN port is in the center console.
Seite 181CD/multimediaEntertainment181
Online Edition for Part no. 01 40 2 914 595 - VI/12
Page 182 of 291
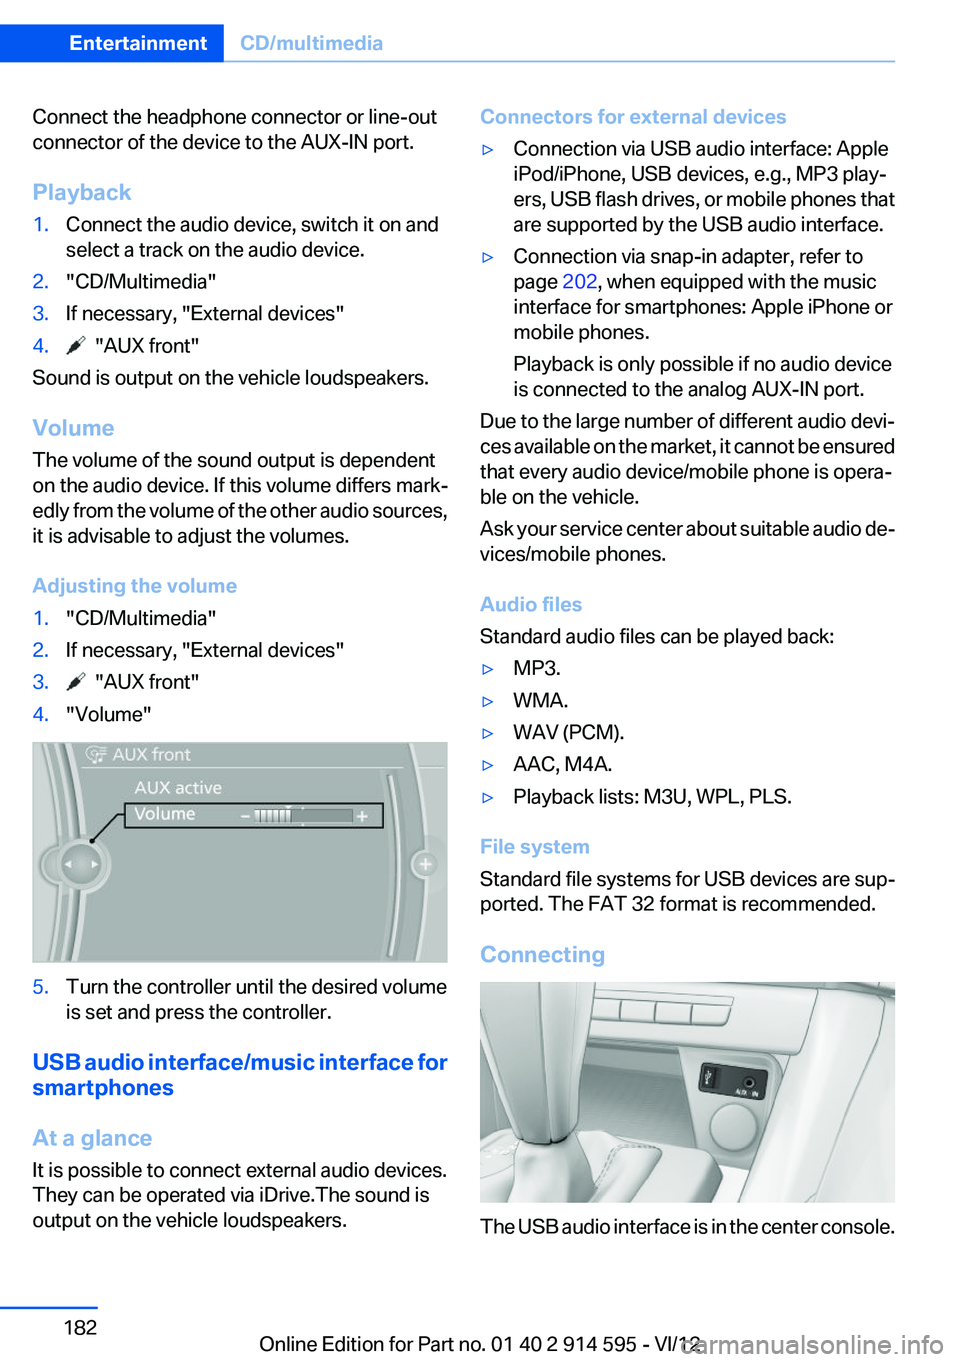
Connect the headphone connector or line-out
connector of the device to the AUX-IN port.
Playback1.Connect the audio device, switch it on and
select a track on the audio device.2."CD/Multimedia"3.If necessary, "External devices"4. "AUX front"
Sound is output on the vehicle loudspeakers.
Volume
The volume of the sound output is dependent
on the audio device. If this volume differs mark‐
edly from the volume of the other audio sources,
it is advisable to adjust the volumes.
Adjusting the volume
1."CD/Multimedia"2.If necessary, "External devices"3. "AUX front"4."Volume"5.Turn the controller until the desired volume
is set and press the controller.
USB audio interface/music interface for
smartphones
At a glance
It is possible to connect external audio devices.
They can be operated via iDrive.The sound is
output on the vehicle loudspeakers.
Connectors for external devices▷Connection via USB audio interface: Apple
iPod/iPhone, USB devices, e.g., MP3 play‐
ers, USB flash drives, or mobile phones that
are supported by the USB audio interface.▷Connection via snap-in adapter, refer to
page 202, when equipped with the music
interface for smartphones: Apple iPhone or
mobile phones.
Playback is only possible if no audio device
is connected to the analog AUX-IN port.
Due to the large number of different audio devi‐
ces available on the market, it cannot be ensured
that every audio device/mobile phone is opera‐
ble on the vehicle.
Ask your service center about suitable audio de‐
vices/mobile phones.
Audio files
Standard audio files can be played back:
▷MP3.▷WMA.▷WAV (PCM).▷AAC, M4A.▷Playback lists: M3U, WPL, PLS.
File system
Standard file systems for USB devices are sup‐
ported. The FAT 32 format is recommended.
Connecting
The USB audio interface is in the center console.
Seite 182EntertainmentCD/multimedia182
Online Edition for Part no. 01 40 2 914 595 - VI/12
Page 188 of 291
from the vehicle and pair and connect only
one device.▷The device no longer reacts? Switch the de‐
vice off and on again.▷Repeat the pairing procedure.
Music cannot be played back.
▷Start the program for playing back music
data on the device and select a track on the
device if necessary.▷Switch the radio on and off again.
Music files can only be played back softly.
▷Adjust the volume settings on the device.
Playback is disturbed when buttons are pressed
or by other messages on the device.
▷Switch off the button tones and other signal
tones on the device.
Playback is interrupted by a telephone call or
traffic bulletin and is not resumed automatically.
▷Switch the radio on and off again.
Playback is not possible if the mobile phone is
connected via Bluetooth Audio while it is also
connected via the USB interface or the snap-in
adapter.
▷Disconnect one of the two connections; for
example, disconnect the audio connection,
refer to page 187, and restart playback.
If all points in this list have been checked and the
required function is still not available, please
contact the hotline or service center.
Software Update
The vehicle supports various external devices
depending on the current software version. With
a software update, the vehicle can support new
mobile phones or new external device, for ex‐
ample.
▷USB.
Software updates and related current infor‐
mation is available at www.bmw.com/up‐
date.Displaying the current version
The currently installed software is displayed.1."Settings"2."Software update"3."Show current version"
Select desired version to display additional in‐
formation.
Updating software via USB
The software may only be updated when the ve‐
hicle is stationary.
1.Store the file for the software-update in the
main director of a USB flash drive.2.Insert the USB flash drive into the USB audio
interface in the center console. An update
via the USB interface in the glove compart‐
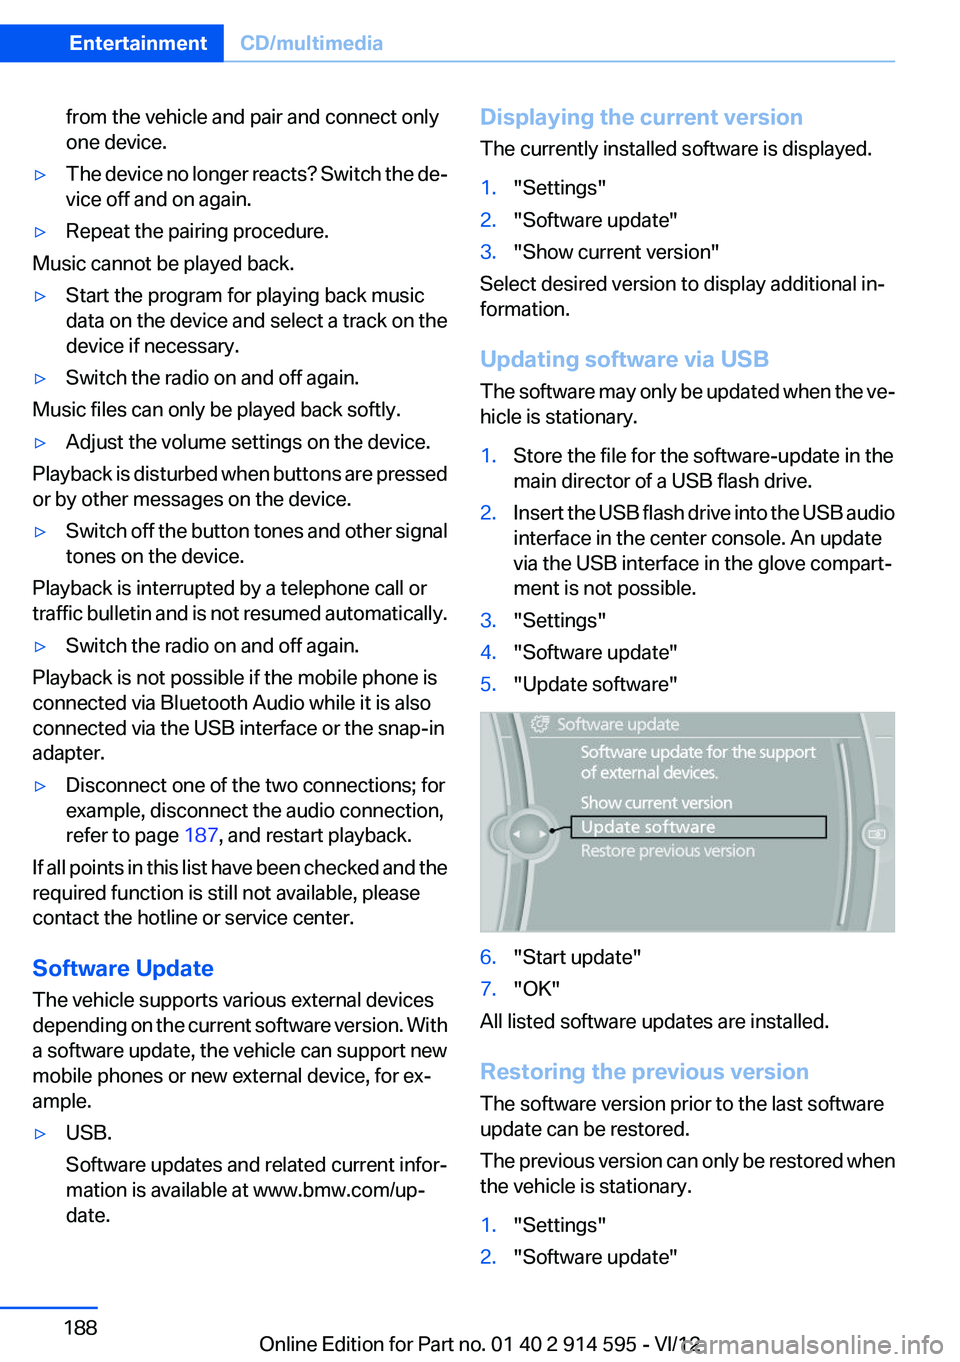
ment is not possible.3."Settings"4."Software update"5."Update software"6."Start update"7."OK"
All listed software updates are installed.
Restoring the previous version
The software version prior to the last software
update can be restored.
The previous version can only be restored when
the vehicle is stationary.
1."Settings"2."Software update"Seite 188EntertainmentCD/multimedia188
Online Edition for Part no. 01 40 2 914 595 - VI/12
Page 196 of 291
▷Is the ambient temperature too high or low?
Do not expose the mobile phone to extreme
environmental conditions.
The telephone functions are not available.
▷Is the mobile phone paired as an additional
telephone and is the additional telephone
function deactivated? Activate the function.▷Is an outgoing call not possible? Connect
the mobile phone as a telephone.
No phone book entries or only some phone book
entries are displayed, or they are incomplete.
▷Transmission of the phone book entries is
not yet complete.▷It is possible that only the phone book en‐
tries of the mobile phone or the SIM card are
transmitted.▷It may not be possible to display phone book
entries with special characters.▷The number of phone book entries to be
stored is too high.▷Is the data volume of the contact too large,
e. g., due to stored information such as
notes? Reduce the data volume of the con‐
tact.▷Is the mobile phone connected as an audio
source or additional telephone? The mobile
phone must be connected as a telephone.
The phone connection quality is poor.
▷The strength of the Bluetooth signal on the
mobile phone can be adjusted, depending
on the mobile phone.▷Insert the mobile phone into the snap-in
adapter or place it in the area of the center
console.▷Adjust the volume of the microphone and
loudspeakers separately.
If all points in this list have been checked and the
required function is still not available, contact
Customer Relations or the service center.
Controls
Adjusting the volume
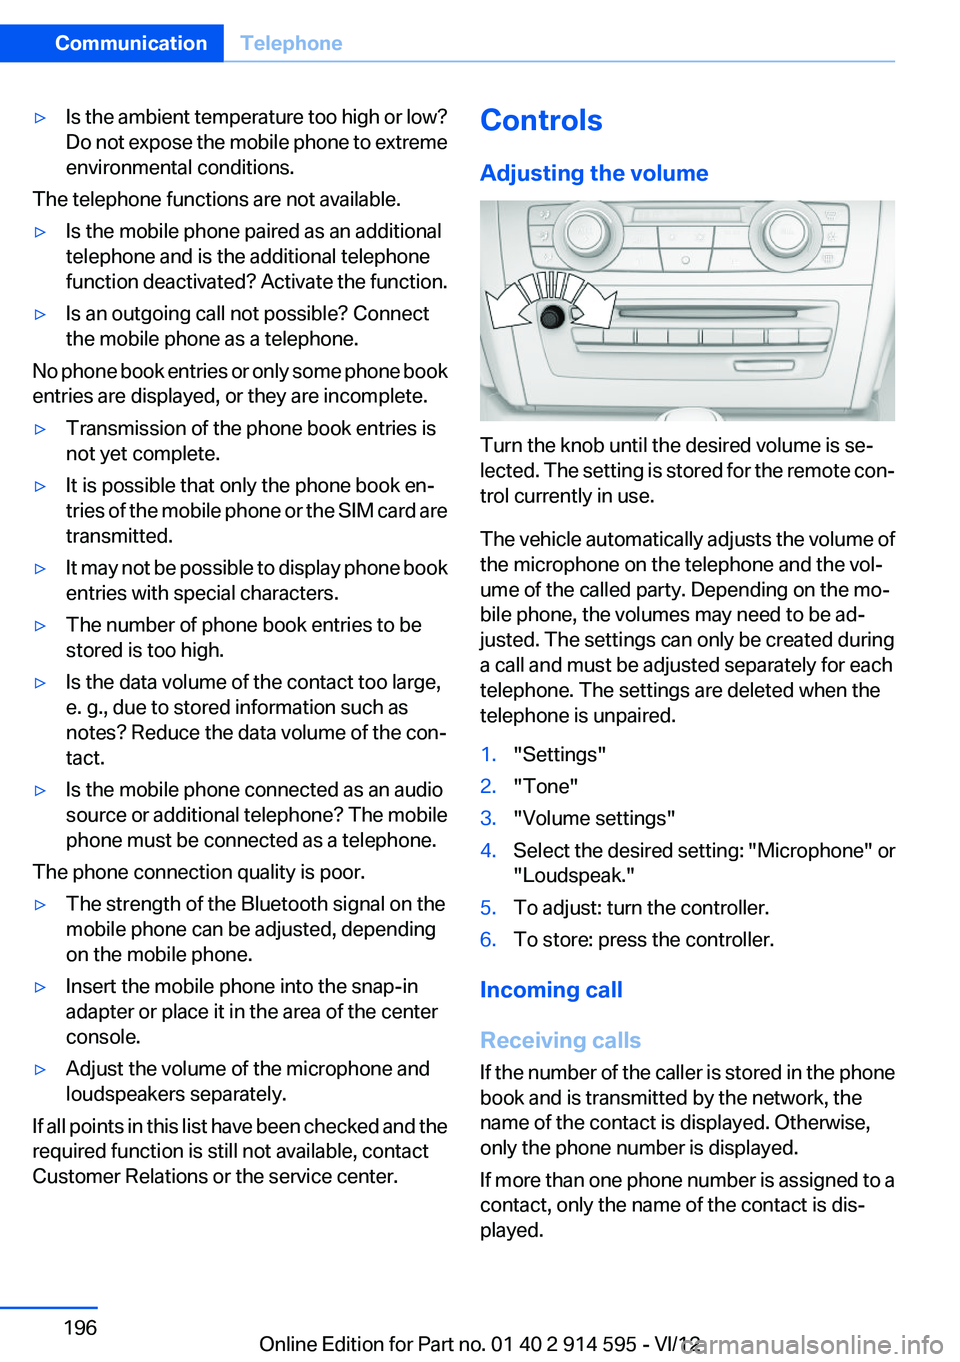
Turn the knob until the desired volume is se‐
lected. The setting is stored for the remote con‐
trol currently in use.
The vehicle automatically adjusts the volume of
the microphone on the telephone and the vol‐
ume of the called party. Depending on the mo‐
bile phone, the volumes may need to be ad‐
justed. The settings can only be created during
a call and must be adjusted separately for each
telephone. The settings are deleted when the
telephone is unpaired.
1."Settings"2."Tone"3."Volume settings"4.Select the desired setting: "Microphone" or
"Loudspeak."5.To adjust: turn the controller.6.To store: press the controller.
Incoming call
Receiving calls
If the number of the caller is stored in the phone
book and is transmitted by the network, the
name of the contact is displayed. Otherwise,
only the phone number is displayed.
If more than one phone number is assigned to a
contact, only the name of the contact is dis‐
played.
Seite 196CommunicationTelephone196
Online Edition for Part no. 01 40 2 914 595 - VI/12