2013 BMW X1 XDRIVE 28I fold seats
[x] Cancel search: fold seatsPage 116 of 291

Observe the instructions concerning the
safety belt
Observe the instructions concerning the safety
belt, refer to page 45. Otherwise, personal pro‐
tection may be compromised.◀
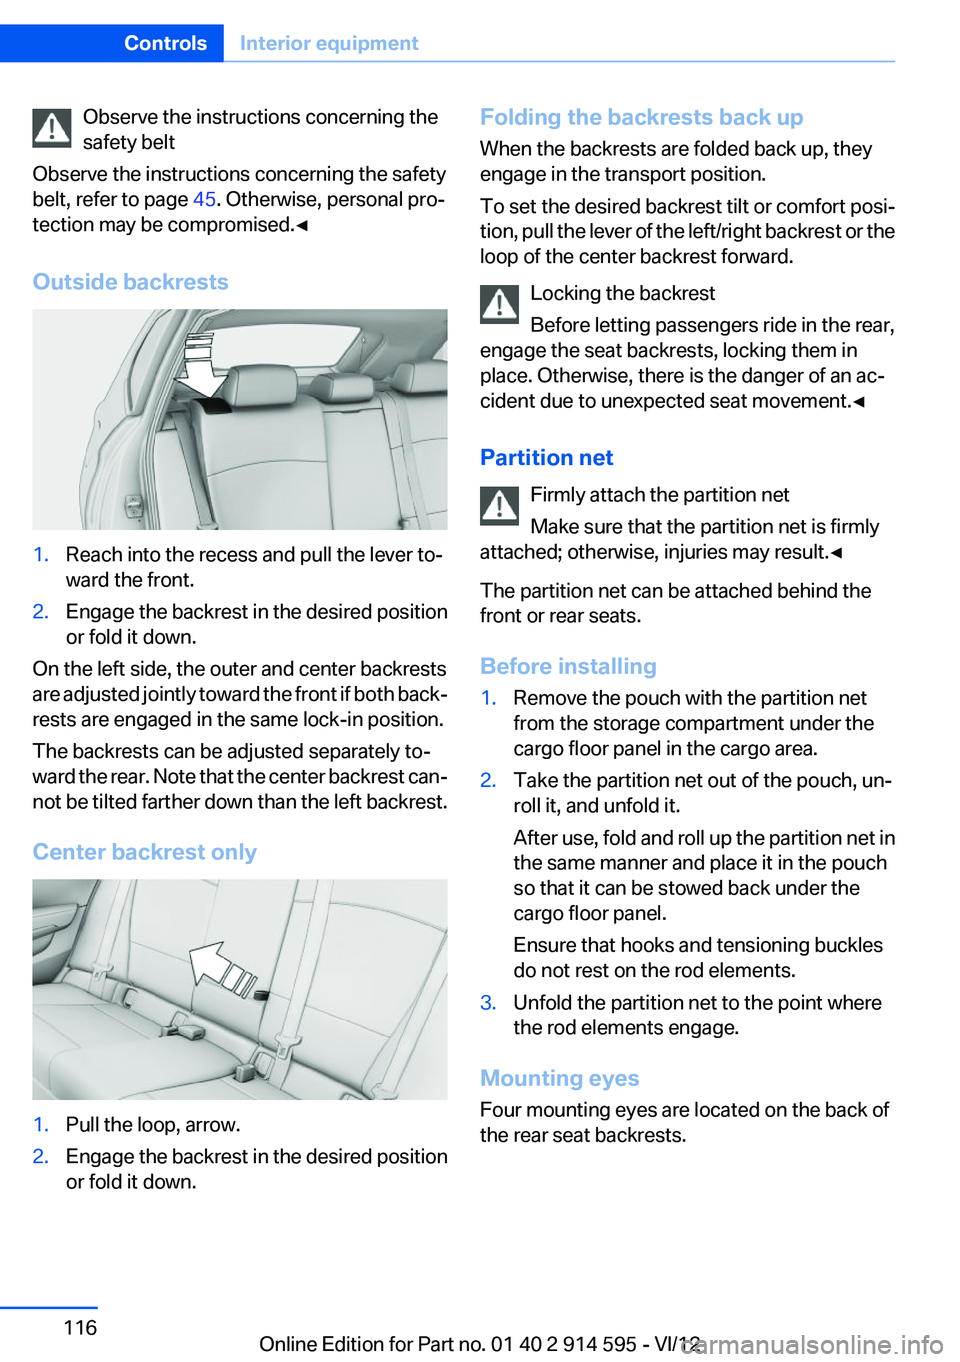
Outside backrests1.Reach into the recess and pull the lever to‐
ward the front.2.Engage the backrest in the desired position
or fold it down.
On the left side, the outer and center backrests
are adjusted jointly toward the front if both back‐
rests are engaged in the same lock-in position.
The backrests can be adjusted separately to‐
ward the rear. Note that the center backrest can‐
not be tilted farther down than the left backrest.
Center backrest only
1.Pull the loop, arrow.2.Engage the backrest in the desired position
or fold it down.Folding the backrests back up
When the backrests are folded back up, they
engage in the transport position.
To set the desired backrest tilt or comfort posi‐
tion, pull the lever of the left/right backrest or the
loop of the center backrest forward.
Locking the backrest
Before letting passengers ride in the rear,
engage the seat backrests, locking them in
place. Otherwise, there is the danger of an ac‐
cident due to unexpected seat movement.◀
Partition net Firmly attach the partition net
Make sure that the partition net is firmly
attached; otherwise, injuries may result.◀
The partition net can be attached behind the
front or rear seats.
Before installing1.Remove the pouch with the partition net
from the storage compartment under the
cargo floor panel in the cargo area.2.Take the partition net out of the pouch, un‐
roll it, and unfold it.
After use, fold and roll up the partition net in
the same manner and place it in the pouch
so that it can be stowed back under the
cargo floor panel.
Ensure that hooks and tensioning buckles
do not rest on the rod elements.3.Unfold the partition net to the point where
the rod elements engage.
Mounting eyes
Four mounting eyes are located on the back of
the rear seat backrests.
Seite 116ControlsInterior equipment116
Online Edition for Part no. 01 40 2 914 595 - VI/12
Page 117 of 291

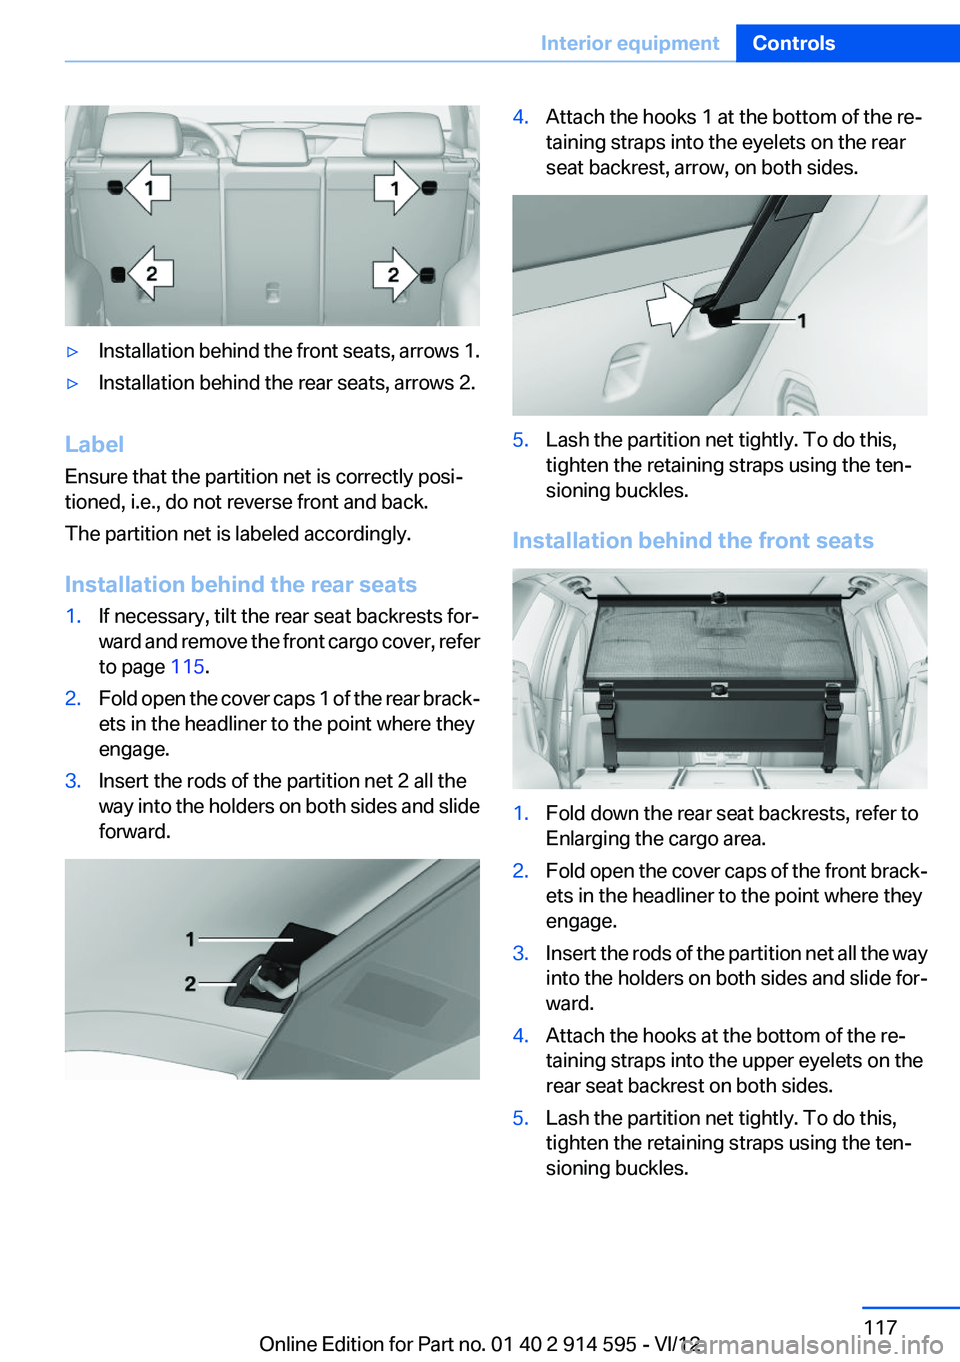
▷Installation behind the front seats, arrows 1.▷Installation behind the rear seats, arrows 2.
Label
Ensure that the partition net is correctly posi‐
tioned, i.e., do not reverse front and back.
The partition net is labeled accordingly.
Installation behind the rear seats
1.If necessary, tilt the rear seat backrests for‐
ward and remove the front cargo cover, refer
to page 115.2.Fold open the cover caps 1 of the rear brack‐
ets in the headliner to the point where they
engage.3.Insert the rods of the partition net 2 all the
way into the holders on both sides and slide
forward.4.Attach the hooks 1 at the bottom of the re‐
taining straps into the eyelets on the rear
seat backrest, arrow, on both sides.5.Lash the partition net tightly. To do this,
tighten the retaining straps using the ten‐
sioning buckles.
Installation behind the front seats
1.Fold down the rear seat backrests, refer to
Enlarging the cargo area.2.Fold open the cover caps of the front brack‐
ets in the headliner to the point where they
engage.3.Insert the rods of the partition net all the way
into the holders on both sides and slide for‐
ward.4.Attach the hooks at the bottom of the re‐
taining straps into the upper eyelets on the
rear seat backrest on both sides.5.Lash the partition net tightly. To do this,
tighten the retaining straps using the ten‐
sioning buckles.Seite 117Interior equipmentControls117
Online Edition for Part no. 01 40 2 914 595 - VI/12
Page 120 of 291

Storage compartmentsVehicle equipment
This chapter describes all series equipment as
well as country-specific and special equipment
offered for this model series.Therefore, it also
describes equipment that may not be found in
your vehicle, for instance due to the selected
special equipment or the country version. This
also applies to safety-related functions and sys‐
tems.
Notes No loose objects in the passenger com‐
partment
Do not stow any objects in the passenger com‐
partment without securing them; otherwise,
they may present a danger to occupants for in‐
stance during braking and avoidance maneu‐
vers.◀
No non-slip mats on the dashboard
Do not use non-slip materials, such as
non-slip mats, on the dashboard, or it could be
damaged by the substances in the materials.◀
Glove compartment
Opening
Pull the handle.
The light in the glove compartment switches on. Close the glove compartment again im‐
mediately
Close the glove compartment immediately after
use while driving; otherwise, injury may occur
during accidents.◀
Closing
Fold up the cover.
USB interface for data transfer
Port for importing and exporting data, such as
music collections, refer to page 176, on USB
devices.
Observe the following when connecting:
▷Do not use force when plugging the con‐
nector into the USB interface.▷Do not connect devices such as fans or
lamps to the USB interface.▷Do not connect a USB hard drive.▷Do not use the USB interface to recharge
external devices.
Center armrest front
Storage compartment
The center armrest between the front seats
contains a compartment with cupholders or the
Seite 120ControlsStorage compartments120
Online Edition for Part no. 01 40 2 914 595 - VI/12
Page 121 of 291

cover for the snap-in adapter, depending on the
version.
Details on this mobile phone cradle, refer to
page 202.
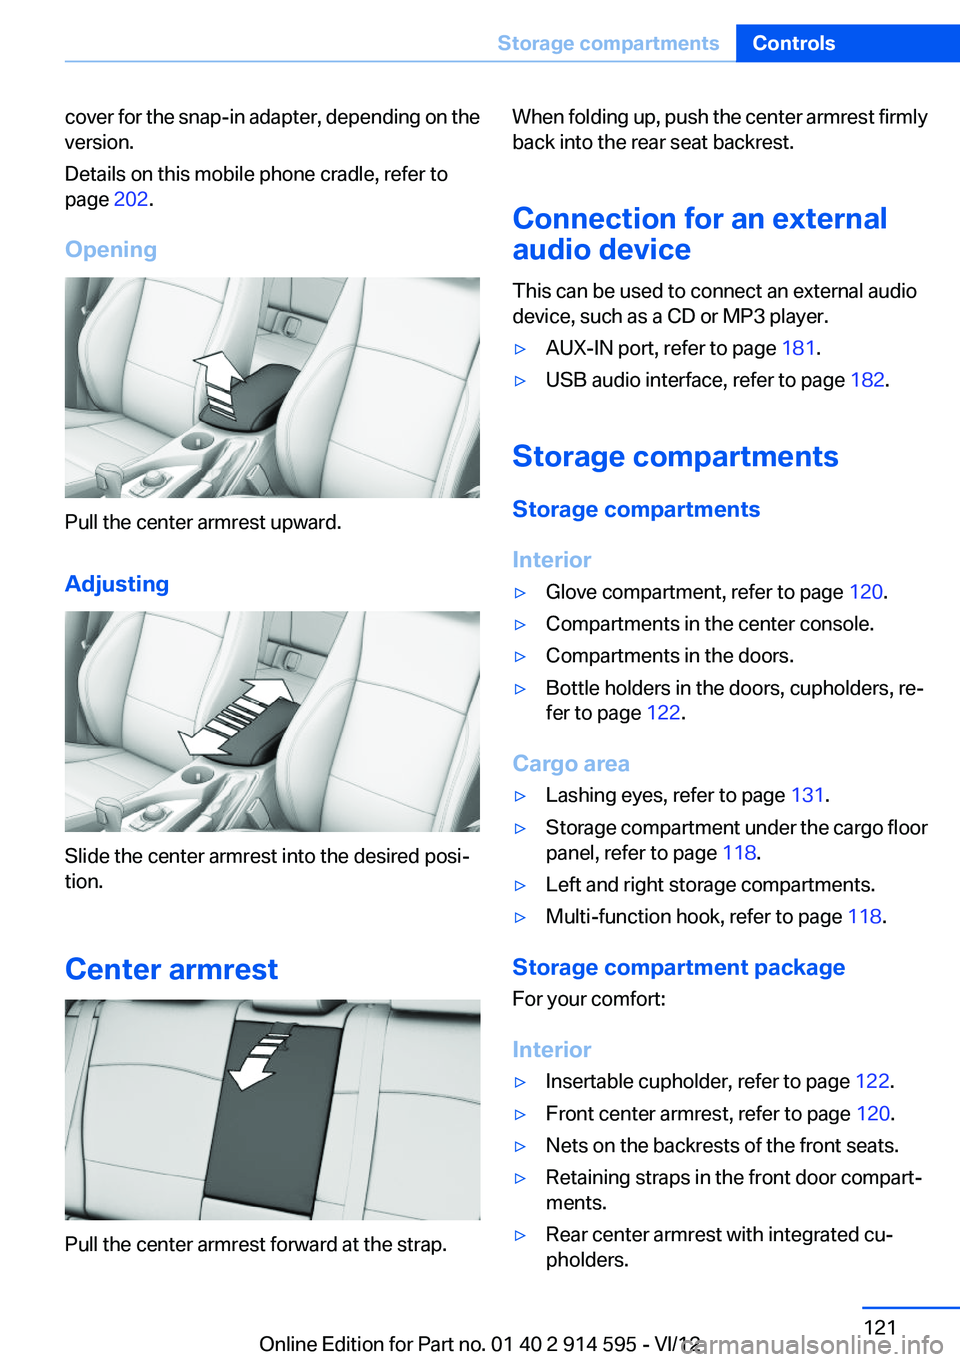
Opening
Pull the center armrest upward.
Adjusting
Slide the center armrest into the desired posi‐
tion.
Center armrest
Pull the center armrest forward at the strap.
When folding up, push the center armrest firmly
back into the rear seat backrest.
Connection for an external
audio device
This can be used to connect an external audio
device, such as a CD or MP3 player.▷AUX-IN port, refer to page 181.▷USB audio interface, refer to page 182.
Storage compartments
Storage compartments
Interior
▷Glove compartment, refer to page 120.▷Compartments in the center console.▷Compartments in the doors.▷Bottle holders in the doors, cupholders, re‐
fer to page 122.
Cargo area
▷Lashing eyes, refer to page 131.▷Storage compartment under the cargo floor
panel, refer to page 118.▷Left and right storage compartments.▷Multi-function hook, refer to page 118.
Storage compartment package
For your comfort:
Interior
▷Insertable cupholder, refer to page 122.▷Front center armrest, refer to page 120.▷Nets on the backrests of the front seats.▷Retaining straps in the front door compart‐
ments.▷Rear center armrest with integrated cu‐
pholders.Seite 121Storage compartmentsControls121
Online Edition for Part no. 01 40 2 914 595 - VI/12
Page 277 of 291

Axle loads, refer toWeights 267
B
Backrest curvature, refer to Lumbar support 44
Backrests, refer to Seats 43
Backrest width adjustment 44
Back seats– Adjusting the backrest
tilt 115
Backup camera 102
Backup camera, cleaning 104
Backup camera, obstacle marking 103
Backup camera, pathway lines 103
Backup camera, turning lines 103
Backup lamps, bulb replace‐ ment 249
Balance 160
Band-aids, refer to First aid kit 254
Bass 160
Battery
– Remote control 30
Battery disposal 251
Battery, refer to Vehicle bat‐ tery 251
Battery replacement, remote control for vehicle 38
Before entering the car wash 259
Belts, refer to Safety belts 45
Belt tensioners, refer to Safety belts 45
Beverage holder, refer to Cu‐ pholder 122
Black and white map dis‐ play 154
Blower, refer to Air flow rate 106
Bluetooth audio 185
Bluetooth connection, activat‐ ing/deactivating 193
BMW Apps 219
BMW Apps, video play‐ back 184
BMW Assist 215
BMW Assist, refer to Connec‐ tedDrive 215
BMW EfficientDynamics, refer to Saving fuel 133
BMW Homepage 6
BMW Internet page 6
BMW maintenance sys‐ tem 243
BMW Online 217
Bottle holder, refer to Cu‐ pholder 122
Brake assistant 94
Brake discs, breaking in 126
Brake fluid, refer to Service re‐ quirements 75
Brake force display 93
Brake force distribution, elec‐ tronic 94
Brake lamps– Bulb replacement 249
Brake lamps, brake force dis‐
play 93
Brake lights, adaptive 93
Brake pads, breaking in 126
Brakes
– Handbrake 58
Brakes, BMW maintenance
system 243
Brakes, service require‐ ments 75
Brake system, BMW mainte‐ nance system 243
Braking, notes 127
Breakdown assistance 254
Breakdown, transporting the vehicle 256
Breaking in 126
Brightness on the Control Dis‐ play 75
Bulb replacement, refer to Lamp and bulb replace‐
ment 246
Button for starting the engine,
refer to Start/Stop button 54
C
Calendar 209
California Proposition 65 Warning 7
Camera, care 261
Camera, refer to Backup cam‐ era 102
Can holder, refer to Cu‐ pholder 122
Car battery, refer to Vehicle battery 251
Car care products 260
Care 259
Care, displays 262
Care, vehicle 260
Cargo 130
Cargo area 115
Cargo area– Comfort Access 37– Cover 115– Folding up the cargo floor
panel 118– Multi-function hook 118– Partition net 116
Cargo area, capacities 267
Cargo area, enlarging 115
Cargo area lamp, refer to Inte‐ rior lamps 84
Cargo area lid, refer to Tail‐ gate 35
Cargo area net, refer to Parti‐ tion net 116
Cargo area, opening from the inside 35
Cargo area, opening from the outside 36
Cargo floor panel
– Folding up 118
Cargo floor panel, raising 118
Cargo straps, securing cargo 131
Car key, refer to Integrated key/remote control 30
Seite 277Everything from A to ZReference277
Online Edition for Part no. 01 40 2 914 595 - VI/12
Page 284 of 291

Onboard monitor, refer toControl Display 18
Onboard vehicle tool kit 245
Opening and closing– Comfort Access 36– From the inside 34– From the outside 32– Using the door lock 34– Using the remote control 32
Operating concept, iDrive 18
Outside-air mode
– Automatic climate con‐
trol 107
Outside air, refer to Recircu‐
lated air mode 107
Overheating of engine, refer to Coolant temperature 69
P
Paint, vehicle 260
Pairing, mobile phone 193
Panic mode 33
Panoramic glass sunroof
– Convenient operation 32– Initializing 42– Opening, closing 41– Pinch protection 42– Power failure 42– Remote control 32– Tilting 41
Park Distance Control
PDC 100
Parked-car ventilation 108
Parked vehicle, condensa‐ tion 128
Parking aid, refer to Park Dis‐ tance Control PDC 100
Parking assistant, refer to Park Distance Control PDC 100
Parking brake, refer to Hand‐ brake 58
Parking lamps 80
Parking lamps/low beams 80
Parking lamps, bulb replace‐ ment 248
Passenger airbags, deactivat‐ ing 86
Passenger side mirror, tilt‐
ing 48
PDC Park Distance Con‐ trol 100
Performance Control 96
Personal information 204
Personal Profile 30
Pinch protection– Panoramic glass sunroof 42– Windows 40
Plastic, care 261
PlugIn 220
Pollen
– Refer to Microfilter/acti‐
vated-charcoal filter with au‐
tomatic climate control 108
Poor road operation 128
Position, storing 142
Postal code, entering in navi‐ gation 141
Power windows
– Safety switch 41
Power windows, opening and
closing 40
Power windows, refer to Win‐ dows 40
Prescribed engine oils, refer to Approved engine oils 241
Pressure, tires 228
Pressure warning, tires 88
Profile depth, refer to Mini‐ mum tread depth 234
Profile, tires 234
Programmable memory but‐ tons, iDrive 23
Protection function, refer to
Pinch protection
– Panoramic glass sunroof 42
Protective function, refer to
Pinch protection
– Windows 40
Push-and-turn switch, refer to
Controller 19
R
Radiator fluid, refer to Cool‐ ant 242
Radio-operated key, refer to Remote control with
integrated key 30
Radio ready state 54
Radio ready state, switched off 55
Radio ready state, switched on 54
Radio setting, refer to Radio ready state 54
Rain sensor 60
Random 171
Random playback 171
Range 70
RDS 163
Reading lamps 84
Reading out loud 211
Rear lamps, refer to Tail lamps 249
Rear seat backrest– Foldable 115
Rear seats
– Adjusting the backrest
tilt 115– Adjusting the head re‐
straints 47– Folding down 115– Folding down the back‐
rests 115
Rear socket 114
Rearview mirror, refer to Mir‐ rors 48
Rear window defroster 107
Rear window, washing 61
Rear window wiper 61
Recirculated air mode 107
Recommended tire brands 236
Redialing 199
Refueling 224
Remaining distance to desti‐ nation, refer to Computer 70
Seite 284ReferenceEverything from A to Z284
Online Edition for Part no. 01 40 2 914 595 - VI/12