2013 BMW 335I CONVERTIBLE key
[x] Cancel search: keyPage 16 of 308

15
Dashboard
At a glance
6
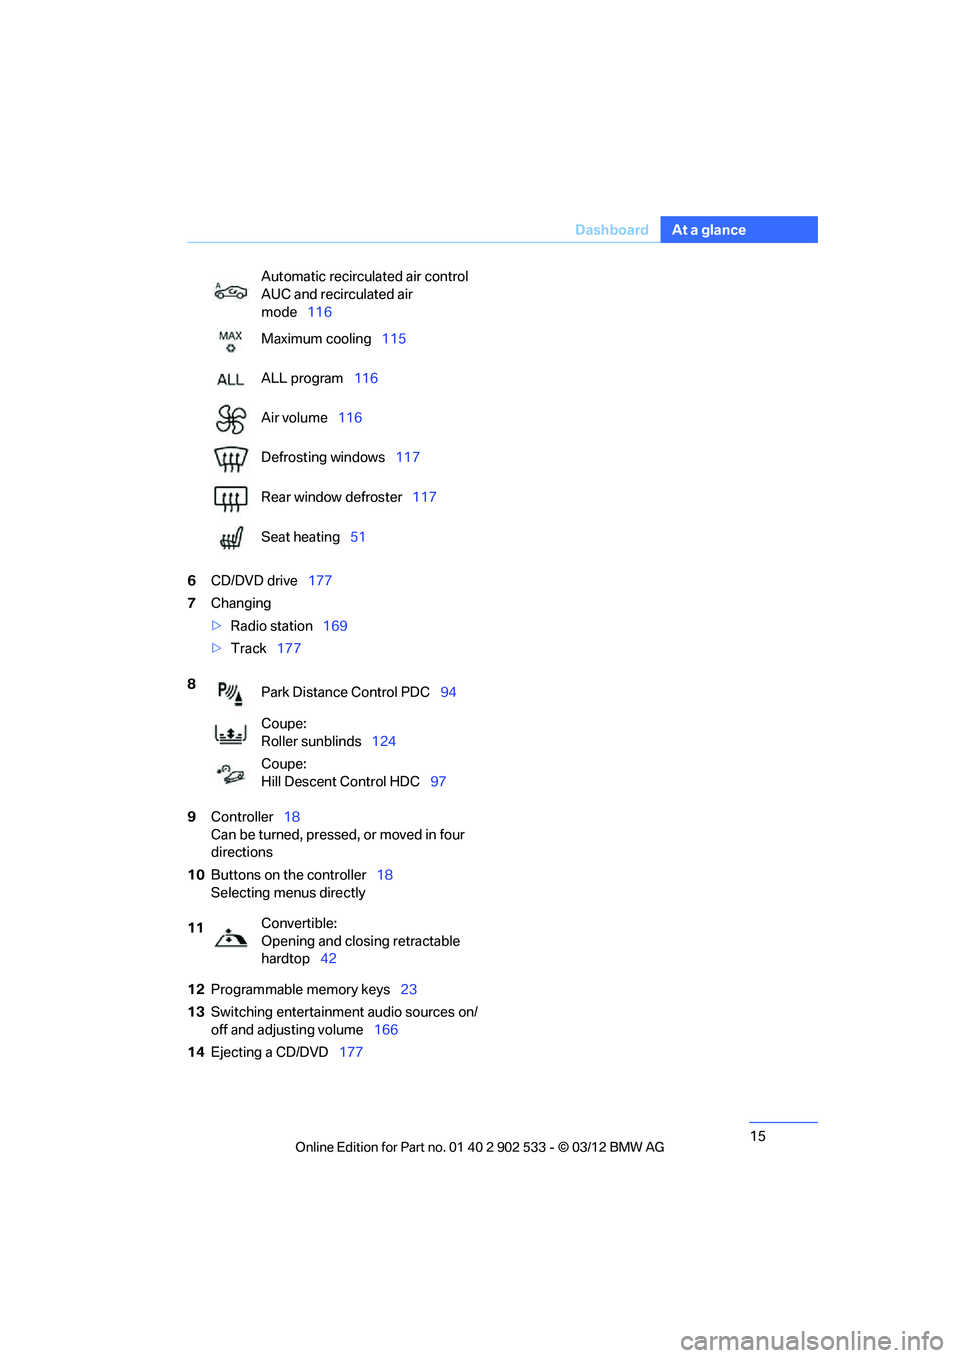
CD/DVD drive 177
7 Changing
>Radio station 169
> Track 177
9 Controller 18
Can be turned, pressed, or moved in four
directions
10 Buttons on the controller 18
Selecting menus directly
12 Programmable memory keys 23
13 Switching entertainment audio sources on/
off and adjusting volume 166
14 Ejecting a CD/DVD 177
Automatic recirculated air control
AUC and recirculated air
mode
116
Maximum cooling 115
ALL program 116
Air volume 116
Defrosting windows 117
Rear window defroster 117
Seat heating 51
8 Park Distance Control PDC 94
Coupe:
Roller sunblinds 124
Coupe:
Hill Descent Control HDC 97
11 Convertible:
Opening and closing retractable
hardtop
42
00320051004F004C00510048000300280047004C0057004C005200510003
Page 24 of 308

23
iDrive
At a glance
Programmable memory keys
General information
iDrive functions can be stored on the program-
mable memory keys and called up directly, e.g.
radio stations, navigation destinations, phone
numbers and entry points into the menu.
The settings are stored for the remote control
currently in use.
Storing functions
1.
Highlight the function via the iDrive.
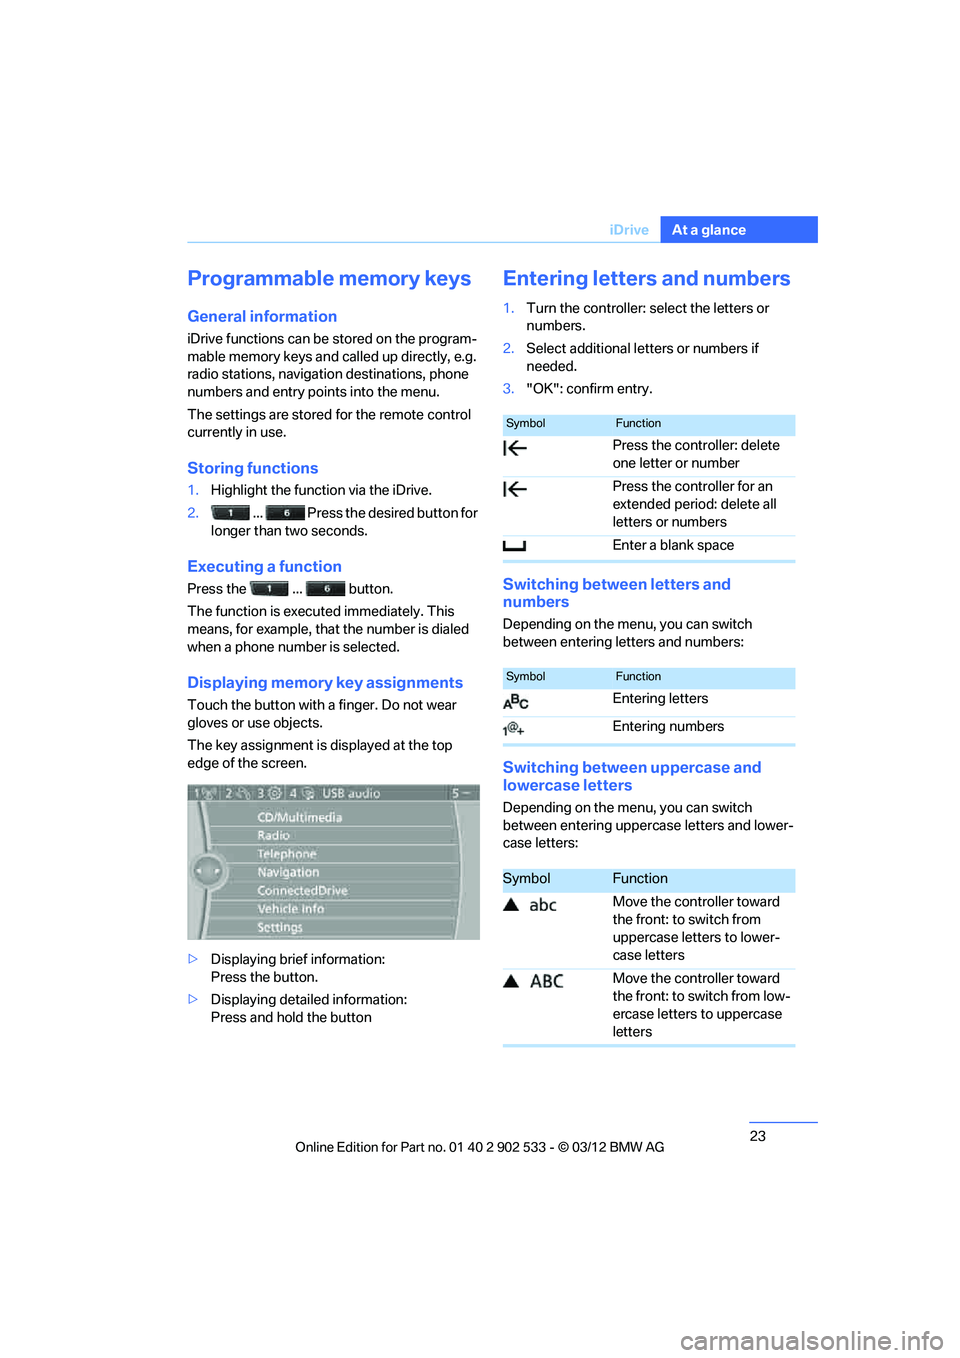
2. ... Press the desired button for
longer than two seconds.
Executing a function
Press the ... button.
The function is executed immediately. This
means, for example, that the number is dialed
when a phone number is selected.
Displaying memory key assignments
Touch the button with a finger. Do not wear
gloves or use objects.
The key assignment is displayed at the top
edge of the screen.
> Displaying brief information:
Press the button.
> Displaying detailed information:
Press and hold the button
Entering letters and numbers
1.Turn the controller: select the letters or
numbers.
2. Select additional letters or numbers if
needed.
3. "OK": confirm entry.
Switching between letters and
numbers
Depending on the menu, you can switch
between entering letters and numbers:
Switching between uppercase and
lowercase letters
Depending on the menu, you can switch
between entering uppercase letters and lower-
case letters:
SymbolFunction
Press the controller: delete
one letter or number
Press the controller for an
extended period: delete all
letters or numbers
Enter a blank space
SymbolFunction
Entering letters
Entering numbers
SymbolFunction
Move the controller toward
the front: to switch from
uppercase letters to lower-
case letters
Move the controller toward
the front: to switch from low-
ercase letters to uppercase
letters
00320051004F004C00510048000300280047004C0057004C005200510003
Page 31 of 308

30
ControlsOpening and closing
Opening and closing
Vehicle equipment
In this chapter, all production, country, and
optional equipment that is offered in the model
range is described. For this reason, descrip-
tions will be given of some equipment that may
not be available in a vehicle, for example due to
the special options or national-market version
selected. This also applies to safety related
functions and systems.
Remote control
Each remote control contains a rechargeable
battery that is automatically recharged when it
is in the ignition lock while the car is being
driven. Use each remote control at least twice a
year for longer road trips in order to maintain the
batteries' charge status. In cars with Comfort
Access, the remote cont rol contains a replace-
able battery, refer to page 39.
The settings called up and implemented when
the car is unlocked depend on which remote
control is used to unlock the car, refer to Per-
sonal Profile, next column.
In addition, information about service require-
ments is stored in the remote control, refer to
Service data in the remote control, page 260.
Integrated key
Press button 1 to release the key.
The integrated key fits the following locks:
> Glove compartment, refer to page 124
> Driver's door, refer to page 34
New remote controls
Your BMW center can supply new remote con-
trols with integrated keys as additional units or
as replacements in the event of loss.
Personal Profile
The concept
You can set many of your BMW's functions to
suit your personal needs and preferences.
Without any action on your part, Personal Pro-
file ensures that most of these settings are
stored for the remote control currently in use.
When you unlock the car, the remote control
used for the purpose is recognized and the set-
tings stored for it are called up and imple-
mented.
This means that your personal settings will be
activated for you, even if in the meantime your
car was used by someone else with another
remote control and the corresponding settings.
The individual settings are stored for a maxi-
mum of four remote controls. They are stored
00320051004F004C00510048000300280047004C0057004C005200510003
Page 32 of 308

31
Opening and closing
Controls
for two remote controls if Comfort Access is in
use.
Personal Profile settings
For more information on specific settings, refer
to the specified pages.
>
Assignment of programmable memory
keys, refer to page 23
> Response of the central locking system
when the car is unlocked, refer to page 32
> Automatic locking of the vehicle, refer to
page 34
> Automatic call-up of the driver's seat posi-
tion, refer to page 52
> Triple turn signal activation, refer to
page 70
> Settings for the display on the Control Dis-
play and in the instrument cluster:
>12h/24h format of the clock, refer to
page 88
> Date format, refer to page 89
> Brightness of the Co ntrol Display, refer
to page 92
> Language on the Control Display, refer
to page 92
> Units of measure, refer to page 85
> Show visual warning for Park Distance Con-
trol PDC, refer to page 95
> Light settings:
>Welcome lamps, refer to page 109
> Pathway lighting, refer to page 109
> Daytime running lights, refer to
page 109
> High-beam Assistant, refer to page 110
> Automatic climate control: activating/deac-
tivating AUTO program, cooling function
and automatic recirculated air control, set-
ting temperature, air volume and distribu-
tion, refer to page 115 ff >
Entertainment:
>Setting tone controls, refer to page 167
> Speed-dependent volume control, refer
to page 168
Central locking system
The concept
The central locking system functions when the
driver's door is closed.
The system simultaneously engages and
releases the locks on the following:
>Doors
> Trunk lid
> Fuel filler flap
> Convertible: glove compartment
Operating from outside
>Via the remote control
> Using the door lock
> In cars with Comfort Access, via the handles
on the driver's door and the front passenger
door
At the same time as locking and unlocking via
the remote control:
> Welcome lights, the interior light, and the
courtesy lighting are switched on and off.
> Alarm system, refer to page 36, is armed or
disarmed.
Operating from inside
By means of the button for central locking, refer
to page 34.
In the event of a sufficiently severe accident, the
central locking system un locks automatically. In
addition, the hazard warning flashers and inte-
rior lamps come on.
00320051004F004C00510048000300280047004C0057004C005200510003
Page 35 of 308

34
ControlsOpening and closing
Malfunctions
The remote control may malfunction due to
local radio waves. If this occurs, unlock and lock
the car at the door lock with the integrated key.
Convertible: if hardtop movement via the
remote control is interrupted briefly, the move-
m e n t w i l l b e c o m p l e t e d m o r e q u i c k l y i f y o u k e e p
the corresponding button pressed continu-
ously.
If the car can no longer be locked with a remote
control, the battery in the remote control is dis-
charged. Use the remote control on an
extended trip to recharge the battery, refer to
page30. The remote control for Comfort
Access contains a battery that may have to be
changed, refer to page 39.
For US owners only
The transmitter and receiver units comply with
part 15 of the FCC/Federal Communications
Commission regulations. Operation is gov-
erned by the following:
FCC ID:
LX8766S
LX8766E
LX8CAS
Compliance statement:
This device complies with part 15 of the FCC
Rules. Operation is subject to the following two
conditions:
> This device must not cause harmful inter-
ference, and
> this device must accept any interference
received, including interference that may
cause undesired operation.
Any unauthorized modifications or
changes to these devices could void the
user's authority to operate this equipment. <
Opening and closing:
Using the door lock
Do not lock the vehicle from the outside if
there is any person inside, because the
vehicle cannot be unlocked from inside without
special knowledge. <
With Comfort Access, you can set how the vehi-
cle is unlocked, refer to page 32.
Manual operation
In the event of an electrical malfunction, you can
lock and unlock the driver's door by turning the
integrated key to the corresponding limit posi-
tions in the door lock.
Opening and closing:
From inside
This button serves to unlock or lock doors and
the trunk lid when the front doors are unlocked
or locked, but does not activate the anti-theft
system. Depending on the equipment package,
the fuel filler flap can be unlocked as needed.
00320051004F004C00510048000300280047004C0057004C005200510003
Page 37 of 308

36
ControlsOpening and closing
Coupe: locking or unlocking separately
The switch is located in the glove compartment.
1Locking the trunk lid
2 Unlocking the trunk lid
Locking separately
Push the switch in the direction of arrow 1.
The trunk lid is locked and cannot be unlocked
using the central locking system.
If you give the remote control without the inte-
grated key to someone else while the glove
compartment is locked, the trunk lid cannot be
opened. This is an advantage when valet park-
ing, for example. Locking the glove compart-
ment, refer to page 124.
Unlocking separately
Push the switch in the direction of arrow 2.
Emergency release
Pull the lever in the trunk. The trunk lid is
unlocked.
Closing
The handle recesses on the interior trim of the
trunk lid make it easier to pull down.
Make sure that the closing path of the
trunk lid is clear; otherwise, injuries may
result. <
Coupe
Convertible
To close the trunk lid, press it down
lightly. The lid is closed automatically. <
Alarm system
The concept
The vehicle alarm system responds:
>When a door, the hood or the trunk lid is
opened
> To movements inside the vehicle: Interior
motion sensor, refer to page 37
> When the car's inclination changes, for
instance if an attempt is made to jack it up
and steal the wheels or to raise it prior to
towing away
00320051004F004C00510048000300280047004C0057004C005200510003
Page 40 of 308

39
Opening and closing
Controls
consumers are switched off before locking the
vehicle.
<
Coupe: Convenient closing
Keep pressing the surface, arrow 2, with your
finger.
Convertible: window and convertible
top operation
With the ignition at radio readiness or beyond,
you can open and close the windows and the
convertible top when a remote control is
located inside the vehicle.
Unlocking the trunk lid separately
Press the button on the outside of the trunk lid.
This corresponds to pressing the button.
If the vehicle detects that a remote con-
trol has been accidentally left inside the
locked vehicle's trunk after the trunk lid is
closed, the lid will reopen. The hazard warning
flashers flash and a signal sounds. <
Switching on radio readiness
Pressing the Start/Stop button switches on
radio readiness.
Do not depress the brake or the clutch; other-
wise, the engine will start immediately.
Starting the engine
The engine can be started or the ignition can be
switched on when a remote control is inside the
vehicle. It is not necessary to insert a remote
control into the ignition lock, refer to page 60.
Switching off the engine in cars with
automatic transmission
The engine can only be switched off when the
selector lever is in position P, refer to page 62.
To switch the engine off when the selector lever
is in position N, the remote control must be in
the ignition lock.
Malfunction
Local radio waves can interfere with the func-
tion of Comfort Access, for example when a
mobile phone is in the immediate vicinity of the
remote control or by when a mobile phone is
being charged in the vehicle.
If this happens, open or close the vehicle via the
buttons on the remote control or using the inte-
grated key. To start the engine afterward, insert
the remote control into the ignition lock.
Warning lamps
The warning lamp in the instrument
cluster lights up when you attempt to
start the engine: the engine cannot
be started. The remote control is not inside the
vehicle or is malfunctioning.
Take the remote control with you inside the
vehicle or have it checked. If necessary, insert
another remote control into the ignition lock.
The warning lamp in the instrument
cluster lights up while the engine is
running: the remote control is no
longer inside the vehicle. After the engine is
switched off, the engine can only be restarted
within approx. 10 seconds.
The indicator lamp in the instrument
cluster lights up and a message
appears on the Control Display:
replace the battery in the remote control.
Replacing the battery
The remote control for Comfort Access con-
tains a battery that will need to be replaced from
time to time.
00320051004F004C00510048000300280047004C0057004C005200510003
Page 41 of 308

40
ControlsOpening and closing
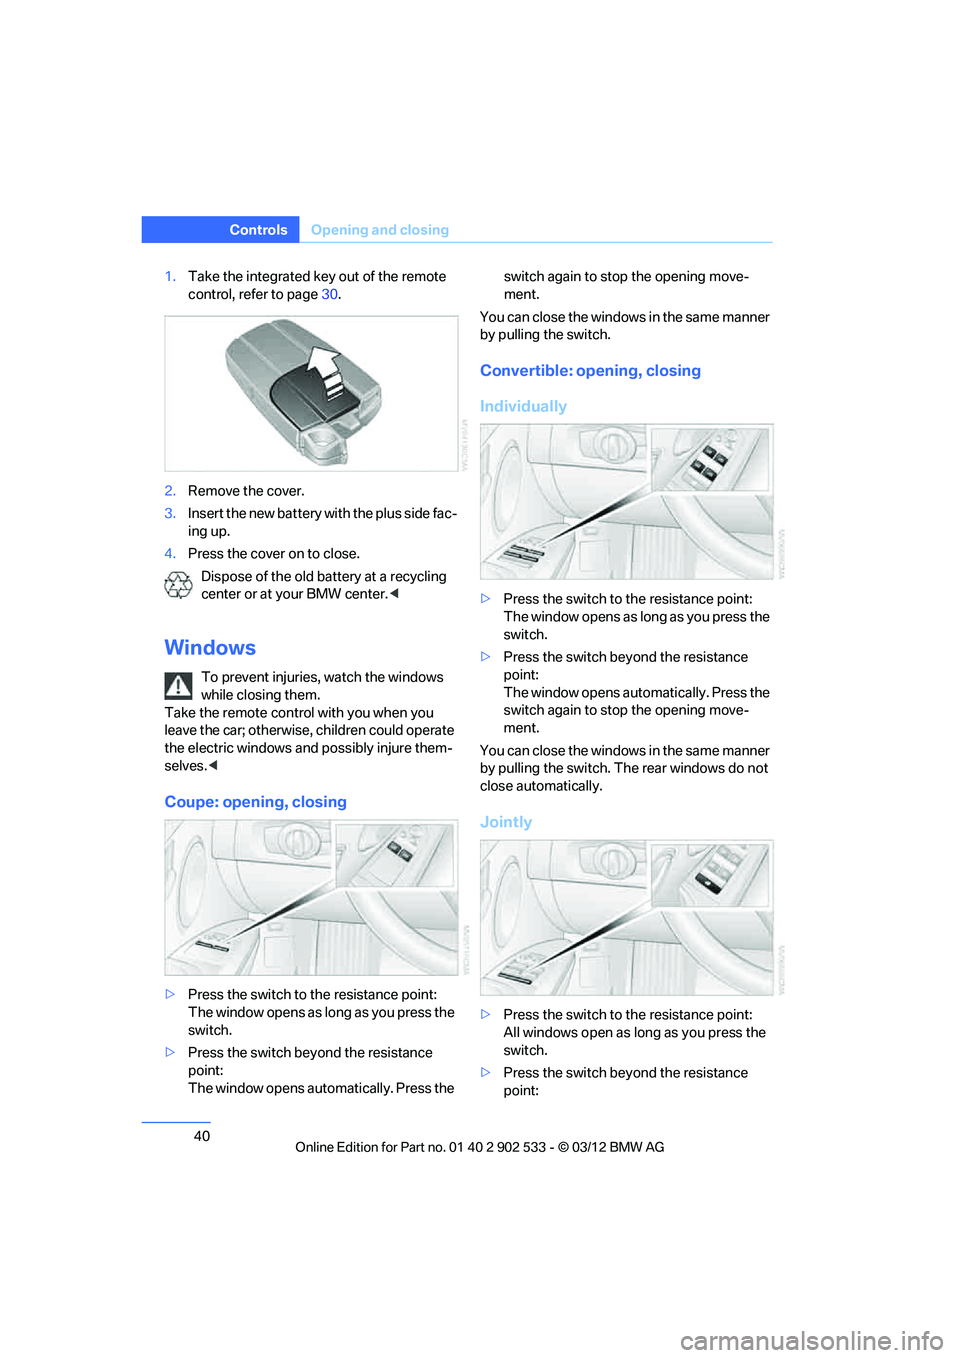
1.Take the integrated key out of the remote
control, refer to page 30.
2. Remove the cover.
3. Insert the new battery with the plus side fac-
ing up.
4. Press the cover on to close.
Dispose of the old battery at a recycling
center or at your BMW center. <
Windows
To prevent injuries, watch the windows
while closing them.
Take the remote control with you when you
leave the car; otherwise, children could operate
the electric windows and possibly injure them-
selves. <
Coupe: opening, closing
>Press the switch to the resistance point:
The window opens as long as you press the
switch.
> Press the switch beyond the resistance
point:
The window opens automatically. Press the switch again to stop the opening move-
ment.
You can close the windows in the same manner
by pulling the switch.
Convertible: opening, closing
Individually
> Press the switch to the resistance point:
The window opens as long as you press the
switch.
> Press the switch beyond the resistance
point:
The window opens automatically. Press the
switch again to stop the opening move-
ment.
You can close the windows in the same manner
by pulling the switch. The rear windows do not
close automatically.
Jointly
> Press the switch to the resistance point:
All windows open as long as you press the
switch.
> Press the switch beyond the resistance
point:
00320051004F004C00510048000300280047004C0057004C005200510003