Page 265 of 310

@ Tips
Where snow chains are mandatory oncer
tain roads, this normally also applies to
veh icles with all-wheel dr ive.
Wheel bolts
Wheel bolts must always be tightened to the
correct torque .
The design of whee l bolts is matched to the
factory insta lled rims . If different rims are fit
ted, the correct wheel bolts with the right
length and correctly shaped bolt heads must
be used. This ensures that wheels are f itted
securely and that the brake system functions
correctly .
In certain circumstances, you may not use
wheel bolts from a different vehicle -even if it
is the same model
<=> page 291.
.&_ WARNING
Improperly tightened or maintained wheel
bolts can becom e loose caus ing loss of
cont ro l, a co llision and serious persona l in
Jury .
- Always keep the wheel bolts and the
threads in the wheel hubs clea n so the
w heel bolts can t urn easily and be prop
erly t ightened .
- Never grease or oil the wheel bolts and
the threads in the wheel hubs. They can
become loose while d riving if greased or
oi led, even if tightened to the specif ied
torque.
- Only use whee l bolts that belong to the
rim being installed .
- Never use different whee ls bolts on your
vehicle.
- Always maintain the co rrect tighten ing
torq ue for the wheel bo lts to reduce the
risk of a wheel loss . If the tightening tor
que of the wheel bolts is too low, they
can loosen and come out when the vehi
cle is moving. If the tightening torque is
too high, the whee l bolts and threads
Tire s an d wheel s 263
can be damaged and the whee l can be
come loose.
(D Note
The specified torque for the whee l bolts is
90 ft lb (120 Nm) with a tolerance of± 7,4
ft lb(± 10 Nm) . Torq ue whee l bolts diago
nally. After changing a whee l, the torq ue
must be checked as soon as possible with a
torque wrench -preferably by an author
i zed Audi dealer or qualified workshop.
Low aspect ratio tires
You r Aud i is facto ry-equ ipped w it h low aspect
ra tio tires. These tires have been tho ro ughly
tested and been se lec ted spe cifically for you r
model for their superb perfo rmance, road fee l
and handling under a variety of driving condi
tions. Ask your authorized Audi dealer for
more details .
T he low aspect ratio of these t ires is ind icated
by a numera l of
55 or le ss in the tire's s ize
designation. The numera l represents the ratio
of the t ire's sidewa ll height in relation to its
tread width expressed in percentage. Conven
tiona l tires have a he ight/w idth rat io of 60 or
more .
The performance of low-aspect -ra tio tire s is
particularly sens it iv e to improper inflation
pressure. It is therefore important that low
aspect ratio t ires are inflated to the specified
pre ssure and that the inflation pressur e is
regularly che cked and maintain ed. Tire pre s
s ures should be checked at least on ce a
m onth and alwa ys before a long trip
¢ page 2 52, Checking tire pressure .
What you can do to avoid tire and rim
damage
Low aspect ratio tires can be damage d mo re
easily by impact w ith potholes, curbs, g ull ies
or ridges on t he road, partic ularly if the tire is
u nderinflated.
Ill>-
•
•
Page 266 of 310

264 Tire s and wheel s
In o rder to minimize the occurrence o f impact
damage to the tires of your vehicle, we recom mend that you observe the following precau
tions :
- Always maintain recommended inflation
pressures. Check your tire pressure every
2,000 miles (3,000 km) and add a ir if neces
sary.
- Drive carefu lly on roads with potholes, deep
gullies or ridges. The impact from driving
through or over such obstacles can damage
your tires. Impact with a curb may also cause damage to your tires.
- After any impact, immediately inspect your
tires or have them inspected by the nearest
authorized Aud i dealer . Replace a damaged
t ire as soon as possible .
- In spect your t ires every 2,000 miles (3,000
km) for damage and wear . Damage is not al
ways easy to see. Damage can lead to loss of
air and underinflation, wh ic h could event u
ally cause t ire fail ure.
If yo u be lieve that a
ti re may have been damaged, replace the
tire as soon as possible.
- These tires may wea r more qui ck ly than oth
ers.
- Please a lso remembe r that, whi le these t ires
deliver respons ive handling, they may ride
less comfortably and make more noise than
other choices.
R educed p erformance in winter /cold
sea son conditions
A ll tires are designed for certain purposes .
The low aspect ratio, ultra high performance
tires originally installed on your vehicle are in
tended for max imum dry and wet road per
f ormance and handling . They are not suitable
for cold, snowy or icy weather cond it ions.
If
you dr ive under those circumstances, you
should equip your vehicle with all-season or
winter tires, whi ch offe r better traction under
those cond it ions . We suggest you use the rec
ommended snow or a ll-season tires specifie d
for your vehicle, or their equiva lent .
Refe r to ~
page 261 for mo re deta iled infor
ma tion r egarding w in ter ti res.
Tire pressure
monitoring system
ill General notes
Applies to veh icles: w ith tire pressure monito ring system
Each tire, incl uding the spare (if provided),
sho uld be checked monthly when co ld and in
flated to the inf lat ion pressure recommended
by the veh icle manufacturer on the veh icle
placard or tire inflation pressure label. (If your
vehicle has tires of a d ifferent size than the
s ize indicated on the vehicle placard o r tire in
flat io n pressu re label, you sho uld dete rmine
the p roper t ire infla tion p ressure fo r those
t ir es) .
As an added safety featu re, your ve hicle has
been equipped with a tire pressure mon itoring
system ( TPM S) that illum inates a low ti re
pressure te lltale whe n one or more o f you r
tires is signif icant ly under -inflated . Acco rding
l y, when the low tire pressure te lltale i llumi
nates, you shou ld stop and check your tires as
soon as possib le, and inflate them to the
proper pressure. Driving on a sign ificantly u n
der- inflated t ire causes the tire to overheat
and can lead to tire fa ilure . Under -inflation al
so reduces fuel eff ic iency and tire tread life,
and may affe ct the vehicle 's hand ling and
stopp ing ability.
Please note that the TPMS is not a substitute
for proper tire ma intenance, and it is the d riv
er's respo nsibility to maintain co rrect tire
pressure, even if under -inflation has not
reached the leve l to tr igger illuminat ion of the
T PMS low tire p ressu re tellta le .
You r vehicle has also been equipped with a
T PMS ma lf u nction indicator to ind icate when
the sys tem is not oper ating properly . T he
T PMS ma lfunction indicator is comb ined w ith
the low tire pressure te lltale. Whe n the sys
tem detects a malfunction, the telltale will
flash for approximately one min ute and then
rema in con tinuously i llum inated . T hi s se
quence will continue upon subsequent vehicle
start-ups as long as t he malfunct ion exists . .,.
Page 267 of 310

When the malfunction indicator is illuminat
ed, the system may not be able to detect or
signal low tire pressure as intended. TPMS
malfunctions may occur for a variety of rea
sons, including the installation of replace ment or alternate tires or wheels on the vehi
cle that prevent the TPMS from function ing
properly . Always check the TPMS malfunction
tellta le after replacing one or more tires or
wheels on your vehicle to ensure that the re
placement or alternate tires and wheels allow
the TPMS to continue to function properly.
Tire pressure indicator appears
Applies to vehicles: with tire pressure monitoring system
The tire pressure indicator in the instrument
cluster informs you if the tire pressure is too
low or if there is a system malfunction.
Fig. 201 Display : underinflatio n warning
Fig. 202 Display : Syste m malfun ctio n
Using the ABS sensors, the tire pressure moni
toring system compares the tire tread circum
ference and vibration characteristics of the in
dividual tires . If the pressure decreases in one
or more tires , th is is indicated in the instru
ment cluster with a warning symbol
RE and a
message¢
fig . 201.
The tire pressure monitoring system must be
reset via MMI each time the pressures are ad-
Tires and wheels 265
justed (e.g. when switching between partial
and full load pressure) or after changing or re
plac ing a tire on your vehicle¢
page 266. The
TPMS indicator only monitors the tire pres
sure that you have previously stored. You can
find the recommended tire pressures for your
vehicle on the label on dr iver's side B-pillar
<=:>page 250 .
Tire tread circumference and vibration charac
teristics can change and cause a tire pressure
warning if :
- the tire pressure in one or more tires is too
low,
- the tire has structural damage,
- the tire pressure was changed, wheels rotat-
ed or replaced but the TPMS was not reset
¢page 266 .
Warning symbols
RE Loss of pressure in at least one tire¢.&. .
Check the tire or tires and replace or repair if
necessary. The indicator light
RE in the instru
ment cluster also illuminates
¢ page 12.
Check/correct the pressures of all four tires
and reset TPMS via MMI.
11;;~, ( T ire Pressure Monitoring System) Tire
pressure! System malfunction.
If11NIS, appears after switching the ignition
on or while driving¢
fig. 202 and the indica
tor light
RE in the instrument cluster blinks
for approximately one minute and then stays
on, there is a system malfunction.
Attempt to store the correct tire pressure
¢
page 266 . If the indicator light does not
turn off or if it turns on shortly thereafter, im
mediately drive your vehicle to an authorized
Audi dealer or authorized repair facility to have the malfunction corrected .
A WARNING
-If the tire pressure ind icator appears in
the instrument cluster display, one or
more of your tires is significantly under
inflated. Reduce your speed immediately
and avoid any hard steering or braking
maneuvers. Stop as soon as possib le and .,.
Page 268 of 310

26 6 T ire s and whee ls
check the tires and their pressures. In
flate the tire pressure to the proper pres
sure as indicated on the vehicle's tire
pressure label
c> page 250. Driving on a
significantly under-inflated tire causes
the tire to overheat and can lead to tire
failure. Under-inflation also is likely to impair the vehicle's handling and stop
ping ability.
- T he driver is responsible for ma inta ining
the correct tire pressures. You must check the t ire pressures regular ly .
- Under certain cond itions (such as a spor
ty driving style, winter condit ions or un
paved roads), the pressure monitor indi
cator may be de layed .
- Ask your author ized Audi dealer if r un
flat tires may be used on your vehicle .
Your vehicle regist ration becomes invalid
if yo u use these tires when not permit
ted. Damage to your veh icle or accidents
cou ld also result.
- The tire pressure monitoring system
stops working when there is an ESC/ABS
malfunction .
- Using snow chains may result in a system
malfunction.
- The tire pressure monitoring system on
your Audi was developed using tires with
the "AO" or "RO" identif ication on the
tire sidewall
c> page 257. We recom
mend using these t ires.
Reset tire pressure monitoring system
App lies to vehicles: with tire pressure monito ring system
If the tire pressure is adjusted, wheels are ro
tated or changed, the TPMS must be reset via
MMI.
., Switch on the ignition .
., Se lect in the MMI: !CAR !function button>
(C ar)* s ystems contro l butto n > Se rvicing &
checks > Tire pre ssure mon itoring > Store
tire pr essures> Ye s, store n ow .
(D Tips
Do not store the tire pressure if there are
snow cha ins on the tire .
Page 269 of 310

What do I do now? Emergency warning
triangle
App lies to vehicles: with emerge ncy warning triangle
The warning triangle is located on the inside
of the trunk lid .
"' M ~
D -~ .. m
!I l
Fig. 203 Trun k lid: Warn ing triang le
.,. To open the cover, turn the locking mecha
nism and pull the cover downward .
.,. Remove the warning triangle from its hold
er.
The rear lid is only designed to ho ld the warn
ing triangle offered by the original accessories
program. If you would like to retrofit your ve
hicle with a warning triangle, p lease contact
your authorized Audi dealer.
Vehicle tool kit
Vehicle tool kit and jack
The vehicle tool kit is located in the luggage
compartment under the cargo floor cover.
F ig . 204 Luggage compa rtment: cargo floo r cover
folded upward/spa re tire
What do I d o now ? 267
Fig. 20 5 Trunk lid: Veh icle too l kit
.,. Fold the floor to the seatback with the help
of the handle .
.,. Turn the handwheel counter- clockwise
q fig. 204 and remove the spare t ire to
reach the vehicle tool kit.
T he onboard tool k it includes:
- Hooks to remove the whee l covers*
- Plastic hook to remove wheel bolt covers*
- Wheel bolt wrench
-Alignment pin for changing wheels
- Screwdriver with reversib le blade
- Tow ing loop
-Jack
Before storing the jack, make sure it is wound
back down as far as it will go.
A WARNING
Im proper use of the vehicle jack can cause
serious personal injuries.
- Never use the screw driver hex head to
tighten w heel bolts, since the bolts can
not attain the necessary tighten ing tor
que if you use the hex head, potentially
causing an ac cident.
- The factory-supplied jack is intended on
ly for yo ur vehicle model. Under no c ir
cumstances sho uld it be used to lift
heavy ve hicles o r other loads; yo u risk in
juring yo urself.
- Never start the engine when the vehicle
is raised, wh ich co uld cause an acc ident.
- Support the vehicle secu rely with appro
pria te stands if wor k is to be per formed
underneath the vehicle; otherwise, there
is a potentia l risk for injury.
Page 270 of 310

268 What do I do no w?
-Never use the jack s upplied with your
Audi on another vehicle, particularly on a
heavier one. The jack is only suitable for
use on the vehicle it came w ith.
- Some of the on board items listed above
are provided on certain mode ls only or
are optiona l extras.
- Before you can raise your vehicle using
the jack, you must activate the jack ing
mode
Q page 271.
Space-saving spare tire (compact spare
tire)
The spare tire/wheel is located in the luggage
compartment under the cargo floor cover. It
is intended for short-term use only.
Taking out the sp are tire
,. Fold the floor to the seatback with the help
of the handle.
,. Turn the large screw~
fig. 204 counter
clockwise.
,. Take out the spare tire .
,. Always store the vehicle too l kit, the jack*
and the replaced t ire in the l uggage com
partment
Q page 136.
Using the spare tire (compact spare tir e)
The compact spare tire is only intended for
emergenc ies until you can reach a repair shop.
Replace it as quick ly as poss ible with a s tand
a rd whee l and tire.
There are some restrictions on the use of the
compact spare t ire. The compact spare t ire
has been des igned specifically fo r yo ur type of
ve hicle . It must not be swapped with a com
pact spare ti re from another type of ve hicle .
Snow chains
For technica l reasons, the use of snow chains
on the compa ct spare tire is
not p ermitt ed .
If you do have to dr ive with snow cha in s and a
front tire fails , mo unt the spare wheel w ith
tire instead of a rea r tir e . I nstall the snow chains on the rear tire and use it to rep
lace
the defective front tire.
A WARNING
-- Never use the spare t ire if it is damaged
or if it is worn down to the tread wear in
d icat ors.
- I f the spare tire is more than 6 years old,
use it only in an emergency and with ex
treme caution and careful driv ing.
- The spare tire is intended only for tem porary and sh ort-term use . It s hou ld be
replaced as soo n as poss ible with the
normal wheel and tire.
- After mount ing t he compact spare t ire,
the t ire pressure must be checked as
soon as possible . The tire pressure of the
compact spa re t ire must be
4. 2 ba r; oth
erwi se, you risk having an a cc iden t.
- Do not dr ive faste r th an
50 mph (80 km/
h). Yo u ris k havi ng a n accident.
- Avoid full-throttle acceleration, heavy
b rak ing, and fast corne ring . You risk hav
ing ('In accide nt.
- N ever d rive using more than one s pare
wheel and ti re. You r is k having an acci
den t.
- Normal summer or winter t ires must not
be mounted on the compa ct spare wheel
r im .
- F or technica l reasons, the use of tire
ch ain s on t he sp are tire is not permitted.
If it is ne cessary to drive with tir e c hains,
the spare wheel must be mounted on the
f ront ax le in the event of a flat in a rear
tire. The new ly available front whee l
m ust then be insta lled in place of the
rear whee l w ith the flat tire. Installing
the t ire chain before mounting the whee l
a nd tire is recommended .
- Loose items in the passenger compart
ment can cause se rious personal injury
du ring hard b rak ing or in an accident.
Never store t he i nflatable spa re tire or
jack and tool s in the passenge r compart
men t.
Page 271 of 310

Changing a wheel
Before changing a wheel
Observe the following precautions for your
own and your passenger's safety when chang
ing a wheel .
.,. After you experience a tire fai lure, pull the
car well away from moving traffic and try to
reach
le vel gro und before you stop¢.&_ .
.. All passengers shou ld
leav e the car and
move to a safe location (fo r instan ce, be hind
the guardra il)¢ .&_.
.. Engage the
parking br ake to prevent your
vehicle from ro lling unintentionally¢ .&_.
.. Move
selecto r leve r to posi tion P ¢ .&_ .
.. If you are tow ing a trai ler, unh itch the trai l
er from your veh icle.
.,. Take the
jack and the spare tire out of the
luggage compartment ¢
page 267,
¢page 268.
.8, WARNING
You or your passengers cou ld be injured
w hile changing a whee l if yo u do not fol
low t hese safety precautions:
- If you have a flat t ire, move a safe dis
t a nce off the ro ad. Tur n off the eng ine,
turn the emergency f lashers on an d use
other warning dev ices to alert other mo
torists.
- Make sure that passengers wait in a safe
place away from the ve hicle and well
away from the road and traff ic.
- To help p revent the vehicle from moving
sudden ly and possibly slipping off the
jack, always fu lly set the parking brake
and block the wheel diagonally opposite
the wheel being changed. Whe n one
front wheel is lifted off the ground, plac ing the A utomat ic Transm iss ion in P
(Park) will
not p revent the vehicle from
moving.
- Before you change a wheel, be su re the
ground is level and fi rm. If necessa ry,
use a sturdy board under the jack.
-
What do I do now? 269
- Always store the vehicle tool kit, the jack
and the replaced tire in the luggage com partment
¢page 136.
(D Tips
Before changing the whee l, you must acti
vate the jacking mode, so that the auto matic controls for the Adaptive Air Sus
pension* do not make it more d iff icult to
lift the vehicle with the jack
¢ page 271 .
Changing a wheel
When you change a wheel , follow these
quence described below step-by-step and in
exactly that order .
l. Activate the vehicle jack mode*
¢page 271 .
2. Remove the decorativ e whee l cover* . For
more details see also¢
page 2 70, Deco
rative wheel covers
or ¢ page 2 70,
Wheels with wheel bolt caps .
3. Loosen the wh eel bolt s ¢page 271.
4. Loca te the p roper moun ting poin t for the
jack and align the jack be low that point
¢ page 271 .
5. Rais e the car with the jack ¢ page 271.
6. Remove the wheel with the flat tire and
then install
the spare ¢page 273.
7. Tighten all whee l bolts lightly .
8.
Lo wer the vehicle with the jack .
9 . Use the wheel bolt w rench and
firmly
t ighten al l wheel bolts¢ page 2 71.
10. Rep lace the deco ra ti ve whe el c ove r*.
11. Deactivate the vehicle jack mode* in the
MMI:
ICARI f u nction button > (Car )* sy s
tems
contro l button > S ervici ng & check s
> Air s usp.: jack mod e > Off.
The vehicle jack mode * switches off automati
ca lly at speeds above 6 mph (10 km/h) .
.8, WARNING
-Always read and fo llow all WARNINGS and
i nformat ion¢
A in Raising the vehicle on
page
272 and ¢ page 274.
•
•
Page 272 of 310

2 70 What do I do now ?
After changing a wheel
A wheel change is not complete without the
doing the following .
.. Always store the vehicle too l kit, the jack*
and the replaced ti re i n the luggage com
partment ¢
page 136.
.. Check the tire pres sure on the spare w heel
i m media tely after mount ing it .
.,. As soo n as po ssible, have the
tightening
torques
on a ll w heel bol ts checked with a
tor que wrench . The correct tightening tor
que is 90 ft lb ( 120 Nm) .
.. Have the flat tire
replaced as soon as poss i
ble.
@ Tips
- If you notice t hat the whee l bolts are
corroded and difficult to t urn while
changing a t ire, they should be replaced
bef ore yo u check the tighten ing torque .
- Drive at reduced speed unt il y ou have the
tightening torques checked .
- After changing a wheel, the tire pressure
i n a ll four tires must be checked/cor rect
ed and t he tire pressure mo nitor ing indi
cator must be stored in the MMI
¢page 266 .
Decorative wheel covers
Applies to vehicles: with decorative wheel covers
T he decora tive wh eel covers must be removed
first to access the wheel bolts .
Fig. 206 Changing a w hee l: Re movin g the w heel cove r
Removing
.,. Inse rt the hook (provided with the ve hicle
tool kit ) in t he hole in the wheel hub cove r. ..
Pull off the
decorative wheel cover
¢fig . 206.
Wheels with wheel bolt caps
Applies to veh icles: w it h w heel bolts with caps
The ca ps must be removed first from the
wheel bolts before the bolts can be un
screwed.
Fig . 20 7 Cha ng ing a w heel: re m oving t he w hee l b o lt
caps
Removing
.. Push t he plastic clip (provided with the ve
hicle tool kit) over t he wheel bolt cap u nti l
the inner reta iners on the clip a lign with the
edge of the cover.
.,. Remove the cap wit h the
plastic clip (veh i
cle tool kit)
¢ fig . 207 .
Refitting
.. Place the caps over the whee l bolts and
push them back o n.
The caps are to protect and keep the wheel bo lts clean .
 1
1 2
2 3
3 4
4 5
5 6
6 7
7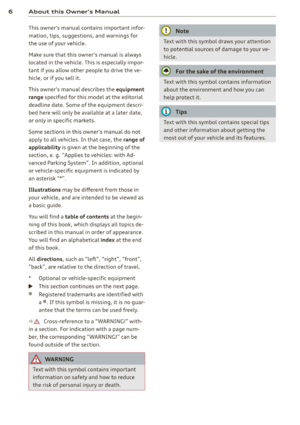 8
8 9
9 10
10 11
11 12
12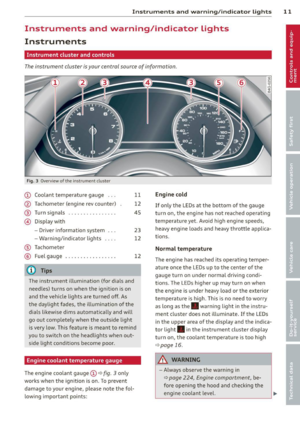 13
13 14
14 15
15 16
16 17
17 18
18 19
19 20
20 21
21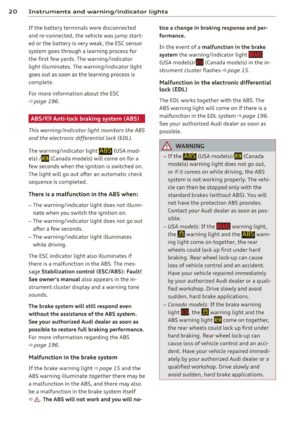 22
22 23
23 24
24 25
25 26
26 27
27 28
28 29
29 30
30 31
31 32
32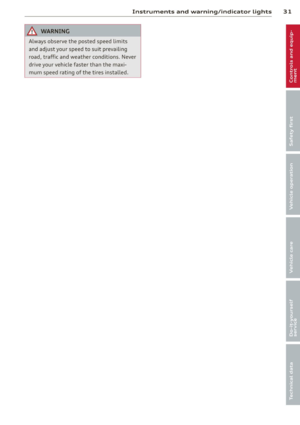 33
33 34
34 35
35 36
36 37
37 38
38 39
39 40
40 41
41 42
42 43
43 44
44 45
45 46
46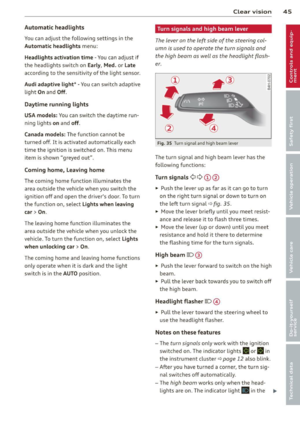 47
47 48
48 49
49 50
50 51
51 52
52 53
53 54
54 55
55 56
56 57
57 58
58 59
59 60
60 61
61 62
62 63
63 64
64 65
65 66
66 67
67 68
68 69
69 70
70 71
71 72
72 73
73 74
74 75
75 76
76 77
77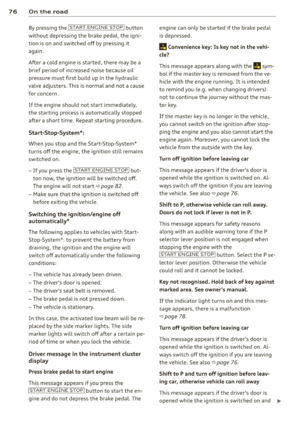 78
78 79
79 80
80 81
81 82
82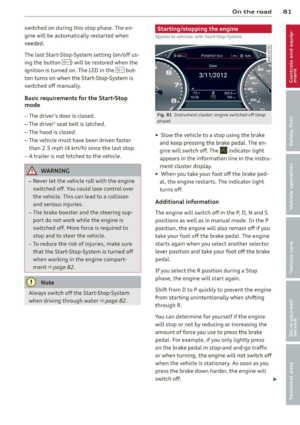 83
83 84
84 85
85 86
86 87
87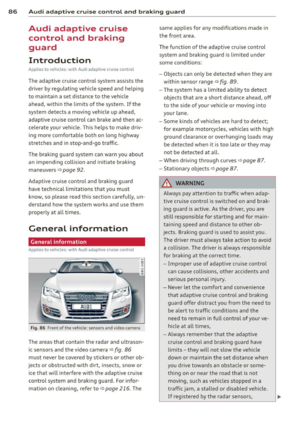 88
88 89
89 90
90 91
91 92
92 93
93 94
94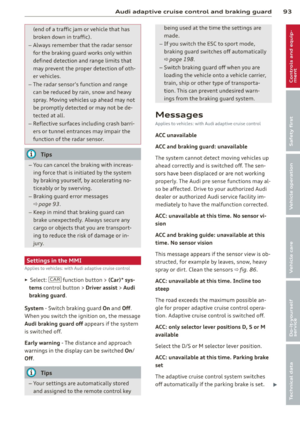 95
95 96
96 97
97 98
98 99
99 100
100 101
101 102
102 103
103 104
104 105
105 106
106 107
107 108
108 109
109 110
110 111
111 112
112 113
113 114
114 115
115 116
116 117
117 118
118 119
119 120
120 121
121 122
122 123
123 124
124 125
125 126
126 127
127 128
128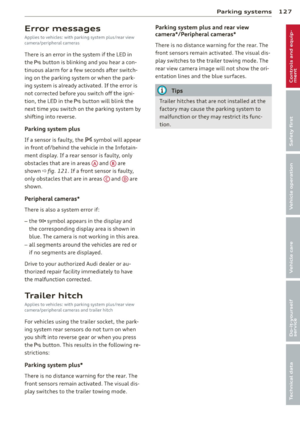 129
129 130
130 131
131 132
132 133
133 134
134 135
135 136
136 137
137 138
138 139
139 140
140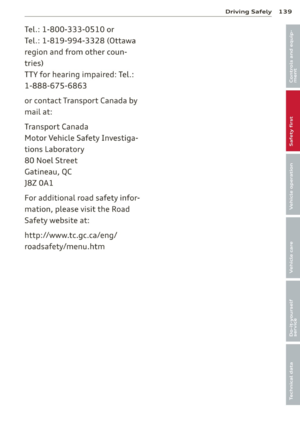 141
141 142
142 143
143 144
144 145
145 146
146 147
147 148
148 149
149 150
150 151
151 152
152 153
153 154
154 155
155 156
156 157
157 158
158 159
159 160
160 161
161 162
162 163
163 164
164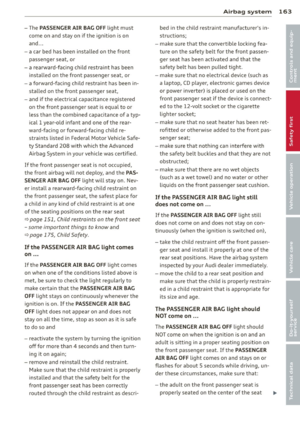 165
165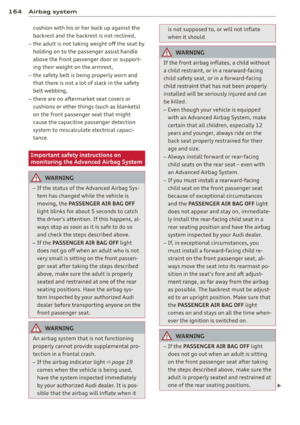 166
166 167
167 168
168 169
169 170
170 171
171 172
172 173
173 174
174 175
175 176
176 177
177 178
178 179
179 180
180 181
181 182
182 183
183 184
184 185
185 186
186 187
187 188
188 189
189 190
190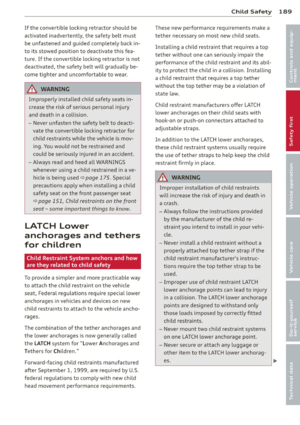 191
191 192
192 193
193 194
194 195
195 196
196 197
197 198
198 199
199 200
200 201
201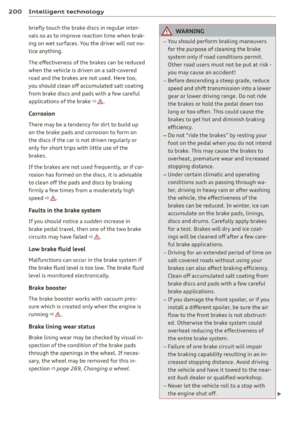 202
202 203
203 204
204 205
205 206
206 207
207 208
208 209
209 210
210 211
211 212
212 213
213 214
214 215
215 216
216 217
217 218
218 219
219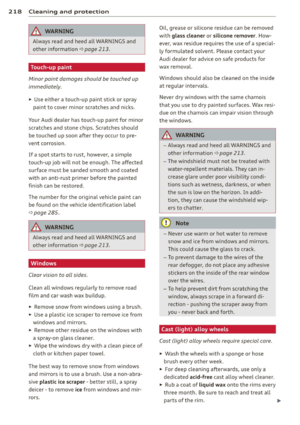 220
220 221
221 222
222 223
223 224
224 225
225 226
226 227
227 228
228 229
229 230
230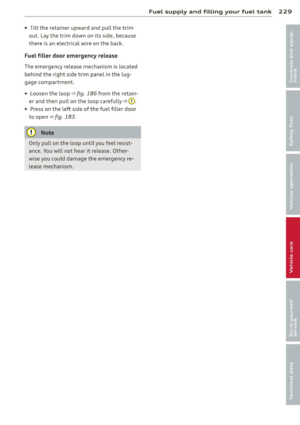 231
231 232
232 233
233 234
234 235
235 236
236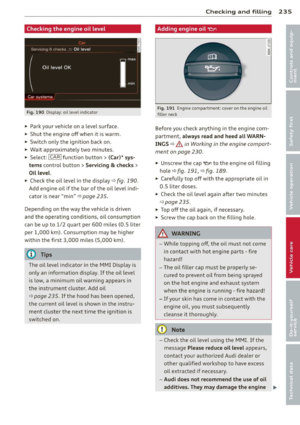 237
237 238
238 239
239 240
240 241
241 242
242 243
243 244
244 245
245 246
246 247
247 248
248 249
249 250
250 251
251 252
252 253
253 254
254 255
255 256
256 257
257 258
258 259
259 260
260 261
261 262
262 263
263 264
264 265
265 266
266 267
267 268
268 269
269 270
270 271
271 272
272 273
273 274
274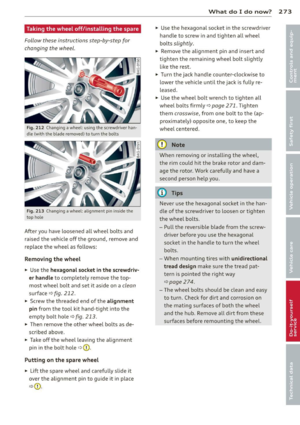 275
275 276
276 277
277 278
278 279
279 280
280 281
281 282
282 283
283 284
284 285
285 286
286 287
287 288
288 289
289 290
290 291
291 292
292 293
293 294
294 295
295 296
296 297
297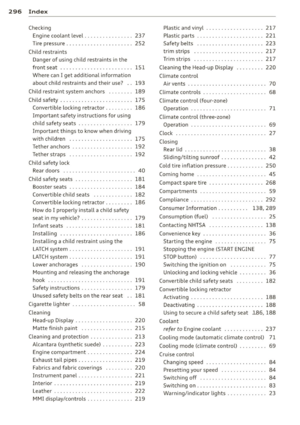 298
298 299
299 300
300 301
301 302
302 303
303 304
304 305
305 306
306 307
307 308
308 309
309