Page 3 of 23

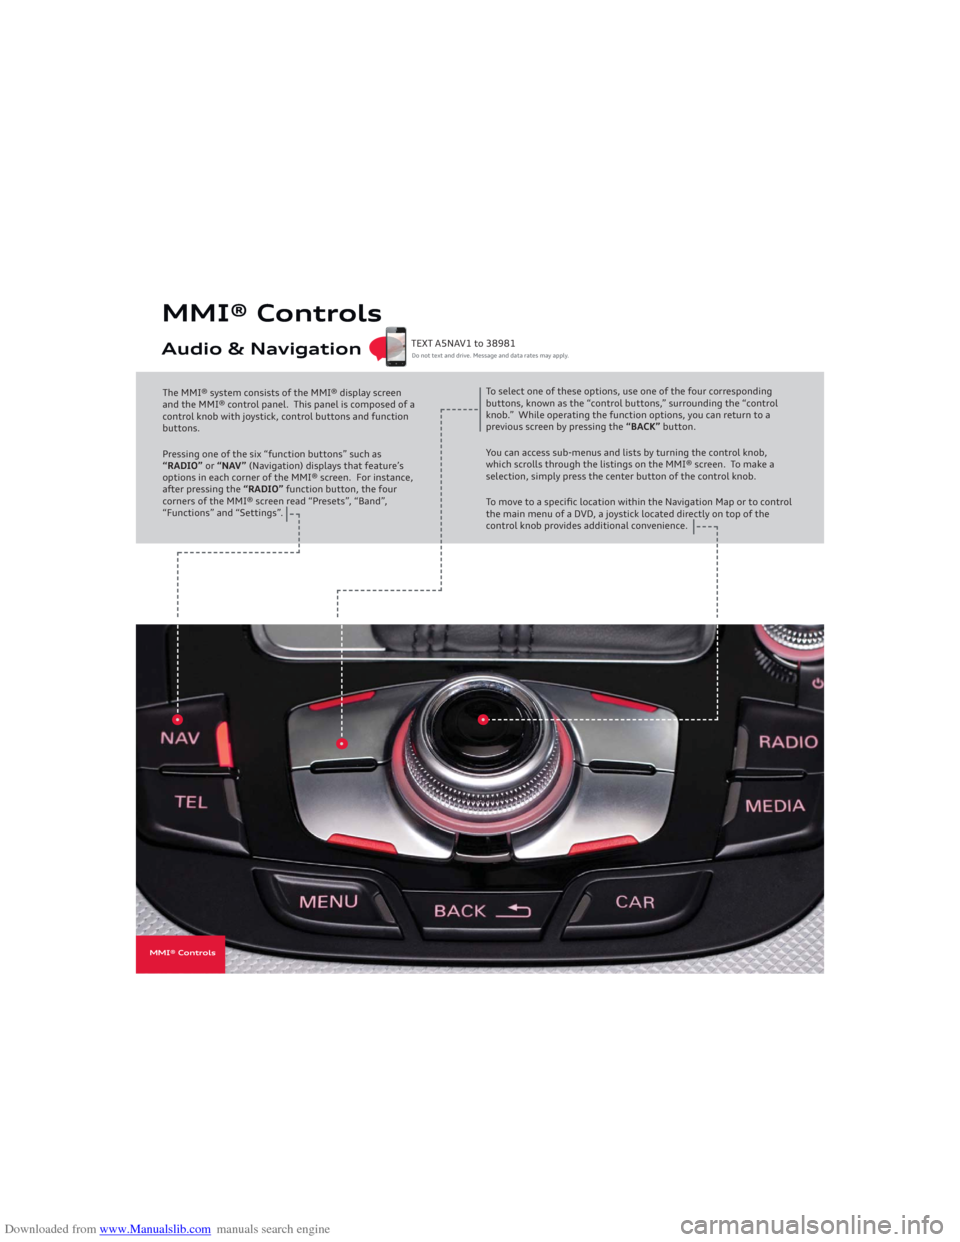
Downloaded from www.Manualslib.com manuals search engine MMI® ControlsAudio & NavigationThe MMI® system consists of the MMI® display screen
and the MMI® control panel. This panel is composed of a
control knob with joystick, control buttons and function
buttons.
Pressing one of the six “function buttons” such as
“RADIO” or “NAV” (Navigation) displays that feature’s
options in each corner of the MMI® screen. For instance,
after pressing the “RADIO” function button, the four
corners of the MMI® screen read “Presets”, “Band”,
“Functions” and “Settings”.To select one of these options, use one of the four corresponding
buttons, known as the “control buttons,” surrounding the “control
knob.” While operating the function options, you can return to a
previous screen by pressing the “BACK” button.
You can access sub-menus and lists by turning the control knob,
which scrolls through the listings on the MMI® screen. To make a
selection, simply press the center button of the control knob.
To move to a specifi c location within the Navigation Map or to control
the main menu of a DVD, a joystick located directly on top of the
control knob provides additional convenience.
Do not text and drive. Message and data rates may apply. TEXT A5NAV1 to 38981
MMI® Controls
Page 5 of 23
Downloaded from www.Manualslib.com manuals search engine You can set any mix of up to 50 Presets from FM, AM or Sirius options. Setting Station Presets
Do not text and drive. Message and data rates may apply. TEXT A5NAV2 to 38981
1. Press the “RADIO” function button
multiple times to toggle between FM,
�����������7�C���e�h���I�?�H�?�K�I�$
2. Tune to the desired station using the
control knob and pressing to select.3. Press and hold the center control knob
until the Presets screen shows the
Preset list.
MMI® Controlscont.MMI® Controls
To access your Presets:�
Page 9 of 23

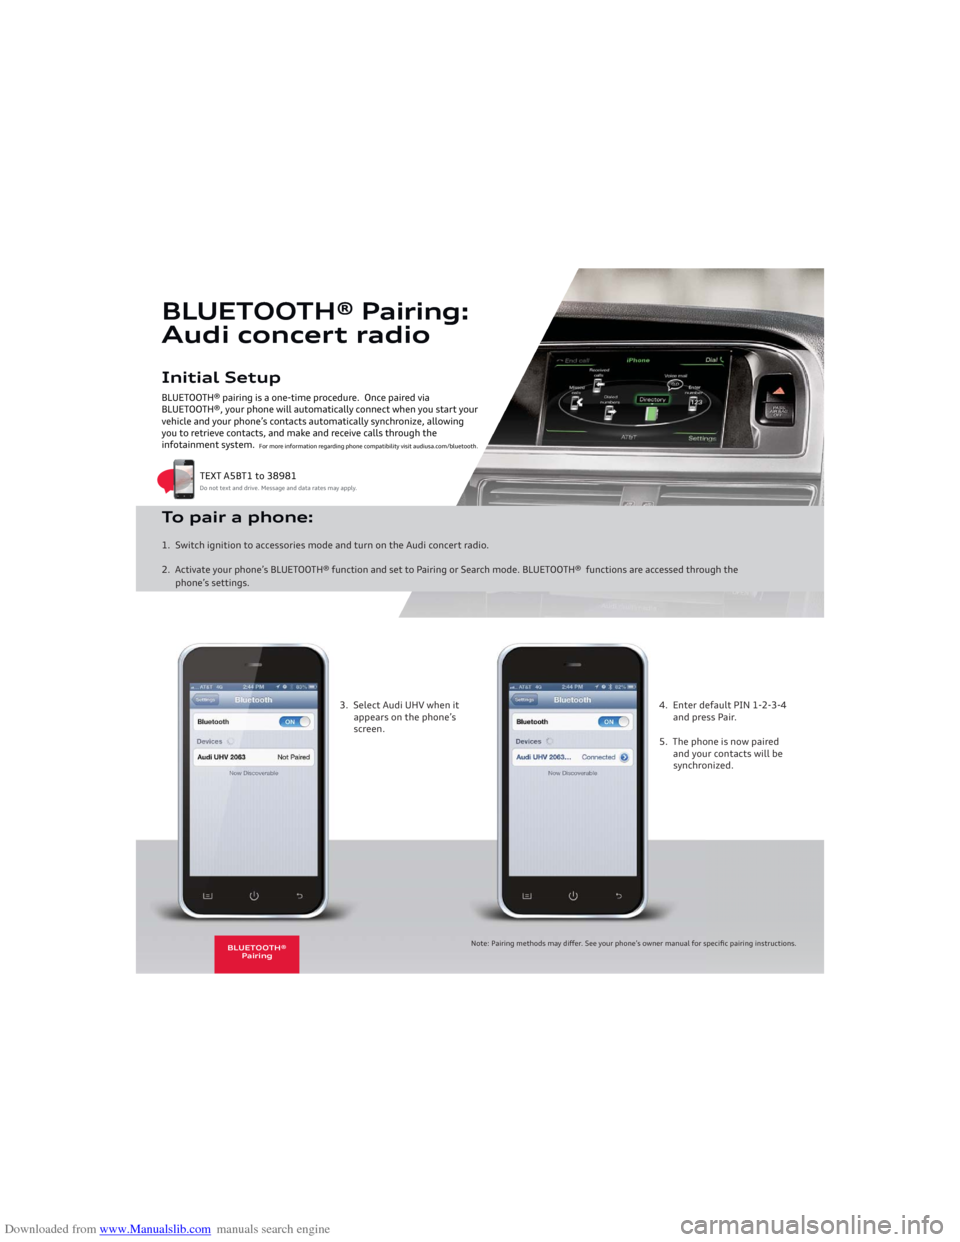
Downloaded from www.Manualslib.com manuals search engine Initial SetupBLUETOOTH® pairing is a one-time procedure. Once paired via
BLUETOOTH®, your phone will automatically connect when you start your
vehicle and your phone’s contacts automatically synchronize, allowing
you to retrieve contacts, and make and receive calls through the
infotainment system.BLUETOOTH® Pairing:
Audi concert radioTo pair a phone: 1. Switch ignition to accessories mode and turn on the Audi concert radio.
2. Activate your phone’s BLUETOOTH® function and set to Pairing or Search mode. BLUETOOTH® functions are accessed through the
phone’s settings.
Do not text and drive. Message and data rates may apply.
TEXT A5BT1 to 38981
For more information regarding phone compatibility visit audiusa.com/bluetooth.
3. Select Audi UHV when it
appears on the phone’s
screen.4. Enter default PIN 1-2-3-4
and press Pair.
5. The phone is now paired
and your contacts will be
synchronized.
Note: Pairing methods may diff er. See your phone’s owner manual for specifi c pairing instructions.
BLUETOOTH®
Pairing
Page 10 of 23

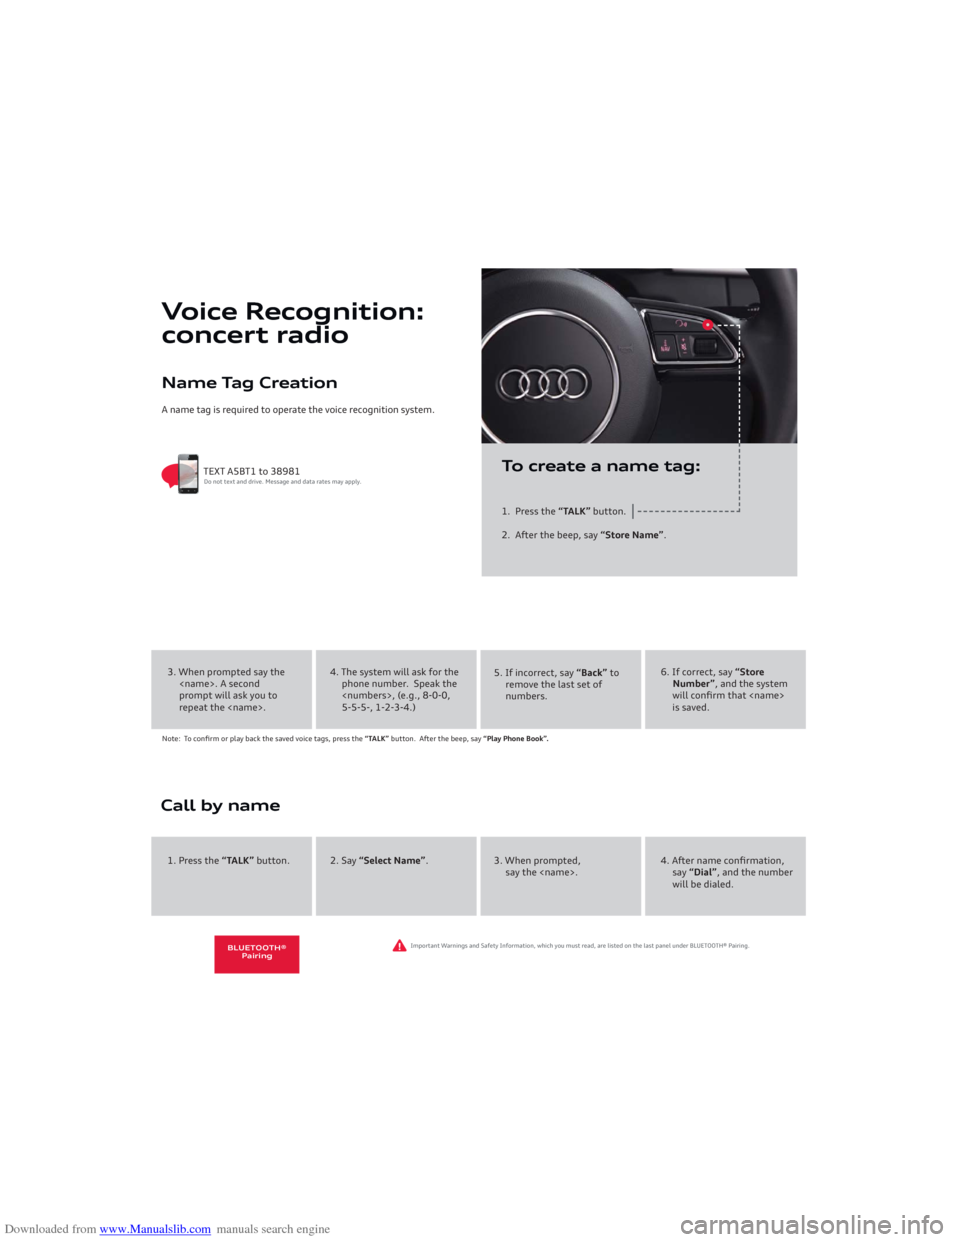
Downloaded from www.Manualslib.com manuals search engine Name Tag CreationA name tag is required to operate the voice recognition system.
Voice Recognition:
concert radio
1. Press the “TALK” button.
2. After the beep, say “Store Name”.
TEXT A5BT1 to 38981Do not text and drive. Message and data rates may apply.
To create a name tag:
4. The system will ask for the
phone number. Speak the
, (e.g., 8-0-0,
5-5-5-, 1-2-3-4.)5. If incorrect, say “Back” to
remove the last set of
numbers.
6. If correct, say “Store
Number”, and the system
will confirm that
is saved.
Note: To confirm or play back the saved voice tags, press the “TALK” button. After the beep, say “Play Phone Book”.3. When prompted say the
. A second
prompt will ask you to
repeat the .Call by name
2. Say “Select Name”. 3. When prompted,
say the .4. After name confirmation,
say “Dial”, and the number
will be dialed. 1. Press the “TALK” button.
Important Warnings and Safety Information, which you must read, are listed on the last panel under BLUETOOTH® Pairing.
BLUETOOTH®
Pairing
Page 19 of 23

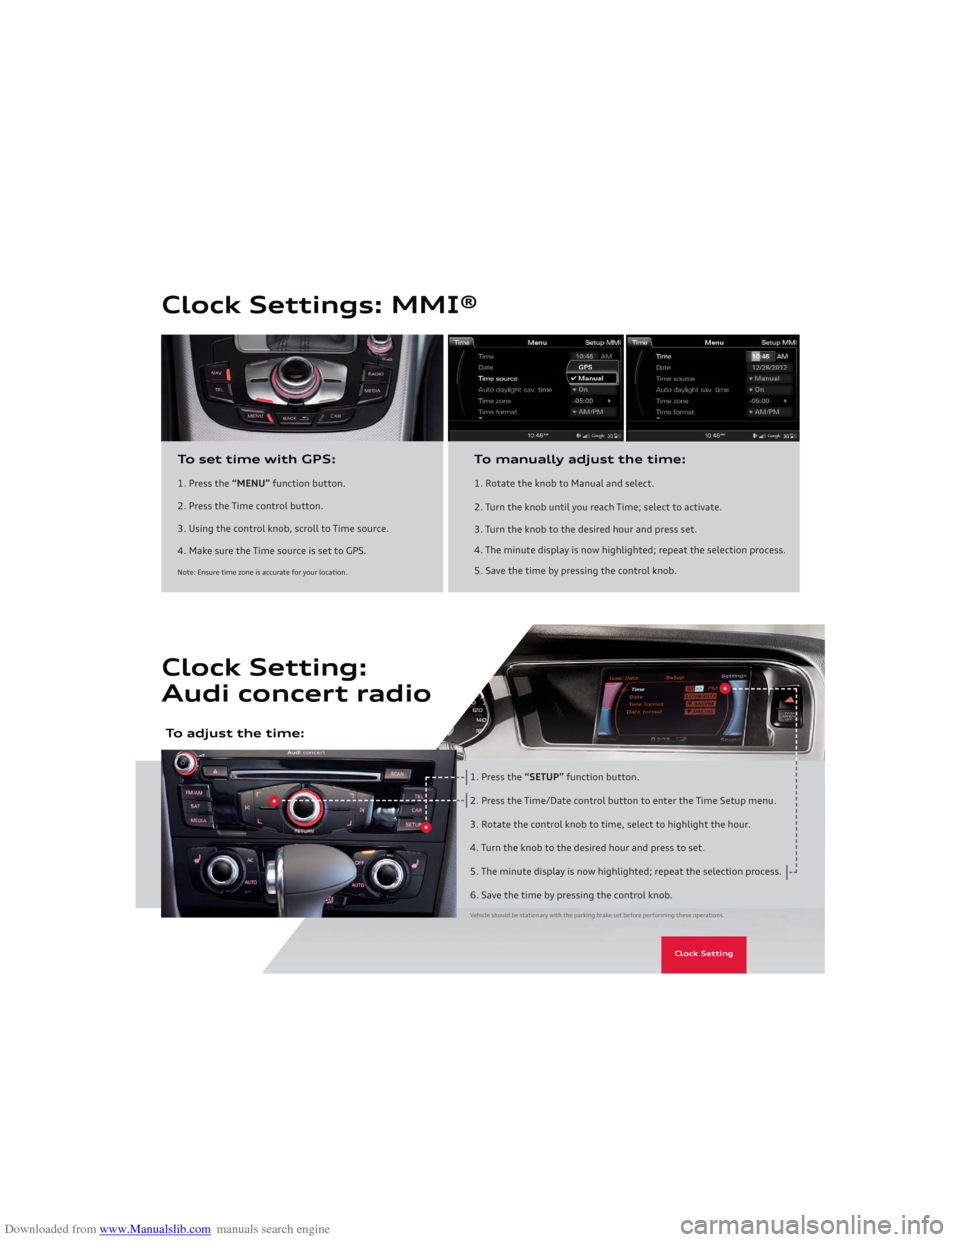
Downloaded from www.Manualslib.com manuals search engine Clock Settings: MMI®
1. Press the “MENU” function button.
2. Press the Time control button.
3. Using the control knob, scroll to Time source.
4. Make sure the Time source is set to GPS.To set time with GPS:
1. Rotate the knob to Manual and select.
2. Turn the knob until you reach Time; select to activate.
3. Turn the knob to the desired hour and press set.
4. The minute display is now highlighted; repeat the selection process.
5. Save the time by pressing the control knob.To manually adjust the time:
Note: Ensure time zone is accurate for your location.
Clock Setting:
Audi concert radio
1. Press the “SETUP” function button.
2. Press the Time/Date control button to enter the Time Setup menu.
3. Rotate the control knob to time, select to highlight the hour.
4. Turn the knob to the desired hour and press to set.
5. The minute display is now highlighted; repeat the selection process.
6. Save the time by pressing the control knob.
To adjust the time:
Vehicle should be stationary with the parking brake set before performing these operations.
Clock Setting