Page 139 of 252
138
Playing FM/AM Radio
Radio Data System (RDS)
Audio
Radio Data System (RDS)Provides text data information related to
your selected RDS capable FM station.
Press the TITLE button to turn RDS informati
on on or off. When set to ON, the name
of the FM station is displayed on the displa
y. When set to OFF, the frequency of the
station is displayed. HAUDIO button (in FM/AM mode)
AUDIO MENU
RDS Search
Search for FM stations with a strong signal
that are broadcasting the selected RDS
category information.
1.Move
w
or
y
to
select
a search
method (
Seek Up
, Seek
Down
,
Scan
).
2.Rotate
i
to select a category.
Press
u
.
Scanning for stations in that category begins.
If there are no RDS-capable stations in the area, “NOTHING” briefly appears on the display.
■RDS Info Display■Searching for Programs by RDS Category
1RDS Info DisplayRDS information is displayed on the audio screen, if available.
QRG
Page 140 of 252
139
Playing FM/AM Radio
Radio Data System (RDS)
HAUDIO button (in FM/AM mode)
AUDIO MENU
Read Radio Text
Display the radio text information of the selected RDS station.■Radio Text Display
1Radio Text DisplayThe RDS indicator comes on the display when the selected RDS station is
broadcasting text data.
QRG
Audio
Page 141 of 252

140Audio
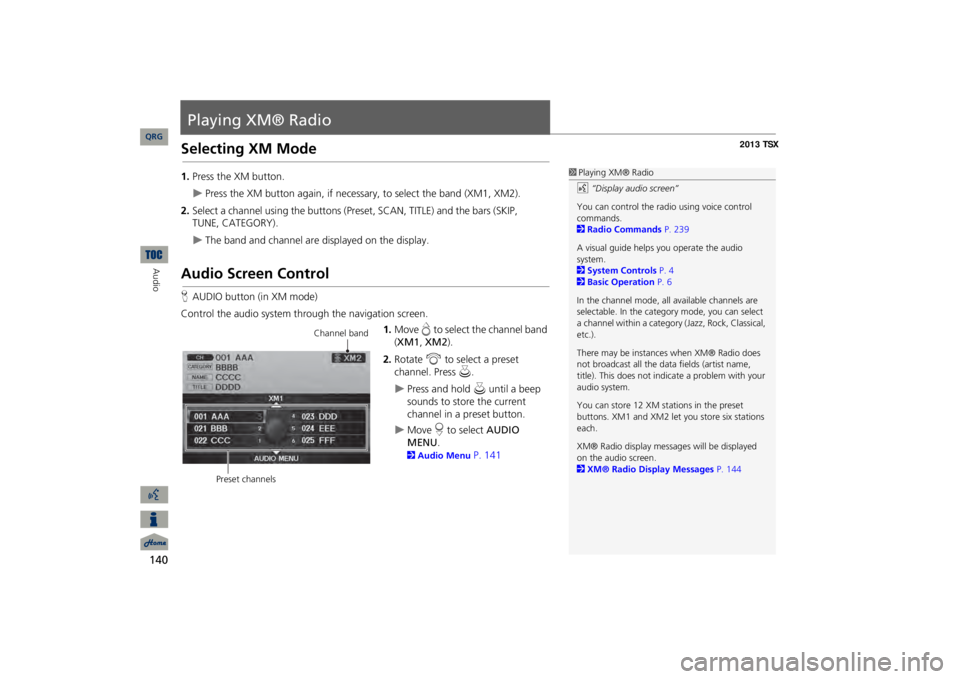
Playing XM® RadioSelecting XM Mode1.Press the XM button.
Press the XM button again, if necessary, to select the band (XM1, XM2).
2.Select a channel using the buttons (Preset, SCAN, TITLE) and the bars (SKIP,
The band and channel are displayed on the display.
Audio Screen ControlHAUDIO button (in XM mode)Control the audio system through the navigation screen.
1.Move
e to select the channel band
(XM1
, XM2
).
2.Rotate
i
to select a preset
channel. Press
u
.
Press and hold
u
until a beep
sounds to store the current channel in a preset button.
Move
r to select
AUDIO
MENU
.
2Audio Menu
P. 141
1Playing XM® Radiod
“Display audio screen”
You can control the radio using voice control commands. 2Radio Commands
P. 239
A visual guide helps
you operate the audio
system. 2System Controls
P. 4
2Basic Operation
P. 6
In the channel mode, all available channels are selectable. In the categor
y mode, you can select
a channel within a category
(Jazz, Rock, Classical,
etc.). There may be instance
s when XM® Radio does
not broadcast all the data
fields (artist name,
title). This does not indica
te a problem with your
audio system.You can store 12 XM stat
ions in the preset
buttons. XM1 and XM2 let
you store six stations
each.XM® Radio display messag
es will be displayed
on the audio screen. 2XM® Radio Display Messages
P. 144
Channel band
Preset channels
QRG
TUNE, CATEGORY).
Page 142 of 252
141
Playing XM® Radio
Audio Menu
Audio MenuHAUDIO button (in XM mode)
AUDIO MENU
Rotate
i
to select an item. Press
u
.
The following items are available: •Note
: Records a 10-second sound file
from the current channel.
2Note Function
P. 142
•Sound Setup
: Displays the sound preferences screen.
2Adjusting the Sound
P. 170
•Tune
: Tunes to the channel you select. Rotate
i
to select a channel.
•Mode
: Sets
CH
(channel mode) or
CAT
(category mode) scan mode.
•Channel List
: Displays the list of available ch
annels. Scroll the list to select a
channel.•Channel Scan
: Scans for channels with a strong
signal in the current band and
plays a 10-second sample. Select
Channel Scan
again to stop scanning and play
the current selection.•Category Scan
: Scans for channels with a strong signal in the selected category in
the current band and plays a 10-second sample. Select
Category Scan
again to
stop scanning and play the current selection.
QRG
Audio
Page 143 of 252
142
Playing XM® Radio
Note Function
Audio
Note FunctionRecord a 10-second sound file from the current channel that contains the channel, category, name, and title information. 1.When tuned to the channel you want to
record, press and hold the XM button for
a few seconds to start recording.2.Press the XM button again to stop the recording if less than 10 seconds
have
elapsed.HAUDIO button (in XM mode)
AUDIO MENU
Note
Rotate
i
to select a sound file. Press
u
to select
PLAY
.
■Recording a Sound File■Replaying a Sound File
1Recording a NoteThe system can store up to
30 sound files. Each
time you add a new recording, the oldest one is deleted.
Recorded date
QRG
Page 144 of 252
143
Playing XM® Radio
Note Function
HAUDIO button (in XM mode)
AUDIO MENU
Note
1.Rotate
i
to select a sound file.
2.Move
y
to select
DELETE
.
3.Rotate
i
to select
Delete All
or
Delete Selected Item
. Press
u
.
■Deleting a Sound File
QRG
Audio
Page 145 of 252

144
Playing XM® Radio
XM® Radio Service
Audio
XM® Radio Service1.You need your radio ID ready be
fore registering for subscription.
To see the ID in the display, press the
n
(TUNE) bar while in XM mode until
“0” appears in the center display.
2.Have your radio ID and credit card number
ready, and either call XM or visit the
XM website to subscribe.Press the XM button and stay in this mode
for about 30 minutes until the service is
activated. Make sure your vehicle is in an open area with good reception. LOADING
: XM is loading the audio or program information.
OFF AIR
: The channel is not currently broadcasting.
UPDATING
: The encryption code is being updated. Channels 0 and 1 still work
normally.NO SIGNAL
: The signal is too weak in the current location.
--------
: No such channel exists, the channel is not part of your subscription, or the
artist or title information is not available. CHECK ANTENNA
: There is a problem with the
XM antenna. Contact a dealer.
■Subscribing to XM® Radio■Receiving XM® Radio■XM® Radio Display Messages
1Subscribing to XM® RadioContact Information for XM® Radio: U.S.
: XM® Radio at
www.siriusxm.com
, or
(800) 852-9696 Canada
: XM Canada at
www.xmradio.ca
, or
(877) 209-00791Receiving XM® RadioThe XM satellites are in orbit over the equator; therefore, objects south
of the vehicle may cause
satellite reception interr
uptions. Satell
ite signals
are more likely to be bl
ocked by tall buildings
and mountains the farther north you travel from the equator. You may experience reception problems under the following circumstances:•In a location with an obstruction to the south of your vehicle•In tunnels•On the lower level of a multi-tiered road•Large items are carried on the roof rack
QRG
Page 171 of 252

170Audio
Adjusting the SoundHAUDIO button
AUDIO MENU
Sound Setup
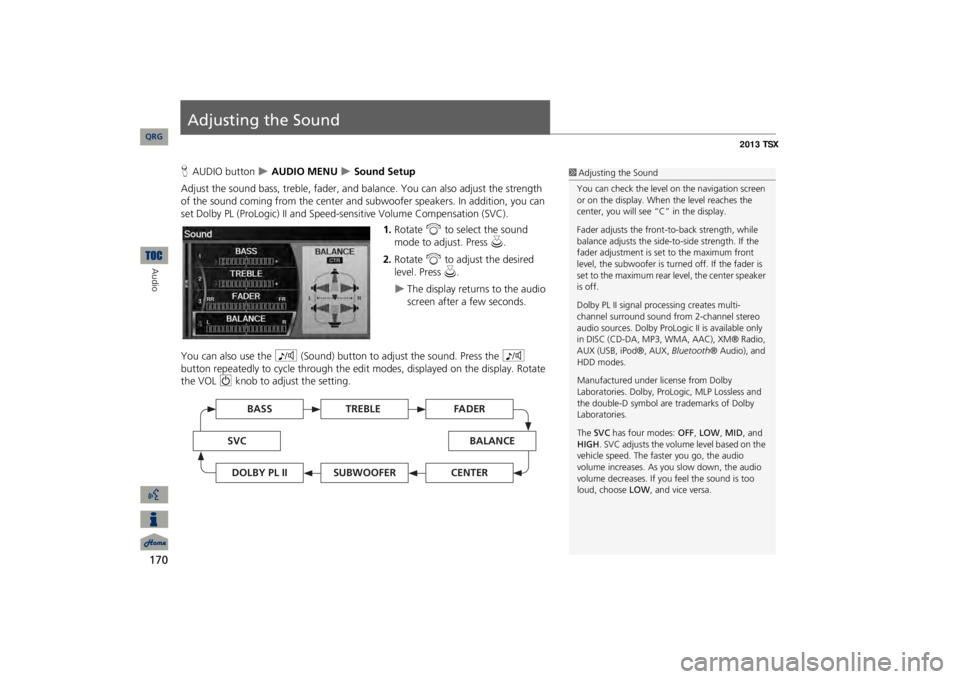
Adjust the sound bass, treble, fader, and ba
lance. You can also adjust the strength
of the sound coming from the center and
subwoofer speakers. In
addition, you can
set Dolby PL (ProLogic) II and Speed-s
ensitive Volume Compensation (SVC).
1.Rotate
i
to select the sound
mode to adjust. Press
u
.
2.Rotate
i
to adjust the desired
level. Press
u
.
The display returns to the audio screen after a few seconds.
You can also use the
8
(Sound) button to adjust the sound. Press the
8
button repeatedly to cycle through the edit
modes, displayed on the display. Rotate
the VOL
9
knob to adjust the setting.
1Adjusting the SoundYou can check the level on the navigation screen or on the display. When the level reaches the center, you will see “C” in the display. Fader adjusts the front-t
o-back strength, while
balance adjusts the side-to-side strength. If the fader adjustment is set to the maximum front level, the subwoofer is turned off. If the fader is set to the maximum rear level, the center speaker is off. Dolby PL II signal proc
essing creates multi-
channel surround sound fro
m 2-channel stereo
audio sources. Dolby ProL
ogic II is available only
in DISC (CD-DA, MP3, WMA, AAC), XM® Radio, AUX (USB, iPod®, AUX,
Bluetooth
® Audio), and
HDD modes. Manufactured under license from Dolby Laboratories. Dolby, ProL
ogic, MLP Lossless and
the double-D symbol are trademarks of Dolby Laboratories. The
SVC
has four modes:
OFF
, LOW
, MID
, and
HIGH
. SVC adjusts the volume level based on the
vehicle speed. The faster you go, the audio volume increases. As you slow down, the audio volume decreases. If you feel the sound is too loud, choose
LOW
, and vice versa.
TREBLE
BASS
SVC
BALANCE
FADER
SUBWOOFER
DOLBY PL II
CENTER
QRG