Page 41 of 82
OPERATION AND IMPORTANT RIDING POINTS
6-4
6
EAU17171
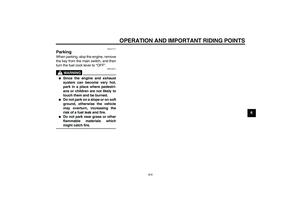
Parking When parking, stop the engine, remove
the key from the main switch, and then
turn the fuel cock lever to “OFF”.
WARNING
EWA10311
�
Since the engine and exhaust
system can become very hot,
park in a place where pedestri-
ans or children are not likely to
touch them and be burned.
�
Do not park on a slope or on soft
ground, otherwise the vehicle
may overturn, increasing the
risk of a fuel leak and fire.
�
Do not park near grass or other
flammable materials which
might catch fire.
U1P686E0.book Page 4 Thursday, April 14, 2011 1:20 PM
Page 42 of 82

PERIODIC MAINTENANCE AND ADJUSTMENT
7-1
7
EAU17244
Periodic inspection, adjustment, and lu-
brication will keep your vehicle in the
safest and most efficient condition pos-
sible. Safety is an obligation of the vehi-
cle owner/operator. The most important
points of vehicle inspection, adjust-
ment, and lubrication are explained on
the following pages.
The intervals given in the periodic
maintenance charts should be simply
considered as a general guide under
normal riding conditions. However, de-
pending on the weather, terrain, geo-
graphical location, and individual use,
the maintenance intervals may need to
be shortened.
WARNING
EWA10321
Failure to properly maintain the ve-
hicle or performing maintenance ac-
tivities incorrectly may increase
your risk of injury or death during
service or while using the vehicle. If
you are not familiar with vehicle ser-
vice, have a Yamaha dealer perform
service.
WARNING
EWA15122
Turn off the engine when performing
maintenance unless otherwise
specified.�
A running engine has moving
parts that can catch on body
parts or clothing and electrical
parts that can cause shocks or
fires.
�
Running the engine while ser-
vicing can lead to eye injury,
burns, fire, or carbon monoxide
poisoning – possibly leading to
death. See page 2-2 for more in-
formation about carbon monox-
ide.WARNING
EWA15460
Brake discs, calipers, drums, and
linings can become very hot during
use. To avoid possible burns, let
brake components cool before
touching them.
EAU17302
Emission controls not only function to
ensure cleaner air, but are also vital to
proper engine operation and maximum
performance. In the following periodic
maintenance charts, the services relat-
ed to emissions control are grouped
separately. These services require
specialized data, knowledge, and
equipment. Maintenance, replacement,
or repair of the emission control devic-
es and systems may be performed by
any repair establishment or individual
that is certified (if applicable). Yamaha
dealers are trained and equipped to
perform these particular services.
U1P686E0.book Page 1 Thursday, April 14, 2011 1:20 PM
Page 43 of 82
 or 18 months, repeat the maintenance intervals starting from 3")
PERIODIC MAINTENANCE AND ADJUSTMENT
7-2
7
EAU39944
Periodic maintenance chart for the emission control system TIP�
From 7000 km (4200 mi) or 18 months, repeat the maintenance intervals starting from 3000 km (1800 mi) or 6 months.
�
Items marked with an asterisk should be performed by a Yamaha dealer as they require special tools, data and technical
skills.
No. ITEM CHECKS AND MAINTENANCE JOBSINITIAL ODOMETER READINGS
1000 km
(600 mi) or
1 month or
30 hours3000 km
(1800 mi) or
6 months or
90 hours5000 km
(3000 mi) or
12 months or
150 hours
1*Fuel lineCheck fuel hoses for cracks or damage.
Replace if necessary.√√
2 Spark plugCheck condition.
Adjust gap and clean.√√
3*Valve clearanceCheck and adjust valve clearance when engine is cold.√
4 Air filter elementClean with solvent.
Replace if necessary.√√
5*Crankcase breather sys-
temCheck ventilation hose for cracks or damage and drain
any deposits.
Replace if necessary.√√√
6*CarburetorCheck engine idling speed and starter operation.
Adjust if necessary.√√√
7 Exhaust systemCheck for leakage.
Tighten if necessary.
Replace gasket(s) if necessary.√√
8*Spark arresterClean.√
9 Engine oilChange (warm engine before draining).√√√
U1P686E0.book Page 2 Thursday, April 14, 2011 1:20 PM
Page 44 of 82
 or 18 months, repeat the maintenance intervals starting from 3000 km (1800 mi)")
PERIODIC MAINTENANCE AND ADJUSTMENT
7-3
7
EAU3534B
General maintenance and lubrication chart TIP�
From 7000 km (4200 mi) or 18 months, repeat the maintenance intervals starting from 3000 km (1800 mi) or 6 months.
�
Items marked with an asterisk should be performed by a Yamaha dealer as they require special tools, data and technical
skills.
No. ITEM CHECKS AND MAINTENANCE JOBSINITIAL ODOMETER READINGS
1000 km
(600 mi) or
1 month or
30 hours3000 km
(1800 mi) or
6 months or
90 hours5000 km
(3000 mi) or
12 months or
150 hours
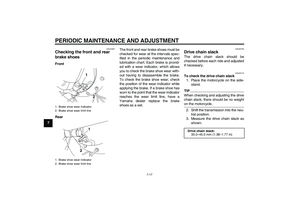
1*ClutchCheck operation.
Adjust if necessary.√√√
2*Front brakeCheck operation.
Adjust brake lever free play and replace brake shoes if
necessary.√√√
3*Rear brakeCheck operation.
Adjust brake pedal free play and replace brake shoes if
necessary.√√√
4*WheelsCheck runout, spoke tightness and for damage.
Tighten spokes if necessary.√√√
5*TiresCheck tread depth and for damage.
Replace if necessary.
Check air pressure.
Correct if necessary.√√
6*Wheel bearingsCheck bearings for smooth operation.
Replace if necessary.√√
7*Swingarm pivot bearingsCheck bearing assemblies for looseness.
Moderately repack with lithium-soap-based grease.√√
U1P686E0.book Page 3 Thursday, April 14, 2011 1:20 PM
Page 45 of 82

PERIODIC MAINTENANCE AND ADJUSTMENT
7-4
7
8Drive chainCheck chain slack/alignment and condition.
Adjust and lubricate chain with Yamaha chain and cable
lube thoroughly.Every ride
9*Steering bearingsCheck bearing assemblies for looseness.
Moderately repack with lithium-soap-based grease.√√
10*Chassis fastenersCheck all chassis fitting and fasteners.
Correct if necessary.√√√
11 Brake lever pivot shaftApply lithium-soap-based grease lightly.√√
12 Brake pedal pivot shaftApply lithium-soap-based grease lightly.√√
13 Sidestand pivotCheck operation.
Apply lithium-soap-based grease lightly.√√
14*Front forkCheck operation and for grease leakage.
Replace if necessary.√√
15*Shock absorber assem-
blyCheck operation and for oil leakage.
Replace if necessary.√
16*Control cablesApply Yamaha chain and cable lube or engine oil thor-
oughly.√√√
17*Throttle gripCheck operation.
Check throttle grip free play, and adjust if necessary.
Lubricate cable and grip housing.√√√ No. ITEM CHECKS AND MAINTENANCE JOBSINITIAL ODOMETER READINGS
1000 km
(600 mi) or
1 month or
30 hours3000 km
(1800 mi) or
6 months or
90 hours5000 km
(3000 mi) or
12 months or
150 hours
U1P686E0.book Page 4 Thursday, April 14, 2011 1:20 PM
Page 46 of 82
PERIODIC MAINTENANCE AND ADJUSTMENT
7-5
7
EAU40000
TIPThe air filter needs more frequent service if you are riding in unusually wet or dusty areas.U1P686E0.book Page 5 Thursday, April 14, 2011 1:20 PM
Page 47 of 82

PERIODIC MAINTENANCE AND ADJUSTMENT
7-6
7
EAU19613
Checking the spark plug The spark plug is an important engine
component, which is easy to check.
Since heat and deposits will cause any
spark plug to slowly erode, the spark
plug should be removed and checked
in accordance with the periodic mainte-
nance and lubrication chart. In addition,
the condition of the spark plug can re-
veal the condition of the engine.
To remove the spark plug
1. Remove the spark plug cap.
2. Remove the spark plug as shown,
with a spark plug wrench available
at a Yamaha dealer.To check the spark plug
1. Check that the porcelain insulator
around the center electrode of the
spark plug is a medium-to-light tan
(the ideal color when the vehicle is
ridden normally).
TIPIf the spark plug shows a distinctly dif-
ferent color, the engine could be oper-
ating improperly. Do not attempt to
diagnose such problems yourself. In-
stead, have a Yamaha dealer check
the vehicle.
2. Check the spark plug for electrode
erosion and excessive carbon or
other deposits, and replace it if
necessary.
3. Measure the spark plug gap with a
wire thickness gauge and, if nec-
essary, adjust the gap to specifica-
tion.
1. Spark plug cap
1. Spark plug wrench
Specified spark plug:
NGK/CR7HSA
1. Spark plug gap
Spark plug gap:
0.6–0.7 mm (0.024–0.028 in)
U1P686E0.book Page 6 Thursday, April 14, 2011 1:20 PM
Page 48 of 82

PERIODIC MAINTENANCE AND ADJUSTMENT
7-7
7To install the spark plug
1. Clean the surface of the spark plug
gasket and its mating surface, and
then wipe off any grime from the
spark plug threads.
2. Install the spark plug with the
spark plug wrench, and then tight-
en it to the specified torque.
TIPIf a torque wrench is not available when
installing a spark plug, a good estimate
of the correct torque is 1/4–1/2 turn
past finger tight. However, the spark
plug should be tightened to the speci-
fied torque as soon as possible.3. Install the spark plug cap.
EAU49932
Engine oil The engine oil level should be checked
before each ride. In addition, the oil
must be changed at the intervals spec-
ified in the periodic maintenance and
lubrication chart.
To check the engine oil level
1. Place the motorcycle on a level
surface and hold it in an upright po-
sition. A slight tilt to the side can re-
sult in a false reading.
2. Start the engine, warm it up for
several minutes, and then turn it
off.
3. Wait a few minutes until the oil set-
tles, remove the engine oil filler
cap, wipe the engine oil dipstick
clean, insert it back into the oil filler
hole (without screwing it in), and
then remove it again to check the
oil level.TIPThe engine oil should be between the
minimum and maximum level marks.
4. If the engine oil is at or below the
minimum level mark, add sufficient
oil of the recommended type to
raise it to the correct level.
5. Insert the dipstick into the oil filler
hole, and then tighten the oil filler
cap.
To change the engine oil
1. Start the engine, warm it up for
several minutes, and then turn it
off.
2. Place an oil pan under the engine
to collect the used oil.
Tightening torque:
Spark plug:
13 Nm (1.3 m·kgf, 9.4 ft·lbf)
1. Engine oil filler cap
2. Engine oil dipstick
3. Maximum level mark
4. Minimum level mark
U1P686E0.book Page 7 Thursday, April 14, 2011 1:20 PM