Page 17 of 80

1
2
3
4
5
6
7
8
9
3-1
EAU1044E
INSTRUMENT AND CONTROL FUNCTIONS
EAU1044E
INSTRUMENT AND CONTROL FUNCTIONS
EAU45440
Main switch/steering lockZAUM00**ON
OFF
LOCK
The main switch/steering lock controls
the ignition and lighting systems, and
is used to lock the steering. The vari-
ous positions are described below.TIPThe main switch/steering lock is
equipped with a keyhole cover. (See
page 3-2.)
EAUT1971
ON
All electrical circuits are supplied with
power; the meter lighting, taillight, and
auxiliary lights come on, and the en-
gine can be started. The key cannot
be removed.
TIPThe headlight comes on automatically
when the engine is started and stays
on until the key is turned to “OFF” or
the sidestand is moved down.
EAU10661
OFF
All electrical systems are off. The key
can be removed.
EWA10061
WARNING
Never turn the key to “OFF” or
“LOCK” while the vehicle is mov-
ing. Otherwise the electrical sys-
tems will be switched off, which
may result in loss of control or an
accident.
EAU10683
LOCK
The steering is locked, and all electri-
cal systems are off. The key can be
removed.
To lock the steeringZAUM00**
1
1. Push.1. Turn the handlebars all the way
to the left.
2. Push the key in from the “OFF”
position, and then turn it to
“LOCK” while still pushing it.
3. Remove the key.
4P9-F8199-E5_CS.indd 3-14P9-F8199-E5_CS.indd 3-1
2011/09/06 14:18:392011/09/06 14:18:39
Process BlackProcess Black
Page 18 of 80

1
2
3
4
5
6
7
8
9
3-2
EAU1044E
INSTRUMENT AND CONTROL FUNCTIONS
EAUT2111
Keyhole coverZAUM00**
1
1. Keyhole cover leverTo open the keyhole cover
Insert the key bow into the keyhole
cover receptacle as shown, and then
turn the key to the right to open the
cover.
To close the keyhole cover
Push the keyhole cover lever inward
and the keyhole cover will close.
EAU11006
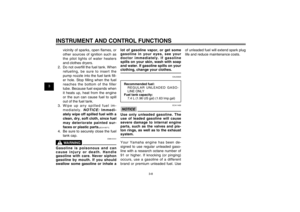
Indicator and warning lightsZAUM00**
RESET
SELECT
1
2
3
1. High beam indicator light “&”
2. Turn signal indicator light “5”
3. Engine trouble warning light “
”
EAU11020
Turn signal indicator light “
5
”
This indicator light flashes when the
turn signal switch is pushed to the left
or right.EAU11080
High beam indicator light “&”
This indicator light comes on when the
high beam of the headlight is switched
on.
EAUT1934
Engine trouble warning light “
”
This warning light fl ashes or stays on
if an electrical circuit monitoring the To unlock the steering
12
ZAUM00**1. Turn.
2. Release.Push the key in, and then turn it to
“OFF” while still pushing it.
4P9-F8199-E5_CS.indd 3-24P9-F8199-E5_CS.indd 3-2
2011/09/06 14:18:392011/09/06 14:18:39
Process BlackProcess Black
Page 19 of 80

1
2
3
4
5
6
7
8
9
3-3
EAU1044E
INSTRUMENT AND CONTROL FUNCTIONS
engine is not working correctly. If this
occurs, have a Yamaha dealer check
the self-diagnosis system.
The electrical circuit of the warning
light can be checked by turning the
key to “ON”. The warning light should
come on for a few seconds, and then
go off.
If the warning light does not come
on initially when the key is turned to
“ON”, or if the warning light remains
on, have a Yamaha dealer check the
electrical circuit.
EAU11601
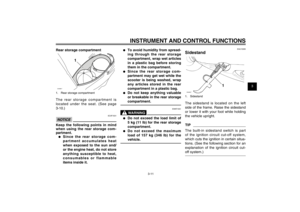
SpeedometerZAUM00**
RESET
SELECT
1
1. SpeedometerThe speedometer shows the riding
speed.
When the key is turned to “ON”, the
speedometer needle will sweep once
across the speed range and then re-
turn to zero in order to test the electri-
cal circuit.
EAUT1957
Multi-function display
EWA14431
WARNING
Be sure to stop the vehicle before
making any setting changes to the
multi-function display. Changing
settings while riding can distract
the operator and increase the risk
of an accident.ZAUM00**
RESET
SELECT
1
2
3
4
5
6
1. Oil change indicator “7”
2. Odometer
3. Fuel meter
4. “RESET” button
5. “SELECT” button
6. ClockThe multi-function display is equipped
with the following:●
an odometer
4P9-F8199-E5_CS.indd 3-34P9-F8199-E5_CS.indd 3-3
2011/09/06 14:18:392011/09/06 14:18:39
Process BlackProcess Black
Page 20 of 80

●
an oil change tripmeter (which
shows the dist")
1
2
3
4
5
6
7
8
9
3-4
EAU1044E
INSTRUMENT AND CONTROL FUNCTIONS●
a tripmeter (which shows the dis-
tance traveled since it was last
set to zero)
●
an oil change tripmeter (which
shows the distance traveled since
the last engine oil change)
●
an oil change indicator (which
flashes when the engine oil
should be changed)
●
a clock
●
a fuel meter
TIP●
When the key is turned to “ON”,
all segments of the display come
on for a few seconds. During this
time, the multi-function display is
performing a self-test.
●
Be sure to turn the key to “ON”
before using the “SELECT” and
“RESET” buttons.
Odometer, tripmeter and oil change
tripmeter modes
Pushing the “SELECT” button switch-
es the display among the odom-
eter mode “ODO”, the tripmeter mode
“TRIP” and the oil change tripmeter
“OIL CHANGE TRIP” in the following
order:
ODO → TRIP → OIL CHANGE TRIP
→ ODO
OdometerTIPIf the odometer indicates “-----”, have
a Yamaha dealer check the multi-
function display, as it may be faulty.
Tripmeter
To reset the tripmeter, select it by
pushing the “SELECT” button until
“TRIP” is displayed, and then push the
“RESET” button at least 1 second.TIPIf the tripmeter indicates “-----”, have
a Yamaha dealer check the multi-
function display, as it may be faulty.
Oil change tripmeter
To reset the oil change tripmeter, se-
lect it by pushing the “SELECT” but-
ton until “OIL CHANGE TRIP” is dis-
played, and then push the “RESET”
button at least 3 seconds.
Push the “SELECT” button again to
start the oil change tripmeter; the dis-
play changes to the ODO mode.
Oil change indicator “7”
This indicator flashes at the initial
1000 km (600 mi), then at every 3000
km (1800 mi) thereafter to indicate
that the engine oil should be changed.
After changing the engine oil, reset
the oil change tripmeter.
If the engine oil is changed before
the oil change indicator flashes (i.e.
before the periodic oil change interval
has been reached), the oil change
tripmeter must be reset after the
oil change for the next periodic oil
change to be indicated at the correct
time.TIP●
If the oil change tripmeter is reset
before the initial 1000 km (600
mi), the next periodic oil change
4P9-F8199-E5_CS.indd 3-44P9-F8199-E5_CS.indd 3-4
2011/09/06 14:18:392011/09/06 14:18:39
Process BlackProcess Black
Page 21 of 80
 thereafter.
●
If the oil change tripmeter in-
dicates “-----”, have a Yamaha
dealer")
1
2
3
4
5
6
7
8
9
3-5
EAU1044E
INSTRUMENT AND CONTROL FUNCTIONS
interval will be at every 3000 km
(1800 mi) thereafter.
●
If the oil change tripmeter in-
dicates “-----”, have a Yamaha
dealer check the multi-function
display, as it may be faulty.
Clock
To set the clock:
1. Push the “SELECT” button and
“RESET” button together for at
least two seconds.
2. When the hour digits start flash-
ing, push the “SELECT” button to
set the hours.
3. Push the “RESET” button, and
the first minute digit will start
fl ashing.
4. Push the “SELECT” button to set
the fi rst minute digit.
5. Push the “RESET” button and
the second minute digit will start
fl ashing.
6. Push the “SELECT” button to set
the second minute digit.
7. Push the “RESET” button and
then release it to start the clock.Fuel meter
The fuel meter indicates the amount
of fuel in the fuel tank. The display
segments of the fuel meter disappear
towards “E” (Empty) as the fuel level
decreases. When “
” starts flashing,
refuel as soon as possible. When the
key is turned to “ON”, all of the display
segments of the fuel meter will appear
for a few seconds, and then shown
actual fuel level.
EAU12349
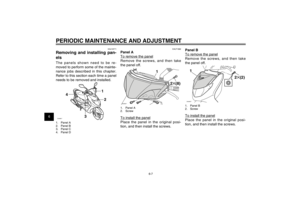
Handlebar switchesLeftZAUM00**
3 1
2
1. Dimmer switch “%/&”
2. Turn signal switch “4/6”
3. Horn switch “*”RightZAUM00**
1
1. Start switch “,”
4P9-F8199-E5_CS.indd 3-54P9-F8199-E5_CS.indd 3-5
2011/09/06 14:18:392011/09/06 14:18:39
Process BlackProcess Black
Page 22 of 80

1
2
3
4
5
6
7
8
9
3-6
EAU1044E
INSTRUMENT AND CONTROL FUNCTIONS
EAU12400
Dimmer switch “&/%”
Set this switch to “&” for the high
beam and to “%” for the low beam.
EAU12460
Turn signal switch “4/6”
To signal a right-hand turn, push this
switch to “6”. To signal a left-hand
turn, push this switch to “4”. When
released, the switch returns to the
center position. To cancel the turn
signal lights, push the switch in after it
has returned to the center position.
EAU12500
Horn switch “*”
Press this switch to sound the horn.
EAU12721
Start switch “,”
With the sidestand up, push this
switch while applying the front or rear
brake to crank the engine with the
starter. See page 5-1 for starting in-
structions prior to starting the engine.
EAU12900
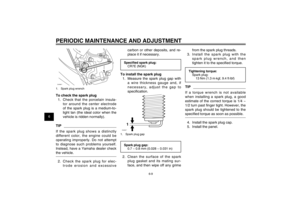
Front brake leverZAUM00**
1
1. Front brake leverThe front brake lever is located on
the right handlebar grip. To apply the
front brake, pull this lever toward the
handlebar grip.
EAU12950
Rear brake leverZAUM00**
1
1. Rear brake leverThe rear brake lever is located on the
left handlebar grip. To apply the rear
brake, pull this lever toward the han-
dlebar grip.
4P9-F8199-E5_CS.indd 3-64P9-F8199-E5_CS.indd 3-6
2011/09/06 14:18:392011/09/06 14:18:39
Process BlackProcess Black
Page 23 of 80

1
2
3
4
5
6
7
8
9
3-7
EAU1044E
INSTRUMENT AND CONTROL FUNCTIONS
EAU13074
Fuel tank capTo open the fuel tank cap
Open the fuel tank cap lock cover,
insert the key into the lock, and then
turn it 1/4 turn clockwise. The lock will
be released and the fuel tank cap can
be opened.ZAUM00**
1
1. Fuel tank cap lock coverTo close the fuel tank cap
1. Push the fuel tank cap into posi-
tion with the key inserted in the
lock.
2. Turn the key counterclockwise to
the original position, remove it,
and then close the lock cover.
TIPThe fuel tank cap cannot be closed
unless the key is in the lock. In addi-
tion, the key cannot be removed if the
cap is not properly closed and locked.
EWA11091
WARNING
Make sure that the fuel tank cap
is properly closed after � lling fuel.
Leaking fuel is a � re hazard.
EAU13221
FuelZAUM00**
1
2
1. Fuel tank fi ller tube
2. Fuel levelMake sure there is suffi cient gasoline
in the tank.
EWA10881
WARNING
Gasoline and gasoline vapors are
extremely � ammable. To avoid � res
and explosions and to reduce the
risk of injury when refueling, follow
these instructions.
1. Before refueling, turn off the en-
gine and be sure that no one is
sitting on the vehicle. Never re-
fuel while smoking, or while in the
4P9-F8199-E5_CS.indd 3-74P9-F8199-E5_CS.indd 3-7
2011/09/06 14:18:392011/09/06 14:18:39
Process BlackProcess Black
Page 24 of 80

1
2
3
4
5
6
7
8
9
3-8
EAU1044E
INSTRUMENT AND CONTROL FUNCTIONS
vicinity of sparks, open fl ames, or
other sources of ignition such as
the pilot lights of water heaters
and clothes dryers.
2. Do not overfi ll the fuel tank. When
refueling, be sure to insert the
pump nozzle into the fuel tank fi ll-
er hole. Stop fi lling when the fuel
reaches the bottom of the filler
tube. Because fuel expands when
it heats up, heat from the engine
or the sun can cause fuel to spill
out of the fuel tank.
3. Wipe up any spilled fuel im-
mediately.
NOTICE:
Immedi-
ately wipe off spilled fuel with a
clean, dry, soft cloth, since fuel
may deteriorate painted sur-
faces or plastic parts.[ECA10071]
4. Be sure to securely close the fuel
tank cap.
EWA15151
WARNING
Gasoline is poisonous and can
cause injury or death. Handle
gasoline with care. Never siphon
gasoline by mouth. If you should
swallow some gasoline or inhale a
lot of gasoline vapor, or get some
gasoline in your eyes, see your
doctor immediately. If gasoline
spills on your skin, wash with soap
and water. If gasoline spills on your
clothing, change your clothes.
EAU33520
Recommended fuel:
REGULAR UNLEADED GASO-
LINE ONLY
Fuel tank capacity:
7.4 L (1.96 US gal) (1.63 Imp.gal)
ECA11400
NOTICEUse only unleaded gasoline. The
use of leaded gasoline will cause
severe damage to internal engine
parts, such as the valves and pis-
ton rings, as well as to the exhaust
system.
Your Yamaha engine has been de-
signed to use regular unleaded gaso-
line with a research octane number of
91 or higher. If knocking (or pinging)
occurs, use a gasoline of a different
brand or premium unleaded fuel. Use of unleaded fuel will extend spark plug
life and reduce maintenance costs.
4P9-F8199-E5_CS.indd 3-84P9-F8199-E5_CS.indd 3-8
2011/09/06 14:18:392011/09/06 14:18:39
Process BlackProcess Black