Page 19 of 400

01 Safety
Seatbelts01
17
•if it is pulled out too quickly
•during braking and acceleration
•if the car leans heavily.
Make sure that you:
•do not use clips or anything else that can
prevent the seatbelt from fitting properly
•ensure that the seatbelt is not twisted or
caught on anything
•the hip strap must be positioned low down
(not over the abdomen)
•tension the hip strap over the lap by pulling
the diagonal shoulder belt up towards the
shoulder.
WARNING
The seatbelts and airbags interact. If a seat-
belt is not used or is used incorrectly, this
may diminish the protection provided by the
airbag in the event of a collision.
WARNING
Each seatbelt is designed for only one per-
son.
WARNING
Never modify or repair the seatbelts your-
self. Volvo recommends that you contact an
authorised Volvo workshop.
If a seatbelt has been subjected to a major
load, such as in conjunction with a collision,
the entire seatbelt must be replaced. Some
of the protective characteristics of the seat-
belt may have been lost, even if it appears
to be undamaged. In addition, replace the
seatbelt if the belt is worn or damaged. The
new seatbelt must be type-approved and
intended for installation in the same position
as the replaced seatbelt.
Seatbelts and pregnancy
G020998
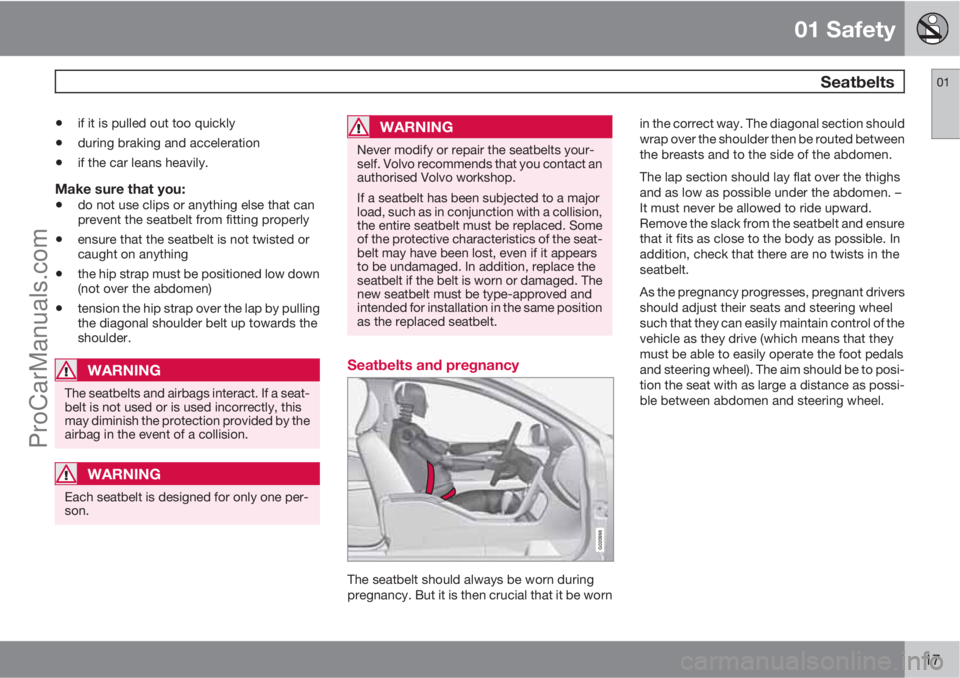
The seatbelt should always be worn during
pregnancy. But it is then crucial that it be wornin the correct way. The diagonal section should
wrap over the shoulder then be routed between
the breasts and to the side of the abdomen.
The lap section should lay flat over the thighs
and as low as possible under the abdomen. –
It must never be allowed to ride upward.
Remove the slack from the seatbelt and ensure
that it fits as close to the body as possible. In
addition, check that there are no twists in the
seatbelt.
As the pregnancy progresses, pregnant drivers
should adjust their seats and steering wheel
such that they can easily maintain control of the
vehicle as they drive (which means that they
must be able to easily operate the foot pedals
and steering wheel). The aim should be to posi-
tion the seat with as large a distance as possi-
ble between abdomen and steering wheel.
ProCarManuals.com
Page 44 of 400

01 Safety
Child safety 01
42
Upper mounting points for child seats
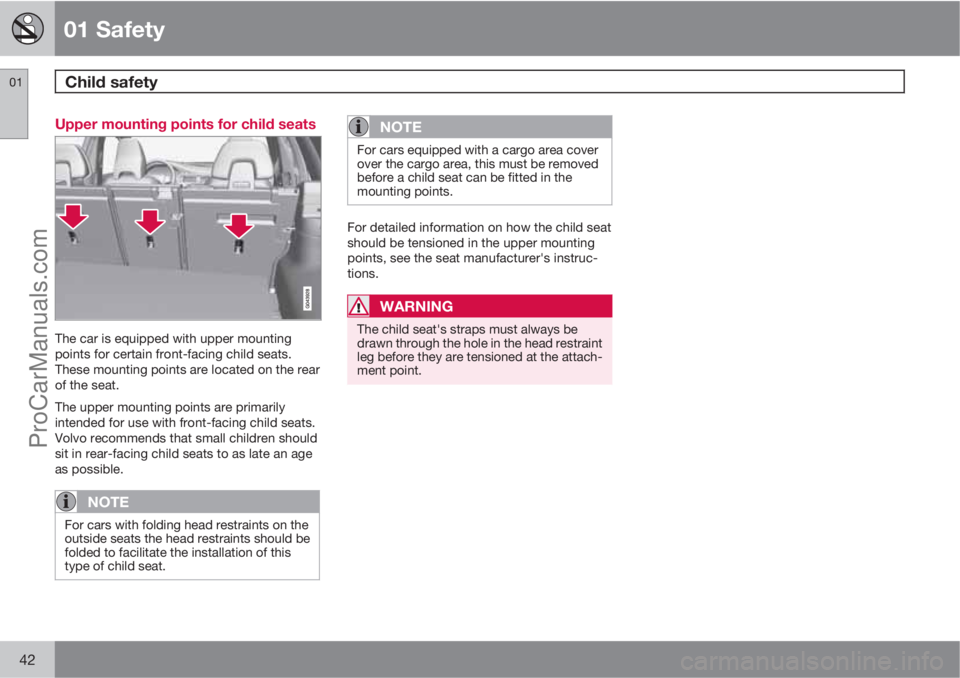
The car is equipped with upper mounting
points for certain front-facing child seats.
These mounting points are located on the rear
of the seat.
The upper mounting points are primarily
intended for use with front-facing child seats.
Volvo recommends that small children should
sit in rear-facing child seats to as late an age
as possible.
NOTE
For cars with folding head restraints on the
outside seats the head restraints should be
folded to facilitate the installation of this
type of child seat.
NOTE
For cars equipped with a cargo area cover
over the cargo area, this must be removed
before a child seat can be fitted in the
mounting points.
For detailed information on how the child seat
should be tensioned in the upper mounting
points, see the seat manufacturer's instruc-
tions.
WARNING
The child seat's straps must always be
drawn through the hole in the head restraint
leg before they are tensioned at the attach-
ment point.
ProCarManuals.com
Page 82 of 400

03 Your driving environment
Key positions
03
80* Option/accessory, for more information, see Introduction.
Insert and remove the remote control
key
Ignition switch with remote control key extracted/
inserted.
NOTE
For cars with the Keyless* function the key
does not need to be inserted into the ignition
switch but can be stored in e.g. a pocket.
For more information on Keyless functions -
see page 55.
Insert the key1. Hold the end of the remote control key with
the detachable key blade and insert the key
in the ignition switch.
2. Then press the key in the lock up to its end
position.
IMPORTANT
Foreign objects in the ignition switch may
jeopardise the function or destroy the lock.
Do not press the remote control key incor-
rectly turned - Hold the end with the detach-
able key blade, see page 50.
Withdraw the key
•Push in the remote control key, allow it to
eject, then pull it out from the ignition
switch.
Functions at different levels
To enable the use of a limited number of func-
tions with the engine switched off, the car's
electrical system can be set in 3 different levels
(key positions) - 0, I and II - with the remote
control key. This owner's manual describes
these levels throughout using the denomina-
tion "key positions".
The following table shows the functions avail-
able in each key position/level.
LevelFunctions
0Odometer, clock and tempera-
ture gauge are illuminated.
Electrically operated seats can be
adjusted.
The audio system can be used for
a limited time - see page 220.
ISunroof, power windows, 12 V
socket in the passenger compart-
ment, RTI, phone, ventilation fan
and windscreen wipers can be
used.
IIThe headlamps come on.
Warning/indicator lamps illumi-
nate for 5 seconds.
Several other systems are acti-
vated. However, electric heating
in seat cushions and the rear win-
dow can only be activated after
starting the engine.
This key position consumes a
lot of current from the battery
and should therefore be avoi-
ded!
ProCarManuals.com