2012 VOLKSWAGEN GOLF PLUS key
[x] Cancel search: keyPage 320 of 541
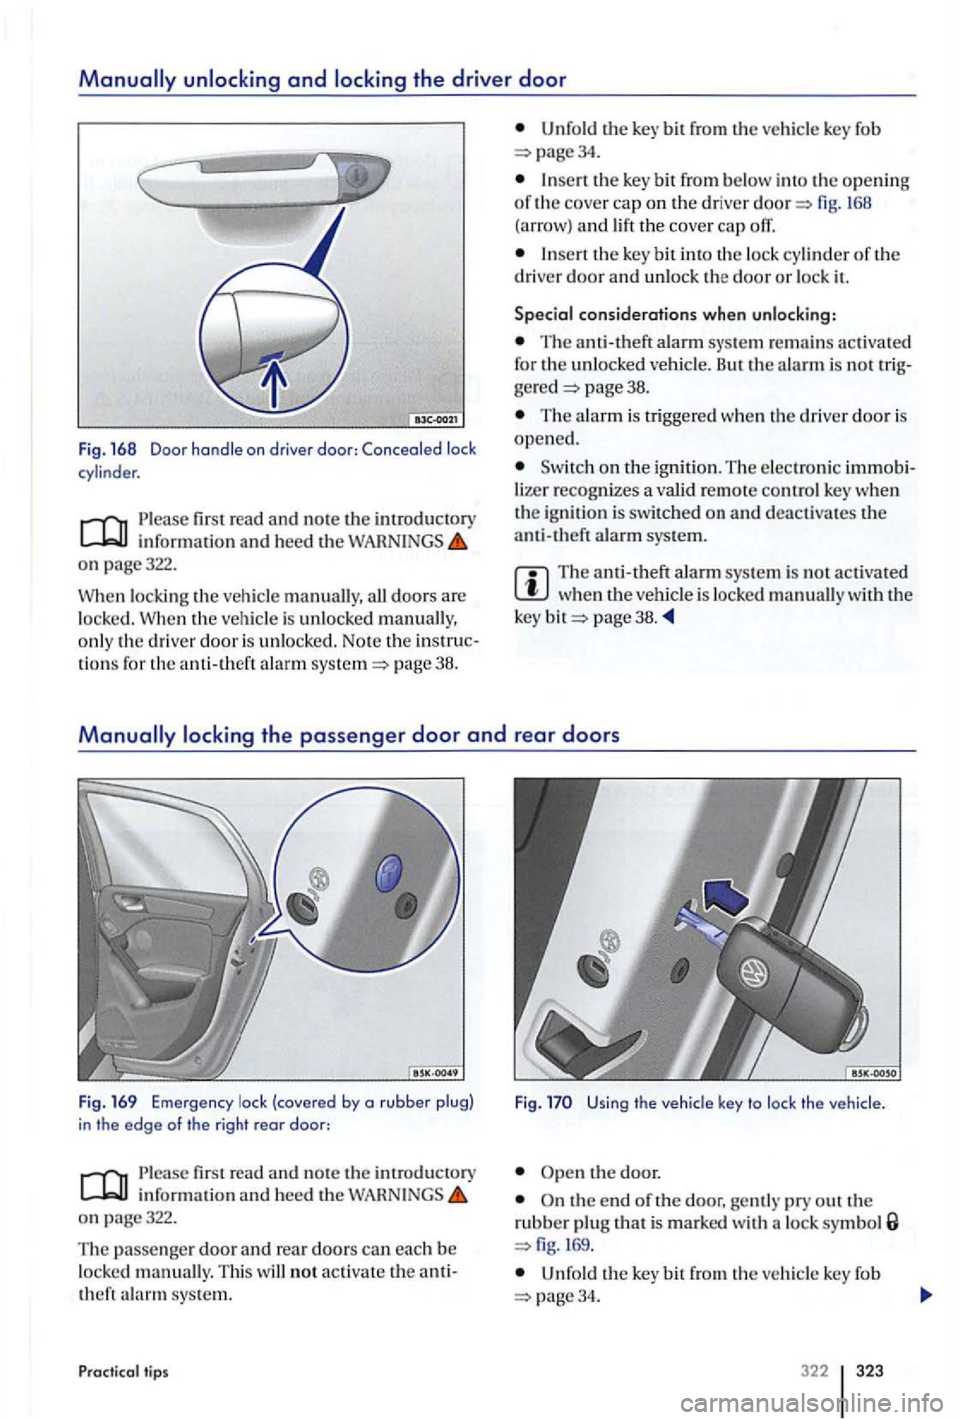
informatio n and heed the WAH N INGS o n page322.
W h
en lock ing the vehicl e all doo rs are
l ocke d. When th e vehicle is unlocke d o n ly th e drive r door is unlo cke d. Note the tions for the anti-th eft ala rm page 38.
Unfo ld the bit from ve hicle key fob page34.
th e key bit from be low into the o pening of the cove r cap on the driver and lift th e cover cap
the ke y bit int o th e lock cy linder of the
driver door and unl ock the door o r lock it.
Special considerations when unlocking:
The anti-theft alarm sys te m activated for the unlo cke d ve hicle. But the alarm is no t page 38.
The alarm is tri gge re d when the drive r door is open e d.
o n the ignition. The e lectron ic lize r recognizes a valid re mot e contro l key w hen
th e ig nit ion is switc hed on and deactivates the anti -theft alarm sys tem.
The anti-theft alarm sys te m is no t activa ted when veh icl e is loc ked manuall y w ith the
k ey page 3 8.
read and note the int roductory information and heed th e WAR N INGS on page322.
T he passe nge r d o
or and rear doors can eac h be loc ked manually. Thi s will not ac tiv ate theft sys te m .
Practic al tip s F
ig. the
vehicle key to lock the vehicle .
Ope n the door.
O n the end of the door, gently pry out th e rubber plug that is m arked with lock symbol 169.
the key bit from the ve hicle key fob 34.
322 323
Page 321 of 541
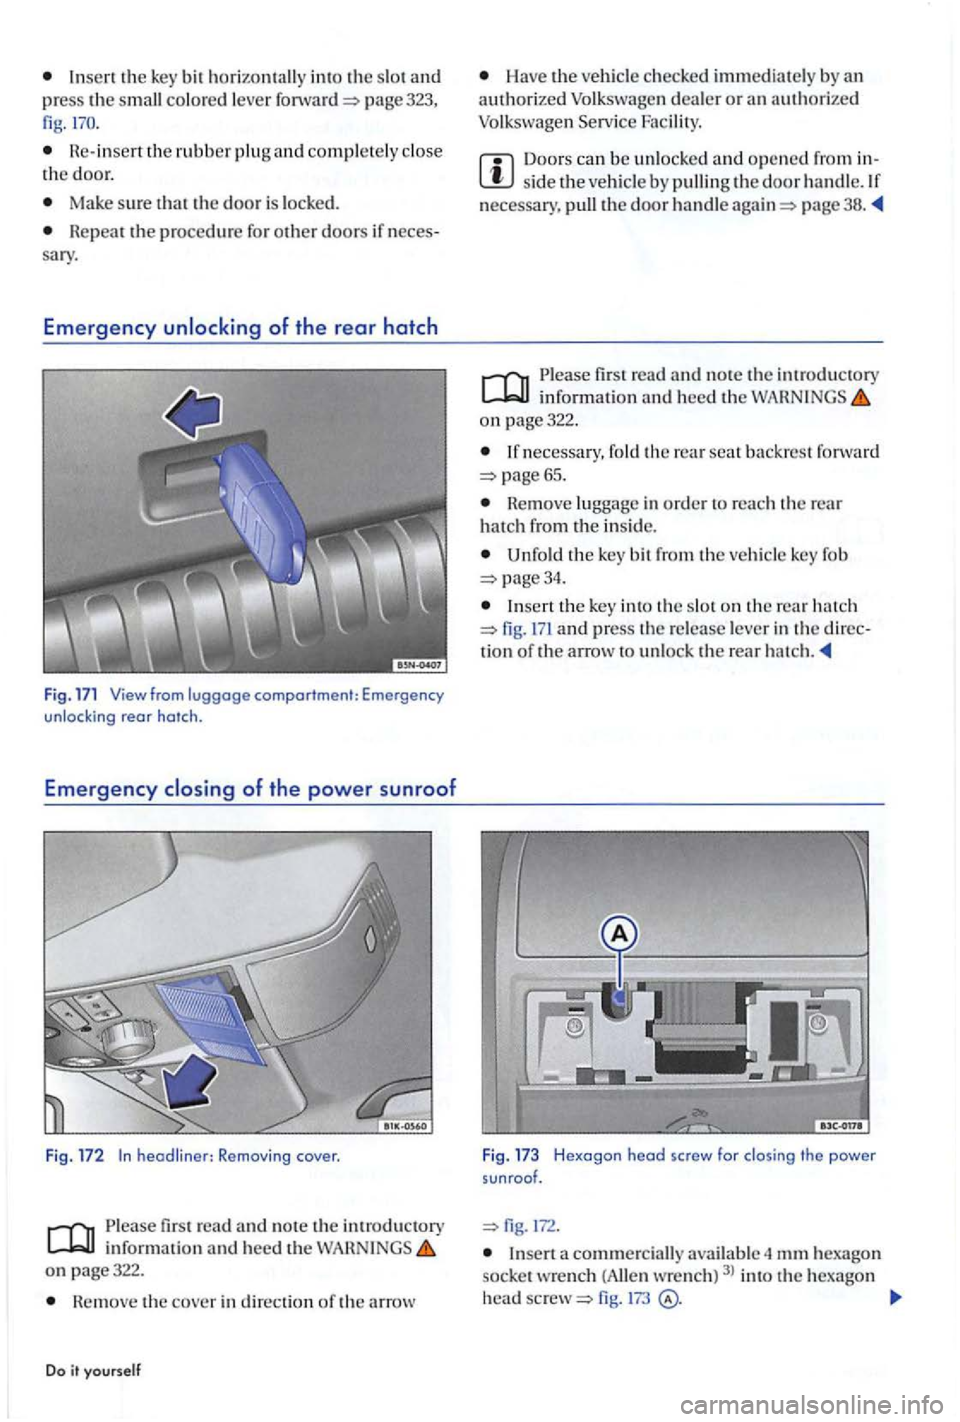
Insert the key bit horizontally int o the slot and press the small colored lever page 323, fig.
Re- insert the rubber plug and completely the door.
Ma ke sure t ha t the door is locke d.
Re peat the procedure fo r othe r doors if sary.
Emergency
Emergency
fir st r ead and note th e introductory inform ation and heed the on page322.
Hemove the cove r in direction of th e a rro w
Do
Have the authorized
Doors can be unlocke d a nd ope ned from sid e t he necessary. pull the door h andl e page 38.
information and heed the on page322.
necessary, fo ld the rear seat back rest fo rwa rd
n emove lugg age in order to re a ch the rear ha tc h from the in sid e.
Unfold the key bit from the key fo b
page34 .
Insert th e ke y int o the slo t o n the rear hatc h and p ress th e re le ase leve r in the d irectio n of the a rro w to unlock the rear h atc h.
Insert a commercially
fig. 173
Page 327 of 541
Introduction
In this s ec tion lowing :
Preparation s chang ing a . . . . . . . . . . . . . 331
. . . . . . . . . . . . . . . . . . . . . . . . . . . . . . . . 332
the with the jack . . . . . . . . . . 333
Changing a
. . . . . . . . . . . . . . . . . . . . . . 335
ve hicl e design s and models are not ered with a jack and lug w re n ch . su ch cases , Volkswage n recommend s havi ng tires and wheels
changed by an authorized Volk swage n dealer or an authorized Volkswag en Servic e Facility.
Vehi cle key page 34
Tir es and wheels=>
In an page
Vehi cle tool pag e 32 6
Whee l cover s page 328
a whe el, especially on th e side of the road, can be da ngerou s. To help reduce the risk of ser ious personal injury:
Always stop the vehicle
Always make sure that all passengers , cially children, are in safe place outside the
Turn on the emergency nasher and set up another
Always make sure th at the ground is level and firm . If necessary place a sturdy board under the jack.
a whee l by yourse lf only if yo u arc
Always use proper and undamaged tools
when changing tire.
Always apply the parking brake and sh ift the transmission into Park mission ) or any gear (manual only) to help ve nt the ve hicle from moving suddenly and ping off the jack.
a w heel is lifted off the ground, having the tran smission in Park or in gea r not prevent sudden vehicl e movement.
Alwa ys blo ck
Jar object.
If you are towing trail er, alway s unhitch it
from your vehicle before star ting to change the
wh eel. Always apply th e trailer bra kes firmly and make sure the
Always use jac k that has been approved by th e m anufacturer for your vehicle . Never use other jack s, eve n if th ey have been approved for
u se on other Volk swag en models.
To reduce the risk of los ing control , crashes, and se riou s personal injurie s, neve r loosen the
sc re w s on rim s with threa ded rim rings.
Mter changin g a wheel , have the wheel bolt
tightening torque checked with an accurate
torqu e
wrench .
Page 333 of 541
Tire
Introduction
In thi s section you'll fin d information on th e lowing:
Cont ent s o f the tire mobi lity set . . . 337
Prep ara tio ns . . . . . . . . . . . . . . . . . . . . . . . . . . . . . . . 338
minu tes of drivin g . . . . . . . . . . . . . .
tures up to abo ut 3/16 in (4 mm) in diam ete r c an
b e re liabl y se ale d using the tir e mobility The
foreign obje ct (sc rew or fo r example) must
n ot be re m ove d from the tire!
Afte r the sealant is th e tire , driv e for abou t minut es and check tir e pressure ag ain.
Never use th e
tire m obility se t to a tire un less you
-have park ed ve hicl e at a safe s po t,
- are fami liar with the nec ess ary pro ce -dures and safe ty pre cautio ns, and
-have th e correc t tir e mobilit y Otherw ise . ge t exp ert ass is tan ce .
Tir e sealant mu st not be used:
If th e w heel rim is damaged.
i\t out side tempe ratur es below
If th e c ut or punctu re da mag e of th e tir e is
g rea te r than 3/16 in (4 mm) in diameter.
I f you were drivin g wi th very lo w tire press ure
o r flat tir e.
If th e tir e inflation cyli nder h as passe d its ration elate.
More information:
Vehicle key page 34
Braking, s to ppin g and page 188
T ires and page 276
In an em erge ncy pag e
page 328
D o it yoursel f
rious personal injury:
Alway s stop the ve hicle as soon as it is sa fe to
d o so and move the ve hicl e
Always make sur e that th e ground is leve l a n d
firm.
passen gers and espec iall y childr en must stay
Turn on the emerge ncy flas hers and set up an oth er warnin g dev ice about 25 yards (25
m ete rs) behind the ve hicl e to warn approaching
traffic .
the tire mobility set only if yo u are mili ar with the n ecessa ry s tep s. Othenvisc, get
expe rt ass is tance.
yo u can get profe ssional h elp.
Sea lant is harmful and mus t immedi atel y be removed in case of skin contact.
Alway s store th e tire mobilit y se t o u t of reach of children .
Never usc a vehicl e jack, even if th e jack is proved for use with your vehicle.
Always apply the parkin g brake and shift the
t ran smi ssio n Par k (P) (automati c
Page 335 of 541
Tire inflatio n cy lind er w ith sealant4l
Replacem ent va lve cor e
Th e valv e
core wrench has a sl it on th e lowe r
end wh ich fits the va lve co re. Thi s is th e only way
Pr eparations
to unsc rew the v alve core from the tir e va lve and t o
sc rew it in aga in. T his a ls o applies for the replace
m ent va lv e co re @ .
first read and no te th e in troduc tory in for mation and hee d th e on page 336.
Checklist
188 .
3 . Autom atic transmi
ssio n: S hift th e tra nsmi ssio n into 179.
4 . Sto p th e e ng in e
and re m ove the key from th e ig ni tio n page 172.
5. Man ua l
tra nsmi ssion: Engage page 179.
6. Have all passengers exit and go to a safe place, su ch as behind th e g uard rail.
7. Swi tc h on em erge ncy flashers and put up th e wa rning page 320.
whe ther a repa ir th e tir e mob ility set is p age 336.
9. If towin g a trailer: Unhi tch th e trailer f rom th e ve hicl e and pa rk the trailer properly.
p age 337, fig. 187 ® from the tire mobility set o n the in strument panel in the driver's fie ld of vis io n.
1 3. The fore ig n o
bject (screw or nail, for example) sh o ul d not be re m ove d from th e tire!
Di sregarding the safe ty-r elat ed checkli st may
lead t o accidents and serious injurie s.
Always rev ie w and follow the c hecklist.
F ollow accepted safety practices and use common sense .
Do it yo ur self
Page 338 of 541
Fuses
Introduction
thi s section yo u'll find information on the lowing:
342
343
Due to ongoing development of the ve hicl e, ment -d ependent allocation of fuse s an d th e bin ed fuse prote ction of multiple load s us ing one fuse, an up-to-date overview of th e fuse location per lo ad is no t pos sible at the time of printing. taile d info rma tion regarding fuse bo x layout is
availabl e from authori zed dea ler s Faciliti es.
In gen eral , one fuse ca n prot ect severa l l oad s. load can a ls o be protected by s evera l fuses.
R eplac e
fuses only if the ca use of th e malfuncti on
wa s corr ected. a newly re pla ced fuse blow s aga in
aft er a short time, th e ele ctri cal sys te m should be
c he cke d b y
an authorized deale r or an au thorize d Facility .
More information:
page 242
High voltage systems in the engine
Never touch ignition cables. Never touch other components of the hi gh voltag e elec tronic
ignition syste m.
Practi cal tips
Avoid short circuits in the electrical system.
tion in tJ1e circuit can cause fires and serious
Neve r replace a fuse with one that has a
higher amp ratin g. Replace a blown fuse only
with a fus e of the same amperage (same color and same imprint) and same overall size.
Never repair fuses.
Never
Note ---To help prevent damage to ele ctr ica l
system, swit ch off all lights and accessories,
switch off the ignition , and remove the key from the ign ition switch befo re replacing a fuse.
If a fuse is replaced with a fuse with higher
electrical system.
A sin gle load (a s ingle electr ical componen t) ma y be prot ected several fuses.
fuse m ay prote ct sev era l loads (several e le ctri ca l compone nts).
341
Page 343 of 541
Please first read and note the introdu cto ry information and heed the on page 344.
for re pla cing a light bulb. Please carry out these ste p s only in the order
page 188.
3. Turn the light switch page
4. Move the tu rn signal lever to neutral page
5. Auto mati c transmission: 179.
6. the eng ine and re move the key from the ig ni tion page 172.
7. Manu al transmission: Engage a page 179.
8. Let orie nt ation lighting go page
9. Let the burned out light bulb cool down.
page 341.
11. R e place the burned out light bulb accordi ng Always replace a burned-out light bulb with a good bulb with the sa me s pecifications. Specifications are on the g lass bulb or on
the meta l base.
12. Neve r tou ch the glass of th e light bulb with your bare hands. Finge rprin ts can clo ud t he o uter sur
f ace of the light bulb when heated, affec ting the lighting power, clouding the reflector, andre
d u ci ng th e brightness.
13. Always make sure th at the new bulb works. the bulb does not work, it may not be installed cor
rectly; the connector may no t be co mplet ely seated; the correspondin g fuse may be burned out; or the bulb may be bad.
14. Always have th e headligh ts adj usted by an authorized Vol k swage n dealer or an a uth orized swagen Service Facility
to accidents and serious Injuries.
Always review and follow the
Note
Alway s insert and remove lamps car efully to avoid damage to the vehicle paint or to other parts of the
Page 354 of 541
Tow-starting and towing
Introduction
In thi s sec tion you'll find informati on on the low ing:
ti ps on towin g your vehicle . . . . . . . . . . . . . . . . . . . 357
Installing the towing eye in the fron t . . . . . . . . . . . . . 358
In stalling the towing eye in the rear . . . . . . . . . . . . . 359
Driving tips while towing . . . . . . . . . . . . . . . . . . . . . .
Ob serve lega l regulations tow -startin g and
t ow ing.
For technical rea sons: A vehicle with dead battery must never be towed;
Engin e control and emissio n control system page315
Never tow a vehicle without any electrica l
power.
Neve r remove the vehicle key from the
first r ea d and no te th e introductory inf ormation and heed the WARNINGS on page357.
Towing eye; bar
A to w ing eye is includ ed in your vehicl e's tool kit.
Thi s ca n b e inserted in a th rea ded h ole in the front bumper a nd use d whe n your ve hicl e is bei ng
t owed by an o th er ve hicle.
Towing a veh icle change s th e way it handles and brake s. To help reduce the risk of an accident and serious personal injury, note the following:
The driver of the ve hicl e that is being towed:
-
need to
press harder on the brak e pedal to slow down or stop. Always be alert so as not to rear-end the towing vehicle.
-
You will have to use conside rably more
force to turn the steerin g whee l because the power steering is not working.
The driver of the ve hicl e that is doing the towing:
- Accelerate gradually
and gently and avoid
jerking movements.
- Do
not brake hard or stee r sharply.
- Brake earlier
and more gently than in normal driving.
Note
Be careful not to damage the paint when stalling and removing the eye and the cove r for the threaded hole behind the bumper.
Unburned fuel can get into the catalytic verter during towing and damage it.
The tow rope s ho uld be nexib le e no ug h to help
protect both v ehicle s from damage . thetic fiber rope or simil ar rope.
A tta ch th e
tow rope or tow bar onl y to the towing
eye included in the vehicl e tool kit for thi s
the transmission in Ne utra l (N).
Do not tow faster than mph km /h ).
D o not tow more than miles