Page 17 of 64

17
<CRB3644-A/U>17
1 DISCSwitches to the CD mode. (Only effective if a disc is loaded.)
2 h (EJECT)Press to eject the disc.
3 LISTPress to display a CD List.Use the ROTARY ENCODER to select a CD fr")
17
17
1 DISCSwitches to the CD mode. (Only effective if a disc is loaded.)
2 h (EJECT)Press to eject the disc.
3 LISTPress to display a CD List.Use the ROTARY ENCODER to select a CD from the list.
4 ROTARY ENCODER (SELECT
LIST)Turn the ROTARY ENCODER clock-wise or counterclockwise to select the desired title. Press the ROTARY ENCODER in the center to start play-back.
• No CD List is displayed when play-ing back a CD containing no text information.
5 UP/DOWN (SELECT LIST)Press to select the desired title.
6 RIGHT (TRACK )Press to proceed to the next track. Press and hold until you hear a beep. Playing of the track is fast forwarded. ( There is sound.)
7 LEFT (TRACK )Press to takes you back to the start of the track currently playing. Press to return to the previous track once more.Press and hold until you hear a beep. Playing of the track is reversed. ( There is sound.)
8 PRESET1 (PLAY/PAUSE)To pause the CD, press PRESET 1 while the CD is playing. Press again to resume playing.
9 PRESET5 (Random)If you press this, and is indicated in the display. This unit starts to play tracks on the disc being played in random order. Press again to cancel.
a PRESET6 (Repeat)If you press this, and is indi-cated in the display. This unit starts to repeat the track being played. Press again to cancel.
b SCANIf you press this, and is indi-cated in the display. This unit starts to play the first 10 seconds of each track on the CD being played. Press again to cancel.
c TEXTPress, and display indications change as follows ( TEX T CD only):
Upper: Artist NameLower: Track Title Track TitleELAPSED TIME
Disc Title Track Title
When d is displayed, if you press and hold until you hear a beep, the display will changes. A maximum of 2 pages (24 characters) can be dis-played.
CAUTION
Compact disc players use an
invisible laser beam which
could cause hazardous radiation
exposure if directed outside
the unit. Be sure to operate the
player correctly.
Page 18 of 64
18
18
Listening to MP3/
WMA/AAC DISC
1 DISCSwitches to the DISC mode. (Only effective if a disc is loaded.)
2 h (EJECT)Press to eject the disc.
3 LISTPress to display an MP3/ WMA /A AC List.Use the ROTARY ENCODER to select an item from the list.
4 ROTARY ENCODER (SELECT
LIST)Turn the ROTARY ENCODER clock-wise or counterclockwise to select a file or folder. Press the ROTARY ENCODER in the center to play the selected file or folder. Use the ROTARY ENCODER to select an item from the list. ( When a folder is selected, the first track in the folder is played.)
The MP3/ WMA /A AC List is dis-played when the top folder in the root directory or the file or folder name is selected.
Page 19 of 64

19
<CRB3644-A/U>19
5 RIGHT (TRACK <UP>)Press to proceed to the next file. Press and hold until you hear a beep. Playing of the file is fast forwarded. ( There is no sound.)
6 LEFT (TRACK <DOWN>)Pre")
19
19
5 RIGHT (TRACK )Press to proceed to the next file. Press and hold until you hear a beep. Playing of the file is fast forwarded. ( There is no sound.)
6 LEFT (TRACK )Press to takes you back to the start of the file currently playing. Press to return to the previous file once more. Press and hold until you hear a beep. Playing of the file is reversed. ( There is no sound.)
7 UP (FOLDER )Press to proceed to the next folder.
8 DOWN (FOLDER )Press to return to the previous folder. Press and hold until you hear a beep to jump to HOME. HOME means returning back to play the first file in the first folder on the CD being played.
9 PRESET1 (PLAY/PAUSE)To pause the track, press PRESET
1 while the track is playing. Press again to resume playing.
a PRESET5 (Random)If you press this, and is indi-cated in the display. This unit starts to play files in the folder being played in random order. Press again to can-cel.If you press and hold until you hear a beep, and is indicated in the display. This unit starts to play files in all folders on the disc being played in random order. Press again to cancel.
b PRESET 6 (Repeat)If you press this, and is indi-
cated in the display. This unit starts to repeat the file being played. Press again to cancel.If you press and hold until you hear a beep, and is indicated in the display. This unit starts to repeat the folder being played. Press again to cancel.
c SCANIf you press this, and is indi-cated in the display. This unit starts to play the first 10 seconds of each file in the folder being played. Press again to cancel.If you press and hold until you hear a beep, and is indicated in the display. This unit starts to play the first 10 seconds of the first file of each folder. Press again to cancel.
d TEXTPress and display indications change as follows:
Upper: Artist NameLower: Track Title Track TitleELAPSED TIME
Folder Name File Name
When d is displayed, if you press and hold until you hear a beep, the display will changes. A maximum of 2 pages (24 characters) can be dis-played.
Page 20 of 64

�0
<CRB3644-A/U>�0
NOTICE
When playing back a disc
recorded with the Multi
Session system, the first
session only is played back.
If the first session combines
MP3, WMA and A AC files")
�0
�0
NOTICE
When playing back a disc
recorded with the Multi
Session system, the first
session only is played back.
If the first session combines
MP3, WMA and A AC files
and music data (CD-DA), this
product only plays the music
data. (Refer to page 54.)
About handling the
iPod
About iPod settings
This unit supports only an iPod
featuring the Dock connector
port.
Operations may vary depending
on the sof tware version of iPod.
The iPod Equalizer setting set by
the iPod is not used.
The Shuf fle function of the iPod
is operated as Random on this
unit.
•
•
•
•
CAUTION
Store the data into another
media, to avoid losing the
data during iPod operation
with this unit.
Do not allow direct
sunlight to fall on the
iPod when it is not being
used. Extended exposure
to direct sunlight can
result in iPod malfunction
due to the resulting high
temperatures.
Do not leave the iPod in
high temperatures or direct
sunlight.
Fix the iPod securely when
using with this unit. Do not
let the iPod fall onto the floor,
where it may become jammed
under the brake or accelerator
pedal.
•
•
•
•
For details, refer to the User Guide
of your iPod.
Page 21 of 64

�1
<CRB3644-A/U>�1
About iPod software version
The iPod sof tware versions that
can be used with this unit are as
follows (operations verified as of
October � 010):
iPod (5th generati")
�1
�1
About iPod software version
The iPod sof tware versions that
can be used with this unit are as
follows (operations verified as of
October � 010):
iPod (5th generation)ver. 1.3
iPod classicver. 2.0
iPod classic 120 GBver. 2.0.1
iPod classic 160 GBver. 2.0.4
iPod nano (1st generation)ver. 1.3.1
iPod nano (2nd generation)ver. 1.1.3
iPod nano (3rd generation)ver. 1.1.3
iPod nano (4th generation)ver. 1.0.4
iPod nano (5th generation)ver. 1.0.1
iPod nano (6th generation)ver. 1.0
iPod touch (1st generation)iOS3.0
iPod touch (2nd generation)iOS3.0
iPod touch (3rd generation)iOS3.1.1
iPod touch (4th generation)iOS4.1
iPhoneiOS3.1.2
iPhone 3GiOS3.0
iPhone 3GSiOS3.0.1
iPhone 4iOS4.1
* Please note that no guarantee applies to iPod
operations and future updated versions of iPod
software.
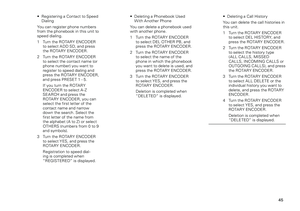
Connecting the iPod
Connect the USB connector.
Connect the iPod as indicated
in the figure below using a USB
cable.
Push the Dock connector into the
Dock connector port until you
hear a click to connect firmly. If it
does not go in smoothly, it may be
upside down so do not force it in as
this may result in damage.
To the vehicle's USB connector *2
*1
USB port
iPod with Dock connector port
Dock connector
When connecting the iPod, remove
a headphone cable from the iPod.
When connecting the iPod, it is
recommended to use a separately
purchased car kit.
*1
It is recommended to use a USB cable which
satisfies USB 2.0 standards.
(Measurements should satisfy USB 2.0 standards)
*2
Connection location differs depending on the
vehicle.
Vehicle
type
Connection location
tCConnect to the USB connector
near the shift knob.
xBConnect to the USB connector
near the parking brake.
xDConnect to the USB connector
near the cup holder.
iQConnect to the USB connector
near the shift knob.
As soon as the iPod is connected, its
power is automatically turned on.
While the iPod is connected to this
unit, the Apple logo (or (check
mark)) is displayed on the iPod.
While the iPod is connected to
this unit, the iPod itself cannot be
turned on or of f.
You cannot use the iPod's
remotecontrol at the same time.
You may hear noise if you
disconnect during iPod playback.
•
•
•
Page 22 of 64

��
<CRB3644-A/U>��
NOTICE
To resolve most problems
when using your iPod with
the Scion Audio system,
disconnect your iPod from the
vehicle iPod connection and
reset it.
For inst")
��
��
NOTICE
To resolve most problems
when using your iPod with
the Scion Audio system,
disconnect your iPod from the
vehicle iPod connection and
reset it.
For instructions on how to
reset your iPod, refer to the
User Guide of your iPod.
Connect the Dock connector
directly to the iPod with
Dock connector port. Do not
connect it via the iPod Dock
or other connection.
When the iPod is connected
to this unit, sound will
also be heard from the
headphone of the iPod.
Disconnect the headphone
from the iPod before use.
If you install an audio
system other than a Scion
Genuine Audio, you will
not be able to use the USB
connector.
•
•
•
•
•
If the iPod does not operate
with Scion Audio system,
disconnect the connector
from the iPod and re-
connect again.
When you are using
iPhone by the multitasking,
according to the application
under use, it might not be
able to charge a battery.
•
•
Disconnecting the iPod
Remove the connector.
When disconnecting the iPod connector, grasp the connector firmly and pull it towards you.
Page 23 of 64
Page 24 of 64
�4
�4
Listening to songs on
the iPod
1 iPod•USBPress the button repeatedly until the source becomes iPod.
NOTICE
If an iPod is not connected, it
will not switch to iPod even if
you press the iPod•USB button.
2 LISTPress the LIST button to display the category list (Playlist is the first cat-egory displayed). Use the ROTARY ENCODER to change or select the category.
3 ROTARY ENCODER (SELECT
LIST)Turning the ROTARY ENCODER while the list is displayed switches
the categories in the following order. Press the ROTARY ENCODER in the center to select.Playlist Artists Albums Songs Podcasts GENRES Composers Audio BookTurn the ROTARY ENCODER to select an item from the selected category, and press the ROTARY ENCODER in the center to select.


18
<CRB3644-A/U>18
Listening to MP3/
WMA/AAC DISC
1 DISCSwitches to the DISC mode. (Only effective if a disc is loaded.)
2 h (EJECT)Press to eject the disc.
3 LISTPress to display an MP3/ WMA /A AC")

