Page 9 of 64

9
<CRB3644-A/U>9
SSP (Scion Sound Processing)
SSP is a modified DSP (Digital Signal Processing) system that provides a customized sound for your vehicle. Press the ROTARY ENCODER to dis-play the cur")
9
9
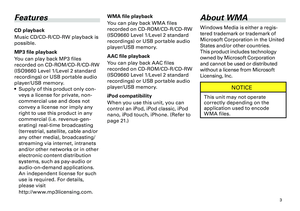
SSP (Scion Sound Processing)
SSP is a modified DSP (Digital Signal Processing) system that provides a customized sound for your vehicle. Press the ROTARY ENCODER to dis-play the current SSP mode setting. While the setting is displayed, press repeatedly to switch to the following modes.
NATURAL:Natural and smooth sound
that gives no listening
fatigue but comfort.
HEAR:A powerful, energetic, live
sound.
FEEL:
Player’s sound –> reproduc-
es the sound on the stage
that musicians hear.
For more details, please visit the SCION
Web site at
http://www.scion.com/.
Each time you press it, the SSP changes
in the following order:
NATURAL HEAR FEEL
AUDIO CTRL
When the ROTARY ENCODER is turned, the setting item of the AUDIO CTRL menu will switch in the following order:FADER BALANCE BASS TREBLE ASL (Automatic Sound Levelizer) SUB -W (Subwoofer) ASR (Sound Retriever)
•
•
FADER: Turn the ROTARY ENCODER to adjust the sound balance between the rear and front speakers. The display ranges from R7 to F7.BALANCE:Turn the ROTARY ENCODER to adjust the sound balance between the left and right speakers. The display ranges from L7 to R7.
BASS: Turn the ROTARY ENCODER to adjust low-pitched tones. The display ranges from –5 to 5.
TREBLE:
Turn the ROTARY ENCODER to adjust high-pitched tones. The display ranges from –5 to 5.ASL: During driving, noise in the car changes according to the driving speed. The Automatic Sound Levelizer (ASL) automatically adjusts the volume based on driving speed. If this noise becomes greater, the sensitivity (variation of volume level to noise level) of ASL can be set to one of three levels. Press the ROTARY ENCODER changes the ASL setting as follows: LOW MID HIGH OFF
SUB-W:
Subwoofer output phase can be
switched between normal and reverse by pressing the ROTARY ENCODER, Turn the ROTARY ENCODER up or down to adjust the output level of the subwoofer. Each time ROTARY ENCODER is turned up or down, subwoofer level increases or decreases. (+6 to –24 is displayed as the level is increased or decreased.)
•
The output level and output phase
of the subwoofer can be adjusted
only when "SUB -W CTRL" on the
SETUP MENU is set to ON. While
"SUB -W CTRL" is set to OFF, the
output level and output phase cannot be adjusted. (Refer to page 52.)
ASR: The ASR (Sound Retriever) function provides a wide, deep and rich quality to MP3/ WMA/AAC sound, which gives the user a lively impression. Pressing the ROTARY ENCODER repeatedly switches the setting in the following order:LOW RATE HIGH RATE OFF
LOW RATE:
Effective for low- compres-sion audio media.
HIGH RATE:
Effective for high- compres-sion audio media.
Page 10 of 64

10
<CRB3644-A/U>10
NOTICE
The ASR function can only be
selected when playing MP3/
WMA /A AC from CD and iPod,
USB portable audio player/
USB memory/Bluetooth-
Audio.
The ASR function does not
sup")
10
10
NOTICE
The ASR function can only be
selected when playing MP3/
WMA /A AC from CD and iPod,
USB portable audio player/
USB memory/Bluetooth-
Audio.
The ASR function does not
support external compressed
audio media.
Switching of ASR settings is
disabled in Bluetooth-Audio
mode when no Bluetooth
device is connected or when
settings cannot be switched.
BASS function and TREBLE
function values can be set for
each of the modes (AM, FM,
CD/MP3/ WMA /A AC, iPod/USB
portable audio player/USB
memory, XM Satellite Radio,
Bluetooth audio player, AUX).
When you switch modes, the
settings change to the BASS
and TREBLE values set for the
selected mode.
The ASL function is only
effective when the vehicle is
moving.
•
•
•
•
•
SETTINGS
You can select this item in TUNER mode or iPod mode.If you select SET TINGS, you can set the following items.• HD ON/OFF (in TUNER mode)
• IPOD DIRECT (in iPod mode)
• AUDIO BOOK (in iPod mode)
To select a setting option in iPod mode, turn the ROTARY ENCODER clockwise or counterclockwise and press the ROTARY ENCODER.
IPOD DIRECT AUDIO BOOK
HD ON/OFF:If you set HD ON/OFF to ON, digital broadcasting is preferentially selected. During SCAN or SEEK operations, the tuner searches for all digital and analog broadcasting stations.
If you set HD ON/OFF to OFF, only analog broadcasting is selected. During SCAN or SEEK operations, the tuner searches only for analog broadcasting stations.
When the ROTARY ENCODER is pressed, switches in the following order:
ON OFF
• The setting can only be changed in
RADIO mode.
•IPOD DIRECT:A menu for turning on or off iPod direct control (in iPod mode). If you select ON, you can control iPod operations on the iPod, and you can control only the vol-ume of iPod from this unit. If you select OFF, you can control iPod operations from this unit. When the ROTARY ENCODER is pressed, switches in the following order:
OFF ON
• The setting can only be changed in
iPod mode.
AUDIO BOOK:You can change the iPod Audiobook playback speed.
Pressing the ROTARY ENCODER repeatedly switches the setting in the following order:
NORMAL FASTER SLOWER
• The speed can only be changed in
iPod mode.
• While IPOD DIRECT is set to ON, the
speed cannot be changed.
NOTICE
iPod (5th generation) and iPod
nano (1st generation) do not
support iPod direct control.
Page 11 of 64

11
<CRB3644-A/U>11
BLUETOOTH
If you select BLUETOOTH, you can make the settings for connecting and controlling Bluetooth devices.To select the following setting options, turn the ROTARY ENCODER cloc")
11
11
BLUETOOTH
If you select BLUETOOTH, you can make the settings for connecting and controlling Bluetooth devices.To select the following setting options, turn the ROTARY ENCODER clockwise or counterclockwise and press the ROTARY ENCODER. Refer to page 38 “Bluetooth Settings.”
BT PAIRING LIST PHONE LIST
AUDIO SET PASSKEY BT POWER
ON/BT POWER OFF BT INFO
DISPLAY ON/DISPLAY OFF INITIALIZE
BT PAIRING:You can connect your Bluetooth devices.
LIST PHONE:You can connect or disconnect a reg-istered Bluetooth- compatible mobile phone, or delete it from the list.
LIST AUDIO:You can connect or disconnect a reg-istered Bluetooth device, delete the device from the list, and select the connection method.
SET PASSKEY:You can set the passkey.
BT POWER ON/BT POWER OFF:You can select whether or not to auto-matically connect a Bluetooth device when the ignition switch is set to ON.
BT INFO:You can check the name and address of this unit.
•DISPLAY ON/DISPLAY OFF:You can select whether or not to dis-play the connection confirmation when a Bluetooth device is connected by setting the ignition switch to ON.
INITIALIZE:You can initialize certain setting infor-mation or all settings.
PHONE
If you select PHONE, you can edit the phonebook, set the ring tone or transfer the call histories.To select the following items, turn the ROTARY ENCODER clockwise or counterclockwise and press the ROTARY ENCODER.
PHONE BOOK SET HF SOUND SEND
HISTORYPHONE BOOK:You can edit the phonebook in this unit.
SET HF SOUND:When a mobile phone is connected, you can select the ring tone and adjust the volume of the call tone and ring tone.
SEND HISTORY:You can transfer the call histories on the connected mobile phone to this unit.
When the ROTARY ENCODER is pressed, switches in the following order:
YES NO
•
3 BACKPress the BACK button to exit from the menu.Press and hold the BACK button to exit from a list that was displayed by pressing the LIST button.
Page 12 of 64
1�
1 �
Listening to the RADIO
1 FM1/2Switches between FM1 and FM2 modes.
2 AM•SATSwitches between the AM mode and SAT1/2/3 modes. (must have Satellite Radio receiver and antenna installed at an additional charge to listen to Satellite Radio.)
3 LISTPress to display the registered broad-casting station list in PRESET1- 6.Use the ROTARY ENCODER to select a station from the list.
Page 13 of 64

13
<CRB3644-A/U>13
4 ROTARY ENCODER (SELECT
LIST)Turn the ROTARY ENCODER clockwise or counterclockwise to select a station. Press the ROTARY ENCODER to set the station. If you press and hold the RO")
13
13
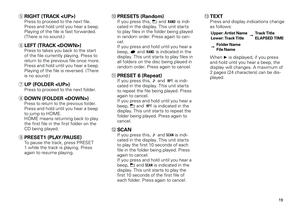
4 ROTARY ENCODER (SELECT
LIST)Turn the ROTARY ENCODER clockwise or counterclockwise to select a station. Press the ROTARY ENCODER to set the station. If you press and hold the ROTARY ENCODER in the center until you hear a beep, the currently tuned sta-tion is stored as a preset channel in the preset channel list.
5 RIGHT (TUNE )Press to manually select (one step at a time) the station with the next higher frequency. Press and hold to fast-forward to a higher frequency.
6 UP (TUNE )Press to select the next higher sta-tion.Press and hold to continue searching for a higher frequency station.
7 LEFT (TUNE )Press to manually select (one step at a time) the station with the next lower frequency. Press and hold to fast-forward to a lower frequency.
8 DOWN (TUNE )Press to select the next lower station.Press and hold to continue searching for a lower frequency station.
9 PRESET 1-6Press to recall previously stored sta-tions (Preset Channels).Press and hold until you hear a beep, and the station you are cur-rently tuned to is stored as a Preset Channel.
NOTICE
You can store up to 6 stations
per band.
a SCANIf you press, is indicated in the display. The tuner begins searching for stations with good reception and you can listen to each channel for 5 seconds.
Page 14 of 64
14
14
Listening to the HD
Radio broadcast
HD RadioTM Technology is a terrestrial
digital radio broadcast that utilizes
AM/FM analogue broadcasting fre-
quencies to transmit digital signals.
For information regarding viewing
methods, refer to Listening to the
RADIO (page 1�). This section con
-
tains explanations solely regarding
HD Radio broadcast functions.
Page 15 of 64
15
15
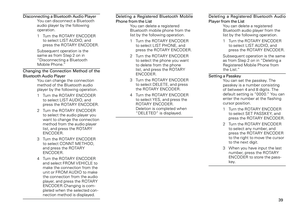
1 RIGHT (TUNE )When receiving the HD Radio Broadcast signal and tuning in a Multicast Channel-supported broadcast in something other than analogue, the following actions will occur each time you press.
When
receiving
MPS
signal
The first SPS is tuned in.
When
receiving
SPS
signal
The next SPS is tuned in.
When
receiving
last SPS
T he nex t MP S is tuned
in.
2 LEFT (TUNE )When receiving the HD Radio Broadcast signal and tuning in a Multicast Channel-supported broadcast in something other than analogue, the following actions will occur each time you press.
When
receiving
MPS
signal
The previous MPS is
tuned in.
When
receiving
SPS
signal
The previous SPS is
tuned in. Or, the next
MPS is tuned in.
When
receiving
next SPS
signal
The first SPS is tuned in.
3 TEXTIf you press while the HD Radio broadcasting signal is being recieved, the display switches in the following order.
Upper: Station NameLower: FrequencyArtist Name Song Title
Album TitleSong Title
Page 16 of 64
16
16
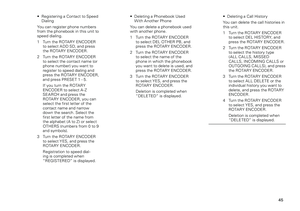
.No title name is displayed when playing back a CD containing no te xt information.
Listening to a CD
NOTICE
Never try to disassemble or
oil any part of the compact
disc player. Do not insert
anything except a compact
disc into the slot.
Use 1 �-cm disc. Do not use
8-cm disc or an adapter for
8-cm disc.
•
•
Load a CD in the CD slot.


14
<CRB3644-A/U>14
Listening to the HD
Radio broadcast
HD RadioTM Technology is a terrestrial
digital radio broadcast that utilizes
AM/FM analogue broadcasting fre-
quencies to transmit digital s")

15
<CRB3644-A/U>15
1 RIGHT (TUNE <UP>)When receiving the HD Radio Broadcast signal and tuning in a Multicast Channel-supported broadcast in something other than analogue, the following actions will")

16
<CRB3644-A/U>16
.No title name is displayed when playing back a CD containing no te xt information.
Listening to a CD
NOTICE
Never try to disassemble or
oil any part of the compact
disc player")