Page 88 of 520

88
1-3. Charging
When normal charging cannot be carried out
A problem has occurred during chargingRefer to the following table and carry out the appropriate correction
procedure.
SituationReasonCorrection procedure
The power indicator on
the CCID (Charging
Circuit Interrupting
Device) does not illumi-
nate even when con-
nected to a power
source
The plug is not properly
connected to the elec-
trical receptacle.Insert the plug firmly
into the electrical
receptacle.
There is a power out-
age.Restart charging once
power has been
restored.
The circuit breaker has
activated.
Check the circuit
breaker. If there is
nothing unusual, con-
nect to another electri-
cal receptacle and
check that charging is
possible.
If charging is possible,
there is likely a prob-
lem with the first elec-
trical receptacle.
Contact your building
manager or an electri-
cian.
If charging does not commence even though the correct procedure
has been carried out, and an er ror message is shown on the multi-
information display, try the correction procedures listed in the table
below.
If you still cannot correct the problem, contact your Toyota dealer.
Page 90 of 520
90 1-3. Charging
The charging indicator
lights do not illuminate
or flash even though
the charging connec-
tor is connected
The traction battery is
already fully charged.
If the charging indicator
lights flash quicklyAn error may have
occurred in the charg-
ing system.
Turn the “POWER”
switch to ON mode and
comply with the warn-
ing message shown on
the multi-information
display. (P. 443)
SituationReasonCorrection procedure
Page 91 of 520

91
1-3. Charging
1
Before driving
If a warning message is displayed after charging
If a warning message is displayed when the “POWER” switch is
turned to ON mode after charging, comply with the contents of the
message and take any necessary actions. ( P. 443)
■Resetting the CCID (Charging Circuit Interrupting Device)
If the error warning indicator of the CCID
(Charging Circuit Interrupting Device) illu-
minates during charging, conduct either
of the following procedures.
●Press the reset button on the CCID
(Charging Circuit Interrupting Device).
● Disconnect the plug, wait for a short
while and reconnect.
The error warning indicator will go out
and the power source will reconnect.
● If the error warning indicator does not
illuminate a second time after the power
source has been reconnected, charging
can continue.
● If the error warning indicator illuminates
again, there may be a problem with the
charging cable or the power source.
Stop charging immediately and contact
your Toyota dealer.
Page 100 of 520

100 1-5. Opening, closing and locking the doors
■Operation signals
A buzzer sounds and the emergency flashers flash to indicate that the doors
have been locked/unlocked. (Locked: Once; Unlocked: Twice)
■ Alarms and warning indicators
A combination of exterior and interior alarms are used to prevent theft of the
vehicle and unforeseeable accidents resulting from erroneous operation.
Take appropriate measures according to the warning message shown on the
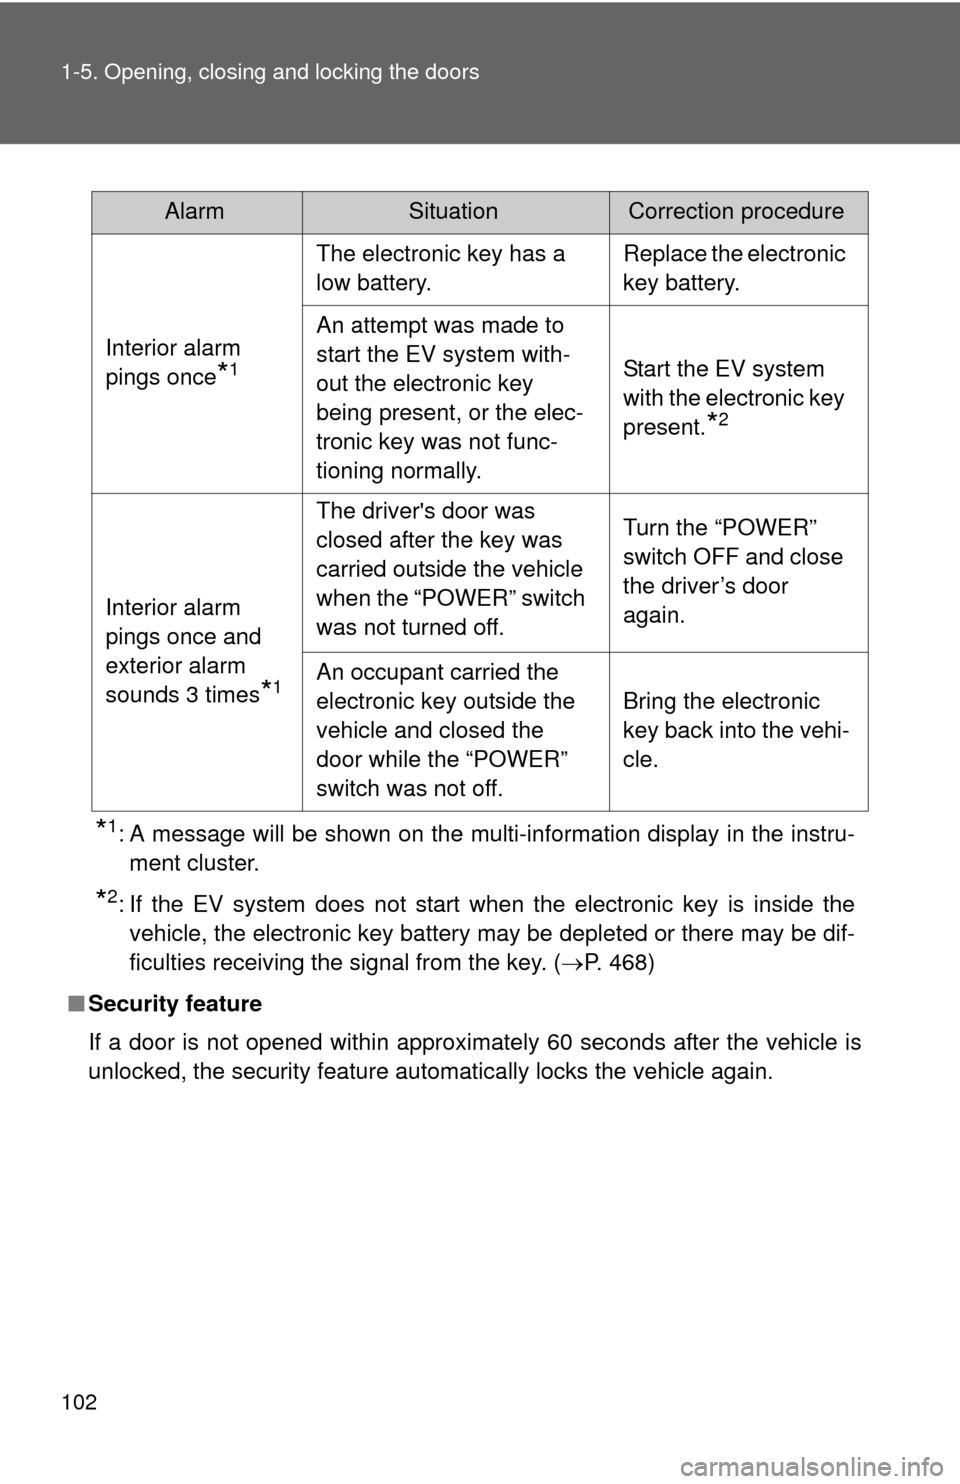
multi-information display. ( P. 427)
The following table describes circumstances and correction procedures
when only alarms are sounded.
AlarmSituationCorrection procedure
Interior alarm
pings once and
exterior alarm
sounds once for
10 seconds
*1
An attempt was made to
lock the doors using the
entry function while the
electronic key was still
inside the passenger com-
partment. Retrieve the elec-
tronic key from the
passenger compart-
ment and lock the
doors again.
An attempt was made to
exit the vehicle and lock
the doors without first turn-
ing the “POWER” switch
off. Turn the “POWER”
switch off and lock the
doors again.
Exterior alarm
sounds once for
10 seconds An attempt was made to
lock the vehicle while a
door is open. Close all of the doors
and lock the doors
again.
Page 102 of 520

102 1-5. Opening, closing and locking the doors
*1: A message will be shown on the multi-information display in the instru-ment cluster.
*2: If the EV system does not start when the electronic key is inside thevehicle, the electronic key battery may be depleted or there may be dif-
ficulties receiving the signal from the key. ( P. 468)
■ Security feature
If a door is not opened within approximately 60 seconds after the vehicle is
unlocked, the security feature automatically locks the vehicle again.
AlarmSituationCorrection procedure
Interior alarm
pings once
*1
The electronic key has a
low battery. Replace the electronic
key battery.
An attempt was made to
start the EV system with-
out the electronic key
being present, or the elec-
tronic key was not func-
tioning normally. Start the EV system
with the electronic key
present.
*2
Interior alarm
pings once and
exterior alarm
sounds 3 times
*1
The driver's door was
closed after the key was
carried outside the vehicle
when the “POWER” switch
was not turned off.
Turn the “POWER”
switch OFF and close
the driver’s door
again.
An occupant carried the
electronic key outside the
vehicle and closed the
door while the “POWER”
switch was not off. Bring the electronic
key back into the vehi-
cle.
Page 103 of 520
103
1-5. Opening, closing and locking the doors
1
Before driving
■
Switching the door unlock function
It is possible to set which doors the entry function unlocks.
Turn the “POWER” switch off.
When the indicator on the key surface is turned off, push and hold or for approximately 5 seconds while pushing the but-
ton on the key.
The setting changes each time an operation is performed, as shown below.
(When changing the setting continuously, release the buttons, wait for at
least 5 seconds, and repeat .)
STEP 1
STEP 2
STEP 2
Multi-information displayUnlocking doorsBeep
Hold the driver’s door
handle to unlock only the
driver’s door. Exterior: Beeps three
times
Interior: Pings once
Hold the passenger’s door
handle or back door
opener to unlock all the
doors.
Hold a front door handle or
back door opener to unlock
all the doors. Exterior: Beeps twice
Interior: Pings once
Page 176 of 520
176
1-9. Safety information
Installing child restraints
Follow the child restraint system manufacturer's instructions. Firmly
secure child restraints to the seat s using the LATCH anchors or a
seat belt. Attach the top tether stra p when installing a child restraint.
The lap/shoulder belt can be used if your child restraint system is
not compatible with the LATCH (Low er Anchors and Tethers for Chil-
dren) system.
Rear outside seats: Child
restraint LATCH anchors
LATCH anchors are provided
for the rear outside seats. (But-
tons displaying the location of
the anchors are attached to the
seats.)
Seat belts equipped with a
child restraint locking mecha-
nism (ALR/ELR belts except
driver’s seat belt) ( P. 134)
Page 189 of 520

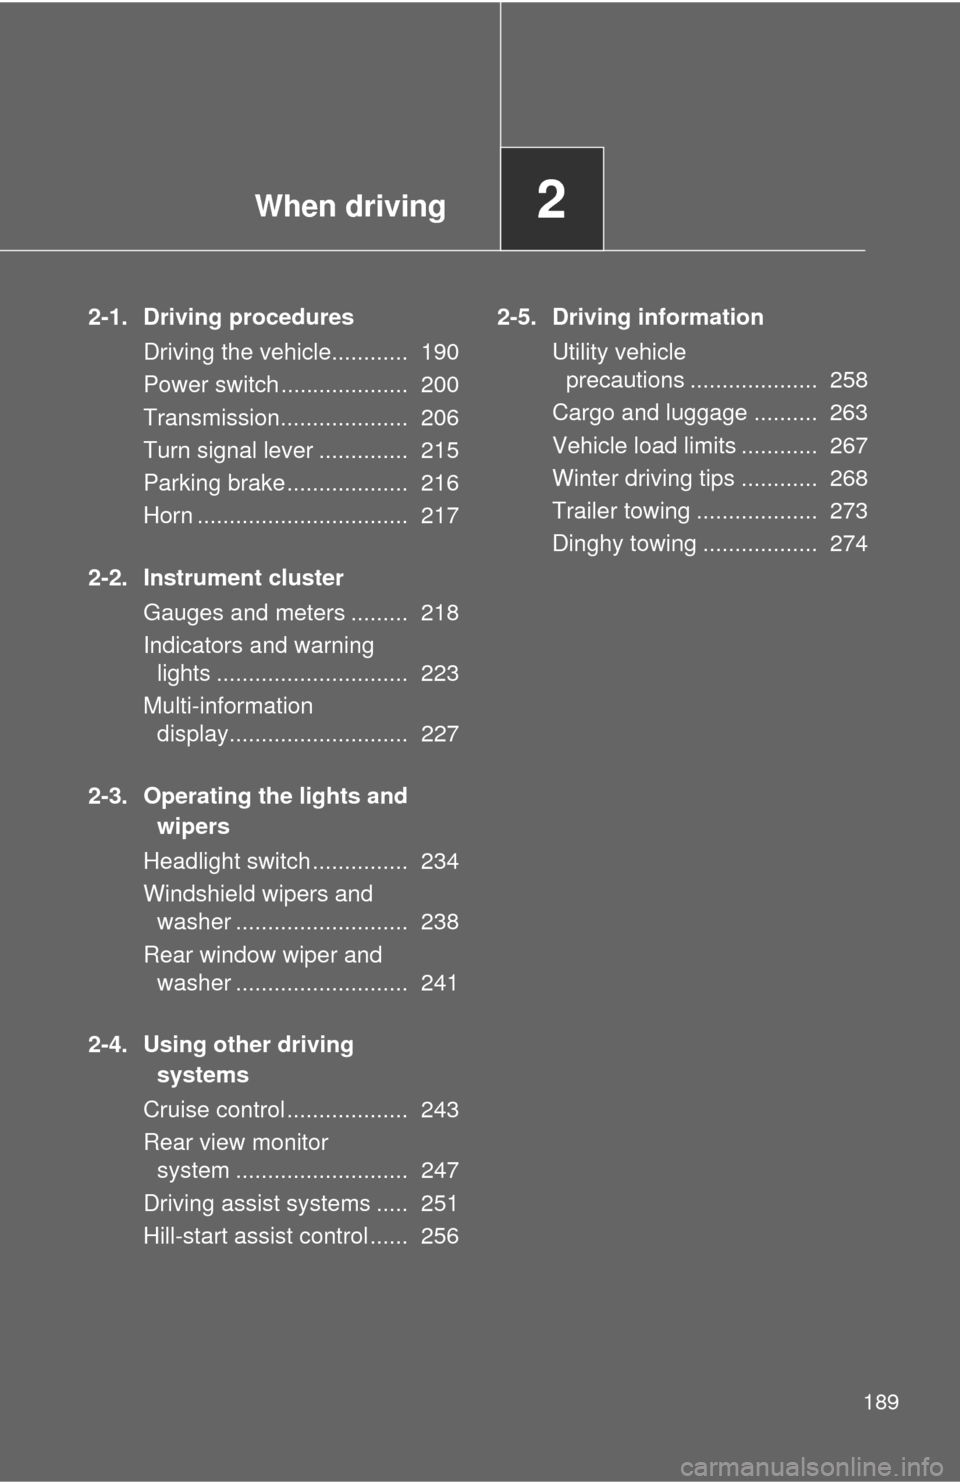
When driving2
189
2-1. Driving proceduresDriving the vehicle............ 190
Power switch .................... 200
Transmission.................... 206
Turn signal lever .............. 215
Parking brake ................... 216
Horn ................................. 217
2-2. Instrument cluster Gauges and meters ......... 218
Indicators and warning lights .............................. 223
Multi-information display............................ 227
2-3. Operating the lights and wipers
Headlight switch ............... 234
Windshield wipers and washer ........................... 238
Rear window wiper and washer ........................... 241
2-4. Using other driving systems
Cruise control ................... 243
Rear view monitor system ........................... 247
Driving assist systems ..... 251
Hill-start assist control ...... 256 2-5. Driving information
Utility vehicle precautions .................... 258
Cargo and luggage .......... 263
Vehicle load limits ............ 267
Winter driving tips ............ 268
Trailer towing ................... 273
Dinghy towing .................. 274