2012 SUBARU TRIBECA light
[x] Cancel search: lightPage 220 of 420
Interior light......................................................... 6-2
Dome light .......................................................... 6-2
Cargo area light .................................................. 6-3
Rear gate light .................................................... 6-3
Map light ............................................................. 6-3
Automatic ambient light for center console area (if equipped) ...................................................... 6-4
Sun visors ........................................................... 6-4
Sun visor extension plate .................................... 6-5
Vanity mirror with light ........................................ 6-5
Storage compartment ......................................... 6-6
Glove box ........................................................... 6-6
Center console box ............................................. 6-6
Rear console ....................................................... 6-7
Overhead console ............................................... 6-8
Cup holder ........................................................... 6-8
Front passenger ’s cup holder .............................. 6-8
Second-row seat cup holders .............................. 6-9
Third-row seat cup holders .................................. 6-9
Bottle holders ...................................................... 6-9
Accessory power outlets ................................... 6-10
Coat hook ........................................................... 6-12
Shopping bag hook ............................................ 6-13 Floor mat
............................................................ 6-13
Cargo area cover (if equipped) ......................... 6-14
Using the cover ................................................. 6-14
To remove the cover .......................................... 6-15
To install the cover housing ............................... 6-15
Convenient tie-down hooks .............................. 6-16
Under-floor storage compartment .................... 6-16
HomeLink
®Wireless Control System (if
equipped) ........................................................ 6-17
Garage door opener programming in the U.S.A. .............................................................. 6-18
Programming rolling-code-protected garage door openers in the U.S.A. ....................................... 6-19
Programming for entrance gates and garage door openers in Canada ........................................... 6-20
Programming other devices ............................... 6-21
Operating the HomeLink
®Wireless Control
System ............................................................ 6-21
Erasing HomeLink
®button memory .................... 6-21
In case a problem occurs ................................... 6-21
Rear view camera (if equipped) ........................ 6-21
How to use the rear view camera ....................... 6-22
Viewing range on the screen .............................. 6-23
Help line ............................................................ 6-24 Interior equipment
6
Page 221 of 420
6-2Interior equipment
Interior light
When leaving your vehicle, make sure the
lights are turned off to avoid batterydischarge. &Dome light
Models with Rear Seat Entertainment
Models without Rear Seat Entertainment
1) ON
2) DOOR
3) OFF
The dome light switch has the following
three positions. ON: The light remains on continuously.
OFF: The light remains off.
DOOR: The dome light illuminates auto-
matically in the following cases. . Any of the doors or the rear gate is
opened.. The doors or the rear gate are un-
locked using the remote keyless entry
transmitter. . The ignition switch is turned from the
“ Acc ”position to the “LOCK ”position. The automatically illuminated dome light
remains on for several seconds and then
gradually turns off after all doors and the
rear gate are closed. While the light is
illuminated, if any of the following opera-
tions are performed, the dome light turns
off immediately. .
The ignition switch is turned from the
“ LOCK ”position to “Acc ”or “ON ”position.
. All doors and the rear gate are locked
using the remote keyless entry transmitter.
The setting of the period for which the light
remains on (OFF delay timer) can be
changed by a SUBARU dealer. Contact
the nearest SUBARU dealer for details.
Page 222 of 420
&Cargo area light
1) DOOR
2) OFF
3) ON
The cargo area light switch has the
following three positions. DOOR: The light illuminates when the rear
gate is opened. The light remains illumi-
nated for several seconds and turns off
after the rear gate is closed. OFF: The light remains off.
ON: The light remains on continuously. &
Rear gate light
The rear gate light is located inside the
vehicle on the rear gate. Push the right
side of the switch to turn it on, and push
the left side of the switch to turn it off. &
Map light
To turn on the map light, push the switch.
To turn it off, push the switch again.
When leaving the vehicle, make sure the
lights are turned off to avoid batterydischarge.
Although the map light switches are in the
OFF position, the map lights illuminate
automatically in the following cases. .Any of the doors or the rear gate is
opened.
–The operational/non-operational
setting of this function can be changed
by a SUBARU dealer. Contact your
SUBARU dealer to change the setting. – The factory setting (default setting)
for this function is set as “operational ”
Interior equipment
6-3
– CONTINUED –
Page 223 of 420
6-4Interior equipment
(automatic illumination - ON).
. The doors are unlocked using the
remote keyless entry transmitter. . The ignition switch is turned from the
“ Acc ”position to the “LOCK ”position.
The automatically illuminated map lights
remain illuminated for several seconds
and then gradually turn off after all doors
are closed.
While the lights are illuminated, if any of
the following operations are performed,
the map lights turn off immediately. . The ignition switch is turned from the
“ LOCK ”position to the “Acc ”or “ON ”
position.. All doors and the rear gate are locked
using the remote keyless entry transmitter.
The setting of the period for which the light
remains illuminated (OFF delay timer) can
be changed by a SUBARU dealer. Con-
tact your SUBARU dealer for details.
NOTE
If any of the doors or the rear gate is
not completely closed, the map lights
will remain illuminated as a result.
However, the map lights are automati-
cally turned off by the battery drainage
prevention functi on to prevent the
battery from discharging. For details, refer to
“Battery drainage prevention
function ”F 2-6.
& Automatic ambient light for
center console area (if equipped)
The automatic ambient light illuminates
when the ignition switch is in the “ON ”
position and the light control switch is inthe “
”position or “”position. The
light dimly illuminates the area around the
center console. The light turns off when
the light control switch is in the “OFF ”
position. Also, the brightness of the light is
adjusted by the illumination brightness
control dial. Sun visors
To block out glare, swing down the visors.
To use the sun visor at a side window,
swing it down and move it sideways.
Page 224 of 420
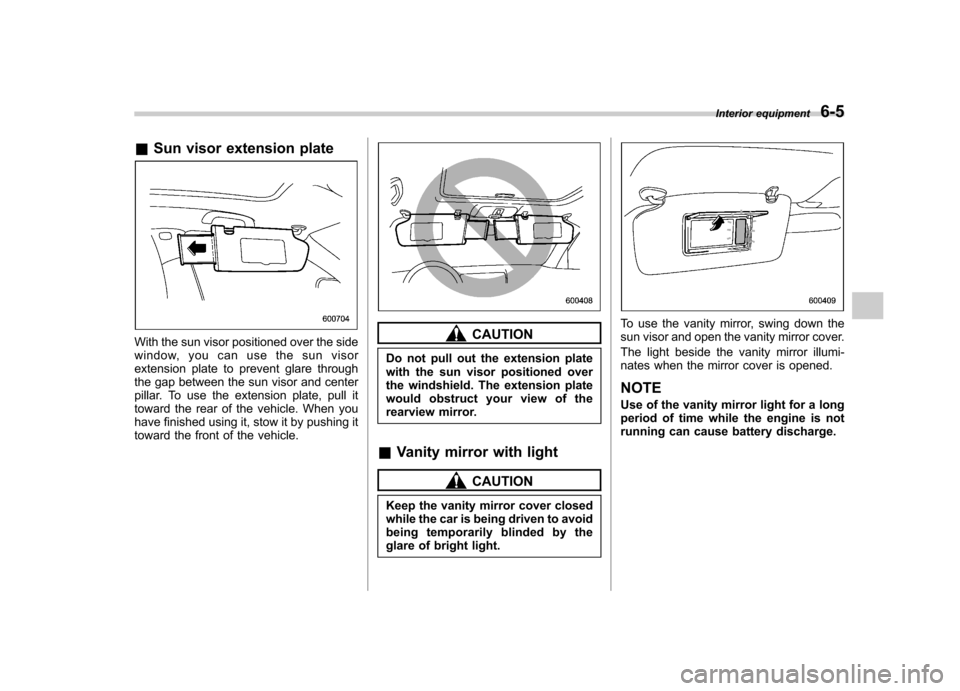
&Sun visor extension plate
With the sun visor positioned over the side
window, you can use the sun visor
extension plate to prevent glare through
the gap between the sun visor and center
pillar. To use the extension plate, pull it
toward the rear of the vehicle. When you
have finished using it, stow it by pushing it
toward the front of the vehicle.CAUTION
Do not pull out the extension plate
with the sun visor positioned over
the windshield. The extension plate
would obstruct your view of the
rearview mirror.
& Vanity mirror with light
CAUTION
Keep the vanity mirror cover closed
while the car is being driven to avoid
being temporarily blinded by the
glare of bright light.
To use the vanity mirror, swing down the
sun visor and open the vanity mirror cover.
The light beside the vanity mirror illumi-
nates when the mirror cover is opened. NOTE
Use of the vanity mirror light for a long
period of time while the engine is not
running can cause battery discharge. Interior equipment
6-5
Page 227 of 420
6-8Interior equipment
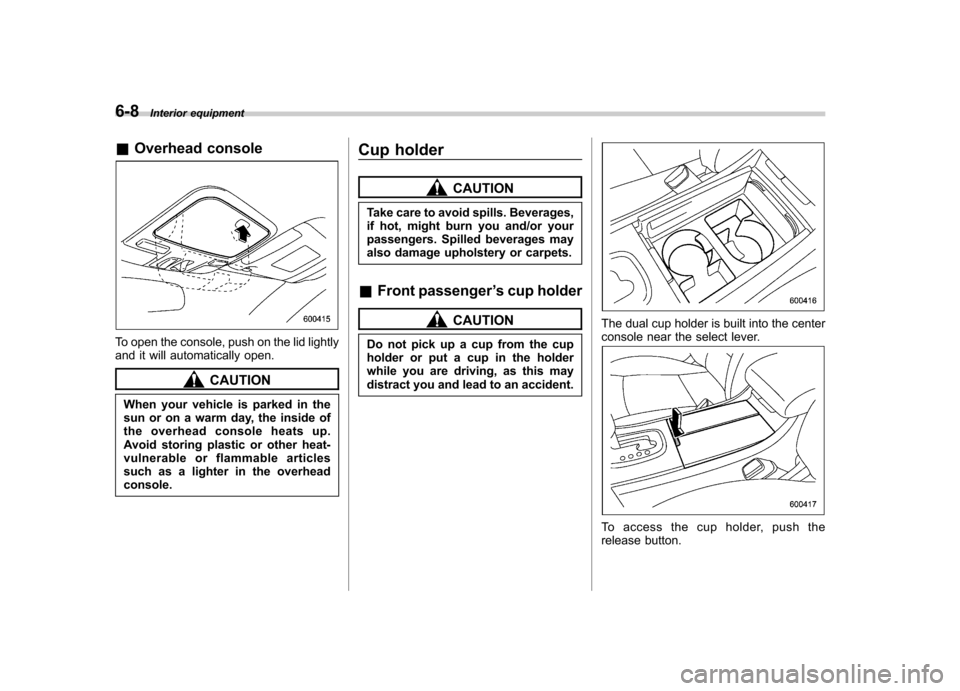
&Overhead console
To open the console, push on the lid lightly
and it will automatically open.
CAUTION
When your vehicle is parked in the
sun or on a warm day, the inside of
the overhead console heats up.
Avoid storing plastic or other heat-
vulnerable or flammable articles
such as a lighter in the overheadconsole. Cup holder
CAUTION
Take care to avoid spills. Beverages,
if hot, might burn you and/or your
passengers. Spilled beverages may
also damage upholstery or carpets.
& Front passenger ’s cup holder
CAUTION
Do not pick up a cup from the cup
holder or put a cup in the holder
while you are driving, as this may
distract you and lead to an accident.The dual cup holder is built into the center
console near the select lever.
To access the cup holder, push the
release button.
Page 229 of 420
6-10Interior equipment
trim can be used to hold beverage bottles
and other items. Accessory power outlets
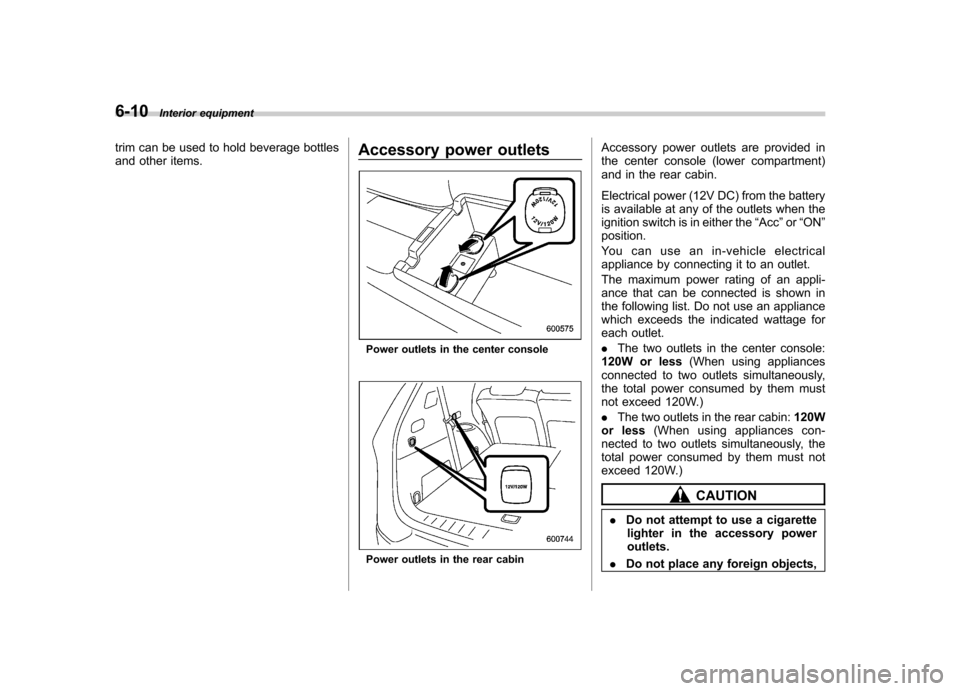
Power outlets in the center console
Power outlets in the rear cabinAccessory power outlets are provided in
the center console (lower compartment)
and in the rear cabin.
Electrical power (12V DC) from the battery
is available at any of the outlets when the
ignition switch is in either the
“Acc ”or “ON ”
position.
You can use an in-vehicle electrical
appliance by connecting it to an outlet.
The maximum power rating of an appli-
ance that can be connected is shown in
the following list. Do not use an appliance
which exceeds the indicated wattage for
each outlet. . The two outlets in the center console:
120W or less (When using appliances
connected to two outlets simultaneously,
the total power consumed by them must
not exceed 120W.) . The two outlets in the rear cabin: 120W
or less (When using appliances con-
nected to two outlets simultaneously, the
total power consumed by them must not
exceed 120W.)
CAUTION
. Do not attempt to use a cigarette
lighter in the accessory power outlets.
. Do not place any foreign objects,
Page 233 of 420
6-14Interior equipment
.Do not use more than one floor
mat. Cargo area cover (if equipped)
The cargo area cover is provided for
covering the cargo area and to protect its
contents from direct sunlight. This cover is
detachable to make room for additionalcargo. &
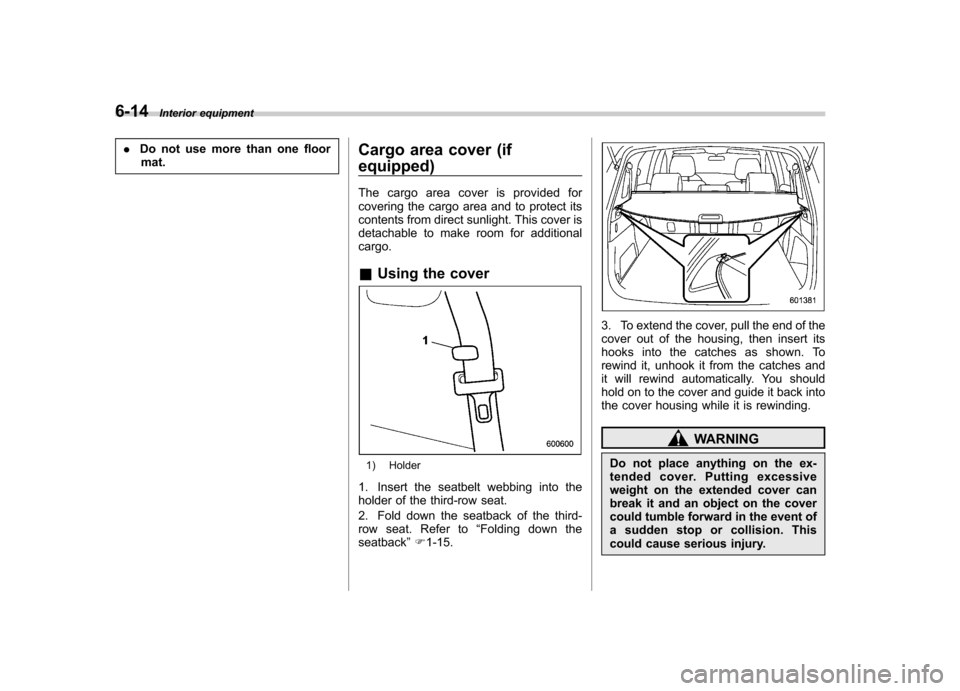
Using the cover
1) Holder
1. Insert the seatbelt webbing into the
holder of the third-row seat.
2. Fold down the seatback of the third-
row seat. Refer to “Folding down the
seatback ”F 1-15.
3. To extend the cover, pull the end of the
cover out of the housing, then insert its
hooks into the catches as shown. To
rewind it, unhook it from the catches and
it will rewind automatically. You should
hold on to the cover and guide it back into
the cover housing while it is rewinding.
WARNING
Do not place anything on the ex-
tended cover. Putting excessive
weight on the extended cover can
break it and an object on the cover
could tumble forward in the event of
a sudden stop or collision. This
could cause serious injury.