2012 SUBARU TRIBECA set clock
[x] Cancel search: set clockPage 132 of 420
Ignition switch..................................................... 3-3
LOCK .................................................................. 3-3
Acc..................................................................... 3-4
ON...................................................................... 3-4
START ................................................................ 3-4
Key reminder chime ............................................ 3-4
Ignition switch light ............................................. 3-4
Hazard warning flasher ....................................... 3-5
Meters and gauges. ............................................. 3-5
Combination meter illumination ........................... 3-5
Canceling the function for meter needle/gauge movement and combination meter sequential
illumination upon turning on the ignition switch ............................................................... 3-5
Speedometer ....................................................... 3-6
Odometer ............................................................ 3-6
Double trip meter ................................................ 3-7
Tachometer ......................................................... 3-7
Fuel gauge .......................................................... 3-8
Temperature gauge ............................................. 3-8
Warning and indicator lights .............................. 3-9
Seatbelt warning light and chime ........................ 3-10
SRS airbag system warning light ........................ 3-11
Front passenger ’s frontal airbag ON and OFF
indicators ......................................................... 3-12
CHECK ENGINE warning light/Malfunction indicator light ................................................... 3-12
Charge warning light .......................................... 3-13
Oil pressure warning light .................................. 3-13
AT OIL TEMP warning light ................................. 3-13 Rear differential oil temperature warning
light ................................................................ 3-13
Low tire pressure warning light .......................... 3-14
ABS warning light .............................................. 3-15
Brake system warning light ................................ 3-16
Low fuel warning light ....................................... 3-17
Door open warning light .................................... 3-17
Windshield washer fluid warning light ................ 3-17
All-Wheel Drive warning light ... .......................... 3-18
Vehicle Dynamics Control warning light (U.S.- spec models and Canada-spec. models)/Vehicle
Dynamics Control operation indicator light (allmodels) ........................................................... 3-18
Traction Control system OFF indicator light (U.S.-spec models and Canada-spec.models) ........................................................... 3-19
Vehicle Dynamics Control warning light (Latin America-spec. models)/Traction Control OFF
indicator light (Latin America-spec. models) ..... 3-19
Security indicator light ....................................... 3-21
SPORT mode indicator light ............................... 3-21
Select lever/Gear position indicator .................... 3-21
Turn signal indicator lights ................................. 3-21
High beam indicator light ................................... 3-22
Cruise control indicator light .............................. 3-22
Cruise control set indicator light ........................ 3-22
Headlight indicator light ..................................... 3-22
Front fog light indicator light .............................. 3-22
Clock .................................................................. 3-22
Outside temperature indicator .......................... 3-23
Low outside temperature warning ...................... 3-24
Instruments and controls
3
Page 153 of 420

3-22Instruments and controls
&High beam indicator light
This light shows that the headlights are in
the high beam mode.
This indicator light also illuminates when
the headlight flasher is operated. &Cruise control indica-
tor light
This light illuminates when the “CRUISE ”
main switch is pressed to activate the
cruise control function. NOTE . If you move the cruise control lever
or press the main switch button while
turning the ignition switch “ON ”, the
cruise control function is deactivated
and the cruise control indicator light
flashes. To reactivate the cruise control
function, turn the ignition switch back
to the “Acc ”or “LOCK ”position, and
then turn it again to the “ON ”position.
. If this indicator light and the CHECK
ENGINE warning light/malfunction in-
dicator light flash simultaneously dur-
ing driving, have the vehicle checked
by your nearest SUBARU dealer. &
Cruise control set in-
dicator light
This light illuminates when vehicle speed
has been set to use the cruise controlfunction. &Headlight indicator light
This indicator light illuminates when the
light switch is turned to the “”position
(to turn on the parking lights) or to the “
” position (to turn on the headlights).
& Front fog light indicator light
This indicator light illuminates while the
front fog lights are illuminated. Clock NOTE
If your vehicle is equipped with a
genuine SUBARU navigation system,
refer to the Owner
’s Manual supple-
ment for the navigation system.
The clock shows the time while the
ignition switch is in the “Acc ”or “ON ”
position.
Page 154 of 420
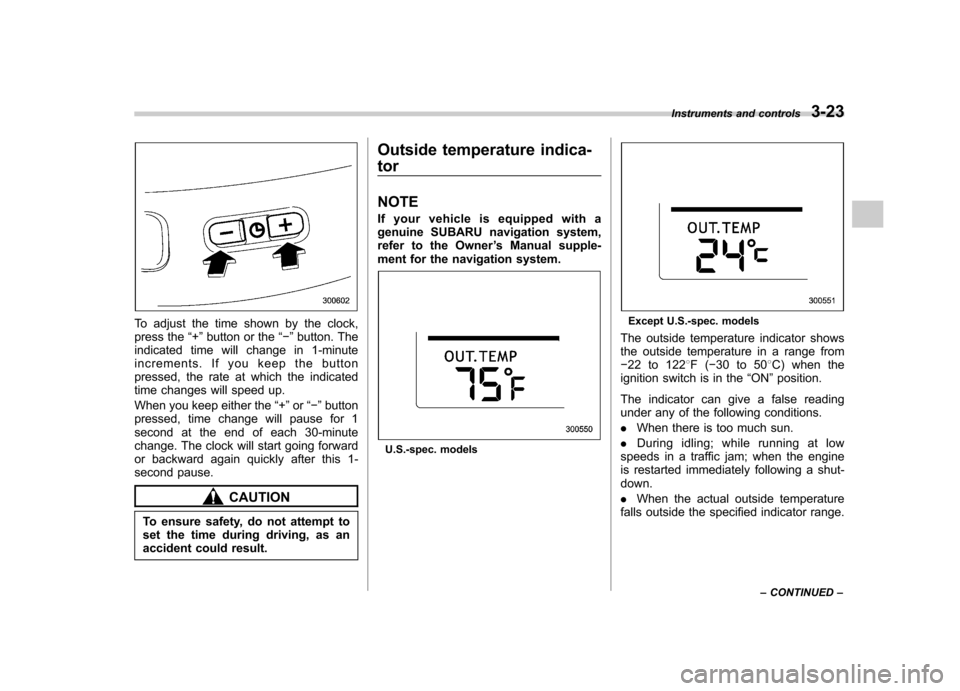
To adjust the time shown by the clock,
press the“+ ” button or the “� ” button. The
indicated time will change in 1-minute
increments. If you keep the button
pressed, the rate at which the indicated
time changes will speed up.
When you keep either the “+ ” or “� ” button
pressed, time change will pause for 1
second at the end of each 30-minute
change. The clock will start going forward
or backward again quickly after this 1-
second pause.
CAUTION
To ensure safety, do not attempt to
set the time during driving, as an
accident could result. Outside temperature indica- tor NOTE
If your vehicle is equipped with a
genuine SUBARU navigation system,
refer to the Owner
’s Manual supple-
ment for the navigation system.
U.S.-spec. models
Except U.S.-spec. models
The outside temperature indicator shows
the outside temperature in a range from� 22 to 122 8F( �30 to 50 8C) when the
ignition switch is in the “ON ”position.
The indicator can give a false reading
under any of the following conditions. . When there is too much sun.
. During idling; while running at low
speeds in a traffic jam; when the engine
is restarted immediately following a shut-down. . When the actual outside temperature
falls outside the specified indicator range. Instruments and controls
3-23
– CONTINUED –
Page 181 of 420
4-6Climate control
! OFF button
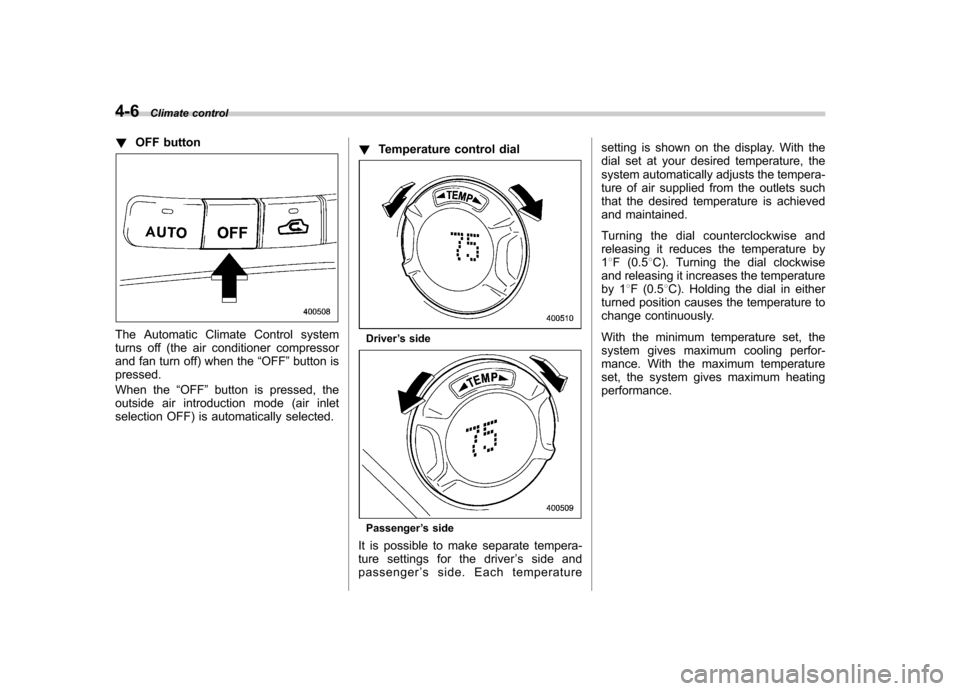
The Automatic Climate Control system
turns off (the air conditioner compressor
and fan turn off) when the “OFF ”button is
pressed.
When the “OFF ”button is pressed, the
outside air introduction mode (air inlet
selection OFF) is automatically selected. !
Temperature control dialDriver ’s side
Passenger ’s side
It is possible to make separate tempera-
ture settings for the driver ’ssideand
passenger ’s side. Each temperature setting is shown on the display. With the
dial set at your desired temperature, the
system automatically adjusts the tempera-
ture of air supplied from the outlets such
that the desired temperature is achieved
and maintained.
Turning the dial counterclockwise and
releasing it reduces the temperature by1
8F (0.5 8C). Turning the dial clockwise
and releasing it increases the temperature
by 1 8F (0.5 8C). Holding the dial in either
turned position causes the temperature to
change continuously.
With the minimum temperature set, the
system gives maximum cooling perfor-
mance. With the maximum temperature
set, the system gives maximum heatingperformance.
Page 310 of 420
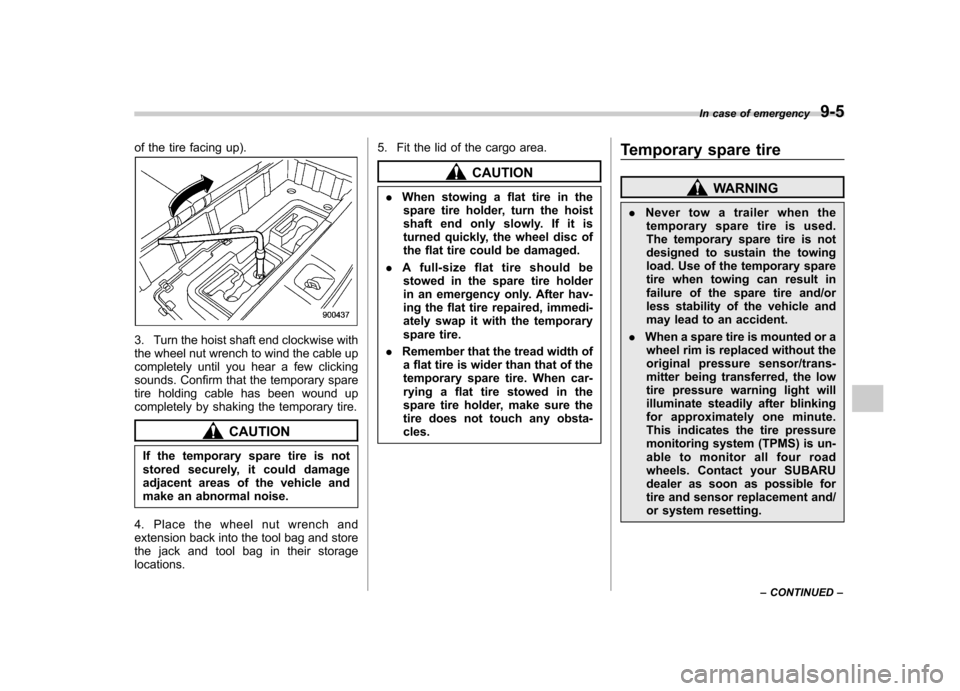
of the tire facing up).
3. Turn the hoist shaft end clockwise with
the wheel nut wrench to wind the cable up
completely until you hear a few clicking
sounds. Confirm that the temporary spare
tire holding cable has been wound up
completely by shaking the temporary tire.
CAUTION
If the temporary spare tire is not
stored securely, it could damage
adjacent areas of the vehicle and
make an abnormal noise.
4. Place the wheel nut wrench and
extension back into the tool bag and store
the jack and tool bag in their storagelocations. 5. Fit the lid of the cargo area.
CAUTION
. When stowing a flat tire in the
spare tire holder, turn the hoist
shaft end only slowly. If it is
turned quickly, the wheel disc of
the flat tire could be damaged.
. A full-size flat tire should be
stowed in the spare tire holder
in an emergency only. After hav-
ing the flat tire repaired, immedi-
ately swap it with the temporary
spare tire.
. Remember that the tread width of
a flat tire is wider than that of the
temporary spare tire. When car-
rying a flat tire stowed in the
spare tire holder, make sure the
tire does not touch any obsta-cles. Temporary spare tire
WARNING
. Never tow a trailer when the
temporary spare tire is used.
The temporary spare tire is not
designed to sustain the towing
load. Use of the temporary spare
tire when towing can result in
failure of the spare tire and/or
less stability of the vehicle and
may lead to an accident.
. When a spare tire is mounted or a
wheel rim is replaced without the
original pressure sensor/trans-
mitter being transferred, the low
tire pressure warning light will
illuminate steadily after blinking
for approximately one minute.
This indicates the tire pressure
monitoring system (TPMS) is un-
able to monitor all four road
wheels. Contact your SUBARU
dealer as soon as possible for
tire and sensor replacement and/
or system resetting. In case of emergency
9-5
– CONTINUED –
Page 369 of 420
11-38Maintenance and service
Left-hand side
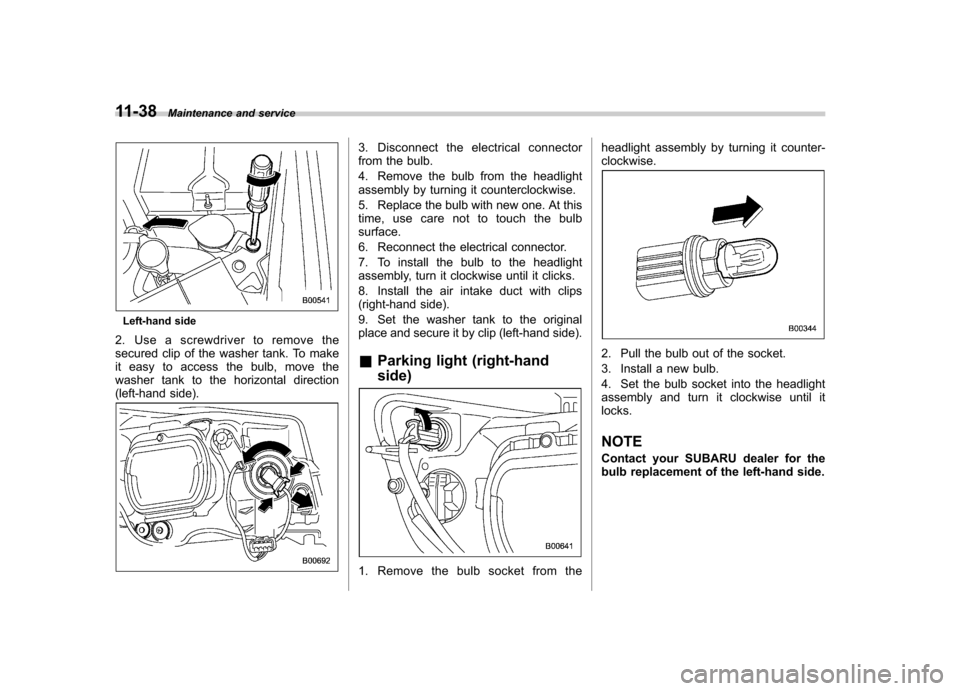
2. Use a screwdriver to remove the
secured clip of the washer tank. To make
it easy to access the bulb, move the
washer tank to the horizontal direction
(left-hand side).
3. Disconnect the electrical connector
from the bulb.
4. Remove the bulb from the headlight
assembly by turning it counterclockwise.
5. Replace the bulb with new one. At this
time, use care not to touch the bulbsurface.
6. Reconnect the electrical connector.
7. To install the bulb to the headlight
assembly, turn it clockwise until it clicks.
8. Install the air intake duct with clips
(right-hand side).
9. Set the washer tank to the original
place and secure it by clip (left-hand side). & Parking light (right-hand side)
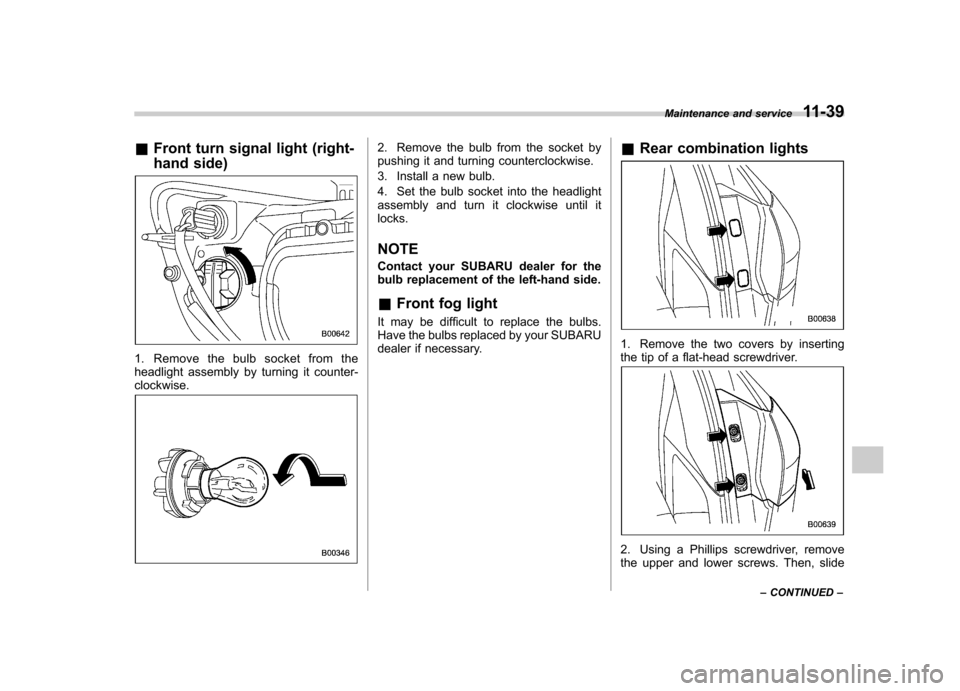
1. Remove the bulb socket from the headlight assembly by turning it counter- clockwise.
2. Pull the bulb out of the socket.
3. Install a new bulb.
4. Set the bulb socket into the headlight
assembly and turn it clockwise until itlocks. NOTE
Contact your SUBARU dealer for the
bulb replacement of the left-hand side.
Page 370 of 420
&Front turn signal light (right-
hand side)
1. Remove the bulb socket from the
headlight assembly by turning it counter-clockwise.
2. Remove the bulb from the socket by
pushing it and turning counterclockwise.
3. Install a new bulb.
4. Set the bulb socket into the headlight
assembly and turn it clockwise until itlocks. NOTE
Contact your SUBARU dealer for the
bulb replacement of the left-hand side. &Front fog light
It may be difficult to replace the bulbs.
Have the bulbs replaced by your SUBARU
dealer if necessary. &
Rear combination lights
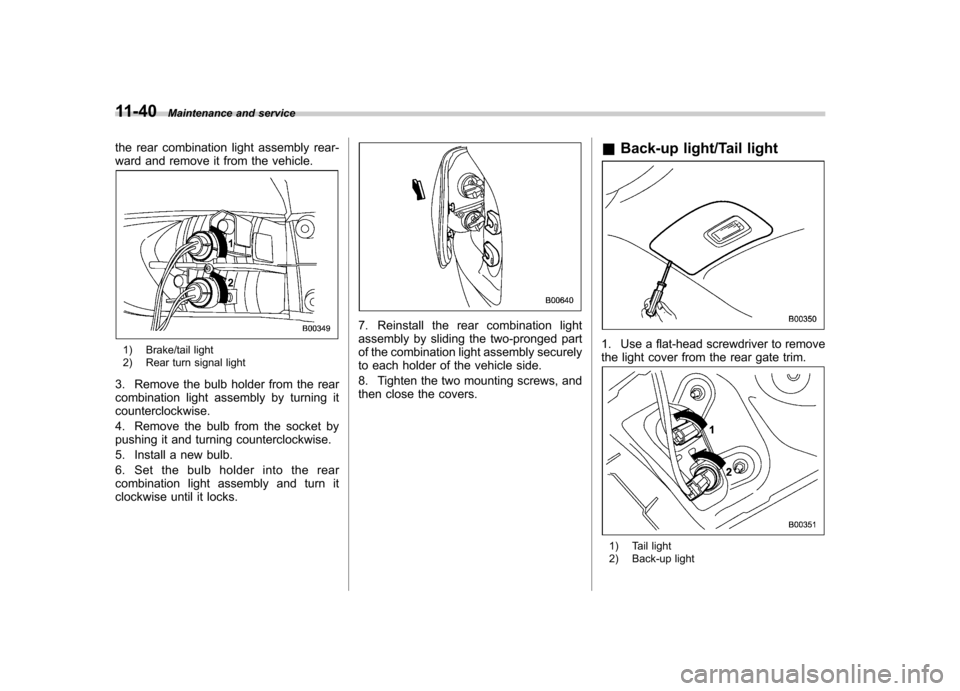
1. Remove the two covers by inserting
the tip of a flat-head screwdriver.
2. Using a Phillips screwdriver, remove
the upper and lower screws. Then, slide Maintenance and service
11-39
– CONTINUED –
Page 371 of 420
11-40Maintenance and service
the rear combination light assembly rear-
ward and remove it from the vehicle.
1) Brake/tail light
2) Rear turn signal light
3. Remove the bulb holder from the rear
combination light assembly by turning itcounterclockwise.
4. Remove the bulb from the socket by
pushing it and turning counterclockwise.
5. Install a new bulb.
6. Set the bulb holder into the rear
combination light assembly and turn it
clockwise until it locks.
7. Reinstall the rear combination light
assembly by sliding the two-pronged part
of the combination light assembly securely
to each holder of the vehicle side.
8. Tighten the two mounting screws, and
then close the covers. &
Back-up light/Tail light
1. Use a flat-head screwdriver to remove
the light cover from the rear gate trim.
1) Tail light
2) Back-up light