2012 SUBARU OUTBACK change key battery
[x] Cancel search: change key batteryPage 23 of 474

20
Function settings
A SUBARU dealer can change the settings of the functions shown in the following table to meet your personal requirements. Contact
the nearest SUBARU dealer for details.Item Function Possible settings Default setting Page
Alarm system Alarm system Operation/Non-operation Operation 2-15 Monitoring start delay time (after closure
of doors) 0 second/30 seconds 30 seconds 2-17
Impact sensor operation (only models
with shock sensors (dealer option)) Operation/Non-operation Non-operation 2-19
Passive arming Operation/Non-operation Non-operation 2-18
Map light/Dome light/Cargo area light illumination ON/OFF OFF 2-15
Remote keyless entry sys-tem Hazard warning flasher Operation/Non-operation Operation 2-7
Audible signal Operation/Non-operation Operation 2-10
Key lock-in prevention Key lock-in prevention Operation/Non-operation Operation 2-6
Defogger and deicer system
for models with the automatic
climate control system Rear window defogger, outside mirror
defogger and windshield wiper deicer
Operation for 15 minutes/
Continuous operationOperation for 15 minutes 3-34
Map light/Dome light/Cargo
area light Operation of map light/Dome light/Cargo
area light OFF delay timer OFF/Short/Normal/Long Long 6-2
Battery drainage preventionfunction Battery drainage prevention function Operation/Non-operation Operation 2-6
Seatbelt warning Sounds a chime while driving Operation/Non-operation Operation 1-14
Auto on/off headlights Sensitivity of the operation of the auto on/ off headlights Low/Normal/High/Very high Normal 3-27
Page 95 of 474

2-6Keys and doors
&Battery drainage prevention function
If a door or the rear gate (Outback) is not
completely closed, the interior lights will
remain illuminated as a result. However,
several lights are automatically turned off
by the battery drainage prevention func-
tion to prevent the battery from going
dead. The following interior lights are
affected by this function.
Item Switch
position Automatically turning
off
Map lights OFF
*1Approximately 20 minutes later
Dome lights DOORApproximately 20
minutes later
Ignition
switch light —
Approximately 20
minutes later
Door steplights —
None
*2
Cargo arealightDOORApproximately 20
minutes later
*1: The map lights can be controlled by the
battery drainage prevention function only when
the map light switches are in the OFF position
and the door interlock switch is in the DOOR
position. For the switch positions, refer to “Map
light ”F 6-2
.
*2: The door step lights are not affected by the
battery drainage prevention function, so the lights do not turn off automatically. To turn off
the lights, it is necessary that each door is
completely closed.
The operational/non-operational setting of
this function can be changed by a
SUBARU dealer. Contact the nearest
SUBARU dealer if you would like to
change the setting. NOTE .
The factory setting (default setting)
for this function is set as “operational ”.
. When leaving the vehicle, please
make sure that all doors and the rear
gate (Outback) are completely closed.. The battery drainage prevention
function does not operate while the
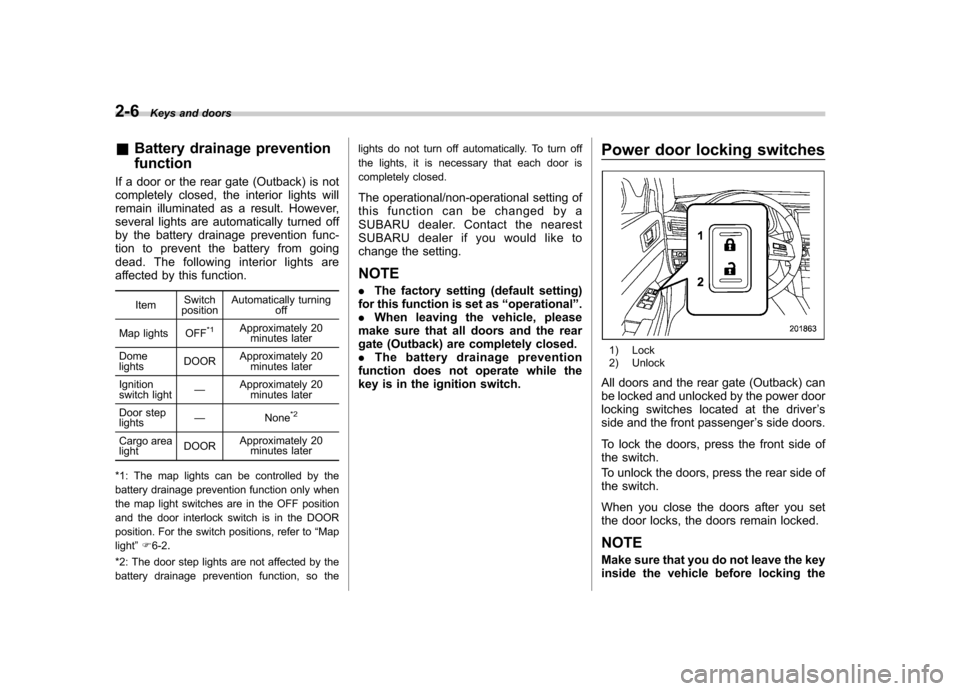
key is in the ignition switch. Power door locking switches
1) Lock
2) Unlock
All doors and the rear gate (Outback) can
be locked and unlocked by the power door
locking switches located at the driver ’s
side and the front passenger ’s side doors.
To lock the doors, press the front side of
the switch.
To unlock the doors, press the rear side of
the switch.
When you close the doors after you set
the door locks, the doors remain locked.
NOTE
Make sure that you do not leave the key
inside the vehicle before locking the
Page 96 of 474

doors from the outside using the power
door locking switches. &Key lock-in prevention func- tion
This function prevents the doors from
being locked with the key still in the
ignition switch. ! Behavior with key lock-in preven-
tion function operational
With the driver ’s door open, the doors are
automatically kept unlocked even if the
front side of the power door locking switch
is pressed. ! Behavior with key lock-in preven-
tion function non-operational
. If the lock lever is turned to the rear
( “LOCK ”) position with the driver ’s door
open and the driver ’s door is then closed
with the lock lever in that position, thedriver ’s door is locked.
. If the spare key is used to lock the
driver ’s door from the outside of the
vehicle, the door is locked.
This function ’s operational/non-opera-
tional setting can be changed by a
SUBARU dealer. Contact a SUBARU
dealer for details. NOTE .
The factory setting (default setting)
for this function is set as “operational ”.
. When leaving the vehicle, make sure
you are holding the key before locking
the doors. Remote keyless entry system
CAUTION
. Do not expose the remote trans-
mitter to severe shocks, such as
those experienced as a result of
dropping or throwing.
. Do not take the remote transmit-
ter apart except when replacing
the battery.
. Do not get the remote transmitter
wet. If it gets wet, wipe it dry with
a cloth immediately.
. When you carry the remote trans-
mitteronanairplane,donot
press the button of the remote
transmitter while in the airplane.
When any button of the remote
transmitter is pressed, radio
waves are sent and may affect
the operation of the airplane.
When you carry the remote trans-
mitter in a bag on an airplane,
take measures to prevent the
buttons of the remote transmitter
from being pressed.
. FCC WARNING
Changes or modifications not
expressly approved by the party
responsible for compliance Keys and doors
2-7
– CONTINUED –
Page 146 of 474

Light control switch
The light control switch only operates
when the key is inserted into the ignitionswitch.
Regardless of the position of the light
control switch, the illuminated lights are
turned off when the key is removed from
the ignition switch. NOTE .Even if the key is removed from the
ignition switch, the lights can be illu-
minated by operating the light control
switch position from “OFF ”to “
”
and/or “”.
. If the driver ’s door is opened while
the lights are illuminated and the key is
removed from the ignition switch, the
chirp sound informs the driver that the
lights are illuminated.
CAUTION
. Use of any lights for a long period
of time while the engine is not
running can cause the battery todischarge.
. Before leaving the vehicle, make
sure that the light control switch
is turned to the “OFF ”position. If
the vehicle is left unattended for a long time with the light control
switch set to a position otherthan
“OFF ”, the battery may be
discharged.
& Headlights
To turn on the headlights, turn the knob on
the end of the turn signal lever.
first position
Instrument panel illumination, tail lights,
front side marker lights and license plate
lights are on.
second position
Headlights, instrument panel illumination,
front side marker lights, tail lights and
license plate lights are on.
: Auto on/off headlights
When the ignition switch is in the “ON ”
position, the headlights, instrument panel
illumination, front side marker lights, tail
lights and license plate lights are auto-
matically on or off depending on the level
of the ambient light. NOTE
The sensitivity of the auto on/off head-
lights can be changed by your
SUBARU dealer. Contact your SUBARU
dealer for details. ! Sensor for the auto on/off head- lights
The sensor is on the instrument panel as
shown in the illustration. Instruments and controls
3-27
– CONTINUED –
Page 227 of 474

5-44Audio
NOTE . The Bluetooth
®audio function may
not operate properly under the follow-
ing conditions.
–The device is turned off.
– The battery of the device has run
down. – The device is not connected to
the system.– The device is behind the seat or
in the glove box.– A metal material is covering or
touching the device.
. Depending on the type of device that
is used, operation and sound volume
may be different from normal use of
those devices. . The sound quality may degrade due
to the influence of the device that is
connected to the system or the circum-
stances of the Bluetooth network. . When another Bluetooth
®device is
simultaneously connected, noise may
be heard. & Media format
Bluetooth
®audio devices cannot be
connected if they are not compatible with
the following Bluetooth
®profiles.
. A2DP (Advanced Audio Distribution
Profile) .
AVRCP (Audio/Video Remote Control
Profile)
& Setting Bluetooth
®audio
(type B audio)
1. Select “BT-A SETUP ”by pressing the
“ MENU ”button.
2. Perform the following procedure by
operating the “TUNE ”dial while “BT-A ”is
displayed.
NOTE
You cannot set Bluetooth
®audio while
driving. ! Registering (pairing) device
NOTE
Only one device can be registered.
1. Select the “PAIR AUDIO ”menu.
– If a device is already registered,
“ MEMORY FULL ”is displayed and the
mode changes to the Bluetooth
®
audio setting mode.
2. After the passkey is shown on the
display, input the passkey into the device. –If the registering procedure is fin-
ished, “PAIRED ”and the name of the
device are displayed. – If the registering procedure was not
successful, “FAILED ”is displayed. After the name of the device or
“FAILED ”
is displayed, the mode changes to the Bluetooth
®audio setting mode.
NOTE
After the ignition switch is turned to the “ LOCK ”position, the registered device
is not automatically connected to the
system even if the ignition switch is
turned to the “Acc ”or “ON ”position.
! Selecting device
1. Select the “SELECT AUDIO ”menu.
– If no devices are registered,
“ EMPTY ”is displayed and the mode
changes to the Bluetooth
®audio
setting mode.
2. Select the “CONFIRM ”menu.
– Then the name of the selected
device is displayed. – If the device is connected, “SE-
LECTED ”is displayed and the mode
changes to the Bluetooth
®audio
setting mode.– If the device cannot be connected,
“ FAILED ”is displayed and the select-
ing procedure was not successful.
! Setting passkey
1. Select the “SET PASSKEY ”menu.
– After the currently set passkey is
displayed, a new passkey can be
Page 255 of 474

6-2Interior equipment
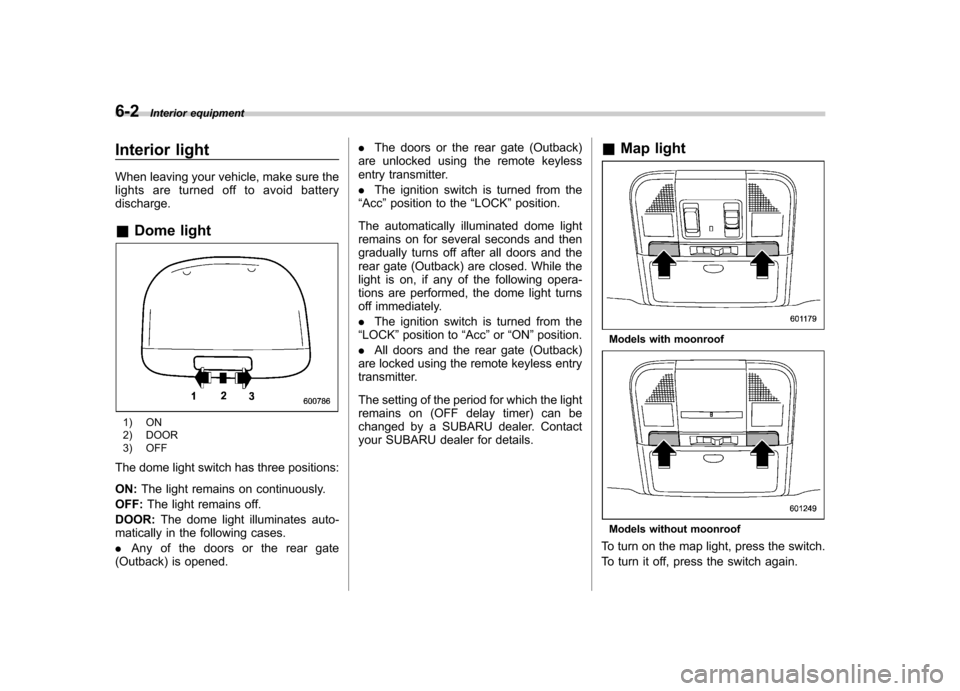
Interior light
When leaving your vehicle, make sure the
lights are turned off to avoid batterydischarge. &Dome light
1) ON
2) DOOR
3) OFF
The dome light switch has three positions: ON: The light remains on continuously.
OFF: The light remains off.
DOOR: The dome light illuminates auto-
matically in the following cases. . Any of the doors or the rear gate
(Outback) is opened. .
The doors or the rear gate (Outback)
are unlocked using the remote keyless
entry transmitter. . The ignition switch is turned from the
“ Acc ”position to the “LOCK ”position.
The automatically illuminated dome light
remains on for several seconds and then
gradually turns off after all doors and the
rear gate (Outback) are closed. While the
light is on, if any of the following opera-
tions are performed, the dome light turns
off immediately. . The ignition switch is turned from the
“ LOCK ”position to “Acc ”or “ON ”position.
. All doors and the rear gate (Outback)
are locked using the remote keyless entry
transmitter.
The setting of the period for which the light
remains on (OFF delay timer) can be
changed by a SUBARU dealer. Contact
your SUBARU dealer for details. &
Map light
Models with moonroof
Models without moonroof
To turn on the map light, press the switch.
To turn it off, press the switch again.
Page 256 of 474

When leaving the vehicle, make sure the
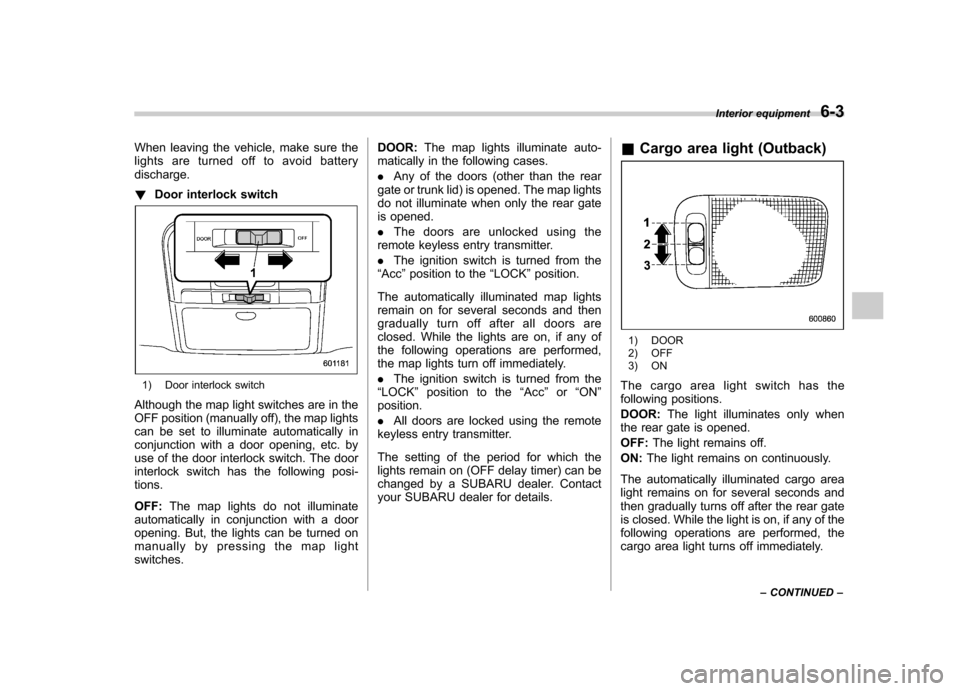
lights are turned off to avoid batterydischarge. !Door interlock switch
1) Door interlock switch
Although the map light switches are in the
OFF position (manually off), the map lights
can be set to illuminate automatically in
conjunction with a door opening, etc. by
use of the door interlock switch. The door
interlock switch has the following posi-tions. OFF: The map lights do not illuminate
automatically in conjunction with a door
opening. But, the lights can be turned on
manually by pressing the map lightswitches. DOOR:
The map lights illuminate auto-
matically in the following cases. . Any of the doors (other than the rear
gate or trunk lid) is opened. The map lights
do not illuminate when only the rear gate
is opened. . The doors are unlocked using the
remote keyless entry transmitter.. The ignition switch is turned from the
“ Acc ”position to the “LOCK ”position.
The automatically illuminated map lights
remain on for several seconds and then
gradually turn off after all doors are
closed. While the lights are on, if any of
the following operations are performed,
the map lights turn off immediately. . The ignition switch is turned from the
“ LOCK ”position to the “Acc ”or “ON ”
position. . All doors are locked using the remote
keyless entry transmitter.
The setting of the period for which the
lights remain on (OFF delay timer) can be
changed by a SUBARU dealer. Contact
your SUBARU dealer for details. &
Cargo area light (Outback)
1) DOOR
2) OFF
3) ON
The cargo area light switch has the
following positions. DOOR: The light illuminates only when
the rear gate is opened.OFF: The light remains off.
ON: The light remains on continuously.
The automatically illuminated cargo area
light remains on for several seconds and
then gradually turns off after the rear gate
is closed. While the light is on, if any of the
following operations are performed, the
cargo area light turns off immediately. Interior equipment
6-3
– CONTINUED –
Page 291 of 474

7-14Starting and operating
will flash one time.
7. Repeat step 5 for any additional
transmitters (the system will accept up to
eight transmitters).
8. The system will exit the transmitter
learn mode if the key is turned to the“LOCK ”position, the door is closed or
after 2 minutes. & System maintenance
NOTE
In the event that the vehicle ’s battery is
replaced, discharged or disconnected,
it will be necessary to start the vehicle
a minimum of one time using the key
prior to activating the remote engine
start system. This is required to allow
the vehicle electronic systems to re-synchronize. ! Changing the batteries
CAUTION
. Do not let dust, oil or water get on
or in the remote engine start
transmitter when replacing the
battery.
. Be careful not to damage the
printed circuit board in the re-
mote engine start transmitter
when replacing the battery. .
Be careful not to allow children to
touch the battery and any re-
moved parts; children could
swallow them.
. There is a danger of explosion if
an incorrect replacement battery
is used. Replace only with the
same or equivalent type of bat-
tery.
. Batteries should not be exposed
to excessive heat such as sun-
shine, fire or the like.
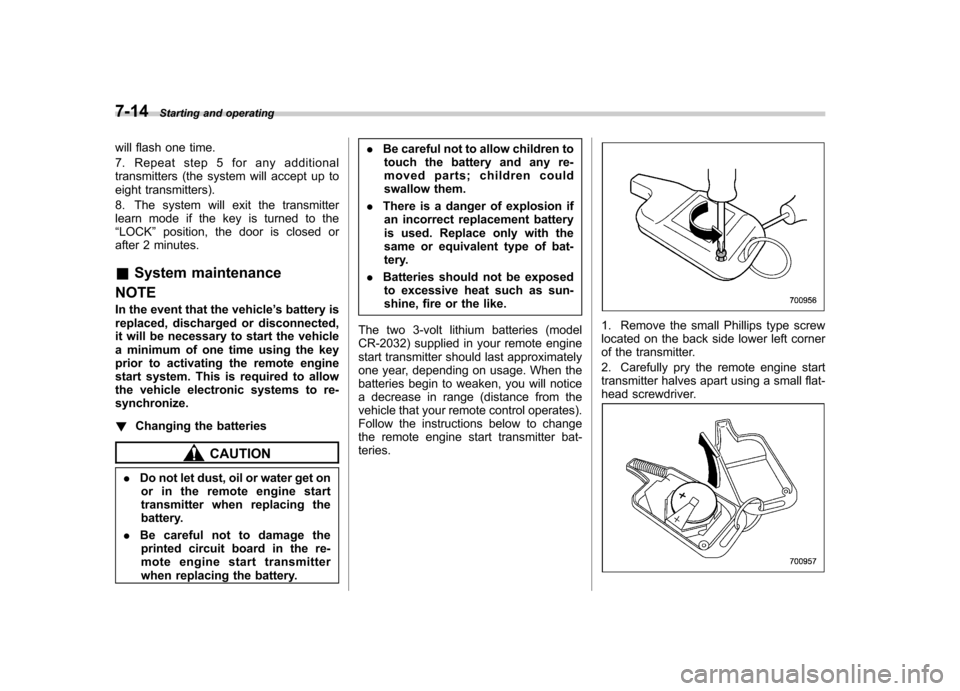
The two 3-volt lithium batteries (model
CR-2032) supplied in your remote engine
start transmitter should last approximately
one year, depending on usage. When the
batteries begin to weaken, you will notice
a decrease in range (distance from the
vehicle that your remote control operates).
Follow the instructions below to change
the remote engine start transmitter bat-teries.
1. Remove the small Phillips type screw
located on the back side lower left corner
of the transmitter.
2. Carefully pry the remote engine start
transmitter halves apart using a small flat-
head screwdriver.