2012 SUBARU OUTBACK starting
[x] Cancel search: startingPage 4 of 474

Warranties &Warranties for U.S.A.
All SUBARU vehicles distributed by
Subaru of America, Inc. and sold at retail
by an authorized SUBARU dealer in the
United States come with the followingwarranties: . SUBARU Limited Warranty
. Emission Control Systems Warranty
. Emissions Performance Warranty
All warranty information, including details
of coverage and exclusions, is in the“ Warranty and Maintenance Booklet ”.
Please read these warranties carefully.
& Warranties for Canada
All SUBARU vehicles distributed by
Subaru Canada, Inc. and sold at retail by
an authorized SUBARU dealer in Canada
come with the following warranties: . SUBARU Limited Warranty
. Anti-Corrosion Warranty
. Emission Control Warranty
All warranty information, including details
of coverage and exclusions, is in the“ Warranty and Service Booklet ”. Please
read these warranties carefully. How to use this Owner
’s
Manual & Using your Owner ’s Manual
Before you operate your vehicle, carefully
read this manual. To protect yourself and
extend the service life of your vehicle,
follow the instructions in this manual.
Failure to observe these instructions may
result in serious injury and damage to yourvehicle.
This manual is composed of fourteen
chapters. Each chapter begins with a brief
table of contents, so you can usually tell at
a glance if that chapter contains the
information you want.
Chapter 1: Seat, seatbelt and SRS airbags
This chapter informs you how to use the
seat and seatbelt and contains precau-
tions for the SRS airbags.
Chapter 2: Keys and doors
This chapter informs you how to operate
the keys, locks and windows.
Chapter 3: Instruments and controls
This chapter informs you about the opera-
tion of instrument panel indicators and
how to use the instruments and otherswitches. Chapter 4: Climate control
This chapter informs you how to operate
the climate control.
Chapter 5: Audio
This chapter informs you how to operate
your audio system.
Chapter 6: Interior equipment
This chapter informs you how to operate
interior equipment.
Chapter 7: Starting and operating
This chapter informs you how to start and
operate your SUBARU.
Chapter 8: Driving tips
This chapter informs you how to drive your
SUBARU in various conditions and ex-
plains some safety tips on driving.
Chapter 9: In case of emergency
This chapter informs you what to do if you
have a problem while driving, such as a
flat tire or engine overheating.
Chapter 10: Appearance care
This chapter informs you how to keep your
SUBARU looking good.
Chapter 11: Maintenance and service
This chapter informs you when you need
to take your SUBARU to the dealer for
scheduled maintenance and informs you
how to keep your SUBARU running
properly.1
– CONTINUED –
Page 12 of 474

Table of contents
Seat, seatbelt and SRS airbags1
Keys and doors2
Instruments and controls
Climate control4
Audio5
Interior equipment6
Starting and operating7
Driving tips8
In case of emergency9
Appearance care10
Maintenance and service11
Specifications12
Consumer information and Reporting safety defects13
Index14
3
Page 92 of 474

Immobilizer
The immobilizer system is designed to
prevent an unauthorized person from
starting the engine. Only keys registered
with your vehicle’s immobilizer system can
be used to operate your vehicle. Even if
an unregistered key fits into the ignition
switch and can be turned to the “START ”
position, the engine will automatically stop
after several seconds.
Each immobilizer key contains a trans-
ponder in which the key ’s ID code is
stored. When a key is inserted into the
ignition switch and turned to the “ON ”
position, the transponder transmits thekey ’s ID code to the immobilizer system ’s
receiver. If the transmitted ID code
matches the ID code registered in the
immobilizer system, the system allows the
engine to be started. Since the ID code is
transmitted and acted upon almost in-
stantly, the immobilizer system does not
impede normal starting of the engine.
If the engine does not start, pull out the
key once before trying again. Refer to“ Ignition switch ”F 3-3.
This device complies with Part 15 of
the FCC Rules and RSS-Gen of IC
Rules. Operation is subject to the
following two conditions: (1) This de- vice may not cause harmful interfer-
ence, and (2) this device must accept
any interference received, including
interference that may cause undesiredoperation.
CAUTION
. Do not place the key under direct
sunlight or anywhere it may
become hot.
. Do not get the key wet. If the key
gets wet, wipe it dry with a cloth
immediately.
. FCC WARNING
Changes or modifications not
expressly approved by the party
responsible for compliance
could void the user ’s authority
to operate the equipment.
NOTE
To protect your vehicle from theft,
please pay close attention to the fol-
lowing security precautions: . Never leave your vehicle unattended
with its keys inside. . Before leaving your vehicle, close all
windows and the moonroof, and lock
the doors (all models) and rear gate(Outback). .
Do not leave spare keys or any
record of your key number in thevehicle. & Security ID plate
1) Key number plate
2) Security ID plate
The security ID is stamped on the security
ID plate attached to the key set. Write
down the security ID and keep it in
another safe place, not in the vehicle.
This number is needed to make a replace-
ment key if you lose your key or lock it
inside the vehicle.
To make replacement keys, the key
number is also needed. Refer to “Key
replacement ”F 2-4. Keys and doors
2-3
– CONTINUED –
Page 94 of 474

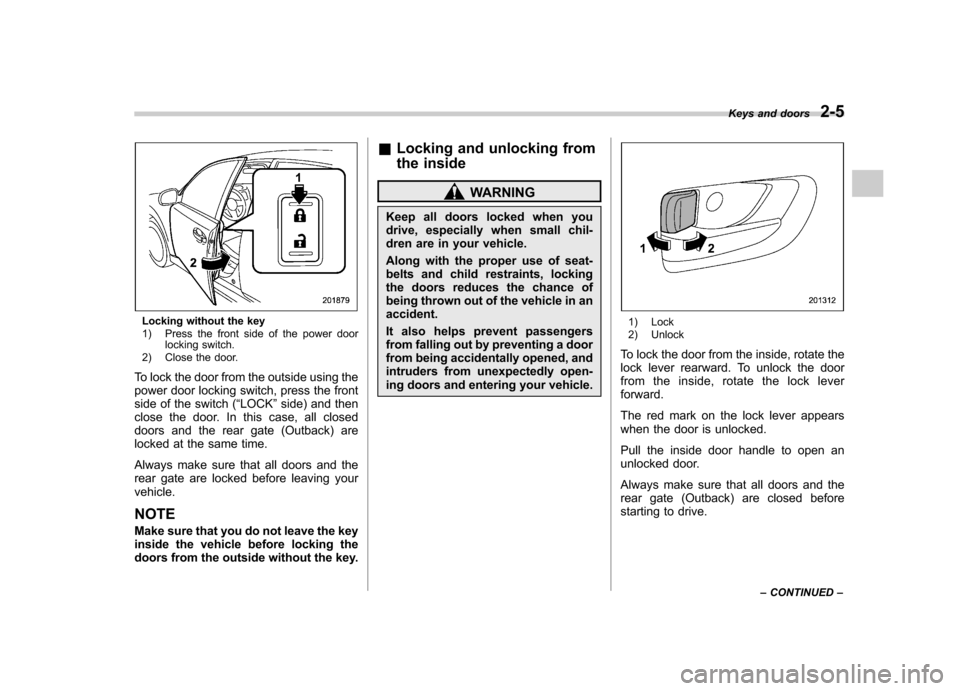
Locking without the key
1) Press the front side of the power doorlocking switch.
2) Close the door.
To lock the door from the outside using the
power door locking switch, press the front
side of the switch ( “LOCK ”side) and then
close the door. In this case, all closed
doors and the rear gate (Outback) are
locked at the same time.
Always make sure that all doors and the
rear gate are locked before leaving yourvehicle. NOTE
Make sure that you do not leave the key
inside the vehicle before locking the
doors from the outside without the key. &
Locking and unlocking from
the inside
WARNING
Keep all doors locked when you
drive, especially when small chil-
dren are in your vehicle.
Along with the proper use of seat-
belts and child restraints, locking
the doors reduces the chance of
being thrown out of the vehicle in anaccident.
It also helps prevent passengers
from falling out by preventing a door
from being accidentally opened, and
intruders from unexpectedly open-
ing doors and entering your vehicle.
1) Lock
2) Unlock
To lock the door from the inside, rotate the
lock lever rearward. To unlock the door
from the inside, rotate the lock leverforward.
The red mark on the lock lever appears
when the door is unlocked.
Pull the inside door handle to open an
unlocked door.
Always make sure that all doors and the
rear gate (Outback) are closed before
starting to drive. Keys and doors
2-5
– CONTINUED –
Page 102 of 474

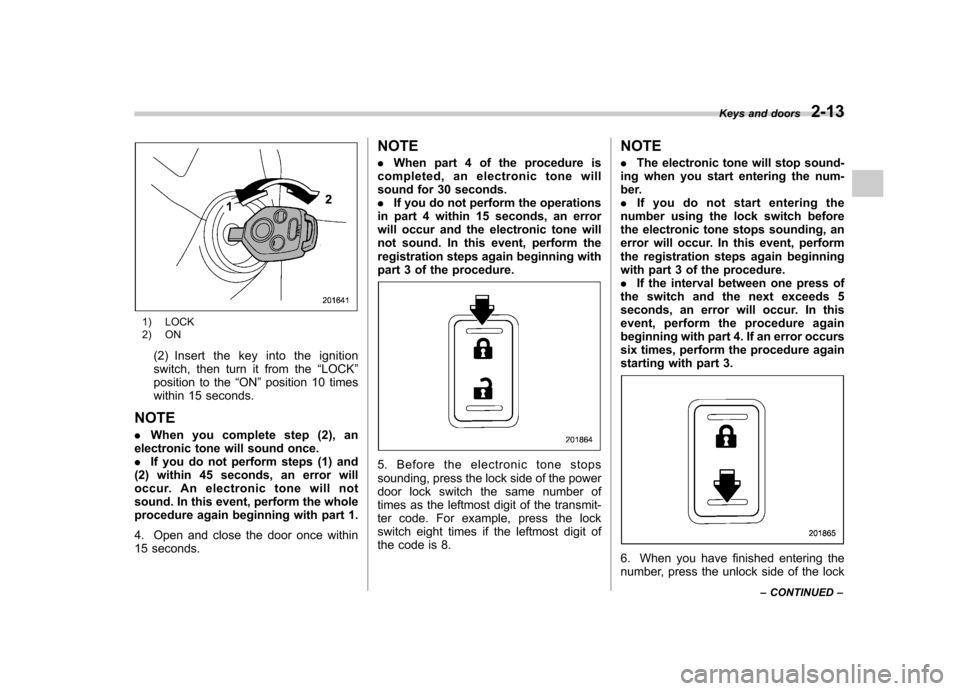
1) LOCK
2) ON(2) Insert the key into the ignition
switch, then turn it from the “LOCK ”
position to the “ON ”position 10 times
within 15 seconds.
NOTE . When you complete step (2), an
electronic tone will sound once. . If you do not perform steps (1) and
(2) within 45 seconds, an error will
occur. An electronic tone will not
sound. In this event, perform the whole
procedure again beginning with part 1.
4. Open and close the door once within
15 seconds. NOTE .
When part 4 of the procedure is
completed, an electronic tone will
sound for 30 seconds.. If you do not perform the operations
in part 4 within 15 seconds, an error
will occur and the electronic tone will
not sound. In this event, perform the
registration steps again beginning with
part 3 of the procedure.
5. Before the electronic tone stops
sounding, press the lock side of the power
door lock switch the same number of
times as the leftmost digit of the transmit-
ter code. For example, press the lock
switch eight times if the leftmost digit of
the code is 8. NOTE .
The electronic tone will stop sound-
ing when you start entering the num-
ber.. If you do not start entering the
number using the lock switch before
the electronic tone stops sounding, an
error will occur. In this event, perform
the registration steps again beginning
with part 3 of the procedure.. If the interval between one press of
the switch and the next exceeds 5
seconds, an error will occur. In this
event, perform the procedure again
beginning with part 4. If an error occurs
six times, perform the procedure again
starting with part 3.
6. When you have finished entering the
number, press the unlock side of the lock Keys and doors
2-13
– CONTINUED –
Page 103 of 474

2-14Keys and doors
switch within 5 seconds. NOTE . An electronic tone will sound.
. If you press the unlock side of the
lock switch when more than 5 seconds
have passed, an error will occur. In this
event, perform the procedure again
beginning with part 4. If an error occurs
six times, perform the procedure again
starting with part 3.
7. Perform parts 5 and 6 of the procedure
for each of the remaining digits of the
transmitter code beginning with the sec-
ond digit (counting from the left) and
finishing with the eighth digit. NOTE . When you finish entering the eighth
digit, an electronic tone will sound for
30 seconds.. If the interval between one press of
the switch and the next exceeds 5
seconds, an error will occur. In this
event, perform the procedure again
beginning with part 4. If an error occurs
six times, perform the procedure again
starting with part 3.
8. Before the electronic tone stops
sounding, use the power door lock switch
to reenter the transmitter code beginning
with the leftmost digit. NOTE
If you do not start entering the number
using the lock switch before the elec-
tronic tone stops sounding, an error
will occur. In this event, perform the
procedure again beginning with part 3.
9. When you have finished entering the
code a second time, an electronic tone will
sound for 1 second to indicate completion
of registration, provided the code entered
the second time is identical to that entered
the first time. NOTE
If the code entered the second time is
not identical to the code entered the
first time, an error will occur. In this
event, perform the procedure again
beginning with part 5. If an error occurs
five times, perform the procedure again
starting with part 3.
10. If you wish to program another trans-
mitter code into the system (up to four
transmitter codes can be programmed into
the system), perform the procedure begin-
ning with part 4. When you have finished
programming all of the necessary trans-
mitter codes into the system, remove the
key from the ignition switch.
11. Test every registered transmitter to
confirm correct operation.
!
Deleting old transmitter codes
The control unit of the remote keyless
entry system has four memory locations to
store transmitter codes, giving it the ability
to operate with up to four transmitters.
When you lose a transmitter, the losttransmitter ’s code remains in the memory.
For security reasons, lost transmitter
codes should be deleted from the mem-
ory.
To delete old transmitter codes, program
four transmitter codes into the system. If
you have only one current transmitter,
program it four times. If you have two
current transmitters, program each one
twice. If you have three current transmit-
ters, program two of them once and the
third one twice. This process will leave
only current transmitter codes in thesystem ’s memory.
Page 195 of 474

5-12Audio
FM/AM radio operation
Press the “FM ”or “AM ”button (type A and
B audio)/ “FM/AM ”button (type C audio)
when the radio is off to turn on the radio.
& FM selection (type A and B audio)
Type A audio
Type B audio
Press the “FM ”button when the radio is on
to select the preferred reception mode.
Each brief press of the “FM ”button
changes the radio in the following se-
quence starting from the last FM radio
band that you selected.
Type A audio:
Type B audio:
& AM selection (type A and B audio)
Type A audio
Type B audio
! Type A audio
Press the “AM ”button when the radio is on
to select AM reception starting from the
last radio band and the last frequency
interval that you selected. ! Type B audio
Each time the “AM ”button is briefly
pressed the radio changes in the following
sequence starting from the last radio band
that you selected.
& FM/AM selection (type C audio)
“ FM/AM ”button
Press the “FM/AM ”button when the radio is on to select the preferred reception mode.
Each brief press of the
“FM/AM ”button
changes the radio in the following se-
quence starting from the last radio band
with you selected.
& Tuning
! Manual tuning
“ TUNE ”dial:
Type A audio
Type B audio
Type C audio
Turn the “TUNE ”dial clockwise to in-
crease the tuning frequency and turn the “ TUNE ”dial counterclockwise to decrease
it.
Each time the dial is turned, the frequency
Page 278 of 474

Fuel...................................................................... 7-2
Fuel requirements ............................................... 7-2
Fuel filler lid and cap ........................................... 7-3
State emission testing (U.S. only) ...................... 7-6
Preparing to drive ............................................... 7-7
Starting the engine .............................................. 7-8
MT models .......................................................... 7-8
AT and CVT models ............................................. 7-9
Stopping the engine ........................................... 7-10
Remote engine start system (dealer option) .............................................................. 7-10
Starting your vehicle .......................................... 7-10
Remote start safety features ............................... 7-11
Entering the vehicle while it is running via remote start ................................................................. 7-11
Remote start confirmation transmitter feature ............................................................. 7-12
Entering the vehicle following remote engine start shutdown ......................................................... 7-13
Pre-heating or pre-cooling the interior of the vehicle ............................................................. 7-13
Service mode ..................................................... 7-13
Remote transmitter program ............................... 7-13
System maintenance .......................................... 7-14
Manual transmission .......................................... 7-15
Selecting reverse gear ........................................ 7-16
Shifting speeds .................................................. 7-16
Driving tips ........................................................ 7-17
Automatic transmission/Continuously variable transmission ..................................... 7-17
Select lever ........................................................ 7-18 Shift lock function
............................................. 7-20
Selection of manual mode .................................. 7-21
Driving tips ........................................................ 7-22
Power steering ................................................... 7-23
Braking ............................................................... 7-23
Braking tips ....................................................... 7-23
Brake system .................................................... 7-23
Disc brake pad wear warning indicators ............. 7-24
ABS (Anti-lock Brake System) .......................... 7-24
ABS system self-check ...................................... 7-25
ABS warning light .............................................. 7-25
Electronic Brake Force Distribution (EBD) system ............................................................. 7-25
Steps to take if EBD system malfunctions ..... ..... 7-25
Vehicle Dynamics Control system .................... 7-26
Vehicle Dynamics Control system monitor..... ..... 7-28
Vehicle Dynamics Control OFF switch ................ 7-28
Tire pressure monitoring system (TPMS) (if equipped) .................................................... 7-29
Parking your vehicle ......................................... 7-30
Electronic parking brake .................................... 7-31
Parking tips ....................................................... 7-34
Cruise control .................................................... 7-35
To set cruise control .......................................... 7-35
To temporarily cancel the cruise control ............. 7-36
To turn off the cruise control .............................. 7-36
To change the cruising speed .. .......................... 7-37
Cruise control indicator light .............................. 7-38
Cruise control set indicator light ........................ 7-38
Starting and operating
7