2012 SUBARU OUTBACK ECO mode
[x] Cancel search: ECO modePage 351 of 474
9-8In case of emergency
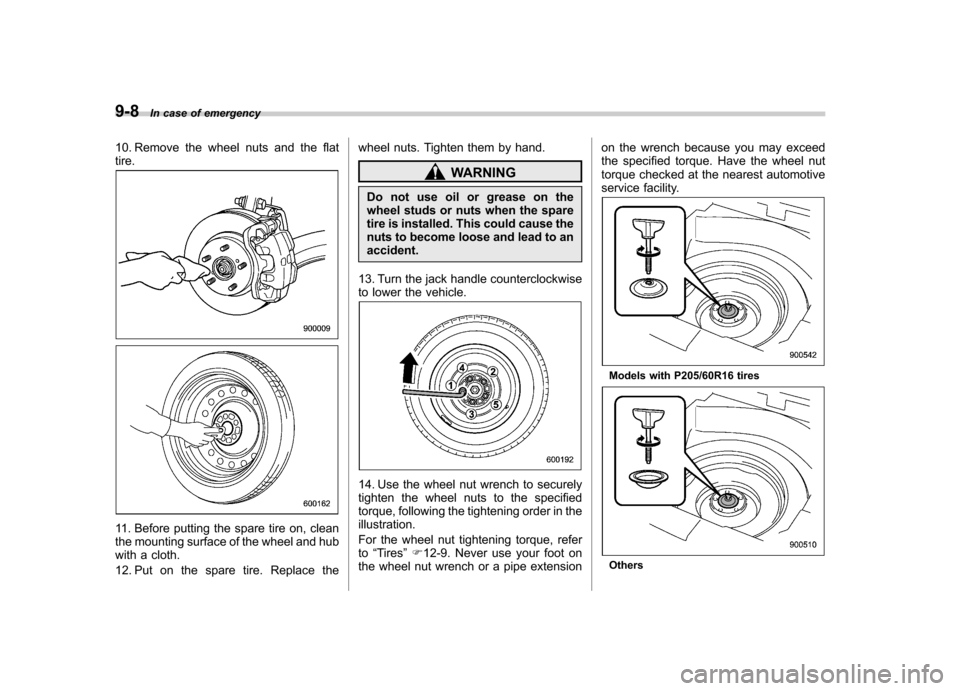
10. Remove the wheel nuts and the flat tire.
11. Before putting the spare tire on, clean
the mounting surface of the wheel and hub
with a cloth.
12. Put on the spare tire. Replace the wheel nuts. Tighten them by hand.
WARNING
Do not use oil or grease on the
wheel studs or nuts when the spare
tire is installed. This could cause the
nuts to become loose and lead to anaccident.
13. Turn the jack handle counterclockwise
to lower the vehicle.
14. Use the wheel nut wrench to securely
tighten the wheel nuts to the specified
torque, following the tightening order in the illustration.
For the wheel nut tightening torque, refer to “Tires ”F 12-9. Never use your foot on
the wheel nut wrench or a pipe extension on the wrench because you may exceed
the specified torque. Have the wheel nut
torque checked at the nearest automotive
service facility.
Models with P205/60R16 tires
Others
Page 372 of 474
Maintenance schedule....................................... 11-3
Maintenance precautions ................................... 11-3
Before checking or servicing in the engine compartment .................................................... 11-4
When checking or servicing in the engine compartment (2.5 L non-turbo models) .. ........... 11-4
When checking or servicing in the engine compartment while the engine is running .......... 11-5
Maintenance tips ................................................ 11-5
Removing and reinstalling clips .......................... 11-5
Removing air intake duct .................................... 11-7
Pulling off the fender lining ................................ 11-7
Engine hood ....................................................... 11-7
Engine compartment overview .......................... 11-9
2.5 L non-turbo models ...................................... 11-9
2.5 L turbo models ........................................... 11-10
3.6 L models .................................................... 11-11
Engine oil .......................................................... 11-12
Checking the oil level ....................................... 11-12
Changing the oil and oil filter ............................ 11-14
Recommended grade and viscosity .................. 11-16
Synthetic oil ..................................................... 11-16
Cooling system ................................................ 11-16
Cooling fan, hose and connections ................... 11-17
Engine coolant ................................................. 11-17
Air cleaner element .......................................... 11-18
Replacing the air cleaner element ..................... 11-18
Spark plugs ...................................................... 11-20
Recommended spark plugs .............................. 11-20
Drive belts ........................................................ 11-21 Manual transmission oil
.................................. 11-21
Recommended grade and viscosity .................. 11-21
Automatic transmission fluid .......................... 11-21
Checking the fluid level .................................... 11-21
Recommended fluid ......................................... 11-22
Continuously variable transmission fluid ...... 11-23
Front differential gear oil (AT and CVT models) .......................................................... 11-23
Checking the oil level ...................................... 11-23
Recommended grade and viscosity .................. 11-24
Rear differential gear oil .................................. 11-24
Recommended grade and viscosity .................. 11-24
Power steering fluid ........................................ 11-24
Checking the fluid level .................................... 11-24
Recommended fluid ......................................... 11-25
Brake fluid ........................................................ 11-25
Checking the fluid level .................................... 11-25
Recommended brake fluid ............................... 11-26
Clutch fluid (MT models) ................................. 11-26
Checking the fluid level .................................... 11-26
Recommended clutch fluid ............................... 11-27
Brake booster .................................................. 11-27
Brake pedal ...................................................... 11-28
Checking the brake pedal free play .................. 11-28
Checking the brake pedal reserve distance....... 11-28
Clutch pedal (MT models) ............................... 11-29
Checking the clutch function ............................ 11-29
Checking the clutch pedal free play .................. 11-29
Replacement of brake pad and lining ............ 11-29
Breaking-in of new brake pads and linings ....... 11-30 Maintenance and service
11
Page 375 of 474
11-4Maintenance and service
guard against getting oil or fluids
in your eyes. If something does
get in your eyes, thoroughly
wash them out with clean water.
. Do not tamper with the wiring of
the SRS airbag system or seat-
belt pretensioner system, or at-
tempt to take its connectors
apart, as that may activate the
system or it can render it inop-
erative. NEVER use a circuit
tester for these wiring. If your
SRS airbag or seatbelt preten-
sioner needs service, consult
your nearest SUBARU dealer. &
Before checking or servicing
in the engine compartment
WARNING
. Always stop the engine and apply
the parking brake to prevent the
vehicle from moving.
. Always let the engine cool down.
Engine parts become very hot
when the engine is running and
remain hot for some time after
the engine is stopped.
. Do not spill engine oil, engine
coolant, brake fluid or any other
fluid on hot engine components.
This may cause a fire.
. Always remove the key from the
ignition switch. When the ignition
switch is in the “ON ”position,
thecoolingfanmayoperate
suddenly even when the engine
is stopped.
. Before performing any servicing
on a vehicle equipped with a
remote engine start system tem-
porarily place that system in the
service mode to prevent it from
unexpectedly starting the engine. &
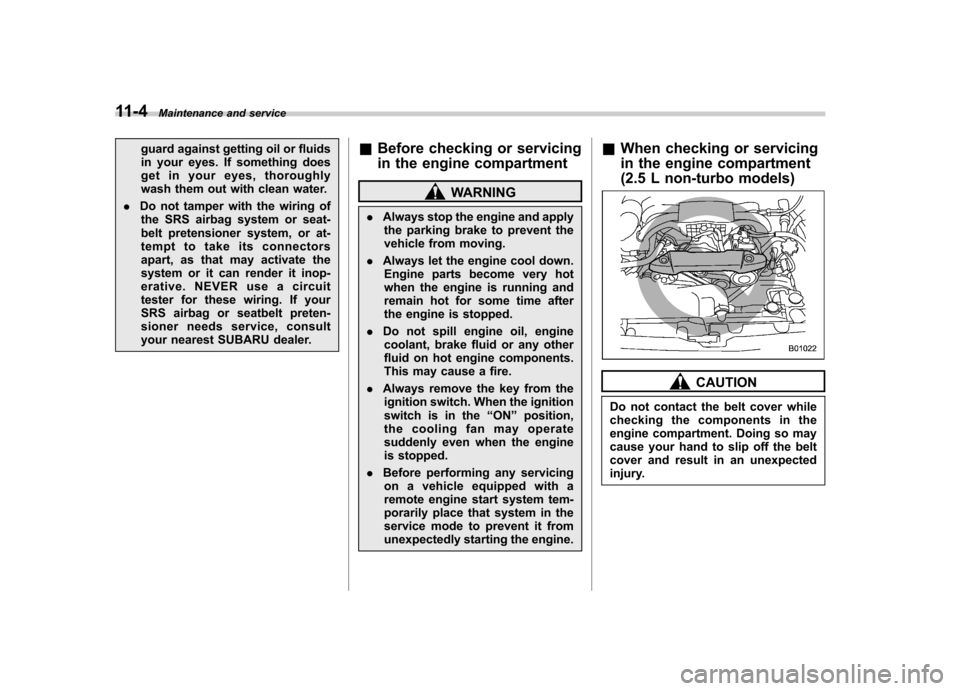
When checking or servicing
in the engine compartment
(2.5 L non-turbo models)
CAUTION
Do not contact the belt cover while
checking the components in the
engine compartment. Doing so may
cause your hand to slip off the belt
cover and result in an unexpected
injury.
Page 384 of 474
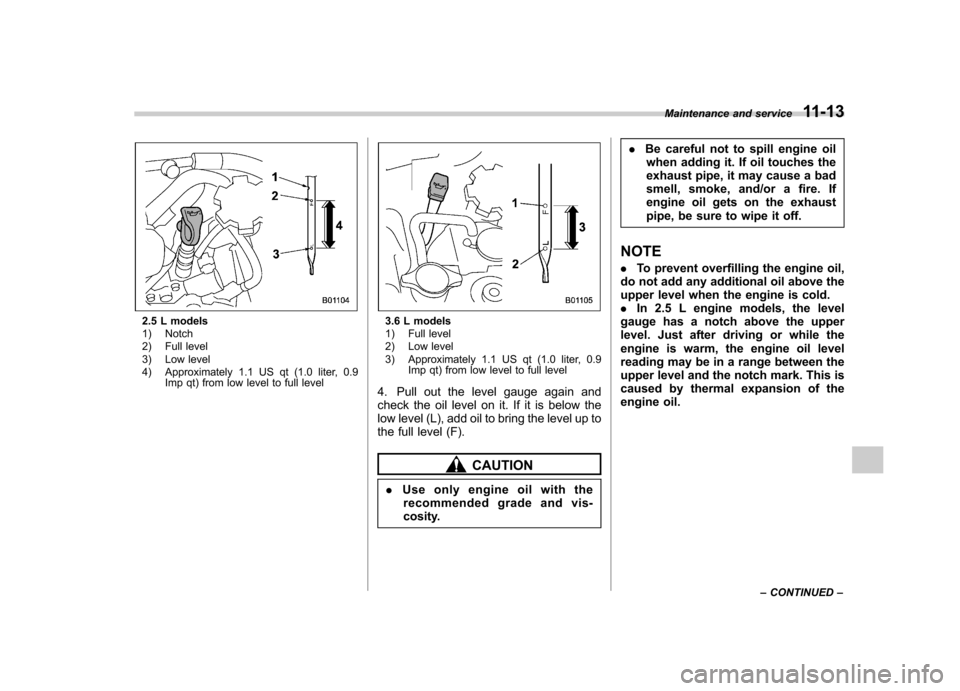
2.5 L models
1) Notch
2) Full level
3) Low level
4) Approximately 1.1 US qt (1.0 liter, 0.9Imp qt) from low level to full level3.6 L models
1) Full level
2) Low level
3) Approximately 1.1 US qt (1.0 liter, 0.9
Imp qt) from low level to full level
4. Pull out the level gauge again and
check the oil level on it. If it is below the
low level (L), add oil to bring the level up to
the full level (F).
CAUTION
. Use only engine oil with the
recommended grade and vis-
cosity. .
Be careful not to spill engine oil
when adding it. If oil touches the
exhaust pipe, it may cause a bad
smell, smoke, and/or a fire. If
engine oil gets on the exhaust
pipe, be sure to wipe it off.
NOTE . To prevent overfilling the engine oil,
do not add any additional oil above the
upper level when the engine is cold.. In 2.5 L engine models, the level
gauge has a notch above the upper
level. Just after driving or while the
engine is warm, the engine oil level
reading may be in a range between the
upper level and the notch mark. This is
caused by thermal expansion of the
engine oil. Maintenance and service
11-13
– CONTINUED –
Page 389 of 474
11-18Maintenance and service
Air cleaner element
WARNING
Do not operate the engine with the
air cleaner element removed. The air
cleaner element not only filters
intake air but also stops flames if
the engine backfires. If the air
cleaner element is not installed
when the engine backfires, you
could be burned.
CAUTION
When replacing the air cleaner ele-
ment, use a genuine SUBARU air
cleaner element. If it is not used,
there is the possibility of causing a
negative effect to the engine.
The air cleaner element functions as a
filter screen. When the element is perfo-
rated or removed, engine wear will be
excessive and engine life shortened.
The air cleaner element is a dry type. It is
unnecessary to clean or wash the ele-ment. &
Replacing the air cleaner element
Replace the air cleaner element according
to the maintenance schedule in the“ Warranty and Maintenance Booklet ”. Un-
der extremely dusty conditions, replace it
more frequently. It is recommended that
you always use genuine SUBARU parts. !
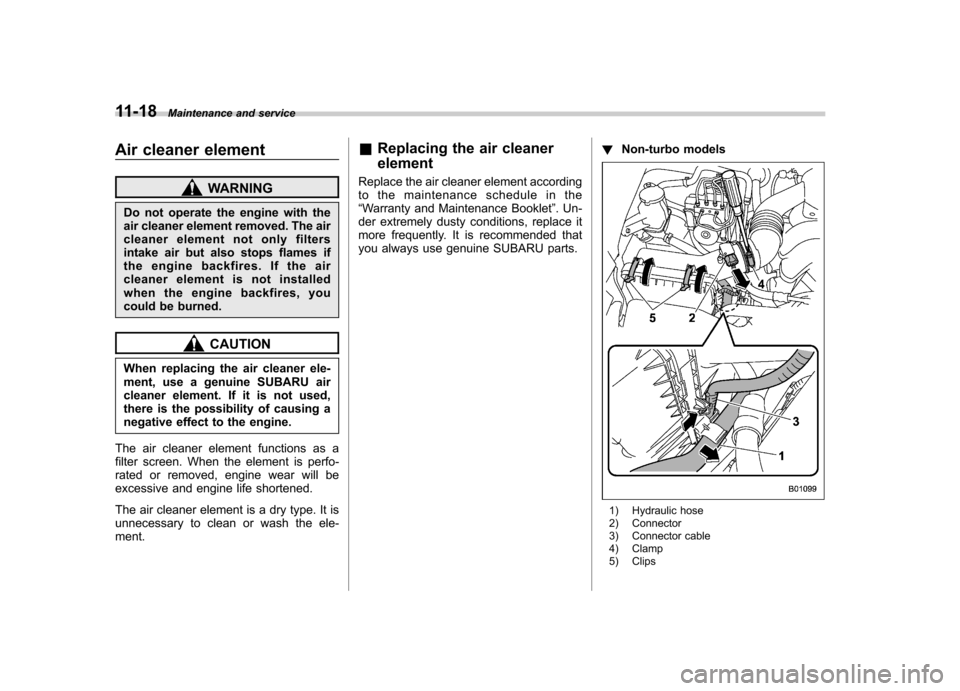
Non-turbo models
1) Hydraulic hose
2) Connector
3) Connector cable
4) Clamp
5) Clips
Page 395 of 474
11-24Maintenance and service
!CVT models
There is no oil level gauge. To check the
front differential gear oil level, we recom-
mend that you consult your SUBARU
dealer for inspection. & Recommended grade and viscosity
Each oil manufacturer has its own base
oils and additives. Never use different
brands together. For details, refer to“ Manual transmission, front differential
and rear differential gear oil ”F 12-7. Rear differential gear oil
There is no oil level gauge. To check the
rear differential gear oil level, we recom-
mend that you consult your SUBARU
dealer for inspection. &
Recommended grade and viscosity
Each oil manufacturer has its own base
oils and additives. Never use different
brands together. For details, refer to“ Manual transmission, front differential
and rear differential gear oil ”F 12-7. Power steering fluid &
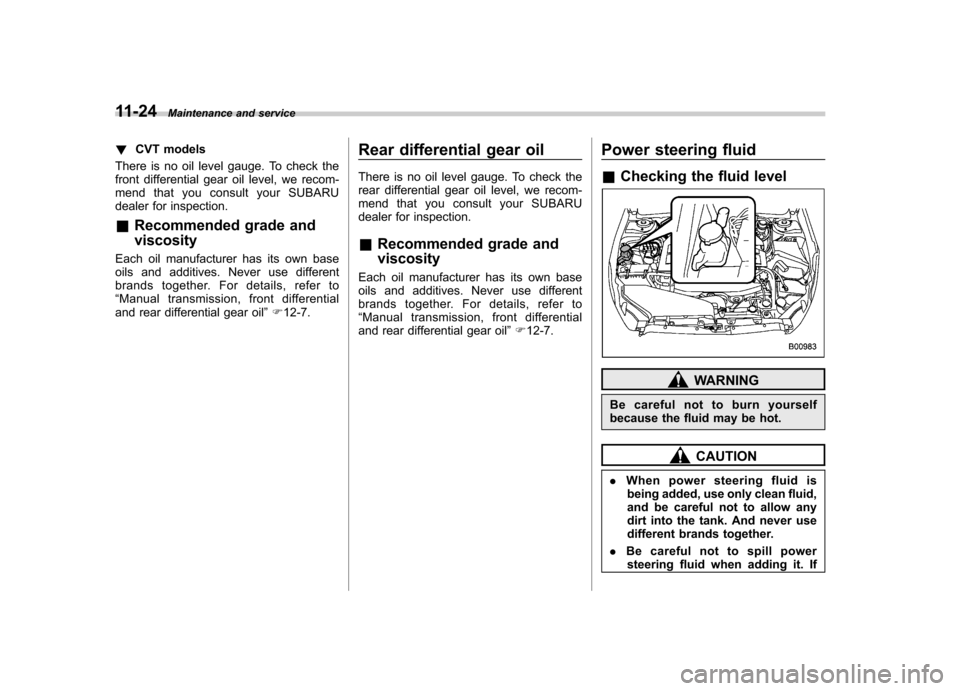
Checking the fluid level
WARNING
Be careful not to burn yourself
because the fluid may be hot.
CAUTION
. When power steering fluid is
being added, use only clean fluid,
and be careful not to allow any
dirt into the tank. And never use
different brands together.
. Be careful not to spill power
steering fluid when adding it. If
Page 397 of 474
11-26Maintenance and service
Alcohol contained in the brake
fluid may damage them.
. Be careful not to spill brake fluid
when adding it. If brake fluid
touches the exhaust pipe, it may
cause a bad smell, smoke, and/or
a fire. If brake fluid gets on the
exhaust pipe, be sure to wipe itoff.
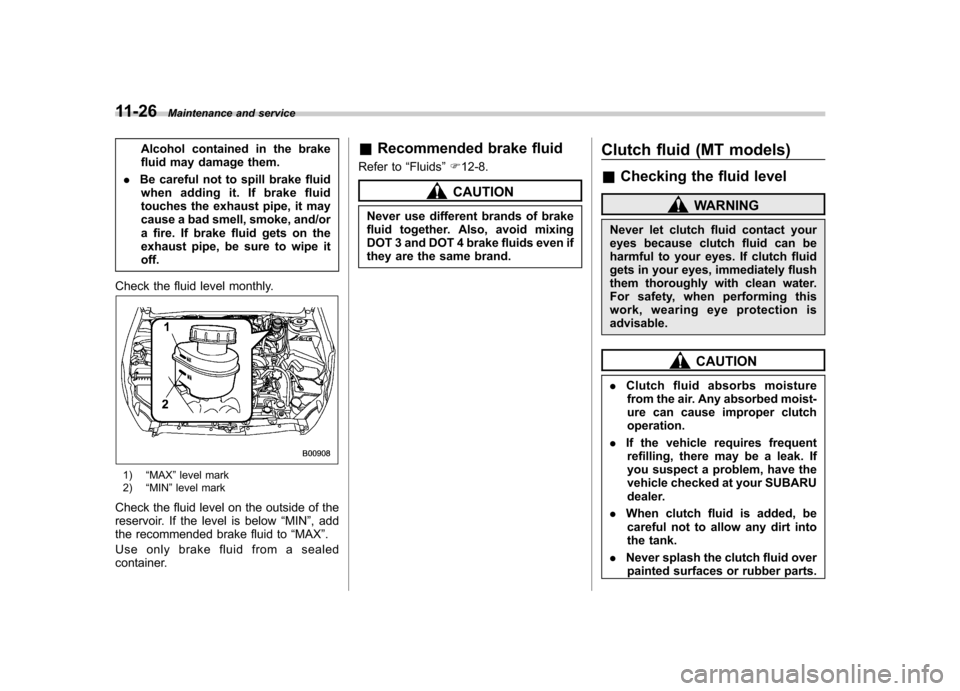
Check the fluid level monthly.
1) “MAX ”level mark
2) “MIN ”level mark
Check the fluid level on the outside of the
reservoir. If the level is below “MIN ”, add
the recommended brake fluid to “MAX ”.
Use only brake fluid from a sealed
container. &
Recommended brake fluid
Refer to “Fluids ”F 12-8.
CAUTION
Never use different brands of brake
fluid together. Also, avoid mixing
DOT 3 and DOT 4 brake fluids even if
they are the same brand. Clutch fluid (MT models) &
Checking the fluid level
WARNING
Never let clutch fluid contact your
eyes because clutch fluid can be
harmful to your eyes. If clutch fluid
gets in your eyes, immediately flush
them thoroughly with clean water.
For safety, when performing this
work, wearing eye protection isadvisable.
CAUTION
. Clutch fluid absorbs moisture
from the air. Any absorbed moist-
ure can cause improper clutchoperation.
. If the vehicle requires frequent
refilling, there may be a leak. If
you suspect a problem, have the
vehicle checked at your SUBARU
dealer.
. When clutch fluid is added, be
careful not to allow any dirt into
the tank.
. Never splash the clutch fluid over
painted surfaces or rubber parts.
Page 401 of 474

11-30Maintenance and service
you apply the brake pedal, have the brake
pads serviced by your SUBARU dealer as
soon as possible. &Breaking-in of new brake
pads and linings
When replacing the brake pad or lining,
use only genuine SUBARU parts. After
replacement, the new parts must be
broken in as follows: ! Brake pad and lining
While maintaining a speed of 30 to 40
mph (50 to 65 km/h), step on the brake
pedal lightly. Repeat this five or moretimes. ! Parking brake lining
The break-in maintenance for the parking
brake linings should be performed at a
SUBARU dealer. Tires and wheels &
Types of tires
You should be familiar with type of tires
present on your vehicle. ! All season tires
The factory-installed tires on your new
vehicle except 2.5 L turbo models are all
season tires.
All season tires are designed to provide
an adequate measure of traction, handling
and braking performance in year-round
driving including snowy and icy road
conditions. However all season tires do
not offer as much traction performance as
winter (snow) tires in heavy or loose snow
or on icy roads.
All season tires are identified by “ALL
SEASON ”and/or “M+S ”(Mud & Snow) on
the tire sidewall. ! Summer tires
The factory-installed tires on your new 2.5
L turbo models are summer tires. Summer
tires are high-speed capability tires best
suited for highway driving under dryconditions.
Summer tires are inadequate for driving
on slippery roads such as on snow-
covered or icy roads.
If you drive your vehicle on snow-covered or icy roads, we strongly recommend the
use of winter (snow) tires.
When installing winter tires, be sure to
replace all four tires. !
Winter (snow) tires
Winter tires are best suited for driving on
snow-covered and icy roads. However
winter tires do not perform as well as
summer tires and all season tires on roads
other than snow-covered and icy roads. & Tire pressure monitoring
system (TPMS) (if equipped)
The tire pressure monitoring system pro-
vides the driver with a warning message
by sending a signal from a sensor that is
installed in each wheel when tire pressure
is severely low. The tire pressure monitor-
ing system will activate only when the
vehicle is driven. Also, this system may
not react immediately to a sudden drop in
tire pressure (for example, a blow-out
caused by running over a sharp object).
If you adjust the tire pressures in a warm
garage and will then drive the vehicle in
cold outside air, the resulting drop in tire
pressures may cause the low tire pressure
warning light to illuminate. To avoid this
problem when adjusting the tire pressures
in a warm garage, inflate the tires to
pressures higher than those shown on the