2012 SUBARU OUTBACK window
[x] Cancel search: windowPage 178 of 474

both side windows to prevent fogging.)
(Heat-def): Windshield defroster outlets,
foot outlets and both side outlets of the
instrument panel
(Defrost): Windshield defroster outlets and
both side outlets of the instrument panel&
Temperature control
! Type A
Turn the temperature control dial over a
range from the blue side (cool) to red side
(warm) to regulate the temperature of
airflow from the air outlets. ! Type B
To increase the temperature setting, press the “
”side of the temperature control
button. To decrease the temperature
setting, press the “
”side of the tempera-
ture control button.
Each temperature setting is shown on the
display. When “LO ”is shown, the system
provides maximum cooling performance.When “HI ”is shown, the system provides
maximum heating performance.
NOTE
When the “DUAL ”button is pressed,
separate temperature settings for the driver ’s side and passenger ’s side can
be enabled (DUAL mode). To cancel the
DUAL mode, press the “DUAL ”button
again. The temperature setting for thepassenger ’s side becomes the same as
the setting for the driver ’s side.
& Fan speed control
The fan operates only when the ignition switch is in the
“ON ”position. Select the
preferred fan speed by turning the fan
speed control dial (type A), or by pressing
the fan speed control buttons (type B).
& Air conditioner control
The air conditioner operates only when
the engine is running.
Press the air conditioner button while the
fan is in operation to turn on the air
conditioner. When the air conditioner is
on, the indicator light on the air conditioner
button (type A)/ “A/C ”indicator light (type
B) illuminates.
To turn off the air conditioner, press the
button again. The indicator light will turnoff. NOTE
For efficient defogging or dehumidify-
ing in cold weather, turn on the air
conditioner. & Air inlet selection
Select the air inlet by pressing the air inlet
selection button.
ON position (recirculation) : Interior air is
recirculated inside the vehicle. Press the
air inlet selection button to the ON position
for fast cooling with the air conditioner or
when driving on a dusty road. When the Climate control
4-7
– CONTINUED –
Page 179 of 474

4-8Climate control
ON position is selected, the indicator light
on the air inlet selection button illuminates.
OFF position (outside air) : Outside air is
drawn into the passenger compartment.
Press the air inlet selection button to the
OFF position when the interior has cooled
to a comfortable temperature and the road
is no longer dusty. The indicator light will
turn off.
WARNING
Continued operation in the ON posi-
tion may fog up the windows. Switch
to the OFF position as soon as the
outside dusty condition clears. Defrosting
Select the desired
“
”mode or “”mode
to defrost or dehumidify the windshield
and front door windows by performing the
following procedures.
For type A: Press the airflow control button
and select the “
”mode or “”mode.
For type B: Press the airflow mode
selection button to select the “
”mode
or press the defroster button to select the “
” mode.
NOTE
When the “
”mode or “”mode is
selected, the air conditioner compres-
sor automatically operates to more
quickly defog the windshield. At the
same time, the air inlet selection is
automatically set to the outside air
mode. For details, refer to “Airflow
mode selection ”F 4-6. Operating tips for heater and
air conditioner &
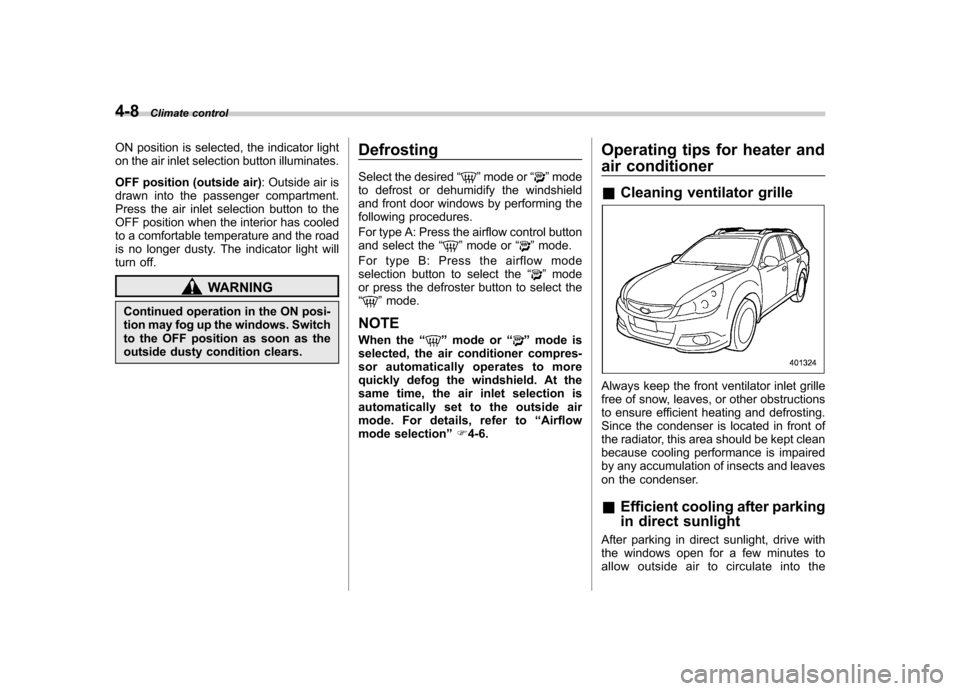
Cleaning ventilator grille
Always keep the front ventilator inlet grille
free of snow, leaves, or other obstructions
to ensure efficient heating and defrosting.
Since the condenser is located in front of
the radiator, this area should be kept clean
because cooling performance is impaired
by any accumulation of insects and leaves
on the condenser. &Efficient cooling after parking
in direct sunlight
After parking in direct sunlight, drive with
the windows open for a few minutes to
allow outside air to circulate into the
Page 180 of 474

heated interior. This results in quicker
cooling by the air conditioner. Keep the
windows closed during the operation of
the air conditioner for maximum cooling
efficiency. &Lubrication oil circulation in
the refrigerant circuit
Operate the air conditioner compressor at
a low engine speed (at idle or low driving
speeds) a few minutes each month during
the off-season to circulate its oil. & Checking air conditioning
system before summer sea-son
Check the air conditioner unit for refriger-
ant leaks, hose conditions, and proper
operation each spring. Have the air con-
ditioning system checked by your
SUBARU dealer. & Cooling and dehumidifying in
high humidity and low tem-
perature weather condition
Under certain weather conditions (high
relative humidity, low temperatures, etc.) a
small amount of water vapor emission
from the air outlets may be noticed. This
condition is normal and does not indicate
any problem with the air conditioning system.
& Air conditioner compressor
shut-off when engine is
heavily loaded
To improve acceleration and gas mileage,
the air conditioner compressor is designed
to temporarily shut off during air condi-
tioner operation whenever the accelerator
is fully depressed such as during rapid
acceleration or when driving on a steepupgrade. & Refrigerant for your climate
control system
Your air conditioner uses ozone friendly
refrigerant HFC134a. Therefore, the meth-
od of adding, changing or checking the
refrigerant is different from the method for
CFC12 (freon). Consult your SUBARU
dealer for service. Repairs needed as a
result of using the wrong refrigerant are
not covered under warranty. Air filtration system
Your vehicle
’s air conditioning system is
equipped with an air filtration system.
Replace the air filter element according
to the replacement schedule shown in the
following table. This schedule should be
followed to maintain the filter ’sdust
collection ability. Under extremely dusty
conditions, the filter should be replaced
more frequently. Have your filter checked
or replaced by your SUBARU dealer. For
replacement, use only a genuine
SUBARU air filter kit.
Replacement schedule: Every 15 months or 15,000 miles (24,000
km) whichever comes first
CAUTION
Contact your SUBARU dealer if the
following occurs, even if it is not yet
time to change the filter. . Reduction of the airflow through
the vents.
. Windshield gets easily fogged or
misted. Climate control
4-9
– CONTINUED –
Page 186 of 474

Antenna system &Printed antenna
CAUTION
Do not use sharp instruments or
window cleaner containing abra-
sives to clean the inner surface of
the window on which the antenna is
printed. Doing so may damage the
antenna printed on the window.
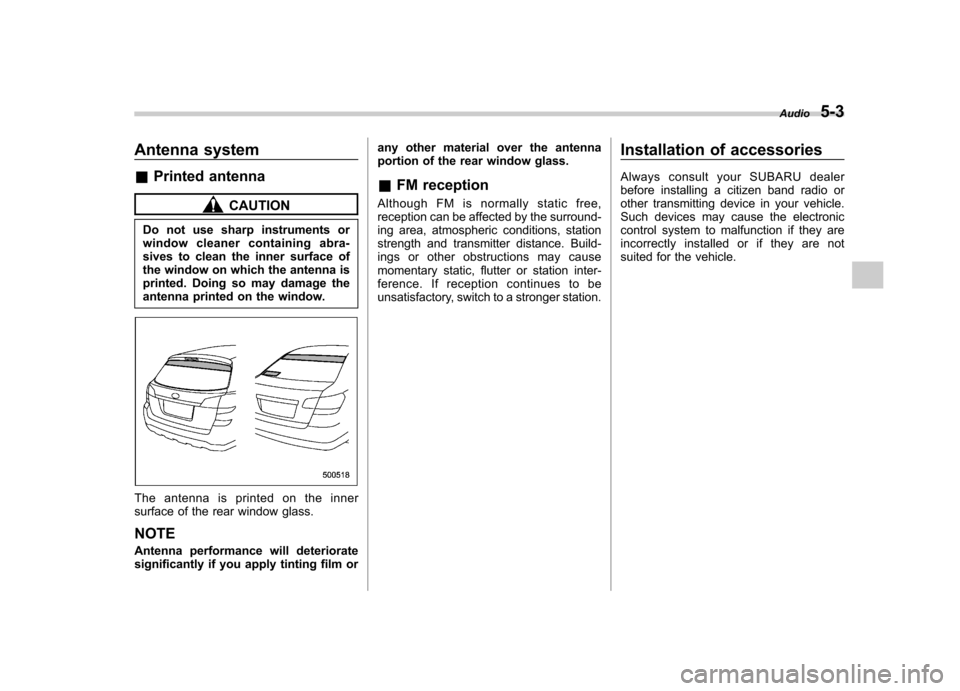
The antenna is printed on the inner
surface of the rear window glass. NOTE
Antenna performance will deteriorate
significantly if you apply tinting film or any other material over the antenna
portion of the rear window glass.
& FM reception
Although FM is normally static free,
reception can be affected by the surround-
ing area, atmospheric conditions, station
strength and transmitter distance. Build-
ings or other obstructions may cause
momentary static, flutter or station inter-
ference. If reception continues to be
unsatisfactory, switch to a stronger station. Installation of accessories
Always consult your SUBARU dealer
before installing a citizen band radio or
other transmitting device in your vehicle.
Such devices may cause the electronic
control system to malfunction if they are
incorrectly installed or if they are not
suited for the vehicle.
Audio
5-3
Page 207 of 474

5-24Audio
MP3: .Based on MPEG 1, 2 and 2.5 Layer 3
(type A and B audio). Based on MPEG 1, 2 and 2.5 Layer 2
and 3 (type C audio). Sampling rate (kHz): 48, 44.1, 32, 24,
22.05, 16, 12, 11.025, 8. Bit rate (kbps): 8 to 320 (type A and B
audio). Bit rate (kbps): 32 to 320 (type C audio)
. Supports variable bit rates
WMA (type B audio):. Based on Windows Media Audio 9
. Sampling rate (kHz): 48, 44.1, 32
. Bit rate (kbps): 32 to 192
WMA (type C audio): . Based on Windows Media Audio 7, 8
and 9 . Sampling rate (kHz): 48, 44.1, 32
. Bit rate (kbps): 32 to 192
AAC (type B audio):. Based on MPEG4 AAC
. Sampling rate (kHz): 48, 44.1, 32, 24,
22.05, 16, 12, 11.025, 8. Bit rate (kbps): 24 to 320
. Number of channels: 1 to 2ch AAC (type C audio):.
Based on MPEG2 AAC and MPEG4
AAC. Sampling rate (kHz): 48, 44.1, 32, 24,
22.05, 16, 12, 11.025, 8. Bit rate (kbps): 24 to 320
. Number of channels: 1 to 2ch
& How to insert a CD
While the ignition switch is in the “Acc ”or
“ ON ”position, hold a disc with a finger in
the center hole while gripping the edge of
the disc, then insert it in to the slot (with
the label side up) and the player will
automatically pull the disc into position.
NOTE
DO NOT INSERT TWO DISCS INTO THE
DISC INSERTION SLOT AT A TIME. & How to play back a CD
! When there is no CD inserted
Insert a CD by referring to “How to insert a
CD ”F 5-24.
When a CD is loaded, the player will start
playback of the CD, beginning with the
first track. !
When CD is in the player (type A)
When the
button is pressed, the
player will start playback. ! When CD is in the player (type B
and C)
Type B audio
Type C audio
Each brief press of the “CD/AUX ”button
changes the modes in the following sequence.
*: For type B audio, “BT-A ”is displayed.
When the CD mode is selected, the player
will start playback. & To select a track from the beginning
NOTE
With an MP3, WMA or AAC: . Skipping past the last track/file will
take you back to the first track/file in
the folder.
Page 232 of 474

Hands-free system (if equipped) NOTE .For models with the genuine
SUBARU navigation system, refer to
the Owner ’s Manual supplement for the
navigation system.. When selling your vehicle, make
sure that you initialize the Hands-free
system to prevent personal data from
being improperly accessed.
The Hands-free system operates while the
ignition switch is in the “Acc ”or “ON ”
position.
& Tips for the Hands-free sys- tem
! Bluetooth
®
It is possible to connect a cell phone to the
in-vehicle equipment through the Blue-
tooth
®format (wireless) to make a phone
call from the in-vehicle equipment or take
an incoming phone call.
Since the Bluetooth
®format is wireless, a
connection between the in-vehicle equip-
ment and the cell phone can be made
without placing them in close vicinity of
each other. The cell phone can be used
with it left in the breast pocket or bag. NOTE .
The Hands-free system may not
operate properly under the following conditions.
–The cell phone is turned off.
– The cell phone is not in the
phone call area. – The battery of the cell phone has
run down.– The cell phone is not connected
to the Hands-free system.– The cell phone is behind the seat
or in the glove box.– A metal material covers or
touches the cell phone.
. Depending on the type of cell phone
that is used, the screen on the cell
phone may remain illuminated while
the ignition switch is in the “ON ”
position. If this occurs, turn the illumi-
nation off by adjusting the cell phonesettings. . Depending on the setting of the cell
phone, the dial lock function may be
activated after making a call. Deacti-
vate the automatic dial lock function of
the cell phone before using the Hands-
free system. . Depending on the type of cell phone
that is used, operation and the sound
volume may be different from those of
cell phones currently used. .
When the ignition switch is turned to
the “LOCK ”position during a call, the
call may be disconnected or continued
on the cell phone depending on the
type of cell phone that is used. Note
that operation of the cell phone may be
necessary if the call is continued on the
cell phone. . Do not speak at the same time as the
other party during a call. If you and the
party speak at the same time, it may be
difficult for the other party to hear your
voice and vice versa. This is normal. . The receiver sound volume should
be set as low as possible. Otherwise,
the party you are calling may notice an
undesirable echo sound. . Speak clearly and loudly.
. Your voice may be difficult to be
heard by the party under the following conditions.
–Driving on a rough road.
– Driving at a high speed.
– Driving with a window open.
– When air from the ventilator
blows directly towards the micro-phone. – When the sound coming from the
ventilator is loud.– When the cell phone is too close
to the microphone. Audio
5-49
– CONTINUED –
Page 257 of 474

6-4Interior equipment
.The ignition switch is turned from the
“ LOCK ”position to the “Acc ”or “ON ”
position. . The rear gate is locked using the
remote keyless entry transmitter.
The setting of the period for which the
lights remain on (OFF delay timer) can be
changed by a SUBARU dealer. Contact
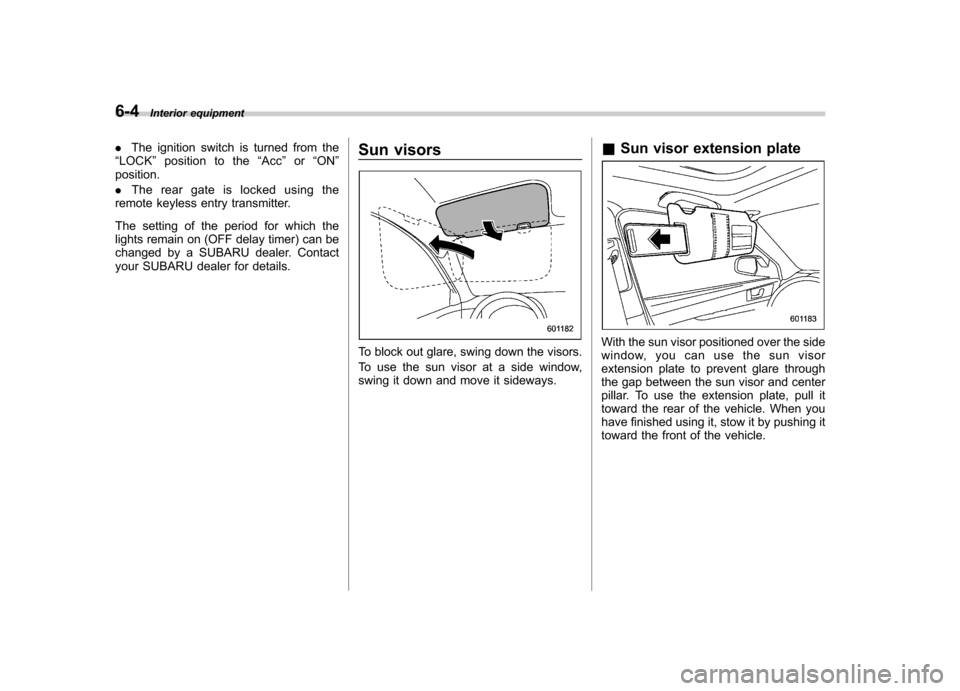
your SUBARU dealer for details. Sun visors
To block out glare, swing down the visors.
To use the sun visor at a side window,
swing it down and move it sideways.&
Sun visor extension plateWith the sun visor positioned over the side
window, you can use the sun visor
extension plate to prevent glare through
the gap between the sun visor and center
pillar. To use the extension plate, pull it
toward the rear of the vehicle. When you
have finished using it, stow it by pushing it
toward the front of the vehicle.
Page 281 of 474

7-4Starting and operating
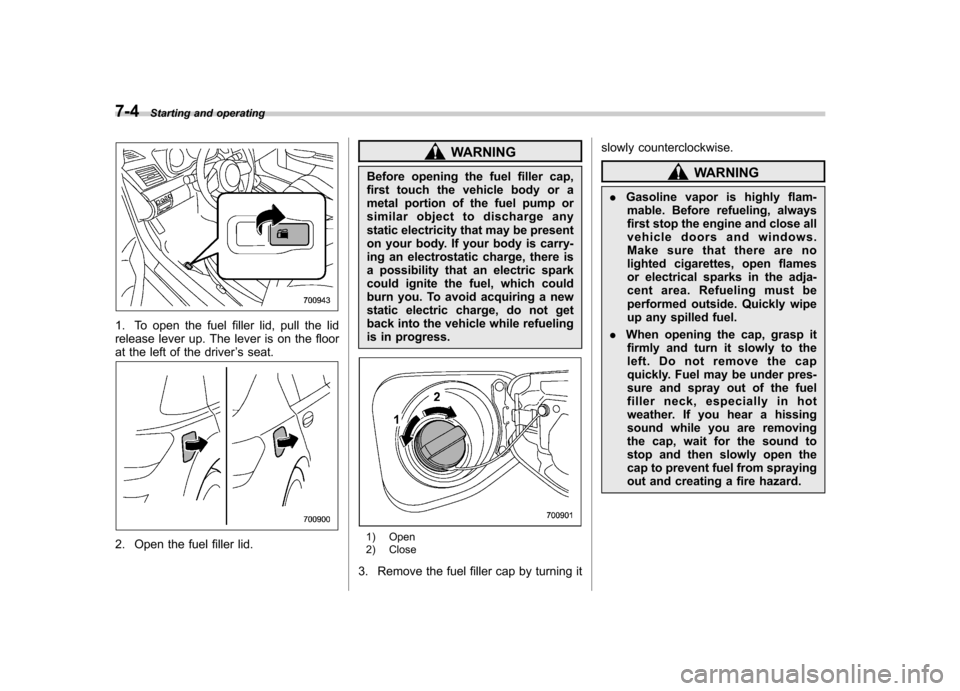
1. To open the fuel filler lid, pull the lid
release lever up. The lever is on the floor
at the left of the driver ’s seat.
2. Open the fuel filler lid.
WARNING
Before opening the fuel filler cap,
first touch the vehicle body or a
metal portion of the fuel pump or
similar object to discharge any
static electricity that may be present
on your body. If your body is carry-
ing an electrostatic charge, there is
a possibility that an electric spark
could ignite the fuel, which could
burn you. To avoid acquiring a new
static electric charge, do not get
back into the vehicle while refueling
is in progress.
1) Open
2) Close
3. Remove the fuel filler cap by turning it slowly counterclockwise.
WARNING
. Gasoline vapor is highly flam-
mable. Before refueling, always
first stop the engine and close all
vehicle doors and windows.
Make sure that there are no
lighted cigarettes, open flames
or electrical sparks in the adja-
cent area. Refueling must be
performed outside. Quickly wipe
up any spilled fuel.
. When opening the cap, grasp it
firmly and turn it slowly to the
left. Do not remove the cap
quickly. Fuel may be under pres-
sure and spray out of the fuel
filler neck, especially in hot
weather. If you hear a hissing
sound while you are removing
the cap, wait for the sound to
stop and then slowly open the
cap to prevent fuel from spraying
out and creating a fire hazard.