2012 SUBARU OUTBACK climate control
[x] Cancel search: climate controlPage 263 of 474

6-10Interior equipment
trim can be used to hold beverage bottles
and other items. Accessory power outlets
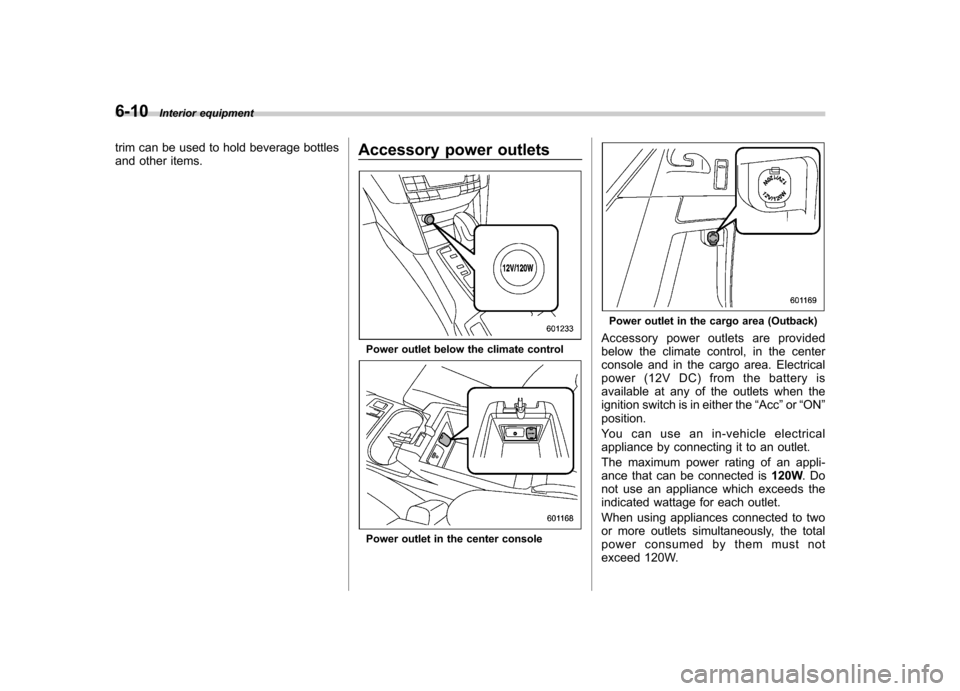
Power outlet below the climate control
Power outlet in the center console
Power outlet in the cargo area (Outback)
Accessory power outlets are provided
below the climate control, in the center
console and in the cargo area. Electrical
power (12V DC) from the battery is
available at any of the outlets when the
ignition switch is in either the “Acc ”or “ON ”
position.
You can use an in-vehicle electrical
appliance by connecting it to an outlet.
The maximum power rating of an appli-
ance that can be connected is 120W.Do
not use an appliance which exceeds the
indicated wattage for each outlet.
When using appliances connected to two
or more outlets simultaneously, the total
power consumed by them must not
exceed 120W.
Page 290 of 474

&Entering the vehicle follow-
ing remote engine start shut- down
An alarm trigger may occur if the vehicle is
opened by the remote keyless entry
transmitter within a few seconds immedi-
ately following remote engine start shut-down. & Pre-heating or pre-cooling
the interior of the vehicle
Models with automatic climate control system:
After the system starts the engine, the
automatic climate control system will
activate the “FULL AUTO ”mode and heat
or cool the interior to the predetermined
median (room) temperature. No pre-
setting of controls is necessary.
Models without automatic climate con-
trol system:
Before exiting the vehicle, set the tem-
perature controls to the desired setting
and operation. After the system starts the
engine, the heater or air conditioning will
activate and heat or cool the interior to
your setting. &
Service mode
In service mode, the remote engine start
function is temporarily disabled to prevent
the system from unexpectedly starting the
engine while being serviced.
To engage or disengage service mode:
1. Enter the vehicle and close all vehicle
doors and the trunk/rear gate.
2. Verify that the select lever is in the “P ”
position (AT and CVT models)
3. Depress and hold the brake pedal
4. Turn the ignition switch to the “ON ”
position
5. Press and release the remote engine
start transmitter “
”button three times.
The system will honk the vehicle ’s horn
each time the button is pressed.
6. The system will pause for 1 second
then honk the vehicle ’s horn three times to
indicate that the service mode has been
engaged or honk one time to indicate that
the service mode has been disengaged.
NOTE
When taking your vehicle in for service,
it is recommended that you inform the
service personnel that your vehicle is
equipped with a remote engine startsystem. &
Remote transmitter program
New transmitters can be programmed to
the remote engine start system in the
event that a transmitter is lost, stolen,
damaged or additional transmitters are
desired (the system will accept up to eight
transmitters). New remote engine start
transmitters can be programmed accord-
ing to the following procedure.
1. Open the driver ’s door (the driver ’s
door must remain opened throughout the
entire process).
2. Depress and hold the brake pedal.
3. Turn the ignition switch to “ON ”then
“ LOCK ”, back to “ON ”then “LOCK ”, then
back to “ON ”again and leave the ignition
“ ON ”throughout the programming pro-
cess.
4. The system will flash the side marker
lights, tail lights and front position lights
and honk the horn three times, indicating
that the system has entered the transmit-
ter learn mode.
5. Press and release the “
”button on
the transmitter that you want to program.
6. The system will flash the side marker
lights, tail lights and front position lights
and honk the horn one time, indicating that
the system has learned the transmitter.
Upon successful programming, the re-
mote start confirmation transmitter button Starting and operating
7-13
– CONTINUED –
Page 325 of 474

8-10Driving tips
If your SUBARU is not going to be used
for an extended period, it is best to have
the fuel tank filled to capacity. &Driving on snowy and icy roads
WARNING
Do not use the cruise control on
slippery roads such as snowy or icy
roads. This may cause loss of
vehicle control.
CAUTION
Avoid prolonged continuous driving
in snowstorms. Snow will enter the
engine ’s intake system and may
hinder the airflow, which could re-
sult in engine shutdown or evenbreakdown.
To prevent skidding and slipping, avoid
sudden braking, abrupt acceleration, high-
speed driving, and sharp turning when
driving on snowy or icy roads.
Always maintain ample distance between
your vehicle and the vehicle ahead of you
to avoid the need for sudden braking.
To supplement the foot brake, use the
engine brake effectively to control the vehicle speed. (Shift into a lower gear
when necessary.)
Avoid shifting down abruptly. Such beha-
vior can cause the wheels to lock, possibly
leading to loss of vehicle control.
An anti-lock brake system (ABS) en-
hances your vehicle
’s braking perfor-
mance on snowy and icy roads. For
information about braking on slippery
surfaces, refer to “ABS (Anti-lock Brake
System) ”F 7-24 and “Vehicle Dynamics
Control system ”F 7-26.
! Wiper operation when snowing
Before driving in cold weather, make sure
the wiper blades are not frozen to the
windshield or rear window.
If the wiper blades are frozen to the
windshield or rear window, perform the
following procedure. . To thaw the windshield wiper blades,
use the defroster with the airflow selection in “
”and the temperature set for
maximum warmth until the wiper blades
are completely thawed. Refer to “Climate
control ”F 4-1.
. If your vehicle is equipped with a wiper
deicer, use it. It is helpful to thaw the
windshield wiper blades. Refer to “Defog-
ger and deicer ”F 3-34.
. To thaw the rear wiper blade, use the rear window defogger. Refer to
“Defogger
and deicer ”F 3-34.
When driving in snow, if frozen snow starts
to stick on the surface of the windshield
despite wiper operation, use the defroster
with the airflow selection in “
”and the
temperature set for maximum warmth.
After the windshield gets warmed enough
to melt the frozen snow on it, wash it away
using the windshield washer. Refer to“ Windshield washer ”F 3-32.
Snow stuck on the wiper arm prevents the
wiper from working effectively. If snow is
stuck on the wiper arm, pull off the road to
a safe place, then remove it. If you stop
the vehicle at road side, use the hazard
warning flasher to alert other drivers.
Refer to “Hazard warning flasher ”F 3-5.
We recommend use of non-freezing type
wiper blades (winter blades) during the
seasons you could have snow and freez-
ing temperatures. Blades of this type give
superior wiping performance in snowy
conditions. Be sure to use blades that
are suitable for your vehicle.
CAUTION
During high-speed driving, non-
freezing type wiper blades may not
perform as well as standard wiper
Page 366 of 474

Exterior care....................................................... 10-2
Washing ............................................................. 10-2
Waxing and polishing ......................................... 10-3
Cleaning aluminum wheels ................................. 10-3
Corrosion protection .......................................... 10-4
Most common causes of corrosion ..................... 10-4
To help prevent corrosion ................................... 10-4 Cleaning the interior
.......................................... 10-5
Seat fabric ......................................................... 10-5
Leather seat materials ........................................ 10-5
Synthetic leather upholstery ............................... 10-5
Climate control panel, audio panel, instrument panel, console panel, switches, combination
meter, and other plastic surface ....................... 10-5
Monitor (if equipped) .......................................... 10-6Appearance care
10
Page 370 of 474

Cleaning the interior
Use a soft, damp cloth to clean the climate
control panel, audio equipment, instru-
ment panel, center console, combination
meter panel, and switches. (Do not use
organic solvents.) &Seat fabric
Remove loose dirt, dust or debris with a
vacuum cleaner. If the dirt is caked on the
fabric or hard to remove with a vacuum
cleaner, use a soft brush then vacuum it.
Wipe the fabric surface with a tightly
wrung cloth and dry the seat fabric
thoroughly. If the fabric is still dirty, wipe
using a solution of mild soap and luke-
warm water then dry thoroughly.
If the stain does not come out, try a
commercially available fabric cleaner. Use
the cleaner on a hidden place and make
sure it does not affect the fabric adversely.
Use the cleaner according to its instruc-tions. NOTE
When cleaning the seat, do not use
benzine, paint thinner, or any similarmaterials. &
Leather seat materials
The leather used by SUBARU is a high
quality natural product which will retain its
distinctive appearance and feel for many
years with proper care.
Allowing dust or road dirt to build up on the
surface can cause the material to become
brittle and to wear prematurely. Regular
cleaning with a soft, moist, natural fiber
cloth should be performed monthly, taking
care not to soak the leather or allow water
to penetrate the stitched seams.
A mild detergent suitable for cleaning
woolen fabrics may be used to remove
difficult dirt spots, rubbing with a soft, dry
cloth afterwards to restore the luster. If
your SUBARU is to be parked for a long
time in bright sunlight, it is recommended
that the seats and headrests be covered,
or the windows shaded, to prevent fading
or shrinkage.
Minor surface blemishes or bald patches
may be treated with a commercial leather
spray lacquer. You will discover that each
leather seat section will develop soft folds
or wrinkles, which is characteristic of
genuine leather. & Synthetic leather upholstery
The synthetic leather material used on the
SUBARU may be cleaned using mild soap or detergent and water, after first vacuum-
ing or brushing away loose dirt. Allow the
soap to soak in for a few minutes and wipe
off with a clean, damp cloth. Commercial
foam-type cleaners suitable for synthetic
leather materials may be used when
necessary. NOTE
Strong cleaning agents such as sol-
vents, paint thinners, window cleaner
or gasoline must never be used on
leather or synthetic interior materials. &
Climate control panel, audio
panel, instrument panel,
console panel, switches,
combination meter, and other
plastic surface
Use a soft, damp cloth to clean the climate
control panel, audio equipment, instru-
ment panel, center console, combination
meter panel, and switches. NOTE
Do not use organic solvents such as
paint thinners or gasoline, or strong
cleaning agents that contain thosesolvents. Appearance care
10-5
– CONTINUED –
Page 459 of 474

13-14Consumer information and Reporting safety defects
4.The resulting figure equals the
available amount of cargo and
luggage load capacity. For exam-
ple, if the “XXX ”amount equals
1,400 lbs (635 kg) and there will be
five- 150 lbs (68 kg) passengers in
your vehicle, the amount of avail-
able cargo and luggage load capa-
city is 650 lbs (1,400 �750 (5 6
150) = 650 lbs).
5. Determine the combined weight
of luggage and cargo being loaded
on the vehicle. That weight may not
safely exceed the available cargo
and luggage load capacity calcu-
lated in Step 4. 6. If your vehicle will be towing a
trailer, load from your trailer will be
transferred to your vehicle. Consult
this manual to determine how this
reduces the available cargo and
luggage load capacity of your ve- hicle. Uniform tire quality grading standards
This information indicates the rela-
tive performance of passenger car
tires in the area of treadwear,
traction, and temperature resis-
tance. This is to aid the consumer
in making an informed choice in the
purchase of tires.
Quality grades can be found where
applicable on the tire sidewall be-
tween tread shoulder and maxi-
mum section width. For example:
Treadwear 200 Traction AA Tem-
perature A
The quality grades apply to new
pneumatic tires for use on passen-
ger cars. However, they do not
apply to deep tread, winter type
snow tires, space-saver or tempor-
ary use spare tires, tires with
nominal rim diameters of 12 inches
or less, or to some limited produc-
tion tires.
All passenger car tires must con-form to Federal Safety Require-
ments in addition to these grades. &
Treadwear
The treadwear grade is a compara-
tive rating based on the wear rate of
the tire when tested under con-
trolled conditions on a specified
government test course.
For example, a tire graded 150
would wear one and one-half (1-
1/2) times as well on the govern-
ment course as a tire graded 100.
The relative performance of tires
depends upon the actual conditions
of their use, however, and may
depart significantly from the norm
due to variations in driving habits,
service practices and differences in
road characteristics and climate. & Traction AA, A, B, C
The traction grades, from highest to
lowest, are AA, A, B and C. Those
grades represent the tire ’s ability to
stop on wet pavement as measured
under controlled conditions on spe-
Page 463 of 474

14-2Index
A
ABS (Anti-lock Brake System) ..................................... 7-24
Warning light ......................................................... 3-16
Accessories ....................................................... 5-3, 11-45
Accessory power outlet ............................................... 6-10
Air cleaner element ................................................... 11-18
Air conditioner Manual climate control system ................................... 4-6
Air filtration system ....................................................... 4-9
Airflow selection Automatic climate control system ............................... 4-5
Manual climate control system ................................... 4-6
Alarm system ............................................................ 2-15
All-Wheel Drive warning light ....................................... 3-20
Aluminum wheel ....................................................... 11-37
Cleaning ............................................................... 10-3
Antenna system ........................................................... 5-3
Anti-lock Brake System (ABS) ..................................... 7-24
Arming the system ..................................................... 2-16
Armrest ..................................................................... 1-12
Ashtray ..................................................................... 6-12
AT OIL TEMP warning light ......................................... 3-14
Audio Antenna system ....................................................... 5-3
Auxiliary input jack ................................................. 5-30
Bluetooth
®audio .................................................... 5-43
CD player operation ............................................... 5-23
Control button ........................................................ 5-41
FM/AM radio operation ........................................... 5-12
iPod
®operations .................................................... 5-33
Satellite radio operations ......................................... 5-19 Set ........................................................................ 5-4
USB storage device operations
................................ 5-33
Auto on/off headlights ................................................. 3-27
Sensor .................................................................. 3-27
Auto-dimming mirror/compass ..................... 3-36, 3-43, 3-45
Automatic climate control system ................................... 4-5
Automatic rain sensing windshield wipers ...................... 3-32
Automatic transmission ............................................... 7-17
Fluid ........................................................... 11-21, 12-8
Manual mode ......................................................... 7-21
Oil temperature warning light (AT OIL TEMP) ............. 3-14
Select lever ........................................................... 7-18
Shift lock function ................................................... 7-20
Automatic/Emergency Locking Retractor (A/ELR) ........... 1-13
Auxiliary input jack ...................................................... 5-30
B Battery .................................................................... 11-43
Drainage prevention function ..................................... 2-6
Jump starting ......................................................... 9-10
Replacement (remote engine start transmitter) ........... 7-14
Replacement (remote keyless entry system) .............. 2-10
Bluetooth
®audio ........................................................ 5-43
Booster seat .............................................................. 1-29
Bottle holder ............................................................... 6-9
Brake Assist .................................................................... 7-24
Booster ....................................................... 7-23, 11-27
Fluid ........................................................... 11-25, 12-8
Pad and lining ...................................................... 11-30
Parking ................................................................. 7-31
Page 464 of 474

Pedal.................................................................. 11-28
System ................................................................. 7-23
Brake pedal
Free play ............................................................. 11-28
Reserve distance .................................................. 11-28
Brake system ............................................................ 7-23
Warning light ......................................................... 3-17
Braking ..................................................................... 7-23
Tips...................................................................... 7-23
Breaking-in of new brake pads and linings ................... 11-30
Bulb Chart .................................................................. 12-14
Replacing ............................................................. 11-45
C
Cargo area Cover ................................................................... 6-15
Light ....................................................................... 6-3
Tie-down hooks ..................................................... 6-17
Catalytic converter ....................................................... 8-3
Center Console .................................................................. 6-6
Changing
Coolant ................................................................ 11-17
Flat tire ................................................................... 9-6
Oil and oil filter ..................................................... 11-14
Charge warning light .................................................. 3-14
CHECK ENGINE warning light/Malfunction indicator light ....................................................................... 3-12
Checking
Brake pedal free play ............................................ 11-28 Brake pedal reserve distance
................................. 11-28
Clutch function ..................................................... 11-29
Clutch pedal free play ........................................... 11-29
Coolant level ........................................................ 11-17
Fluid level (automatic transmission fluid) .................. 11-21
Fluid level (brake fluid) .......................................... 11-25
Fluid level (clutch fluid) .......................................... 11-26
Fluid level (power steering fluid) .. ........................... 11-24
Fluid level (washer fluid) ........................................ 11-37
Oil level (engine oil) .............................................. 11-12
Oil level (front differential gear oil) .......................... 11-23
Child restraint systems ................................................ 1-23
Installation of a booster seat .................................... 1-29
Installation with A/ELR seatbelt ... ............................. 1-26
Lower and tether anchorages ................................... 1-30
Top tether anchorages ............................................ 1-33
Child safety ................................................................... 5
Locks .................................................................... 2-19
Chime Key........................................................................ 3-4Light ..................................................................... 3-27
Seatbelt. ................................................................. 3-9
Cleaning Aluminum wheels ................................................... 10-3
Interior .................................................................. 10-5
Ventilation grille ....................................................... 4-8
Climate control system Automatic ............................................................... 4-5
Manual ................................................................... 4-6
Clock ........................................................................ 3-23 Index
14-3