Page 348 of 474
&Outback
1) Under-floor storage compartment (Refer
to“Under-floor storage compartment ”
F 6-18.)
2) Electronic parking brake release tool
3) Jack handle
4) Spare tire 5) Tool bucket1) Wheel nut wrench
2) Screwdriver
3) Jack
4) Towing hook (eye bolt) (if equipped)
The jack handle is stored under the cargo area. The electronic parking brake release
tool is stored under the floor of the cargo
area. The other tools are stored in the tool
bucket that is located in the recess of the
spare tire wheel.
For the method to use the jack, refer to “
Flat tires ”F 9-6.
For the method to use the electronic
parking brake release tool, refer to “Elec-
tronic parking brake –if the electronic
parking brake cannot be released ”F 9-17.
In case of emergency
9-5
Page 350 of 474
Outback
6. Take out the tool bucket and turn the
attaching bolt counterclockwise, then take
the spare tire out. NOTE
If the spare tire provided in your vehicle
is a temporary spare tire, carefully read“ Temporary spare tire ”F9-2 and
strictly follow the instructions.7. Loosen the wheel nuts using the wheel
nut wrench but do not remove the nuts.
8. Place the jack under the side sill at the
front or rear jack-up point closest to the flattire.
Turn the jackscrew by hand until the jack
head engages firmly into the jack-up point.
9. Insert the jack handle into the jack-
screw, and turn the handle until the tire
clears the ground. Do not raise the vehicle
higher than necessary. In case of emergency
9-7
– CONTINUED –
Page 357 of 474

9-14In case of emergency
&Towing and tie-down hooks/ holes
The towing hooks should be used only in
an emergency (e.g., to free a stuck vehicle
from mud, sand or snow).
CAUTION
. Use only the specified towing
hooks and tie-down hooks/holes.
Never use suspension parts or
other parts of the body for towing
or tie-down purposes.
. Never use the tie-down hole clo-
sest to the muffler under the
vehicle for towing purposes.
. To prevent deformation to the
bumper and the towing hook, do
not apply excessive lateral load
to the towing hooks.
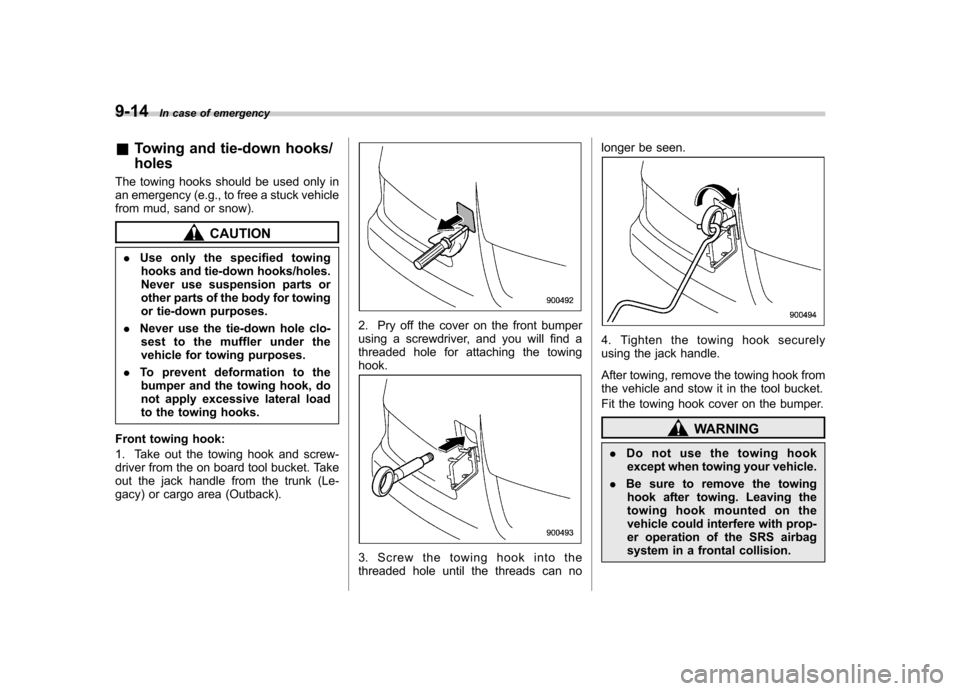
Front towing hook:
1. Take out the towing hook and screw-
driver from the on board tool bucket. Take
out the jack handle from the trunk (Le-
gacy) or cargo area (Outback).
2. Pry off the cover on the front bumper
using a screwdriver, and you will find a
threaded hole for attaching the towinghook.
3. Screw the towing hook into the
threaded hole until the threads can no longer be seen.
4. Tighten the towing hook securely
using the jack handle.
After towing, remove the towing hook from
the vehicle and stow it in the tool bucket.
Fit the towing hook cover on the bumper.
WARNING
. Do not use the towing hook
except when towing your vehicle.
. Be sure to remove the towing
hook after towing. Leaving the
towing hook mounted on the
vehicle could interfere with prop-
er operation of the SRS airbag
system in a frontal collision.
Page 358 of 474
Rear towing hook:
1. Take the towing hook out of the tool
bucket and take the screwdriver out of the
tool bucket. Take the jack handle out of
the trunk (Legacy) or cargo area (Out-back).
2. Pry off the cover on the rear bumper
using a screwdriver, and you will find a
threaded hole for attaching the towinghook.
3. Screw the towing hook into the
threaded hole until its thread can no
longer be seen.
4. Tighten the towing hook securely
using the jack handle.After towing, remove the towing hook from
the vehicle and stow it in the tool bucket.
Fit the towing hook cover on the bumper.
WARNING
Do not use the towing hook except
when towing your vehicle.
Front tie-down hooks:
The front tie-down hooks are located
between each of the front tires and the
front bumper. In case of emergency
9-15
– CONTINUED –
Page 363 of 474

9-20In case of emergency
Rear gate (Outback) –if the
rear gate cannot be unlocked
In the event that you cannot unlock the
rear gate by operating the power door
locking switches or the remote keyless
entry system, you can unlock it from inside
the cargo area.
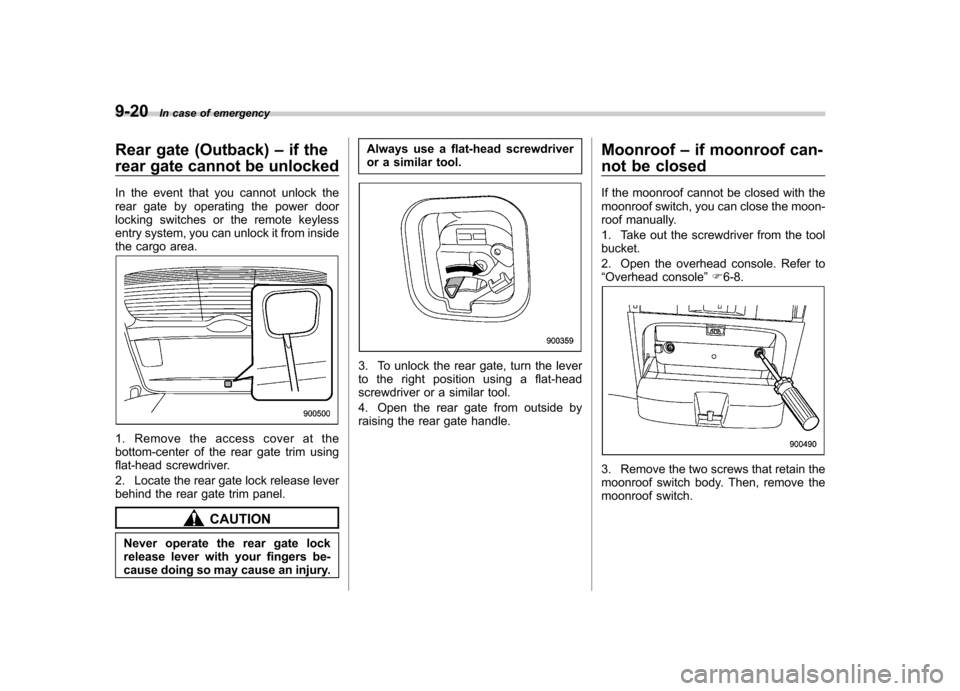
1. Remove the access cover at the
bottom-center of the rear gate trim using
flat-head screwdriver.
2. Locate the rear gate lock release lever
behind the rear gate trim panel.
CAUTION
Never operate the rear gate lock
release lever with your fingers be-
cause doing so may cause an injury. Always use a flat-head screwdriver
or a similar tool.
3. To unlock the rear gate, turn the lever
to the right position using a flat-head
screwdriver or a similar tool.
4. Open the rear gate from outside by
raising the rear gate handle.
Moonroof
–if moonroof can-
not be closed
If the moonroof cannot be closed with the
moonroof switch, you can close the moon-
roof manually.
1. Take out the screwdriver from the tool bucket.
2. Open the overhead console. Refer to “ Overhead console ”F 6-8.
3. Remove the two screws that retain the
moonroof switch body. Then, remove the
moonroof switch.
Page 376 of 474
&When checking or servicing
in the engine compartment
while the engine is running
WARNING
A running engine can be dangerous.
Keep your fingers, hands, clothing,
hair and tools away from the cooling
fan, belts and any other moving
engine parts. Removing rings,
watches and ties is advisable. Maintenance tips
Some clips and fender linings must be
removed before replacing the air cleaner
elements or specific bulbs. &
Removing and reinstalling clips
! Removing clips
There are several types of clips used for
your vehicle. ! Type A clips
1. Turn the clips counterclockwise using
a flat-head screwdriver until the center
portion of the clip is raised.
2. Remove the clips with a flat-head
screwdriver using leverage. !
Type B clips
1. Pull out the center portion of the clip
using a flat-head screwdriver as shown in
the illustration.
2. Pull the protruded center portion to
remove the entire body of the clip. Maintenance and service
11-5
– CONTINUED –
Page 377 of 474
11-6Maintenance and service
! Type C clips
1. Turn the clip counterclockwise using a
Phillips screwdriver until the center portion
of the clip is raised.
2. Remove the entire clip by pulling it up. !
Reinstalling clipsType A clips
Type B clips
Type C clips
Insert the clip without the center portion
first and then push the center portion of
the clip into the hole.
Page 378 of 474
&Removing air intake duct
Use a screwdriver to undo the clips on the
air intake duct, then remove the air intake
duct. Refer to “Type A clips ”F 11-5.
& Pulling off the fender lining
It is necessary to pull off the fender lining
when replacing some bulbs.
1. Start the engine and turn the steering
wheel fully in the opposite direction of the
bulb to be replaced.
2. Stop the engine.
3. Remove the clip from the fender lining.
Refer to “Type B clips ”F 11-5.
4. Pull off the fender lining. Engine hood
To open the hood:
1. If the wiper blades are lifted off the
windshield, return them to their originalpositions.
2. Pull the hood release knob under the
instrument panel.
Maintenance and service
11-7
– CONTINUED –