2012 SUBARU OUTBACK oil change
[x] Cancel search: oil changePage 43 of 474
1-20Seat, seatbelt and SRS airbags
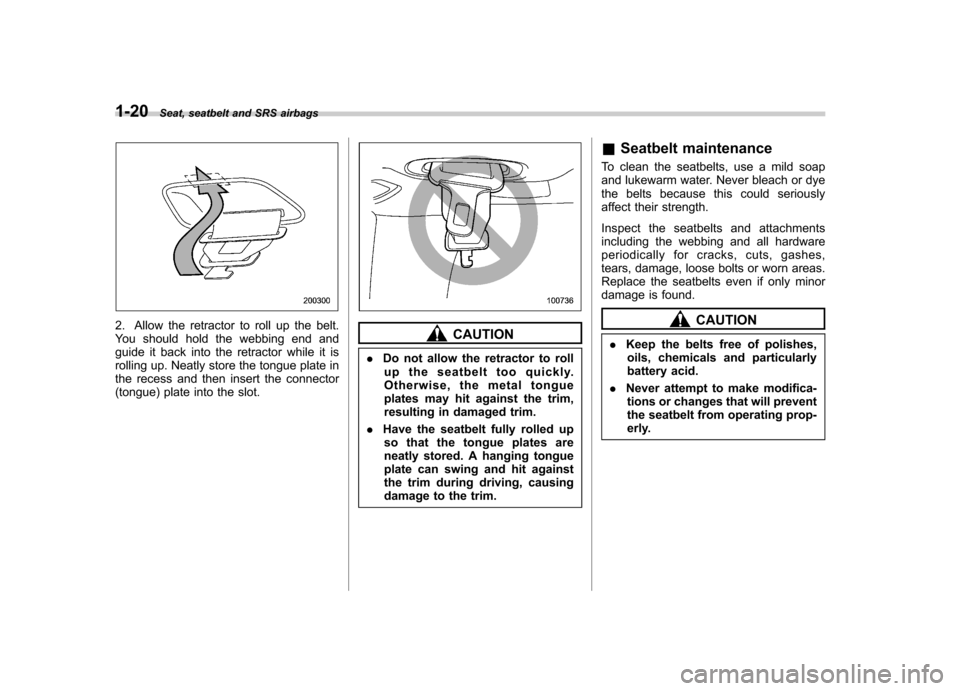
2. Allow the retractor to roll up the belt.
You should hold the webbing end and
guide it back into the retractor while it is
rolling up. Neatly store the tongue plate in
the recess and then insert the connector
(tongue) plate into the slot.CAUTION
. Do not allow the retractor to roll
up the seatbelt too quickly.
Otherwise, the metal tongue
plates may hit against the trim,
resulting in damaged trim.
. Have the seatbelt fully rolled up
so that the tongue plates are
neatly stored. A hanging tongue
plate can swing and hit against
the trim during driving, causing
damage to the trim. &
Seatbelt maintenance
To clean the seatbelts, use a mild soap
and lukewarm water. Never bleach or dye
the belts because this could seriously
affect their strength.
Inspect the seatbelts and attachments
including the webbing and all hardware
periodically for cracks, cuts, gashes,
tears, damage, loose bolts or worn areas.
Replace the seatbelts even if only minor
damage is found.
CAUTION
. Keep the belts free of polishes,
oils, chemicals and particularly
battery acid.
. Never attempt to make modifica-
tions or changes that will prevent
the seatbelt from operating prop-
erly.
Page 180 of 474

heated interior. This results in quicker
cooling by the air conditioner. Keep the
windows closed during the operation of
the air conditioner for maximum cooling
efficiency. &Lubrication oil circulation in
the refrigerant circuit
Operate the air conditioner compressor at
a low engine speed (at idle or low driving
speeds) a few minutes each month during
the off-season to circulate its oil. & Checking air conditioning
system before summer sea-son
Check the air conditioner unit for refriger-
ant leaks, hose conditions, and proper
operation each spring. Have the air con-
ditioning system checked by your
SUBARU dealer. & Cooling and dehumidifying in
high humidity and low tem-
perature weather condition
Under certain weather conditions (high
relative humidity, low temperatures, etc.) a
small amount of water vapor emission
from the air outlets may be noticed. This
condition is normal and does not indicate
any problem with the air conditioning system.
& Air conditioner compressor
shut-off when engine is
heavily loaded
To improve acceleration and gas mileage,
the air conditioner compressor is designed
to temporarily shut off during air condi-
tioner operation whenever the accelerator
is fully depressed such as during rapid
acceleration or when driving on a steepupgrade. & Refrigerant for your climate
control system
Your air conditioner uses ozone friendly
refrigerant HFC134a. Therefore, the meth-
od of adding, changing or checking the
refrigerant is different from the method for
CFC12 (freon). Consult your SUBARU
dealer for service. Repairs needed as a
result of using the wrong refrigerant are
not covered under warranty. Air filtration system
Your vehicle
’s air conditioning system is
equipped with an air filtration system.
Replace the air filter element according
to the replacement schedule shown in the
following table. This schedule should be
followed to maintain the filter ’sdust
collection ability. Under extremely dusty
conditions, the filter should be replaced
more frequently. Have your filter checked
or replaced by your SUBARU dealer. For
replacement, use only a genuine
SUBARU air filter kit.
Replacement schedule: Every 15 months or 15,000 miles (24,000
km) whichever comes first
CAUTION
Contact your SUBARU dealer if the
following occurs, even if it is not yet
time to change the filter. . Reduction of the airflow through
the vents.
. Windshield gets easily fogged or
misted. Climate control
4-9
– CONTINUED –
Page 243 of 474
5-60Audio
!Voice command system
NOTE
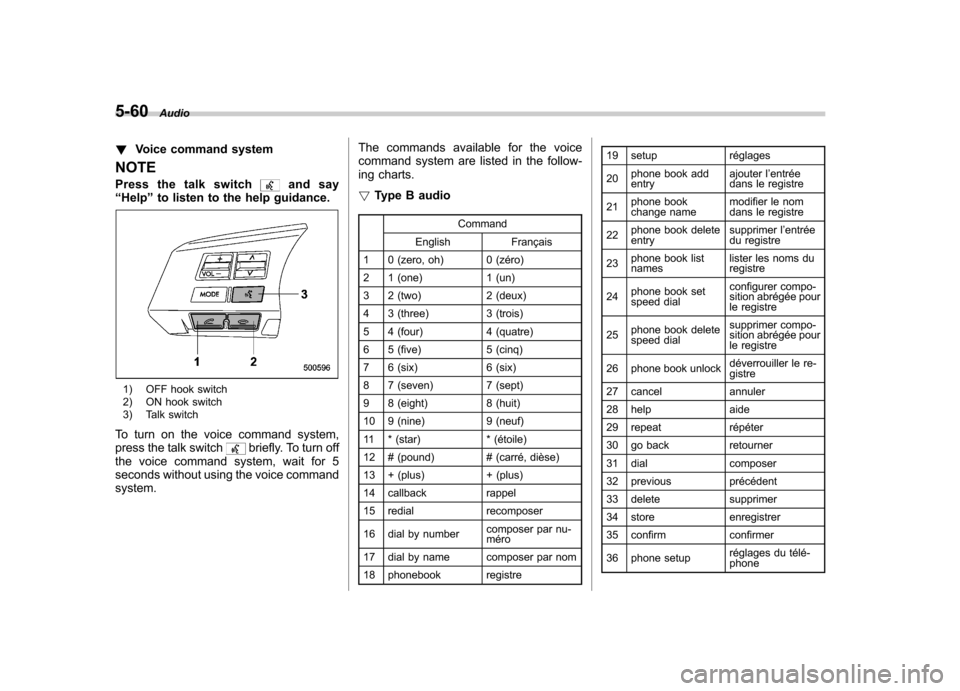
Pressthetalkswitch
and say
“ Help ”to listen to the help guidance.
1) OFF hook switch
2) ON hook switch
3) Talk switch
To turn on the voice command system,
press the talk switch
briefly. To turn off
the voice command system, wait for 5
seconds without using the voice commandsystem. The commands available for the voice
command system are listed in the follow-
ing charts. !
Type B audio
Command
English Français
1 0 (zero, oh) 0 (zéro)
2 1 (one) 1 (un)
3 2 (two) 2 (deux)
4 3 (three) 3 (trois)
5 4 (four) 4 (quatre)
6 5 (five) 5 (cinq)
7 6 (six) 6 (six)
8 7 (seven) 7 (sept)
9 8 (eight) 8 (huit)
10 9 (nine) 9 (neuf)
11 * (star) * (étoile)
12 # (pound) # (carré, dièse)
13 + (plus) + (plus)
14 callback rappel
15 redial recomposer
16 dial by number composer par nu- méro
17 dial by name composer par nom
18 phonebook registre 19 setup réglages 20
phone book add entry ajouter l
’entrée
dans le registre
21 phone book
change name modifier le nom
dans le registre
22 phone book deleteentry supprimer l
’entrée
du registre
23 phone book listnames lister les noms duregistre
24 phone book set
speed dial configurer compo-
sition abrégée pour
le registre
25 phone book delete
speed dial supprimer compo-
sition abrégée pour
le registre
26 phone book unlock déverrouiller le re-gistre
27 cancel annuler
28 help aide
29 repeat répéter
30 go back retourner
31 dial composer
32 previous précédent
33 delete supprimer
34 store enregistrer
35 confirm confirmer
36 phone setup réglages du télé- phone
Page 244 of 474

37 security sécurité
38 pair phonejumeler le télé- phone
39 change name modifier le nom
40 select phone sélectionner le tél- éphone
41 list phones lister les télé-phones
42 set pass key configurer le
passe-partout
43 add entry ajouter l ’entrée
44 delete entry supprimer l ’entrée
45 delete speed dial supprimer compo-
sition abrégée
46 by voice vocalement
47 by phone par téléphone
48 call history historique d ’appels
49 set speed dial configurer compo-
sition abrégée
50 incoming entrant
51 outgoing sortant
52 list names lister les noms
53 set PIN configurer NIP
54 phone book lock verrouiller le regis- tre!
Type C audio
Command
English Français
1 0 (zero, oh) 0 (zéro)
2 1 (one) 1 (un)
3 2 (two) 2 (deux)
4 3 (three) 3 (trois)
5 4 (four) 4 (quatre)
6 5 (five) 5 (cinq)
7 6 (six) 6 (six)
8 7 (seven) 7 (sept)
9 8 (eight) 8 (huit)
10 9 (nine) 9 (neuf)
11 * (star) * (étoile)
12 # (pound) # (dièse)
13 + (plus) + (plus)
14 add entry ajouter entrée 15 Bluetooth Audio setup configuration
Audio Bluetooth
16 BT-A setup configuration
Audio Bluetooth
17 BT-Audio setup configuration
Audio Bluetooth
18 by phone par téléphone
19 by voice par la voix 20 call history
historique des ap- pels
21 call transfer transfert d ’appel
22 callback rappel automatique
23 cancel annuler
24 change name changer nom
25 confirm valider
26 delete supprimer
27 delete audio supprimer audio
28 delete audio player supprimer lecteur audio
29 delete entry supprimer entrée
30 delete phone supprimer télé- phone
31 delete speed dial supprimer compo-
sition rapide
32 dial composer
33 dial by name composer par nom
34 dial by number composer par nu- méro
35 from audio depuis audio
36 from car depuis voiture
37 go back retour
38 hands free power alimentation mains libres
39 help aide
40 incoming appel d ’arrivée
Audio
5-61
– CONTINUED –
Page 291 of 474
7-14Starting and operating
will flash one time.
7. Repeat step 5 for any additional
transmitters (the system will accept up to
eight transmitters).
8. The system will exit the transmitter
learn mode if the key is turned to the“LOCK ”position, the door is closed or
after 2 minutes. & System maintenance
NOTE
In the event that the vehicle ’s battery is
replaced, discharged or disconnected,
it will be necessary to start the vehicle
a minimum of one time using the key
prior to activating the remote engine
start system. This is required to allow
the vehicle electronic systems to re-synchronize. ! Changing the batteries
CAUTION
. Do not let dust, oil or water get on
or in the remote engine start
transmitter when replacing the
battery.
. Be careful not to damage the
printed circuit board in the re-
mote engine start transmitter
when replacing the battery. .
Be careful not to allow children to
touch the battery and any re-
moved parts; children could
swallow them.
. There is a danger of explosion if
an incorrect replacement battery
is used. Replace only with the
same or equivalent type of bat-
tery.
. Batteries should not be exposed
to excessive heat such as sun-
shine, fire or the like.
The two 3-volt lithium batteries (model
CR-2032) supplied in your remote engine
start transmitter should last approximately
one year, depending on usage. When the
batteries begin to weaken, you will notice
a decrease in range (distance from the
vehicle that your remote control operates).
Follow the instructions below to change
the remote engine start transmitter bat-teries.
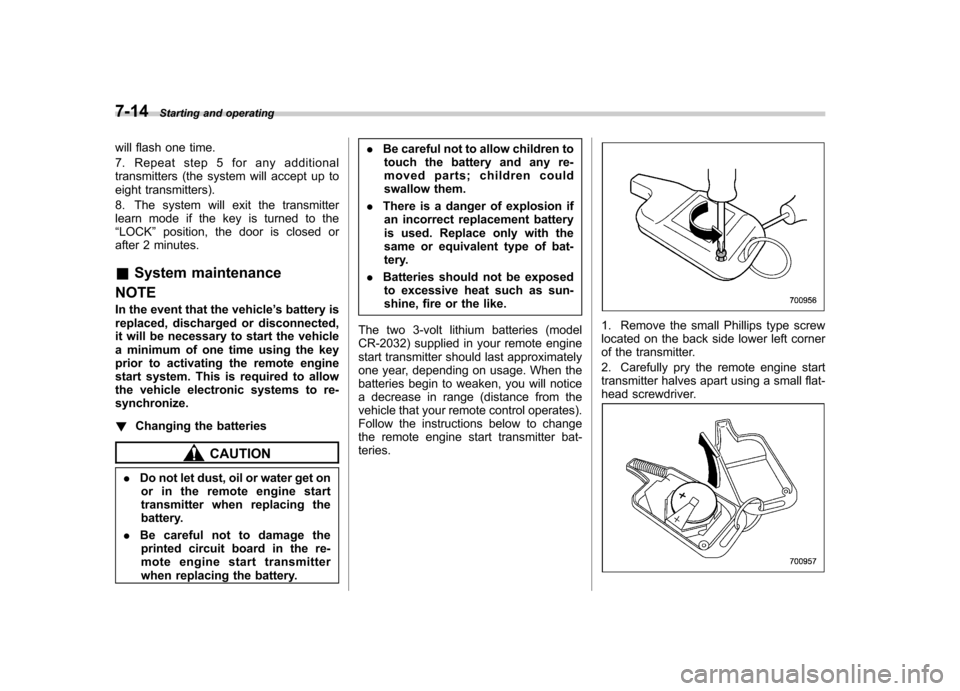
1. Remove the small Phillips type screw
located on the back side lower left corner
of the transmitter.
2. Carefully pry the remote engine start
transmitter halves apart using a small flat-
head screwdriver.
Page 299 of 474
7-22Starting and operating
turns off.
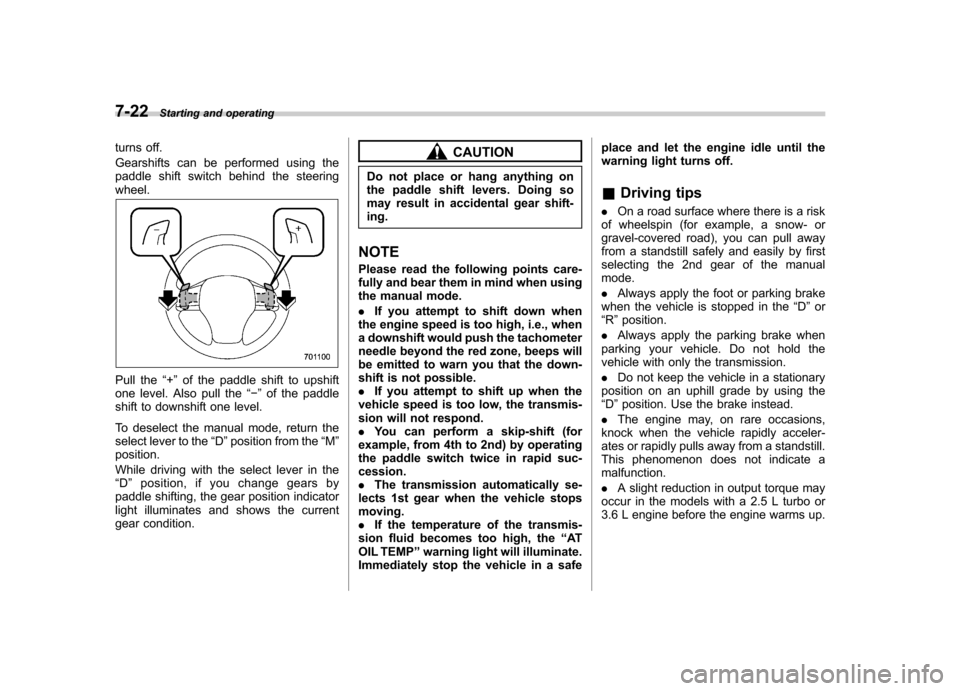
Gearshifts can be performed using the
paddle shift switch behind the steeringwheel.
Pull the “+ ” of the paddle shift to upshift
one level. Also pull the “� ” of the paddle
shift to downshift one level.
To deselect the manual mode, return the
select lever to the “D ”position from the “M ”
position.
While driving with the select lever in the “ D ” position, if you change gears by
paddle shifting, the gear position indicator
light illuminates and shows the current
gear condition.
CAUTION
Do not place or hang anything on
the paddle shift levers. Doing so
may result in accidental gear shift-ing.
NOTE
Please read the following points care-
fully and bear them in mind when using
the manual mode. . If you attempt to shift down when
the engine speed is too high, i.e., when
a downshift would push the tachometer
needle beyond the red zone, beeps will
be emitted to warn you that the down-
shift is not possible.. If you attempt to shift up when the
vehicle speed is too low, the transmis-
sion will not respond.. You can perform a skip-shift (for
example, from 4th to 2nd) by operating
the paddle switch twice in rapid suc-cession.. The transmission automatically se-
lects 1st gear when the vehicle stopsmoving.. If the temperature of the transmis-
sion fluid becomes too high, the “AT
OIL TEMP ”warning light will illuminate.
Immediately stop the vehicle in a safe place and let the engine idle until the
warning light turns off. &
Driving tips
. On a road surface where there is a risk
of wheelspin (for example, a snow- or
gravel-covered road), you can pull away
from a standstill safely and easily by first
selecting the 2nd gear of the manualmode. . Always apply the foot or parking brake
when the vehicle is stopped in the “D ”or
“ R ”position.
. Always apply the parking brake when
parking your vehicle. Do not hold the
vehicle with only the transmission. . Do not keep the vehicle in a stationary
position on an uphill grade by using the “ D ”position. Use the brake instead.
. The engine may, on rare occasions,
knock when the vehicle rapidly acceler-
ates or rapidly pulls away from a standstill.
This phenomenon does not indicate amalfunction. . A slight reduction in output torque may
occur in the models with a 2.5 L turbo or
3.6 L engine before the engine warms up.
Page 383 of 474
11-12Maintenance and service
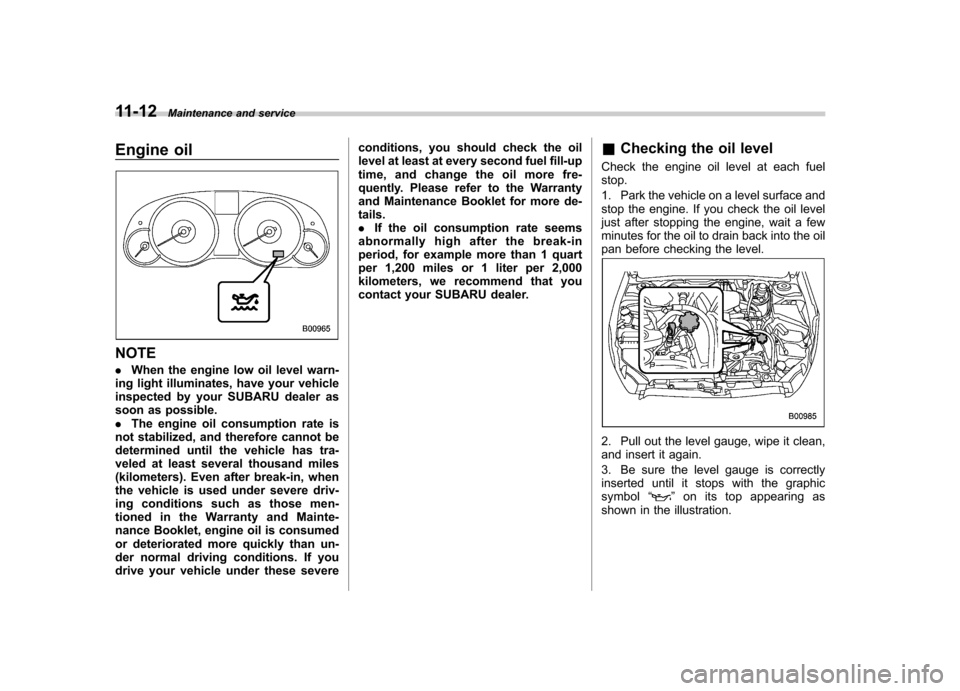
Engine oil
NOTE .When the engine low oil level warn-
ing light illuminates, have your vehicle
inspected by your SUBARU dealer as
soon as possible.. The engine oil consumption rate is
not stabilized, and therefore cannot be
determined until the vehicle has tra-
veled at least several thousand miles
(kilometers). Even after break-in, when
the vehicle is used under severe driv-
ing conditions such as those men-
tionedintheWarrantyandMainte-
nance Booklet, engine oil is consumed
or deteriorated more quickly than un-
der normal driving conditions. If you
drive your vehicle under these severe conditions, you should check the oil
level at least at every second fuel fill-up
time, and change the oil more fre-
quently. Please refer to the Warranty
and Maintenance Booklet for more de-tails..
If the oil consumption rate seems
abnormally high after the break-in
period, for example more than 1 quart
per 1,200 miles or 1 liter per 2,000
kilometers, we recommend that you
contact your SUBARU dealer. &
Checking the oil level
Check the engine oil level at each fuelstop.
1. Park the vehicle on a level surface and
stop the engine. If you check the oil level
just after stopping the engine, wait a few
minutes for the oil to drain back into the oil
pan before checking the level.
2. Pull out the level gauge, wipe it clean,
and insert it again.
3. Be sure the level gauge is correctly
inserted until it stops with the graphic
symbol “
”on its top appearing as
shown in the illustration.
Page 385 of 474
11-14Maintenance and service
&Changing the oil and oil filter
CAUTION
. If you change your own oil, be
sure to drain all the oil from the
filter before disposal.
. Do not dispose of used engine oil
by placing it in the trash, or by
pouring it onto the ground, into
sewers, or into any body of water.
Check with your local govern-
ment office for the proper dis-
posal options available to you.
Change the oil and oil filter according to
the maintenance schedule in the “War-
ranty and Maintenance Booklet ”.
The engine oil and oil filter must be
changed more frequently than listed in
the maintenance schedule when driving
on dusty roads, when short trips are
frequently made, or when driving in
extremely cold weather.
1. Warm up the engine by letting the
engine idle for approximately 10 minutes
to ease draining the engine oil.
2. Park the vehicle on a level surface and
stop the engine.
3. Remove the oil filler cap.
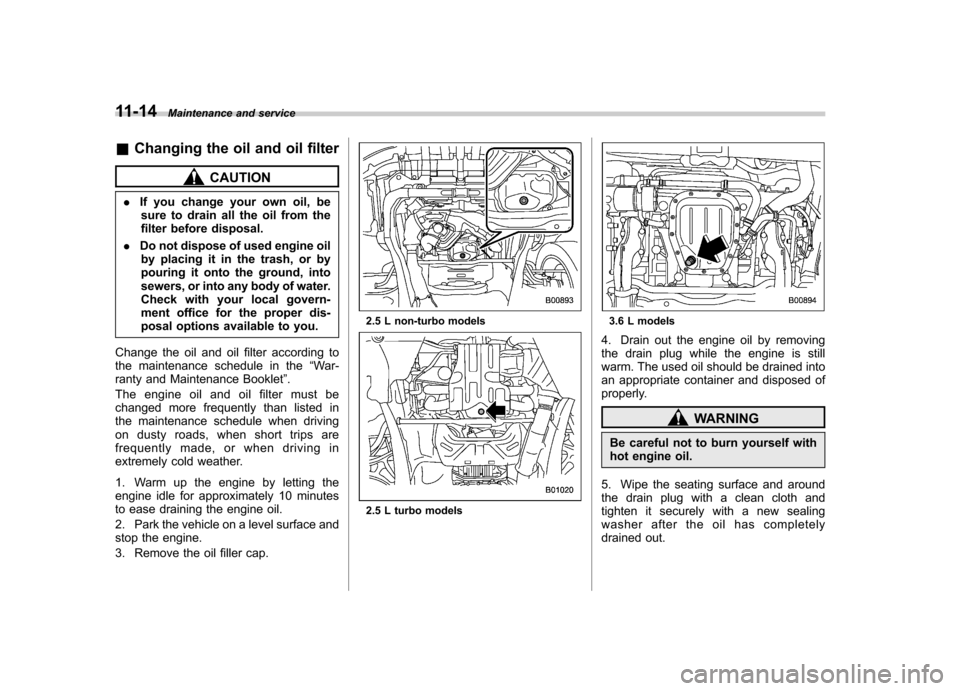
2.5 L non-turbo models
2.5 L turbo models
3.6 L models
4. Drain out the engine oil by removing
the drain plug while the engine is still
warm. The used oil should be drained into
an appropriate container and disposed of
properly.
WARNING
Be careful not to burn yourself with
hot engine oil.
5. Wipe the seating surface and around
the drain plug with a clean cloth and
tighten it securely with a new sealing
washer after the oil has completely
drained out.