2012 SUBARU OUTBACK lock
[x] Cancel search: lockPage 211 of 474

5-28Audio
&Scan
Type A audio
Type B audio
Type C audio
The scan mode lets you listen to the first
10 seconds of each track/file in succes-
sion. Press the “SCAN ”button to start
scanning upward beginning with the track/
file(s) following the currently selected one.
After all track/file(s) in the disk/folder have
been scanned, normal playback will be
resumed. To cancel the scan mode, pressthe “SCAN ”button again.
NOTE
The scan mode will be cancelled if you
perform any of the following steps. . Press the “RPT/RDM ”button (type A
and B audio). . Press the “RPT ”button (type C
audio).. Press the “RDM ”button (type C
audio). .
Turn the “TUNE ”dial.
. Press the “
”or “”side of the
“ FOLDER ”button (type A and B audio).
. Press the “
”button.
. Press the “”or “”side of the
“ SEEK ”button.
. Select the radio or AUX mode.
. Turn off the power of the audio
equipment. . Turn the ignition switch to the
“ LOCK ”position.
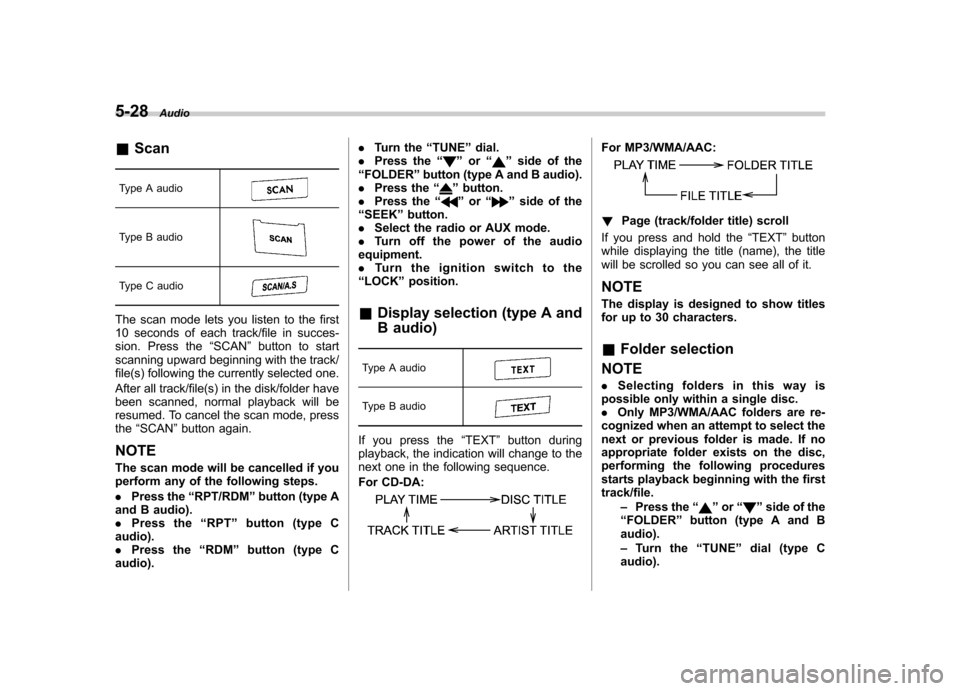
& Display selection (type A and
B audio)
Type A audio
Type B audio
If you press the “TEXT ”button during
playback, the indication will change to the
next one in the following sequence.
For CD-DA:
For MP3/WMA/AAC:
! Page (track/folder title) scroll
If you press and hold the “TEXT ”button
while displaying the title (name), the title
will be scrolled so you can see all of it. NOTE
The display is designed to show titles
for up to 30 characters. & Folder selection
NOTE . Selecting folders in this way is
possible only within a single disc. . Only MP3/WMA/AAC folders are re-
cognized when an attempt to select the
next or previous folder is made. If no
appropriate folder exists on the disc,
performing the following procedures
starts playback beginning with the firsttrack/file.
–Press the “
”or “”side of the
“ FOLDER ”button (type A and B
audio). – Tu r n t h e “TUNE ”dial (type C
audio).
Page 212 of 474

!Type A and B audio
Press the following buttons briefly.
Type A audio:
1) To select the next folder
2) To go back to the previous folder
Type B audio:
To select the next folder
To go back to the
previous folder
! Type C audio
“ TUNE ”dial
Turn the “TUNE ”dial clockwise to select
the next folder. Turn the dial counter-
clockwise to go back to the previous
folder. & How to eject a CD from the player
When a disc is being played back or when
a disc is in the player, press the ejectbutton
. The disc will be ejected.
NOTE . Avoid driving the vehicle with a CD
sticking out. The CD may fall out due to vibration.. If you do not remove the ejected
disc within approximately 15 seconds
(type A and B audio)/20 seconds (type
C audio), a disc protection function will
operate, automatically reloading the
disc. In this case, the disc is not played. &
When the following mes-
sages are displayed
If one of the following messages is
displayed while operating the CD player,
determine the cause based on the follow-
ing information. If you cannot clear those
messages, please contact your SUBARU
dealer. ! When “PUSH EJECT ”is displayed
Press the
button to eject the disc.
Check the disc for damage or deforma-
tion, and also check that the correct disc is
inserted. Do not try to eject the disc
forcibly. Mini CDs (i.e., 8 cm/3 inch CDs)
are not supported, and if inserted, they will
be immediately ejected. If the disc cannot
be ejected or this message remains
displayed, please contact your SUBARU
dealer. ! When “CHECK DISC ”is displayed
Press the
button to eject the discs.
Check that the disc is not damaged or
scratched, and also check that the disc is
inserted correctly. This message may
appear when using some CD-RW discs.
Check that the disc type (i.e., 8 cm/3 inch
CDs are not supported) and data format
are correct. This player can only play CD-
DA, MP3, WMA and AAC data formats. If
the disc cannot be ejected or this mes-
sage remains displayed, please contact Audio
5-29
– CONTINUED –
Page 220 of 474

When connecting iPod®(type B audio):
When connecting iPod®(type C audio):
NOTE .The “FOLDER RDM ”(type B audio)/
“ Folder ”(type C audio) indication re-
fers to the random playback in the
folders. It randomly repeats all of the
tracks in the folder.. The “ALL RDM ”(type B audio)/ “All ”
(type C audio) indication refers to the
random playback on the entire USB
storage device. It randomly repeats all
of the tracks on the USB storage device.. The “ALBUM RDM ”(type B audio)/
“ Album ”(type C audio) indication re-
fers to the shuffle playback of the
album. It sequentially plays back all of
the tracks on the album.. The “SONG RDM ”(type B audio)/
“ Track ”(type C audio) indication refers
to the shuffle playback on the entireiPod
®. It randomly repeats all of the tracks on the iPod
®.
. When an iPod®is connected, the
files are played back at random by the
shuffle function of the iPod
®. There-
fore, iPod®operation may be different
depending on the model of the con-
nected iPod
®. Visit the Apple Inc.
website for details.. When an audiobook or a podcast is
playing, the mode does not change
even if you press the random button.
To cancel the random playback mode,
press the random button and select
CANCEL. The “RDM ”indication will turn
off, and the normal playback mode willresume. & SCAN (only when connecting
USB storage device)
Scan is operated in the same way as for a
CD. For details, refer to “Scan ”F 5-28.
NOTE
When an iPod
®is connected, you
cannot select the SCAN mode. &
Selecting category (only
when connecting iPod
®)
! Type B audio
“ LIST ”button
“TUNE ”dial
When the “LIST ”button is pressed briefly,
the iPod®menu is displayed.
Each time you turn the “TUNE ”dial clock-
wise, the displayed category changes in
the following sequence. Each time you
turn the dial counterclockwise, the dis-
played category changes in the oppositesequence. Audio
5-37
– CONTINUED –
Page 227 of 474

5-44Audio
NOTE . The Bluetooth
®audio function may
not operate properly under the follow-
ing conditions.
–The device is turned off.
– The battery of the device has run
down. – The device is not connected to
the system.– The device is behind the seat or
in the glove box.– A metal material is covering or
touching the device.
. Depending on the type of device that
is used, operation and sound volume
may be different from normal use of
those devices. . The sound quality may degrade due
to the influence of the device that is
connected to the system or the circum-
stances of the Bluetooth network. . When another Bluetooth
®device is
simultaneously connected, noise may
be heard. & Media format
Bluetooth
®audio devices cannot be
connected if they are not compatible with
the following Bluetooth
®profiles.
. A2DP (Advanced Audio Distribution
Profile) .
AVRCP (Audio/Video Remote Control
Profile)
& Setting Bluetooth
®audio
(type B audio)
1. Select “BT-A SETUP ”by pressing the
“ MENU ”button.
2. Perform the following procedure by
operating the “TUNE ”dial while “BT-A ”is
displayed.
NOTE
You cannot set Bluetooth
®audio while
driving. ! Registering (pairing) device
NOTE
Only one device can be registered.
1. Select the “PAIR AUDIO ”menu.
– If a device is already registered,
“ MEMORY FULL ”is displayed and the
mode changes to the Bluetooth
®
audio setting mode.
2. After the passkey is shown on the
display, input the passkey into the device. –If the registering procedure is fin-
ished, “PAIRED ”and the name of the
device are displayed. – If the registering procedure was not
successful, “FAILED ”is displayed. After the name of the device or
“FAILED ”
is displayed, the mode changes to the Bluetooth
®audio setting mode.
NOTE
After the ignition switch is turned to the “ LOCK ”position, the registered device
is not automatically connected to the
system even if the ignition switch is
turned to the “Acc ”or “ON ”position.
! Selecting device
1. Select the “SELECT AUDIO ”menu.
– If no devices are registered,
“ EMPTY ”is displayed and the mode
changes to the Bluetooth
®audio
setting mode.
2. Select the “CONFIRM ”menu.
– Then the name of the selected
device is displayed. – If the device is connected, “SE-
LECTED ”is displayed and the mode
changes to the Bluetooth
®audio
setting mode.– If the device cannot be connected,
“ FAILED ”is displayed and the select-
ing procedure was not successful.
! Setting passkey
1. Select the “SET PASSKEY ”menu.
– After the currently set passkey is
displayed, a new passkey can be
Page 228 of 474

entered.
2. Input the new passkey (a 4 - 8 digit
number) by operating the “TUNE ”dial.
3. Select the “CONFIRM ”menu.
– The new passkey is displayed, the
passkey is changed and the mode
changes to the Bluetooth
®audio
setting mode.
! Deleting device
1. Select the “DELETE AUDIO ”menu.
– If no devices are registered,
“ EMPTY ”is displayed and the mode
changes to the Bluetooth
®audio
setting mode.
2. Select the “CONFIRM ”menu.
–“ DELETED ”is displayed and the
mode changes to the Bluetooth
®
audio setting mode.
& Setting Bluetooth
®audio
(type C audio)
1. Press the
button to select the
“ BT Audio ”mode.
Talk switch
2. Press the talk switch
.
NOTE
If a device and a cell phone are already
registered, “BT ”menu will be dis-
played. Then perform the followingprocedure.
(1) Press the talk switch
and
say “Setup ”.
(2) Press the talk switch
again
and say “Bluetooth audio setup ”.
The “BT Audio Setup ”will then be
displayed.
3. After the “BT Audio Setup ”menu is
displayed, select the following menus by
using the voice command system or by
operating the “TUNE ”dial. NOTE .
You cannot set Bluetooth
®audio
while driving. . After the ignition switch is turned to
the “LOCK ”position, the registered
device/cell phone may be automatically
connected to the system if the ignition
switch is turned to the “Acc ”or “ON ”
position.. When a cell phone is already con-
nected, the system will disconnect the
phone to setup a new device. You may
need to reconnect the phone after
setup is complete.. Up to 2 devices (excluding cell
phones for Hands-free system) can beregistered.. Up to 6 devices (including cell
phones for Hands-free system) can beregistered. ! By using voice command system
NOTE
If no devices are registered, you can
only select from the following menu. . “Pair audio player ”(refer to “Regis-
tering (paring) device ”F 5-46)
. “Set passkey ”(refer to “Selecting
device ”F 5-46) Audio
5-45
– CONTINUED –
Page 232 of 474

Hands-free system (if equipped) NOTE .For models with the genuine
SUBARU navigation system, refer to
the Owner ’s Manual supplement for the
navigation system.. When selling your vehicle, make
sure that you initialize the Hands-free
system to prevent personal data from
being improperly accessed.
The Hands-free system operates while the
ignition switch is in the “Acc ”or “ON ”
position.
& Tips for the Hands-free sys- tem
! Bluetooth
®
It is possible to connect a cell phone to the
in-vehicle equipment through the Blue-
tooth
®format (wireless) to make a phone
call from the in-vehicle equipment or take
an incoming phone call.
Since the Bluetooth
®format is wireless, a
connection between the in-vehicle equip-
ment and the cell phone can be made
without placing them in close vicinity of
each other. The cell phone can be used
with it left in the breast pocket or bag. NOTE .
The Hands-free system may not
operate properly under the following conditions.
–The cell phone is turned off.
– The cell phone is not in the
phone call area. – The battery of the cell phone has
run down.– The cell phone is not connected
to the Hands-free system.– The cell phone is behind the seat
or in the glove box.– A metal material covers or
touches the cell phone.
. Depending on the type of cell phone
that is used, the screen on the cell
phone may remain illuminated while
the ignition switch is in the “ON ”
position. If this occurs, turn the illumi-
nation off by adjusting the cell phonesettings. . Depending on the setting of the cell
phone, the dial lock function may be
activated after making a call. Deacti-
vate the automatic dial lock function of
the cell phone before using the Hands-
free system. . Depending on the type of cell phone
that is used, operation and the sound
volume may be different from those of
cell phones currently used. .
When the ignition switch is turned to
the “LOCK ”position during a call, the
call may be disconnected or continued
on the cell phone depending on the
type of cell phone that is used. Note
that operation of the cell phone may be
necessary if the call is continued on the
cell phone. . Do not speak at the same time as the
other party during a call. If you and the
party speak at the same time, it may be
difficult for the other party to hear your
voice and vice versa. This is normal. . The receiver sound volume should
be set as low as possible. Otherwise,
the party you are calling may notice an
undesirable echo sound. . Speak clearly and loudly.
. Your voice may be difficult to be
heard by the party under the following conditions.
–Driving on a rough road.
– Driving at a high speed.
– Driving with a window open.
– When air from the ventilator
blows directly towards the micro-phone. – When the sound coming from the
ventilator is loud.– When the cell phone is too close
to the microphone. Audio
5-49
– CONTINUED –
Page 239 of 474

5-56Audio
First menu Second menu Third menu Details Page
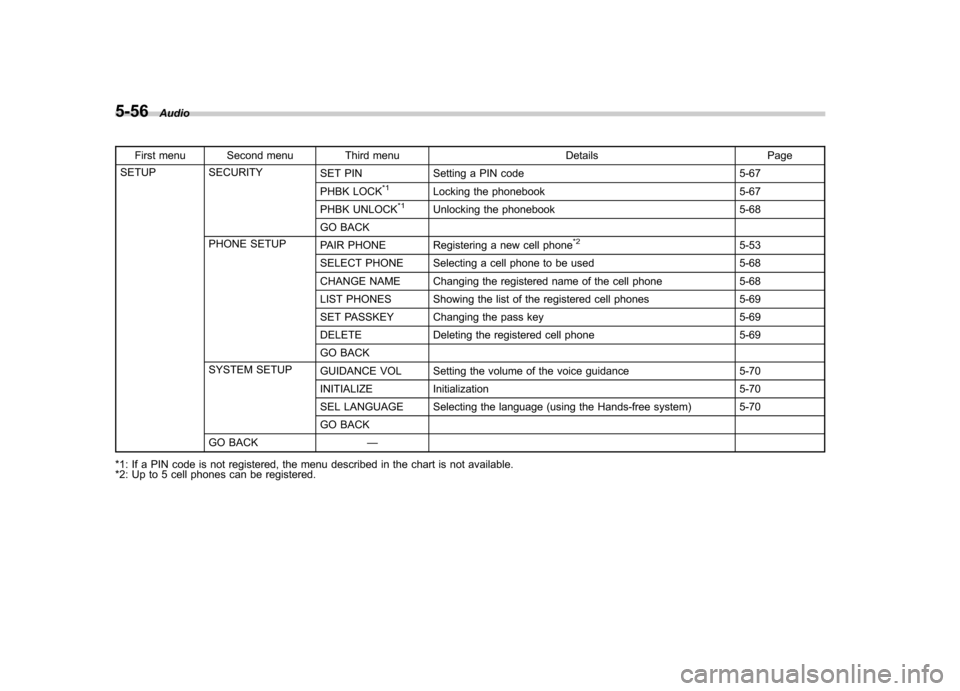
SETUP SECURITY SET PIN Setting a PIN code 5-67
PHBK LOCK
*1Locking the phonebook 5-67
PHBK UNLOCK*1Unlocking the phonebook 5-68
GO BACK
PHONE SETUP PAIR PHONE Registering a new cell phone
*25-53
SELECT PHONE Selecting a cell phone to be used 5-68
CHANGE NAME Changing the registered name of the cell phone 5-68
LIST PHONES Showing the list of the registered cell phones 5-69
SET PASSKEY Changing the pass key 5-69
DELETE Deleting the registered cell phone 5-69
GO BACK
SYSTEM SETUP GUIDANCE VOL Setting the volume of the voice guidance 5-70
INITIALIZE Initialization 5-70
SEL LANGUAGE Selecting the language (using the Hands-free system) 5-70
GO BACK
GO BACK —
*1: If a PIN code is not registered, the menu described in the chart is not available.
*2: Up to 5 cell phones can be registered.
Page 241 of 474

5-58Audio
First menu Second menu Third menu Details
Page
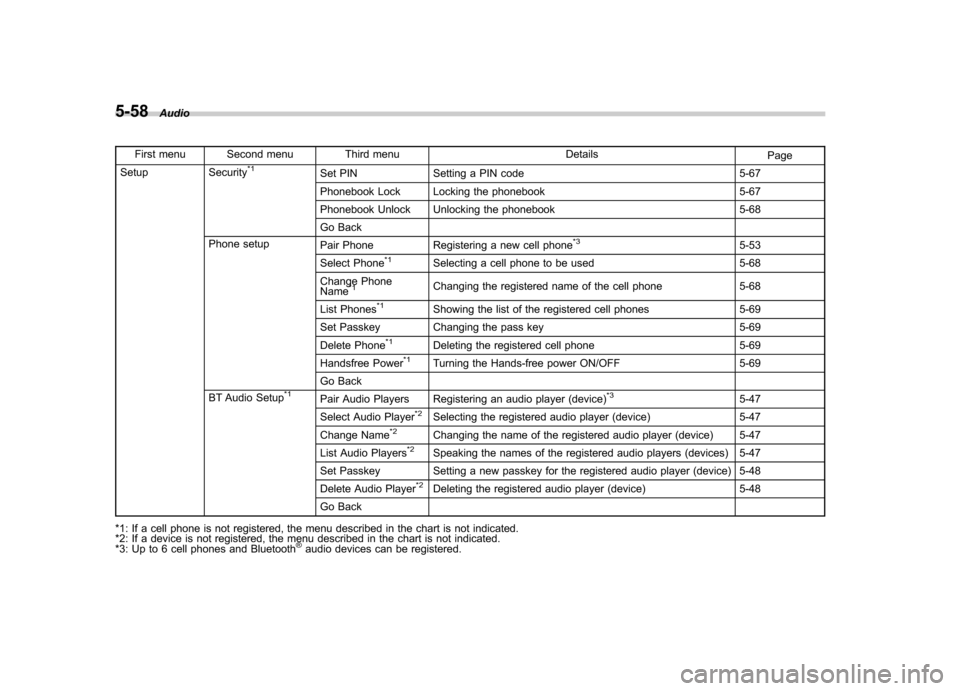
Setup Security*1Set PIN Setting a PIN code 5-67
Phonebook Lock Locking the phonebook 5-67
Phonebook Unlock Unlocking the phonebook 5-68
Go Back
Phone setup Pair Phone Registering a new cell phone
*35-53
Select Phone*1Selecting a cell phone to be used 5-68
Change Phone Name
*1Changing the registered name of the cell phone 5-68
List Phones
*1Showing the list of the registered cell phones 5-69
Set Passkey Changing the pass key 5-69
Delete Phone
*1Deleting the registered cell phone 5-69
Handsfree Power*1Turning the Hands-free power ON/OFF 5-69
Go Back
BT Audio Setup
*1Pair Audio Players Registering an audio player (device)*35-47
Select Audio Player*2Selecting the registered audio player (device) 5-47
Change Name*2Changing the name of the registered audio player (device) 5-47
List Audio Players*2Speaking the names of the registered audio players (devices) 5-47
Set Passkey Setting a new passkey for the registered audio player (device) 5-48
Delete Audio Player
*2Deleting the registered audio player (device) 5-48
Go Back
*1: If a cell phone is not registered, the menu described in the chart is not indicated.
*2: If a device is not registered, the menu described in the chart is not indicated.
*3: Up to 6 cell phones and Bluetooth
®audio devices can be registered.