Page 318 of 600
2. MAINTENANCE AND INSPECTION
1) Maintenance Procedures for DI Engine Fuel System
Always keep the workshop and lift clean (especially, from dust).
Always keep the tools clean (from oil or foreign materials).
Wear a clean vinyl apron to prevent the fuzz, dust and foreign materials from getting into fuel system.
Wash your hands and do not wear working gloves. 1.
2.
3.
Follow the below procedures before starting service works for fuel system.
If the problem is from HP pump, fuel supply line or injector, prepare the clean special tools and sealing
caps to perform the diagnosis for DI engine fuel system in this manual. At this point, thoroughly clean
the related area in engine compartment. 4.
Clean the engine compartment before starting service works.
Tool kit for high pressure lineTook kit for low pressure line
Page 319 of 600

2210-01
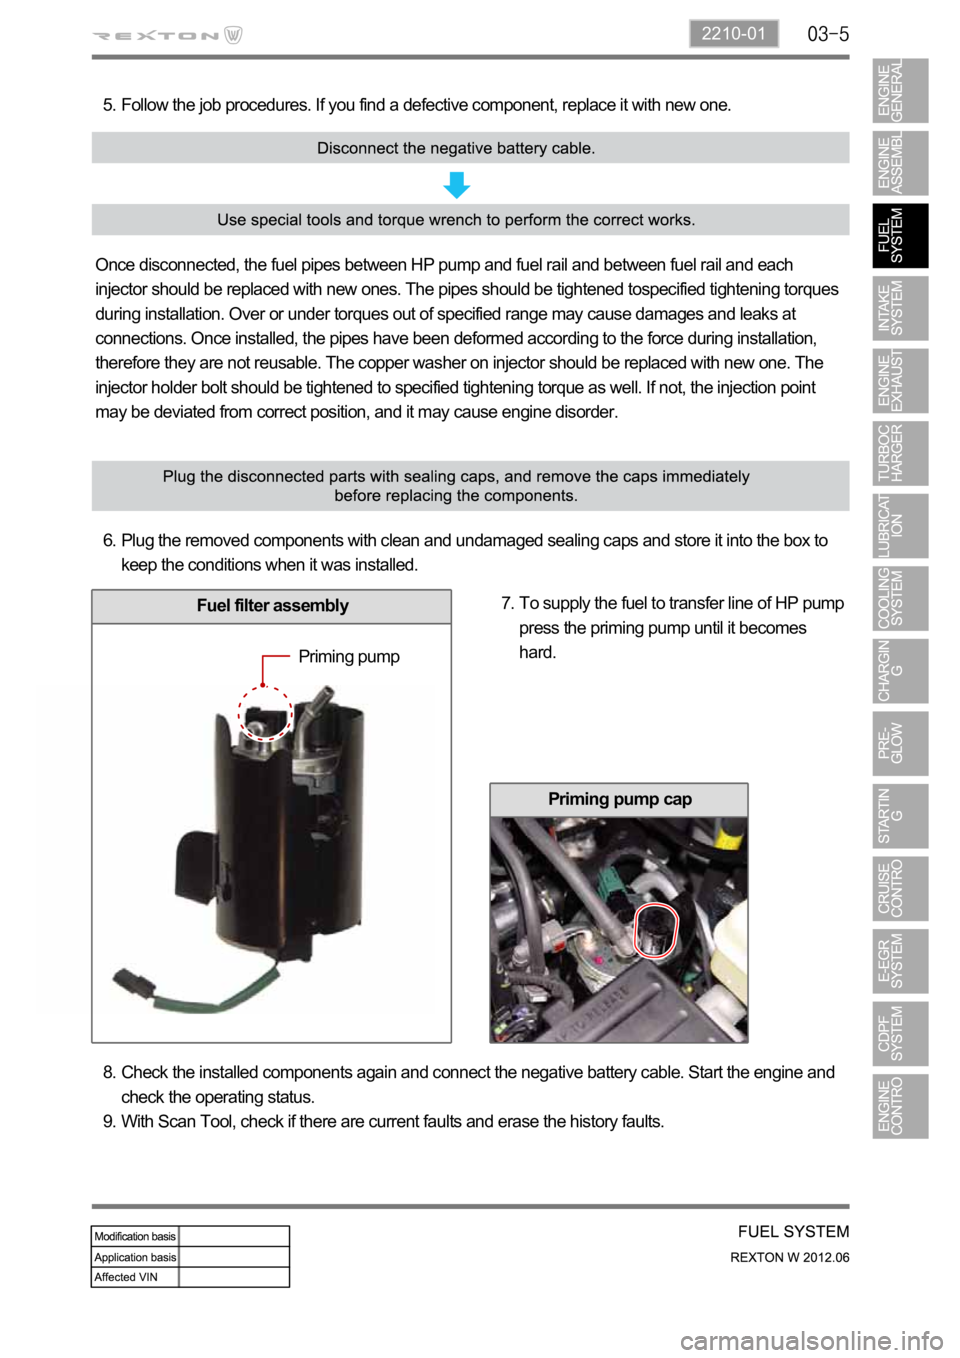
Priming pump cap
Follow the job procedures. If you find a defective component, replace it with new one. 5.
Once disconnected, the fuel pipes between HP pump and fuel rail and between fuel rail and each
injector should be replaced with new ones. The pipes should be tightened tospecified tightening torques
during installation. Over or under torques out of specified range may cause damages and leaks at
connections. Once installed, the pipes have been deformed according to the force during installation,
therefore they are not reusable. The copper washer on injector should be replaced with new one. The
injector holder bolt should be tightened to specified tightening torque as well. If not, the injection point
may be deviated from correct position, and it may cause engine disorder.
Plug the removed components with clean and undamaged sealing caps and store it into the box to
keep the conditions when it was installed. 6.
To supply the fuel to transfer line of HP pump
press the priming pump until it becomes
hard. 7.
Priming pump
Fuel filter assembly
Check the installed components again and connect the negative battery cable. Start the engine and
check the operating status.
With Scan Tool, check if there are current faults and erase the history faults. 8.
9.
Page 329 of 600
2210-01
Static test for backleak of injector
Disconnect the injector return hose and cover
the openings with caps shaped screw (included
in the special tool). 1.
Connect the hose of the container for
measuring backleak to the return nipple of the
injector.
(prevent air entry to the low pressure line) 2.
Disconnect the IMV connector of the high
pressure pump and then fuel pressure
sensor connector. 3.
The connector of the injector can be easily
contaminated. Always keep it clean.
Crank the engine 2 times for 5 seconds.
Check the time for flow if injector backleak and
confirm that it is within the specified range. 4.
5.
If the value is out of the specified range,
replace the injector.
SpecificationBelow 20 sec.
Page 330 of 600
Dynamic test for backleak of injector
Warm up the engine so that the engine
the engine again.
Disconnect the injector return hose and cover
the openings with caps shaped screw
(included in the special tool).. 1.
2.
Connect the hose of the container for
measuring backleak to the return nipple of the
injector.
Start the engine again and let the engine idle
for 30 seconds.
Perform backleak test of fuel system with a
diagnostic device after 30 seconds. 3.
4.
5.
This test consists of 4 cycles, and the engine rpm
reaches 3,500 rpm for 18 seconds in each cycle.
Check the amount of backleak collected into
the container and confirm that it is within the
specified range. 6.
Specification38 ml or less
Page 436 of 600
2) Collecting PM of DPF
There is a filter installed in the DPF and the PM filtered by this filter is burned (regeneration) when the
temperature of exhaust gas is increased due to post-injection. The filter has a honeycomb-like structure
to capture the particulate matter and the inlet and outlet of each channel are closed alternatively. Once
the exhaust gas enters to the inlet of a channel, it is released from the outlet of the adjacent channel
through the porous wall because of the closed outlet of the first channel, and the PM is collected in the
first channel.
[Collecting PM of CDPF]
Normally, when the driving distance becomes approx. 600 to 1,200 km, enough amount of soot to
be burned is filtered and accumulated in the CDPF. The ECU increases the amount of fuel post-
burned. The soot is burned for 15 to 20 minutes (may differ by conditions).
Page 454 of 600

A fourth correction is made according to the pressure error.
This correction is used to reduce the injection timing advance when the pressure in the rail is higher
than the pressure demand.
A fifth correction is made according to the rate of EGR.
This correction is used to correct the injection timing advance as a function of the rate of exhaust gas
recirculation. -
-
<003a004b0048005100030057004b004800030028002a0035000300550044005700480003004c00510046005500480044005600480056000f00030057004b00480003004c0051004d004800460057004c0052005100030057004c0050004c0051004a000300
44004700590044005100460048000300500058005600570003[in fact be increased in order to
compensate for the fall in termperature in the cylinder.
A. Main Flow Control
The main flow represents the amount of fuel injected into the cylinder during the main injection. The pilot
flow represents the amount of fuel injected during the pilot injection.
The total fuel injected during 1 cycle (main flow + pilot flow) is determined in the following manner.
When the driver depress the pedal, it is his demand which is taken into account by the system in order
to determine the fuel injected.
When the driver release the pedal, the idle speed controller takes over to determine the minimum fuel
which must be injected into the cylinder to prevent the enigne from stalling. -
-
It is therefore the greater of these 2 values which is retained by the system. This value is then compared
with the lower flow limit determined by the ESP system.
As soon as the injected fuel becomes lower than the flow limit determined by the ESP system, the
antagonistic torque (engine brake) transmitted to the drive wheels exceeds the adherence capacity of
the vehicle and there is therefore a risk of the drive wheels locking.
The system thus chooses the greater of these 2 values (main flow & pilot flow) in order to prevent any
loss of control of the vehicle during a sharp deceleration.
As soon as the injected fuel becomes higher than the fuel limit determined by the ASR trajectory control
system, the engine torque transmitted to the wheels exceeds the adhesion capacity of the vehicle and
there is a risk of the drive wheels skidding. The system therefore chooses the smaller of the two values
in order to avoid any loss of control of the vehicle during accelerations.
The anti-oscillation strategy makes it possible to compensate for fluctuations in engine speed during
transient conditions. This strategy leads to a fuel correction which is added to the total fuel of each
cylinder.
A switch makes it possible to change over from the supercharge fuel to the total fuel according to the
state of the engine.
Until the stating phase has finished, the system uses the supercharged fuel.
Once the engine changes to normal operation, the system uses the total fuel. -
-
(5) Fuel Control
The main fuel is obtained by subtracting the pilot injection fuel from the total fuel.
A mapping determines the minimum fuel which can control an injector as a function of the rail pressure.
As soon as the main fuel falls below this value, the fuel demand changes to 0 because in any case the
injector is not capable of injecting the quantity demand.
Page 510 of 600

Do not allow the fluid and engine oil to make contact with the body paintwork and hoses.
If work on the fluid system such as fuel and oil, working area should be well ventilated and
smoking should be prohibited.
Gasket or seal on the fuel/lubrication system should be replaced with new ones and bolts and
nuts should be tightened as specified.
After removal/installation works, be sure to check whether there is leak on the connecting
section. -
-
-
-
If fine dust or foreign material enters into DI engine's fuel system, there can be serious
damages between HP pump and injectors. So, be sure to cover removed fuel system
components with cap and protect removed parts not to be contaminated with dirt. (Refer to
cleanness in this manual while working on DI engine fuel system)
When working on the fuel line between priming pump and injector (including return line),
always plug the openings with caps to prevent foreign materials or dust from entering to the
openings and connections.
The HP fuel supply pipe (HP pump to fuel rail) and HP fuel pipe (Fuel rail to injector) should
be replaced with new ones when removed. 1.
2.
3.
Electric devices should be handled more carefully.
Currently, the engine has a lot of electric devices. There could be poor engine performance,
incomplete combustion and other abnormal symptoms due to short circuit or poor contact.
Before work on engine and electrical equipment, be sure to disconnect battery negative (-)
terminal.
When replacing the electric device, use only genuine part and check the conditions of
connections and grounds. Loosened connection or ground makes cause a fire and personal
injury. -
-
Page 514 of 600
Engine Compartment Layout
Engine assembly
Engine oil dipstick
Vacuum pump
Oil filter and cooler
Fuel filter and priming pump
Brake booster
Brake oil tank
AQGS unit
Washer fluid filler cap
Engine compartment fuse box
PTC relay box
Battery
Vacuum modulator (for VGT turbo charger) 1.
2.
3.
4.
5.
6.
7.
8.
9.
10.
11.
12.
13.FFH Assembly (Only for vehicle with FFH)
Power steering oil tank
Engine oil filler cap
Fan shroud
E-EGR Valve
High-capacity PCV oil separator
HFM sensor (6.0)
VGT turbo charger
Air cleaner housing
2Coolant surge tank
ABS/ESP HECU (Including TPMS function:
optional)
Exhaust gas FRT Temp. sensor (T3) 14.
15.
16.
17.
18.
19.
20.
21.
22.
23.
24.
25.