Page 97 of 112

● The hands-free microphone is directed towards the driver, therefore, on-
ly the driver should try to operate the system.
● Avoid other noises in the vehicle during a")
96Telephone control (Phone)
● The hands-free microphone is directed towards the driver, therefore, on-
ly the driver should try to operate the system.
● Avoid other noises in the vehicle during a dialogue (e.g. other passen-
gers speaking in the vehicle).
● Keep the doors, windows and sun roof closed if possible to avoid back-
ground noises that might affect the system.
● At high speeds, you might need to speak louder to drown out back-
ground noises.
● To make a call when there is heavy background noise we recommend us-
ing the speech controlled telephone book instead of speaking individual
digits. This will help avoid mistakes when specifying telephone numbers.
Voice control commands
Voice control is available in the following languages: Spanish, German, English, Italian, French, Portuguese, Czech, Rus-
sian and Dutch.
It is often possible to activate the same function using different spoken in-
structions. If in doubt, just try giving a command.
Basic commands, valid anywhere in the menu
HELPAfter this command, the system repeats all the possible
commands
CANCELThe dialogue ends Commands from the main menu for using the system
If the user does not give a COMMAND (user silence), there are three TIME-
OUTS, after which the system informs the user of the available options:
The system starts the assistance cue with the following DIALOGUE: “The
available commands are: dial number, redial, other options, or say call
followed by a contact, for example, call Mary Smith at home ”.
If the user still does not give a COMMAND, the system starts the second
assistance cue with the DIALOGUE: “For other commands, say Help ”.
If the user still does not say a COMMAND, the “Operation cancelled”
dialogue is started.
TIMEOUTS are considered each time that the system is waiting for a verbal
instruction from the user and the user remains silent.
“HELP” command
● With this COMMAND the user asks the system for help about the availa-
ble options.
● When this command is given, the system starts the DIALOGUE “Say call
followed by the name of the contact you wish to call, for example, call Mary
Smith on her mobile, or say dial number, redial or other options. If you say
cancel, you will leave the voice control system ”
● The system is waiting for a new COMMAND from the user.
● If the user gives the new COMMAND, and this is correctly recognised by
the system, it goes to the corresponding menu.
● If the user remains silent for a time (TIMEOUT T1), the system starts an
initial assistance cue with the DIALOGUE: “The available commands are: di-
al number, redial, other options, or say call followed by a contact, for exam-
ple, call Mary Smith at home ”. If the user remains silent for a time (T2), the
system starts a second assistance cue with the DIALOGUE: “For other com-
mands, say Help ”. If the user remains silent for a time (T3), the system
starts the DIALOGUE: “Operation cancelled”, and the voice recognition sys-
tem is switched off.
T1
T2
T3
Page 98 of 112

“CALL + Name” command
With this COMMAND, the user requests a call to be made, and gives the
name of the person they wish to call. It is essential that the name is pro-")
97
Telephone control (Phone)
“CALL + Name” command
With this COMMAND, the user requests a call to be made, and gives the
name of the person they wish to call. It is essential that the name is pro-
nounced exactly as it is stored in the mobile phone book.
“DIAL NUMBER” command
● With this COMMAND, the user requests a call to be made and gives the
number they wish to call.
● When this command is given, the system starts the DIALOGUE “Please
dial the number ”
● The system waits for a new COMMAND with the number to be dialled.
The telephone number can be entered as a sequence of clearly pronounced
figures (full number: 9 9 9 9 9 9 9), as a series of figures (brief pause be-
tween series: 9 9 9 - 9 9 9 - 9 9 9) or as individual figures (9 - 9 - 9 - 9 - 9).
After each series of figures (separation with a brief pause) the system re-
peats the figures to confirm it has correctly identified the numbers.
● If the user remains silent for a time (TIMEOUT T1), the system starts an
initial assistance cue with the DIALOGUE: “Please repeat”. If the user re-
mains silent for a time (T2), the system starts a second assistance cue with
the DIALOGUE: “The number, please”. If the user remains silent for a time
(T3), the system starts the DIALOGUE: “Operation cancelled. Main menu”.
“REDIAL” command
● With this COMMAND, the user asks to make a call using the last number
dialled.
● If there is a previous call, the redialling starts automatically.
● If there is no previous call, the DIALOGUE “No number available ” is star-
ted.
“OTHER OPTIONS” command
If the user remains silent for a time (TIMEOUT T1), the system starts an ini-
tial assistance cue with the DIALOGUE: “Please repeat”. If the user remains
silent for a time (T2), the system starts a second assistance cue with the
DIALOGUE: “The available commands are: phone book, call log, settings or help”. If the user remains silent for a time (T3), the system starts the DIA-
LOGUE: “Operation cancelled. Main menu”.
■ “HELP” command
■ DIALOGUE: “Say phone book, call log, settings or cancel ”
■ “PHONE BOOK ” command
■ This allows the user to lists all the contacts, select one to call or
store/delete its name by voice command.
■ DIALOGUE: “Say a name, list all or update ”.
■ T1: “Please repeat”.
■ T2: “The available commands are: read all, update phone book or
help”.
■ T3: “Operation cancelled. Main menu”.
■ “CALL LOG ” command
■ This lists the Received Calls, Missed Calls and Dialled Numbers.
■ T1: “Please repeat”.
■ T2: “Which call log do you wish to list? Received calls, missed
calls or dialled numbers ”.
■ T3: “Operation cancelled”.
■ “SETTINGS” command
■ T1: “Please repeat”.
■ T2: “The available commands are: short dialogue, long dialogue
or help ”.
■ T3: “Operation cancelled, main menu”.
Additional information
Voice control is available in several languages. The navigation system al-
lows the language to be changed using the SETUP menu. In this menu, the
user can select the option AUTO so that the language is automatically
changed, or they can select the required language. The language can also
be changed through the vehicle instrument panel using the steering wheel
multifunction controls ⇒ Booklet Instruction Manual.
Page 99 of 112
98Telephone control (Phone)
If the language selected through the instrument panel is available in the ra-
dio and navigation system, the language in both systems becomes the se-
lected language.
If the language is modified through the instrument panel, the selected lan-
guage may not be available in the radio and navigation system. In this case,
the voice recognition system uses the default language (defined according
to the country in which the vehicle is sold), and there may be different lan-
guages in each system. It is not a malfunction.
Page 100 of 112
99
Settings (SETUP)
Settings (SETUP)
Sound, volume and system settings
Introduction
Pressing the SETUP unit button first opens a
context-sensitive settings menu
for the currently selected mode.
Additional Information:
● Safety notes ⇒ page 6
● Unit overview ⇒ page 8
● Radio settings menu ⇒ page 14
● Media settings menu ⇒ page 29
● Navigation settings menu ⇒ page 64
● Phone settings menu ⇒ page 76 Sound and volume settings
Fig. 94 Selection menu
for sound settings.
Fig. 95 Settings menu
for treble level.
Page 101 of 112

Opening the Sound main menu ● Press the SETUP
unit button from any menu.
● Press the Sound function button at the bottom-left of the screen to open
the menu for changing sou")
100Settings (SETUP)
Opening the Sound main menu ● Press the SETUP
unit button from any menu.
● Press the Sound function button at the bottom-left of the screen to open
the menu for changing sound and volume settings ⇒ Fig. 94.
The currently selected settings are indicated in the overview by the scale in
the circle next to the respective menu item ⇒ Fig. 94.
Changing the balance and fader settings
● Press the function buttons Treble
, Mid or Bass to open the respective
settings menus for adjusting the “tone” ⇒ Fig. 95.
● Turn the setting knob ⇒ Fig. 1 10
or press the function button
or to
alter the current setting.
● Press the function button Balance
or Fader to open the settings menu for
changing the sound focus to the left or right (balance) or to the front or rear
(fader).
● Turn the setting knob or press the appropriate function button to alter
the current setting.
Changing the volume settings and adjustments
The volume settings and adjustments can be pre-defined.
While you adjust volume settings, the currently active audio source is
played at the level of the setting as you change it.
● In the Sound main menu, press the Volume
function button ⇒
Fig. 94.
● Press the function button Max. switch-on volume, Traffic announcements (TP)⇒ page 23, Navigation volume or Speed-dependent vol. adjustment to open the cor-
responding settings menu.
● Turn the setting knob or press the
or function button.
● Pressing the vol. reduction function button opens a pop-up window in
which you can set the automatic audio volume reduction applied when the
parking distance warning system is active. When reverse gear is engaged,
the volume of the radio and navigation system is lowered to make manoeu-
vring easier and so that acoustic warnings are audible. If the maximum start-up volume is set very low, the navigation system an-
nouncements will also be lowered to this level. This may mean that the vol-
ume of the navigation system requires turning up each time the unit is
switched on.
Functional description of speed-dependent volume adjustment (GALA)
The speed dependent volume adjustment automatically increases the vol-
ume as the vehicle speed increases.
The degree to which the volume increases with speed is adjusted on a scale
between 1 and 7.
If a low value is set, the volume rises only slightly as the speed of the vehi-
cle increases. At a high setting the volume is increased more. At
0 speed-
dependent volume control is switched off (display: Off).
System settings
● Press the SETUP unit button and the System function button to open the
settings menu.
Resetting to factory settings
The restoration of the original settings deletes all the previous entries, des-
tinations and other settings .
● In the System settings menu , press the Factory settings
function button.
● Confirm the prompt by pressing Yes to reset the unit to its original set-
tings.
Other system settings
Function button: ResultLanguage: Press to select the desired language for text and voice output. ALTERNATIVELY: select Automatic to select the language programmed in
the instrument panel.
Page 102 of 112

Function button: ResultView of keyboard ABC: The keyboard in input windows has an alphabetic layout. QWERTY: The keyboard in input windows has the usual computer layout.Screen: Ch")
101
Settings (SETUP)
Function button: ResultView of keyboard ABC: The keyboard in input windows has an alphabetic layout. QWERTY: The keyboard in input windows has the usual computer layout.Screen: Change display settings. Brightness: press to select the screen brightness setting. Day/Night: changes the map view.
Automatic: the map view changes when the dipped beams are switch-
ed on.
Day: the map view remains in daytime mode (bright). Night: the map view remains in night-time mode (dark).
Acoustic feedback signal: Switch the confirmation tone for pressing a func-
tion button on or off.
Factory settings: restore the unit to its original factory settings.Air conditioning announcements
3 s, 5 s, 10 s Changes to the air conditioning are displayed on the
screen for approximately 3, 5 or 10 seconds.
Off: Changes to the air conditioning settings are not displayed on the
screen.
Clock Display: Switch time display on or off ⇒ page 11.Status of the SD card: Display whether the memory card contains navigation
data.
Remove the SD card: In some units the memory card inserted in the unit must
be prepared before extracting it.
Note
The system of units used in the navigation menu (metric or imperial) is set
on the instrument panel.
Page 103 of 112
102Abbreviations
Abbreviations
Abbreviations
AbbreviationMeaningAMAmplitude modulation (medium wave, MW).AUXAuxiliary inputEONSupports other networks (Enhanced Other Networks).FMFrequency modulation (very high frequency, VHF).MDIExternal data medium (Media Device Interface, e.g. iPod ®
).RDSRadio data system.TMCStation for traffic reports (Traffic Message Channel).TPTraffic Programme.
Page 104 of 112

Index
A
Address entry . . . . . . . . . . . . . . . . . . . . . . . . . . . 53
Adjusting the volume . . . . . . . . . . . . . . . . . . . . . 95
AM . . . . . . . . . . . . . . . . . . . . . . . . . . . . . . . . 15, 102
Anti-theft protectionCode . . . . . . . . . . . . . . . . . . . . . . . . . . . . . . . 10
Radio coding . . . . . . . . . . . . . . . . . . . . . . . . . 10
Areas with special regulations . . . . . . . . . . . . . 77
Automatic pairing . . . . . . . . . . . . . . . . . . . . . . . . 82
Autoscan MEDIA . . . . . . . . . . . . . . . . . . . . . . . . . . . . . . 40
RADIO . . . . . . . . . . . . . . . . . . . . . . . . . . . . . . 16
Autozoom . . . . . . . . . . . . . . . . . . . . . . . . . . . . . . 66
AUX . . . . . . . . . . . . . . . . . . . . . . . . . . . . . . . 34, 102 AUX-IN multimedia socket . . . . . . . . . . . . . . 34
AUX volume . . . . . . . . . . . . . . . . . . . . . . . . . 41
External audio source . . . . . . . . . . . . . . . . . 34
AUX-IN multimedia socket See: AUX . . . . . . . . . . . . . . . . . . . . . . . . . . . . 34
AUX 2 . . . . . . . . . . . . . . . . . . . . . . . . . . . . . . . . . . 35
AUX2 . . . . . . . . . . . . . . . . . . . . . . . . . . . . . . . . . . 35
AUX 2 External audio source . . . . . . . . . . . . . . . . . 35
Avoiding traffic . . . . . . . . . . . . . . . . . . . . . . . . . . 71
B
Balance . . . . . . . . . . . . . . . . . . . . . . . . . . . . . . . . 99 Base volume
Adjusting . . . . . . . . . . . . . . . . . . . . . . . . . . . 11
Mute function . . . . . . . . . . . . . . . . . . . . . . . . 11
Bass . . . . . . . . . . . . . . . . . . . . . . . . . . . . . . . . . . 99
Bluetooth Automatic pairing . . . . . . . . . . . . . . . . . . . . . 82
Bluetooth audio (external audio source) . . . . . 37
BT audio . . . . . . . . . . . . . . . . . . . . . . . . . . . . . . . 37
Button tone See: Confirmation tone . . . . . . . . . . . . . . . 100
C
Cabriolet models (ejecting CDs) . . . . . . . . . . . . 32
Call log . . . . . . . . . . . . . . . . . . . . . . . . . . . . . . . . 86
Calls to SEAT services . . . . . . . . . . . . . . . . . . . . . 92
Car park search . . . . . . . . . . . . . . . . . . . . . . . . . . 56
CD eject in Cabriolet models . . . . . . . . . . . . . . . 32
CD mode See: MEDIA . . . . . . . . . . . . . . . . . . . . . . . . . . 32
Changing frequency band . . . . . . . . . . . . . . . . . 15
Changing station names . . . . . . . . . . . . . . . . . . 22
Checkbox – ticking and clearing . . . . . . . . . . . . 12
Code . . . . . . . . . . . . . . . . . . . . . . . . . . . . . . . . . . 10
Commands . . . . . . . . . . . . . . . . . . . . . . . . . . . . . 96
Confirmation tone Switching on and off . . . . . . . . . . . . . . . . . 100
Controls . . . . . . . . . . . . . . . . . . . . . . . . . . . . . . . . . 8
Coordinates . . . . . . . . . . . . . . . . . . . . . . . . . . . . 61 Cursor
See: "Enter mark" . . . . . . . . . . . . . . . . . . . . . 52
D
DAB . . . . . . . . . . . . . . . . . . . . . . . . . . . . . . . . . . . 24 Additional services . . . . . . . . . . . . . . . . . . . . 24
Additional stations from the main menu . . 25
Additional stations on the DAB station list . 27
Changing an ensemble . . . . . . . . . . . . . . . . 26
Changing station . . . . . . . . . . . . . . . . . . . . . 26
Changing stations . . . . . . . . . . . . . . . . . . . . 25
Channel . . . . . . . . . . . . . . . . . . . . . . . . . . . . . 24
Deleting station list . . . . . . . . . . . . . . . . . . . 27
Ensemble . . . . . . . . . . . . . . . . . . . . . . . . . . . 24
FM programme tracking . . . . . . . . . . . . . . . . 27
Incoming messages . . . . . . . . . . . . . . . . . . . 24
Main menu . . . . . . . . . . . . . . . . . . . . . . . . . . 25
Operation . . . . . . . . . . . . . . . . . . . . . . . . . . . 24
Programme tracking . . . . . . . . . . . . . . . . . . . 27
Radio text . . . . . . . . . . . . . . . . . . . . . . . . . . . 24
Selecting a station . . . . . . . . . . . . . . . . . . . . 26
SETUP . . . . . . . . . . . . . . . . . . . . . . . . . . . . . . 27
Station list . . . . . . . . . . . . . . . . . . . . . . . . . . 26
Switching incoming messages on or off . . . 27
Switching on . . . . . . . . . . . . . . . . . . . . . . . . . 25
Updating the station list . . . . . . . . . . . . . . . 27
Data, deleting See: Deleting . . . . . . . . . . . . . . . . . . . . . . . 100
Day or night design . . . . . . . . . . . . . . . . . . . . . 100
103
Index
 1
1 2
2 3
3 4
4 5
5 6
6 7
7 8
8 9
9 10
10 11
11 12
12 13
13 14
14 15
15 16
16 17
17 18
18 19
19 20
20 21
21 22
22 23
23 24
24 25
25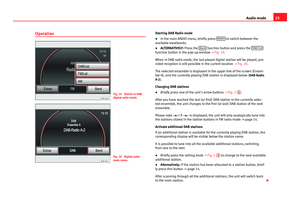 26
26 27
27 28
28 29
29 30
30 31
31 32
32 33
33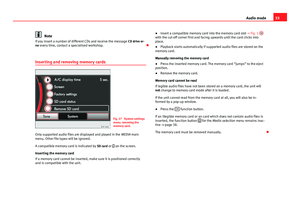 34
34 35
35 36
36 37
37 38
38 39
39 40
40 41
41 42
42 43
43 44
44 45
45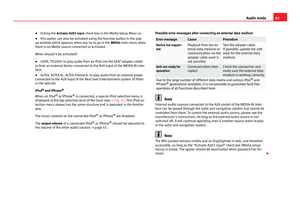 46
46 47
47 48
48 49
49 50
50 51
51 52
52 53
53 54
54 55
55 56
56 57
57 58
58 59
59 60
60 61
61 62
62 63
63 64
64 65
65 66
66 67
67 68
68 69
69 70
70 71
71 72
72 73
73 74
74 75
75 76
76 77
77 78
78 79
79 80
80 81
81 82
82 83
83 84
84 85
85 86
86 87
87 88
88 89
89 90
90 91
91 92
92 93
93 94
94 95
95 96
96 97
97 98
98 99
99 100
100 101
101 102
102 103
103 104
104 105
105 106
106 107
107 108
108 109
109 110
110 111
111
If the language selected through the instrument panel is available in the ra-
dio and navigation system, the language in both systems becomes the se-
lected language.
If th")

Settings (SETUP)
Sound, volume and system settings
Introduction
Pressing the SETUP unit button first opens a
context-sensitive settings menu
for the currently selected mode.
Addi")
.AUXAuxiliary inputEONSupports other networks (Enhanced Other Networks).FMFrequency modulation (")