Page 65 of 167

64Navigation destinations* that you set in the directory as a top destination
⇒ page 115 are displayed in the main navigation menu under the “Start
route guidance” function.
U")
NAME (Directory)
64Navigation destinations* that you set in the directory as a top destination
⇒ page 115 are displayed in the main navigation menu under the “Start
route guidance” function.
Using the (directory) button, you can call up all entries with and
without a stored navigation destination*. Through the Load from directory *
function, ⇒page 118 you can call up all entries with stored navigation
destination.Creating a new entry in the directory
–Press the ⇒page 9 function button.
– Select New entry ⇒ page 63, fig. 78 .
– Select Surname ⇒ fig. 79 and enter a name using the alphanu-
meric keyboard.
– Select OK in the alphanumeric keyboard to confirm the entry.
– Select additional data fields and enter the desired data ⇒fig. 80 .A name must first be entered. All other fields are “greyed out” and cannot be
selected ⇒fig. 79 . Once you have entered a name, you can enter the
remaining data
Selecting a text field automatically activates an alphanumeric keyboard that
allows letters and numbers to be entered.
The entries in the directory are stored automatically.
When you have created a directory card, press the button to create
the next next entry.
NAME
Fig. 79 Directory:
Entering a name for a new
entryFig. 80 Directory: Name
entered, remaining data
fields can be completed
NAME
RETURN
media_systemE_EN.book Seite 64 Montag, 21. September 2009 1:48 13
Page 66 of 167
65
Operating
RADIO, MEDIA (audiovisual
systems)
NAME, TEL
NAV, INFO
CAR, SETUP
Searching a directory entry
Directory entries are located by surname.– Press the ⇒page 9 function")
NAME (Directory)65
Operating
RADIO, MEDIA (audiovisual
systems)
NAME, TEL
NAV, INFO
CAR, SETUP
Searching a directory entry
Directory entries are located by surname.– Press the ⇒page 9 function button.
–Select Find entry ⇒ fig. 81.
– Enter the name you are looking for ⇒page 20 over the alphanu-
meric keyboard.The entries found will be displayed in a list. They can also be subsequently
modified ⇒page 65.
It is no t n e ces sa r y t o e n te r a na me in fu ll to f in d i t, b ut t h is c a n re d uc e t h e s ize
of the entry selection provided.
Note
You can also select an entry through the Show list function ⇒page 65.
Editing a directory entry–Press the ⇒page 9 function button.
– Select Find entry or Show list ⇒ page 63, fig. 78 .
– Search and select the entry that is to be changed ⇒ fig. 82 and
make your changes.Selecting a text field automatically activates an alphanumeric keyboard that
allows letters and numbers to be entered.Viewing entries–Press the ⇒page 9 function button.
– Select Show list ⇒ fig. 81 . All directory entries will be listed.Using the control knob, you can select individual entries from this list to recall
or change the stored data (phone number, navigation destination*)
⇒page 65.
Fig. 81 Directory:
Searching directory entry
NAME
Fig. 82 Directory: Edit a
stored entry
NAMENAME
media_systemE_EN.book Seite 65 Montag, 21. September 2009 1:48 13
Page 67 of 167

66Deleting individual directory entries– Press the ⇒page 9 function button.
– Select Find entry or Show list ⇒ page 65, fig. 81 .
– Select the entry that you want to del")
NAME (Directory)
66Deleting individual directory entries– Press the ⇒page 9 function button.
– Select Find entry or Show list ⇒ page 65, fig. 81 .
– Select the entry that you want to delete from the directory ⇒page 65, fig. 82 .
– Select Delete this entry .
– Confirm the message Are you sure that you want to delete this entry? with Ye s. The selected directory entry is deleted.Deleting all directory entries– Press the ⇒page 9 function button.
– Select Delete directory ⇒ fig. 83 . –Confirm the message Are you sure you want to delete all entries
from the directory? with Ye s. All directory entries will be
deleted.
Setting a directory navigation destination–Press the ⇒page 9 function button.
– Select an entry ⇒ page 65 or create a new entry ⇒page 64.
– Select, as required, business or private Category .
– Select Navigation destination ⇒ fig. 84.
– Enter the data for the navigation destination or
– Select Create from current position or Copy from last
destinations to import the destination data from one of the
previous navigation destinations.
– If desired, select Display as top destination to display the navi-
gation destination in a destination entry menu ⇒page 115.
NAME
Fig. 83 Directory: Delete
all directory entries
NAME
Fig. 84 Directory: Enter
navigation destination for
an entry
NAME
media_systemE_EN.book Seite 66 Montag, 21. September 2009 1:48 13
Page 68 of 167
67
Operating
RADIO, MEDIA (audiovisual
systems)
NAME, TEL
NAV, INFO
CAR, SETUP
You can store two navigation destinations for one directory entry, one for the
business
category and a")
NAME (Directory)67
Operating
RADIO, MEDIA (audiovisual
systems)
NAME, TEL
NAV, INFO
CAR, SETUP
You can store two navigation destinations for one directory entry, one for the
business
category and another for the private category.
If the Display as top destination function shows a check mark (
) after it, this
function is active. These navigation destinations are shown in the main navi-
gations menu ⇒page 115 under the Start route guidance menu item.
Press the button after you have entered the navigation destination
data to return to the directory card; you can then enter additional data for the
entry as desired.
Through the directory, you can call up all entries with and without stored navi-
gation destination. You can open the directory entries with navigation desti-
nation in the navigation menu by using the control button with the Memory
function and by selecting the Load from directory function ⇒page 118.
Note
If you have not inserted a navigation DVD into the navigation system drive,
you cannot use the navigation destination function ⇒page 22, fig. 24 .
RETURN
media_systemE_EN.book Seite 67 Montag, 21. September 2009 1:48 13
Page 69 of 167

Mobile phone system*
68Mobile phone system*IntroductionA mobile phone can be connected to the on-board phone
system and operated via the navigation system, the multi-
function steering wheel*, the telephone speech control
system* or the speech dialogue system*.The mobile phone adapter is located either on the centre console or in the
centre armrest. A special mobile phone adapter ⇒page 69 is needed in
order to connect your mobile phone to this adapter. Mobile phone adapters
are available from your Dealer or specialist retailers.
You can then operate your mobile phone using the navigation system, the
multi-function steering wheel* ⇒page 12 or the speech dialogue system*
⇒ page 86. You can also use the talk button * on the mobile phone
adapter to answer and end a call.
When your mobile phone is in the mobile phone adapter, call signals are sent
and received via the external car aerial. This ensures good transmission
quality and keeps the mobile phone battery charged.
WARNING
•According to the health authorities, mobile phones may interfere with
the function of pacemakers. A minimum distance of 20 cm should therefore
be kept between the mobile phone aerial and the pacemaker.
−Do not carry a mobile phone in your breast pocket directly over the
pacemaker when the phone is switched on.
− If you suspect interference, switch the mobile phone off immedi-
ately.
•Please direct your full attention to the road at all times! As the driver,
you bear the responsibility for road safety. Therefore, you should only use
the functions in a manner that allows you to maintain control of the vehicle
in all situations.Caution
•Always obey the laws controlling the use of telephones in vehicles!•Always switch off your mobile phone in areas where using mobile phones
is prohibited!•Switch off the telephone in all areas where there may be a risk of explo-
sion. Remember that these areas may not always be adequately marked.
Such places are filling stations, fuel and chemical storage facilities or trans-
port vehicles and other places where fumes, chemicals (e.g. from leaking
propane or fuel vapours in vehicles or buildings) or large quantities of dust
particles (e.g. from flour or wood) could accumulate in the air. This warning
also applies to all other places where you would normally switch off your
engine.Note
•In order to use the mobile phone functions, your mobile phone must be
compatible with the mobile phone adapter in the vehicle and the functions
must be supported by your service provider.•The range of the handset may be affected in isolated areas (such as a
tunnel or underground garage).•Some places have no range at all. You will not be able to use the tele-
phone in these places.
WARNING (continued)
media_systemE_EN.book Seite 68 Montag, 21. September 2009 1:48 13
Page 70 of 167

NAME, TEL
NAV, INFO
CAR, SETUP
•In some cases there may be a delay before the connection is established
between the mobile phone")
Mobile phone system*69
Operating
RADIO, MEDIA (audiovisual
systems)
NAME, TEL
NAV, INFO
CAR, SETUP
•In some cases there may be a delay before the connection is established
between the mobile phone adapter and the navigation system. During this
time the display will show the message “Telephone not available”.•For up-to-date information on the mobile phone adapter, please ask your
dealer or refer to our website.InstallationInstalling and removing the mobile phone adapter
The mobile phone adapter is fitted to the top of the mounting
unit.Installing the mobile phone adapter
– Open the central armrest, where applicable. – Slide the lock on the mobile phone adapter ⇒
fig. 85 into the
guide tab of the mounting unit .
– Push the bottom part of the mobile phone adapter down to make it engage.
Removing the mobile phone adapter
– Open the central armrest, where applicable.
– If the mobile phone is in the adapter, take it out ⇒page 70.
– Carefully pull the rear section of the adapter upwards out of the retainer.
Caution
To avoid damaging the adapter, you should only remove the mobile phone
adapter when necessary.
Note
•To avoid system malfunctions, ensure that the adapter unit is properly
attached.•The adapter set you require depends on your type of mobile phone and
may be different from the adapter version shown in the illustration.
Fig. 85 Installing the
mobile phone adapter
A2
A1
A2
media_systemE_EN.book Seite 69 Montag, 21. September 2009 1:48 13
Page 71 of 167

Mobile phone system*
70Inserting/Removing the mobile phoneImportant: The mobile phone adapter must be fitted ⇒page 69. Inserting
– Place the mobile phone in the phone adapter ⇒
fig. 86.
– Press the mobile phone into the adapter until it locks into place. The mobile phone will be connected up to the mobile phone
aerial and the battery will be charged.
Removal
– Press the release button ⇒fig. 87.
– Lift the mobile phone out.
Should you insert the mobile phone into the adapter or remove it during a
call, the audio output or the connection may be interrupted.
A Bluetooth compatible mobile phone is required for the wireless connection
via Bluetooth ⇒page 71.
WARNING
Always make sure that the mobile phone is properly engaged. In the event
of an accident, a mobile phone that is not securely fitted could be flung out
of the adapter unit and injure the driver or passengers.
Caution
The mobile phone could possibly be damaged if it is not properly inserted in
the adapter and falls out when driving.
Note
•The use of mobile phones in the vehicle can generate electromagnetic
fields.
Fig. 86 Inserting the
mobile phone into the
phone adapterFig. 87 Removing the
mobile phone from the
phone adapter
AA
media_systemE_EN.book Seite 70 Montag, 21. September 2009 1:48 13
Page 72 of 167

NAME, TEL
NAV, INFO
CAR, SETUP
−
Therefore, you should always operate mobile phones with an external
aerial. It is also valid fo")
Mobile phone system*71
Operating
RADIO, MEDIA (audiovisual
systems)
NAME, TEL
NAV, INFO
CAR, SETUP
−
Therefore, you should always operate mobile phones with an external
aerial. It is also valid for the use of mobiles using Bluetooth technology.
The external aerial directs the electromagnetic fields to the exterior,
which reduces the field strength in the vehicle interior.
− If retrofitting an external aerial, please ensure that it is installed
correctly.
Bluetooth®
Bluetooth enables a wireless connection between a mobile
phone and the hands free telephone system.The mobile phone
3) must be linked once to the mobile phone
adapter in the vehicle. This procedure involves various steps,
depending on the mobile phone you are using. After switching the
ignition on (and with the vehicle at a standstill), your mobile phone
can be connected to the mobile phone adapter.
– Make sure that no other mobile phone is connected to the mobile phone interface via Bluetooth.
– Switch the ignition on.
– Select the appropriate menu option on your mobile phone to search for Bluetooth compatible devices (i.e. the mobile phone
interface).
– Connect the mobile phone to the mobile phone interface. Your on-board phone system will use the name “Seat XXXX” when it
connects with the mobile phone. – Enter the Bluetooth PIN (“1234”) for the on-board phone system
within about 30 seconds.
4)
– Wait until your mobile phone indicates that it has bonded. The Bluetooth symbol ⇒page 16, fig. 16 will appear in the display.Up to four mobile phones
You can link up to four mobile phones to the mobile phone adapter. However,
it is only possible to activate one connection at a time. If you bond a fifth
mobile phone to the mobile phone interface, the system will delete the device
which has not been used for the longest time in conjunction with the mobile
phone interface.
Connecting and disconnecting
A mobile phone which has been linked to the mobile phone adapter and is
ready to operate will be connected automatically when you switch the ignition
on. On some mobile phones, you have to confirm the connection.
The Bluetooth connection is terminated when the key is removed from the
ignition lock. With most mobile phones the Bluetooth connection will also be
terminated when you insert the mobile phone in the adapter.
Autonomy
The Bluetooth connection between the mobile phone and the mobile phone
adapter is restricted to the interior of the vehicle. The connection can be
susceptible to interference caused by other electronic devices or obstacles
between the devices. For example, the mobile phone adapter may have diffi-
culty detecting your mobile phone or communicating with it if you keep it in
your jacket pocket.
3)Please make sure that the mobile phone supports the hands free profile.
4)Yo u s h o u l d ch a n g e t h e B l u e t o o t h P I N ⇒page 84 to prevent unauthorised use of your
mobile phone.
media_systemE_EN.book Seite 71 Montag, 21. September 2009 1:48 13
 1
1 2
2 3
3 4
4 5
5 6
6 7
7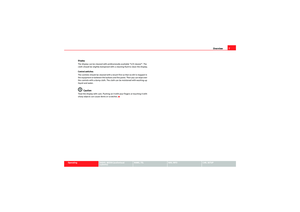 8
8 9
9 10
10 11
11 12
12 13
13 14
14 15
15 16
16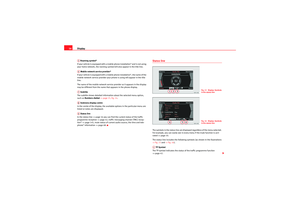 17
17 18
18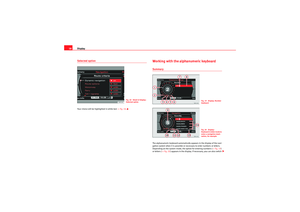 19
19 20
20 21
21 22
22 23
23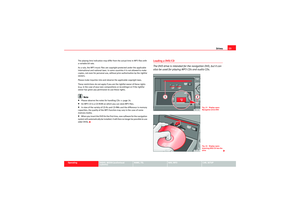 24
24 25
25 26
26 27
27 28
28 29
29 30
30 31
31 32
32 33
33 34
34 35
35 36
36 37
37 38
38 39
39 40
40 41
41 42
42 43
43 44
44 45
45 46
46 47
47 48
48 49
49 50
50 51
51 52
52 53
53 54
54 55
55 56
56 57
57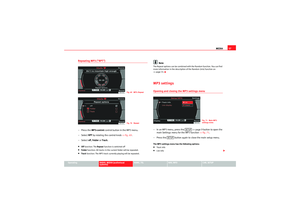 58
58 59
59 60
60 61
61 62
62 63
63 64
64 65
65 66
66 67
67 68
68 69
69 70
70 71
71 72
72 73
73 74
74 75
75 76
76 77
77 78
78 79
79 80
80 81
81 82
82 83
83 84
84 85
85 86
86 87
87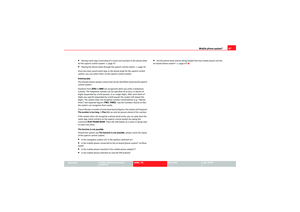 88
88 89
89 90
90 91
91 92
92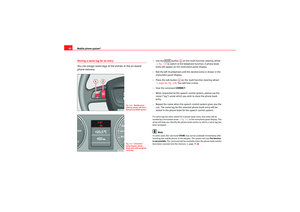 93
93 94
94 95
95 96
96 97
97 98
98 99
99 100
100 101
101 102
102 103
103 104
104 105
105 106
106 107
107 108
108 109
109 110
110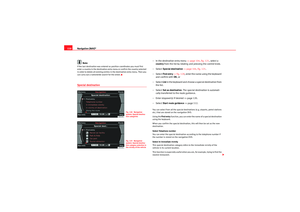 111
111 112
112 113
113 114
114 115
115 116
116 117
117 118
118 119
119 120
120 121
121 122
122 123
123 124
124 125
125 126
126 127
127 128
128 129
129 130
130 131
131 132
132 133
133 134
134 135
135 136
136 137
137 138
138 139
139 140
140 141
141 142
142 143
143 144
144 145
145 146
146 147
147 148
148 149
149 150
150 151
151 152
152 153
153 154
154 155
155 156
156 157
157 158
158 159
159 160
160 161
161 162
162 163
163 164
164 165
165 166
166