Page 25 of 167

Drives
24
Do not use any force when inserting the navigation DVD, MP3 CD or
audio CD into the drive. It will be drawn into the slot automatically.
– Press the button ⇒page 23, fig. 25 to open the display.
– C heck to make su re there is n o navigation DVD, MP3 C D or audio CD already in the drive.
– Hold the navigation DVD, MP3 CD or audio CD by the hole in the centre and the outer edge ⇒ page 23, fig. 26.
– Guide the navigation DVD, MP3 CD or audio CD straight (label side up) into the drive ⇒page 23, fig. 25 . The DVD/CD will be
pulled in automatically.Use the CD function ⇒page 51 for operating audio CDs (CD-A) inserted in
this drive. For MP3 CDs, use the MP3 function ⇒page 54.
If you insert an MP3 CD and do not play it immediately, the ID3 tags will load
in the background. If you start playing the MP3 CD immediately, the ID3 tag
for the current track will be displayed.
When you have inserted the navigation DVD into the drive, you can use the
navigation functions and the system will display the TMC traffic reports.
If the message Please check navigation DVD appears in the MMI display, the
Navigation function cannot be used. For possible causes, refer to ⇒page 26.
If Navigation being initialised... Please wait. is displayed on the display, the
navigation system is loading (start phase). You can use the system once the
message disappears and a navigation menu is displayed.
Note
•Please observe the notes for handling CDs ⇒page 26.
•In view of the variety of CD-Rs and CD-RWs and the difference in memory
capacities, the quality of the MP3 function may vary in the case of some
memory media.•When you insert the navigation DVD for the first time, new software for the
navigation system will automatically be installed. It will then no longer be
possible to use older navigation DVDs.Ejecting a DVD/CD– Press the button ⇒ fig. 27 to open the display.
– When the display is fully open, press the Eject button ⇒fig. 27 .
NotePlease observe the notes for handling CDs ⇒page 26.
A2A1
Fig. 27 Display open:
Ejecting navigation DVD
A2
A1
media_systemE_EN.book Seite 24 Montag, 21. September 2009 1:48 13
Page 26 of 167

NAME, TEL
NAV, INFO
CAR, SETUP
Loading a memory card
The navigation system is equipped with two MP3 memory
card readers.
– Press the button")
Drives25
Operating
RADIO, MEDIA (audiovisual
systems)
NAME, TEL
NAV, INFO
CAR, SETUP
Loading a memory card
The navigation system is equipped with two MP3 memory
card readers.
– Press the button ⇒page 24, fig. 27 to open the display.
– Insert the memory card (printed side faces up, contact surface faces down) into the slot of the card reader ⇒fig. 28. The
missing corner of the memory card must face to the front right (in
the direction of travel) ⇒fig. 29 .
– T h e n p u s h t h e m e m o r y c a r d i n t o t h e s l o t u n t i l y o u f e e l i t e n g a g e s . The memory card must be flush with the surrounding area.If the memory card has been inserted correctly the display (when folded
open) will indicate the formatted memory capacity of the card. If there are
MP3 audio files which can be read by the MP3 player stored on the card, the
display will also show the file format “MP3 audio” or the data carrier name (if
allocated).
Do not remove the card from the drive while the message Reading card... Do
not remove. is shown on the display. If the memory card is removed, data
could be lost. The memory card will then have to be re-formatted before it can
be used again.
If you insert a memory card and do not play it immediately, the ID3 tags will
load in the background. If you start playing the memory card immediately, the
ID3 tag for the current track will be displayed.
Use the MP3 function to play back a memory card which is already loaded in
the player ⇒ page 54.
Note
•The memory capacity indicated in the display is the formatted memory
capacity of the SD/MMC card you are using. It may differ from the capacity
printed onto the card.•The time required for loading the memory card depends on the number of
files on the memory card. The more files there are the longer it will take to load
the memory card.
Fig. 28 Display open:
Inserting memory cardFig. 29 Display open:
Position of the memory
card during the loading
process
A2
media_systemE_EN.book Seite 25 Montag, 21. September 2009 1:48 13
Page 27 of 167

Drives
26•Please observe the notes for handling memory cards ⇒page 28.Removing a card– Press the button ⇒page 24, fig. 27 to open the display.
– Briefly press the memory card ⇒fig. 30 . The card is released
from the slot.
– Remove the memory card.When the memory card has been removed, the open display will show Empty.
Do not remove the card from the drive while the message Reading card... Do
not remove. is shown on the display. If the memory card is removed, data
could be lost. The memory card will then have to be re-formatted before it can
be used again.
Note
Please observe the notes for handling memory cards ⇒page 28.General instructions on CD modeRequirements for good sound reproduction
Please note the following in order to ensure perfect high-quality sound repro-
duction and avoid damage to media drives:
Do not use CDs or navigation DVDs that are damaged or scratched.
Do not play CD singles (8 cm / 3" in diameter).
Do not play CDs that are not round (shape CDs).
Do not place adhesive labels on a CD.
Do not use protective rings.
Fig. 30 Display open:
Removing a memory card
A2
Fig. 31 CDs that should
not be used
AAABACADAE
media_systemE_EN.book Seite 26 Montag, 21. September 2009 1:48 13
Page 28 of 167

NAME, TEL
NAV, INFO
CAR, SETUP
Do not use dirty CDs or navigation DVDs
Do not use CD covers/stabilisers
Always keep unused CDs or navigation DVDs")
Drives27
Operating
RADIO, MEDIA (audiovisual
systems)
NAME, TEL
NAV, INFO
CAR, SETUP
Do not use dirty CDs or navigation DVDs
Do not use CD covers/stabilisers
Always keep unused CDs or navigation DVDs in a suitable case and never
expose them to direct sunlight.
Cleaning drives and CDs or navigation DVDs
Never use a CD player cleaning disc to clean drives.
Clean CDs or navigation DVDs with a soft lint-free cloth. Wipe the disc in a
straight line from the centre outwards. If necessary, stubborn stains can be
removed with a commercially available CD cleaner or with isopropyl alcohol.
Please never use petrol, paint thinner or vinyl record cleaner, as these can
damage the CDs or the navigation DVDs.
Use of laser equipment
Laser devices are categorised according to DIN IEC 76 (CO) 6/VDE 0837 into
four safety classes. The audio devices used in your vehicle are classified as
safety class 1. Lasers used in devices that fall into this category are very weak
and well shielded, so there is no danger if used correctly.
Error messages
The following may be the reason for a read error on the display:
Note
•It is possible that you may not be able to play CDs which are copy-
protected or CDs containing CD ROM format that do not correspond to the
standard for audio CDs in your player. Only CDs that comply with this
standard have the logo “Compact Disc Digital Audio” printed on the CD.•At extremely high or low outside temperatures, it is possible that the play-
back of a DVD/CD will temporarily not function. A thermostat switch is
installed to protect the DVD/CDs and the reading laser.•Never remove the cover of the equipment. The equipment has no compo-
nents that can be serviced by the owner.Problem
Solution
The navigation DVD, audio CD or
MP3 CD is dirty.
Clean the CD.
The navigation DVD, audio CD or
MP3 CD is scratched.
Check the CD for scratches.
The navigation DVD, audio CD or
MP3 CD has been inserted upside
down.
Insert the CD with the printed side
upwards.
There is condensation on the naviga-
tion DVD, audio CD or MP3 CD.
Wait until the equipment is dry.
The drive mechanism is malfunction-
ing.
Contact a Dealer or qualified work-
shop.
media_systemE_EN.book Seite 27 Montag, 21. September 2009 1:48 13
Page 29 of 167

Drives
28Instructions relating to memory cardsThe system is compatible with SD and MMC memory cards.The two MP3 memory card drives have been tested for use with many prod-
ucts currently available on the market. However, there may be some memory
cards which are not supported.
Store the memory cards in a suitable case to protect them from dirt and dust
and to avoid scratches or other kind of damage.
Caution
Only use one-piece SD/MMC memory cards. If you use SD/MMC adapter
cards (more than one piece), the memory card can detach from the adapter
(e.g. caused by jolting, etc). Parts could then get stuck in the drive.
Note
The quality of the MP3 function may vary for certain types of memory card.iPod interface*General notes
The iPod interface can be used to connect an iPod to your
navigation system and allows you to play audio files directly
over the vehicle's sound system.The iPod interface is located in your vehicle's glove box. It is compatible with
3rd generation or higher iPod
2) devices (made from about 2003 onwards),
with the exception of the iPod Shuffle. The iPod is controlled using the CD function
⇒page 48.
•The navigation system orders (first numerically and then alphabetically)
the playlists with the tracks stored in the iPod and then assigns them in the
sequence CD 1 to CD 5. For easier playing of these playlists through the
vehicle's sound system, we recommend you create five playlists (e.g. 1.... to
5....) in your iPod.•If you select CD 6, all the tracks on the iPod will be played even if they are
stored in different playlists.
Information stored on the iPod, such as artist, track, album and genre, or the
name of a playlist, does not appear on the navigation system display.Caution
Very high or very low temperatures (a common occurrence in a vehicle's inte-
rior) can cause damage to the iPod and/or impair its performance.•Please do not leave your iPod in the vehicle in case of extreme tempera-
tures.Note
Please refer to the iPod operating instructions for important information on
how to use your iPod.2)iPod is a registered trademark of Apple Computer Inc.
media_systemE_EN.book Seite 28 Montag, 21. September 2009 1:48 13
Page 30 of 167

NAME, TEL
NAV, INFO
CAR, SETUP
Choosing the adapter
The iPod interface is supplied with a choice of adapters for
connecting your iPod.iPods come")
Drives29
Operating
RADIO, MEDIA (audiovisual
systems)
NAME, TEL
NAV, INFO
CAR, SETUP
Choosing the adapter
The iPod interface is supplied with a choice of adapters for
connecting your iPod.iPods come in different sizes. Therefore, you will need to match the iPod inter-
face ⇒fig. 32 to your iPod using one of the adapters supplied. You will
need two adapters for certain iPod models (touch, 5G (video), classic).
The iPod interface is supplied with the following adapters:
1. Narrow adapters of different heights for inserting into the central slot
below the bay . 2.
Flat adapter plates for inserting into the slot above the bay .
3. Wide adapter casing for inserting into the bay .
There are also some iPods that do not require an adapter (e.g. iPod Photo 60
GB)
Caution
The iPod must be firmly seated in the iPod interface. The iPod may be
damaged if it is not installed correctly.
Fig. 32 iPod interface
with slots for adapters
A1A2
iPod
Nº adapter
classic 80 GB,
4G 20 GB
1
5G (video) 30 GB, touch
3
5G (video) 60/80 GB,
Photo 30 GB
4
classic 160 GB,
3G 10-20 GB
5
iPod
Nº adapter
classic 160 GB,
5G (video) 30/60/80 GB
8
classic 80 GB
12
touch
13
iPod
Nº adapter
nano 2G
10
nano 3G
11A3
A4
media_systemE_EN.book Seite 29 Montag, 21. September 2009 1:48 13
Page 31 of 167

Drives
30•Make sure that the iPod is fixed in place with one of the adapters
supplied.Note
•Your Dealer also offers appropriate adapters for iPods that are not latest
generation.•For further information on adapter adaptation, please see the information
enclosed with the adapters supplied.Inserting the iPod into the iPod interface– Switch on the navigation system ⇒ page 4.
– With the display facing upwards and the contact towards the front, slide the iPod into the bay until you hear it engages. The
iPod will switch on automatically and the battery will be charged.
– If the navigation system does not detect the iPod after you insert it, please “reset” the iPod (refer to the iPod operating instruc-
tions).To start the iPod, press the button ⇒page 48.
The iPod is switched off automatically when you switch off the navigation
system or the ignition.
Note
•To ensure optimum sound quality, you should enable the “sound check”
setting on the iPod and disable the “EQ” (equaliser) before inserting the iPod
(please refer to the iPod operating instructions).•Slight scoring marks may occur on the iPod when used with the adapter.
Functions
The iPod is operated using the navigation system controls.– To start the iPod, press the button.The following functions are available:•Play all tracks stored on the iPod•Select directly and play up to five track lists•Switch between the different track lists•Fast forward and rewind within a track•Change tracks within a playlist•Play tracks in shuffle mode ("shuffle")•SCAN function
For further information on handling, please refer to the “MEDIA” chapter
⇒ page 48.TipsHere are some tips and points to remember when using the iPod in the
vehicle:•Track numbers appear with a maximum of two digits in the navigation
system display. The first digit is suppressed if you select a track with a three-
digit number, i.e. track 125 and track 25 are both displayed as track “25”. For
this reason we do not recommend allocating more than 99 tracks to each
playlist.•If you reach the end of a playlist when selecting a track directly
(forward/reverse), the count is resumed at track “1”.
MEDIA
MEDIA
media_systemE_EN.book Seite 30 Montag, 21. September 2009 1:48 13
Page 32 of 167

NAME, TEL
NAV, INFO
CAR, SETUP
•The track numbers are counted up sequentially in the navigation system
display when you play tracks in shuffle")
Drives31
Operating
RADIO, MEDIA (audiovisual
systems)
NAME, TEL
NAV, INFO
CAR, SETUP
•The track numbers are counted up sequentially in the navigation system
display when you play tracks in shuffle mode (MIX).•99 tracks are permanently shown on the navigation system display. This
is even valid when the list contains a smaller number of tracks.•When selecting a track, we recommend you not to jump forward or back
more than 49 tracks at a time. If you jump further than this, the iPod interface
may not select the track you intended.USB interface*Introduction
You can connect a memory stick or an MP3 player to the
vehicle's on-board navigation system via the USB port.The USB port is located in your vehicle's glove box. It is compatible with all
memory sticks and MP3 players approved by SEAT. Problems can occur if you
use a memory stick or MP3 player not listed in the table. Your memory device
must be USB-certified as a minimum requirement.
Caution
Very high or very low temperatures (a common occurrence in a vehicle's inte-
rior) can cause damage to the memory stick or MP3 player and/or impair its
performance.•Never leave your memory stick or MP3 player in the vehicle in case of
extreme temperatures.Note
Please refer to the manufacturer's operating instructions for important infor-
mation on how to use your memory stick or MP3 player.
Connecting a memory stick / MP3 player
For problem-free operation, use only approved memory sticks
and MP3 players.– Switch on your vehicle's sound system.
– Enable radio mode.
–Plug the memory stick into the USB port ⇒fig. 33 (arrow), or
– Connect the MP3 player to a standard USB extension cable and plug the extension cable into the USB port ⇒.
– Before you remove the memory device, switch the audio source for the sound system back to radio.It may take several seconds for the USB port to detect the memory device.
The MP3 player is switched off automatically when you switch the sound
system or the ignition off. The USB port stores the position of the last track
Fig. 33 USB port in glove
box
media_systemE_EN.book Seite 31 Montag, 21. September 2009 1:48 13
 1
1 2
2 3
3 4
4 5
5 6
6 7
7 8
8 9
9 10
10 11
11 12
12 13
13 14
14 15
15 16
16 17
17 18
18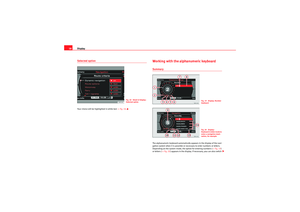 19
19 20
20 21
21 22
22 23
23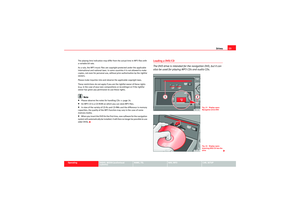 24
24 25
25 26
26 27
27 28
28 29
29 30
30 31
31 32
32 33
33 34
34 35
35 36
36 37
37 38
38 39
39 40
40 41
41 42
42 43
43 44
44 45
45 46
46 47
47 48
48 49
49 50
50 51
51 52
52 53
53 54
54 55
55 56
56 57
57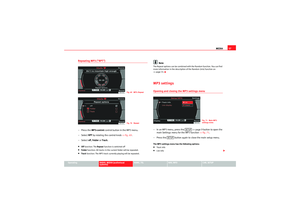 58
58 59
59 60
60 61
61 62
62 63
63 64
64 65
65 66
66 67
67 68
68 69
69 70
70 71
71 72
72 73
73 74
74 75
75 76
76 77
77 78
78 79
79 80
80 81
81 82
82 83
83 84
84 85
85 86
86 87
87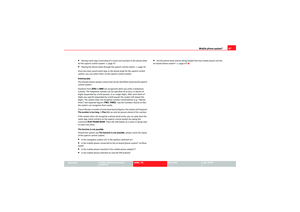 88
88 89
89 90
90 91
91 92
92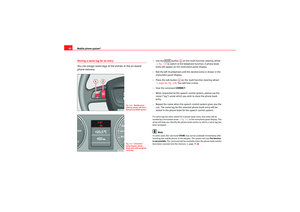 93
93 94
94 95
95 96
96 97
97 98
98 99
99 100
100 101
101 102
102 103
103 104
104 105
105 106
106 107
107 108
108 109
109 110
110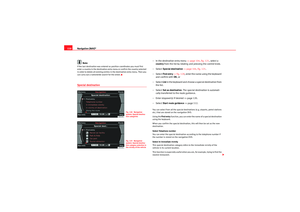 111
111 112
112 113
113 114
114 115
115 116
116 117
117 118
118 119
119 120
120 121
121 122
122 123
123 124
124 125
125 126
126 127
127 128
128 129
129 130
130 131
131 132
132 133
133 134
134 135
135 136
136 137
137 138
138 139
139 140
140 141
141 142
142 143
143 144
144 145
145 146
146 147
147 148
148 149
149 150
150 151
151 152
152 153
153 154
154 155
155 156
156 157
157 158
158 159
159 160
160 161
161 162
162 163
163 164
164 165
165 166
166