2012 RENAULT KOLEOS Lights
[x] Cancel search: LightsPage 178 of 233

changing a wheel.................................. (up to the end of the DU)
puncture ................................................ (up to the end of the DU)
lifting the vehicle changing a wheel ............................ (up to the end of the DU)
jack ....................................................... (up to the end of the DU)
5.4
ENG_UD21005_5
Changement de roue (X45 - H45 - Renault)
ENG_NU_977-2_H45_Ph2_Renault_5
Jaune NoirNoir texte
Attach the wheelbrace 1 and the jack
handle 6 (in groove 5).
Turn the wheelbrace until the wheel lifts
off the ground.
Changing a wheel
changIng a wheel (1/2)
Vehicles equipped with
jack, wheelbrace and wheel
wrench
Use the wheelbrace 1 to slacken off
the wheel bolts. Fit it so that you press
downwards rather than pulling up -
wards.
Start cranking up jack 4 by hand to
align the base plate (which should sit
flat against the ground) and until the
jack head 3 is in the centre of mark 2.
1
2
3
4
5
6
1
Switch on the hazard warn-
ing lights.
Keep the vehicle away from
traffic and on a level sur -
face where it will not slip (if neces -
sary, place a solid support under the
jack base).
Apply the parking brake and engage
a gear (first or reverse, or P for auto-
matic transmissions).
Ask all the passengers to leave the
vehicle and keep them away from
traffic.
To prevent any risk of injury
or damage to the vehi -
cle, raise the jack until the
wheel you are replacing is
a maximum of 3 centimetres off the
ground.
If the vehicle is not equipped with a
jack, wheelbrace or wheel wrench,
these can be obtained from an ap -
proved dealer.
Page 183 of 233

lightsfront ................................................. (up to the end of the DU)
lights changing bulbs ................................ (up to the end of the DU)
changing a bulb .................................... (up to the end of the DU)
indicators .............................................. (up to the end of the DU)
bulbs changing ......................................... (up to the end of the DU)
lights: dipped beam headlights .................. (up to the end of the DU)
lights: main beam headlights ..................... (up to the end of the DU)
lights: side lights ........................................ (up to the end of the DU)
lights: direction indicators .......................... (up to the end of the DU)
bulbs changing ......................................... (up to the end of the DU)
5.9
ENG_UD23533_3
Projecteurs lampes halogène : remplacement des lampes (H45 - X65 - Renault)
ENG_NU_977-2_H45_Ph2_Renault_5
Direction indicator lights
Undo bulb holder 1 a quarter of a turn.
Undo the bulb a quarter of a turn.
Bulb type: wy21w .
Front side light
Disconnect the bulb holder 3 then
remove the bulb.
Bulb type: w5w .
Headlights (changing bulbs)
halOgen heaDlIghts: changing bulbs
Dipped beam/main beam
headlights
Remove cover A or B then remove con-
nector 2 or 4 from the bulb. Unclip at -
tachment 6 or 5 then remove the bulb.
Bulb type: always use 55w anti UV
bulbs to prevent damage to the lights'
plastic glass.
Bulb 2 → h7 (long life)
Bulb 4 → h7
Do not touch the bulb glass. hold it
by its base.
When the bulb has been changed,
make sure you refit the cover correctly.
The bulbs are under pres -
sure and can break when
replaced.
Risk of injury.
1
aB
3
6
2
4
5
However, because the protective
covers need to be removed, you are
advised to have your bulbs replaced
by an approved dealer.
To comply with current legislation,
or as a precaution, you can obtain
an emergency kit from an approved
dealer containing a set of spare
bulbs and fuses.
The engine may be hot
when carrying out opera -
tions in close proximity. In
addition, the engine cooling
fan can come on at any moment.
Risk of injury.
Page 184 of 233

bulbschanging ......................................... (up to the end of the DU)
changing a bulb .................................... (up to the end of the DU)
bulbs changing ......................................... (up to the end of the DU)
lights changing bulbs ................................ (up to the end of the DU)
5.10
ENG_UD23534_3
Projecteurs lampes au xénon : remplacement des lampes (X45 - H45 - Renault)
ENG_NU_977-2_H45_Ph2_Renault_5
cleaning the headlights
As the headlights are made of plastic
glass, use a soft cloth or cotton wool
to clean them. If this does not clean it
properly, moisten the cloth with soapy
water, then wipe clean with a soft damp
cloth or cotton wool.
Finally, carefully dry off with a soft dry
cloth.
c leaning products containing alco -
hol must not be used.
XenOn heaDlIghts: changing bulbs
Because some components (the bat -
tery, its mounting) need to be removed,
you are advised to have your bulbs
replaced by an approved dealer.
Dipped beam headlights A
never remove cover A. fire hazard.
A special mounting is re -
quired to fit this type of
headlight, it is forbidden to
fit a headlight with xenon
bulbs to a vehicle which was not
designed for it.
cornering lights
Remove cover B , pull on the connec -
tor 2. Remove clip 3, pressing down on
it, then remove the bulb holder.
Bulb type: h7.
Front side light
Remove the cover B , then pull bulb
holder 4.
Bulb type: w5w .
Direction indicator lights
Turn the bulb holder 1 to the left.
Bulb type: wy21w .
Due to the danger involved
in handling high-voltage de-
vices, this type of bulb must
be replaced by an approved
dealer.
The engine may be hot
when carrying out opera -
tions in close proximity. In
addition, the engine cooling
fan can come on at any moment.
Risk of injury.
1
a
B
a
2
34
Page 185 of 233

bulbschanging ......................................... (up to the end of the DU)
fog lights ............................................... (up to the end of the DU)
changing a bulb .................................... (up to the end of the DU)
lights: fog lights ......................................... (up to the end of the DU)
bulbs changing ......................................... (up to the end of the DU)
lights additional ........................................ (up to the end of the DU)
lights fog lights ......................................... (up to the end of the DU)
5.11
ENG_UD25389_5
Projecteurs avant : feux de brouillard avant, additionnels (X45 - H45 - Renault)
ENG_NU_977-2_H45_Ph2_Renault_5
heaDlIghts: additional/front fog lights
Front fog lights 1
changing a bulb:
Contact an approved dealer.
additional lights
If you wish to fit fog lights or long range
headlights to your vehicle, consult an
approved dealer.
The bulbs are under pres -
sure and can break when
replaced.
Risk of injury.
1
Any operation on (or modi -
fication to) the electrical
system must be performed
by an approved dealer
since an incorrect connection might
damage the electrical equipment
(harness, components and in partic-
ular the alternator). In addition, your
Dealer has all the parts required for
fitting these units.
Page 186 of 233

bulbschanging ......................................... (up to the end of the DU)
changing a bulb .................................... (up to the end of the DU)
lights: side lights ......................................................... (current page)
lights: brake lights ...................................................... (current page)
bulbs changing ......................................... (up to the end of the DU)
lights: direction indicators ........................................... (current page)
5.12
ENG_UD23303_3
Feux arrière : remplacement des lampes (X45 - H45 - Renault)
ENG_NU_977-2_H45_Ph2_Renault_5
Jaune NoirNoir texte
Rear lights and side lights (changing bulbs)
rear lIghts anD sIDe lIghts: changing bulbs (1/3)
However, because bodywork compo -
nents need to be removed, you are ad-
vised to have your bulbs replaced by
an approved dealer.
removing the bulbs
Open the tailgate then unclip cover 1
using a flat blade screwdriver or simi -
lar tool.
Remove the cover 2 then remove the
nut behind.
When changing the bulb, do
not touch the electrical cir -
cuit in which the new bulb is
to be inserted.
You could damage the light.
The bulbs are under pres -
sure and can break when
replaced.
Risk of injury.
Release the light unit by pulling it back-
wards.
Undo bulb holder 3, 4 or 5 a quarter of
a turn then replace the bulb.
n ote: Ensure that the lead is in place
before inserting the light unit.
side light 3
Bulb type: w5w .
Indicator light 4
Bulb type: Py21w .
Brake light 5
Bulb type: P21w .
1
2
43
5
Page 187 of 233

lights:side lights ......................................................... (current page)
lights: reversing lights ................................................. (current page)
JauneNoirNoir texte
5.13
ENG_UD23303_3
Feux arrière : remplacement des lampes (X45 - H45 - Renault)
ENG_NU_977-2_H45_Ph2_Renault_5
rear lIghts anD sIDe lIghts: changing bulbs (2/3)
side lights and tailgate
reversing light
Remove the screws 7 on the tailgate
before removing the light unit 6 by
pushing it outwards.
Undo bulb holder 8 or 9 a quarter of a
turn then replace the bulb.
n ote: Ensure that the lead is in place
before inserting the light unit.
reversing light 8
Bulb type: w16w .
side light 9
Bulb type: w5w .
The bulbs are under pres -
sure and can break when
replaced.
Risk of injury.
8
9
7
6
high-level brake light 10
Consult an approved Dealer.
rear fog light 11(depending on vehicle)
Consult an approved Dealer.
Do not raise your vehicle
with the jack to change the
bulbs.
Risk of injury.
10
11
Page 188 of 233

lights:brake lights ...................................................... (current page)
side and number plate lighting changing bulbs ................................................. (current page)
side indicator lights changing bulbs ................................................. (current page)
lights: number plate lights .......................................... (current page)
5.14
ENG_UD23303_3
Feux arrière : remplacement des lampes (X45 - H45 - Renault)
ENG_NU_977-2_H45_Ph2_Renault_5
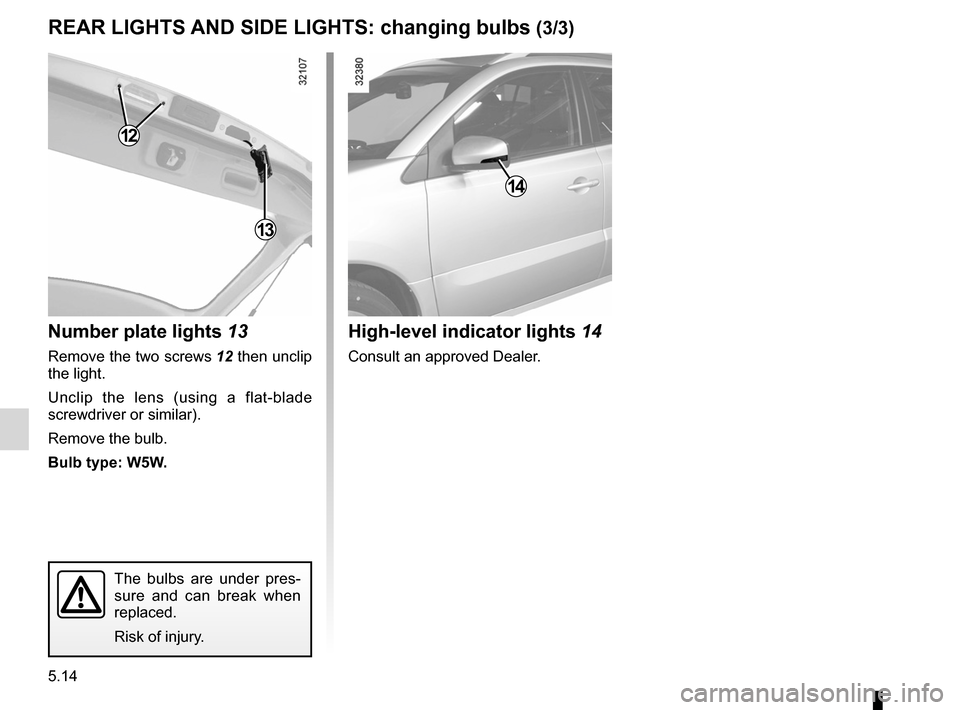
rear lIghts anD sIDe lIghts: changing bulbs (3/3)
number plate lights 13
Remove the two screws 12 then unclip
the light.
Unclip the lens (using a flat-blade
screwdriver or similar).
Remove the bulb.
Bulb type: w5w.
high-level indicator lights 14
Consult an approved Dealer.
The bulbs are under pres-
sure and can break when
replaced.
Risk of injury.
13
14
12
Page 189 of 233

courtesy light ........................................ (up to the end of the DU)
lighting: interior ............................................. (up to the end of the DU)
5.15
ENG_UD23660_3
Eclairage intérieur : remplacement des lampes (X45 - H45 - Renault)
ENG_NU_977-2_H45_Ph2_Renault_5
Interior lights (changing bulbs)
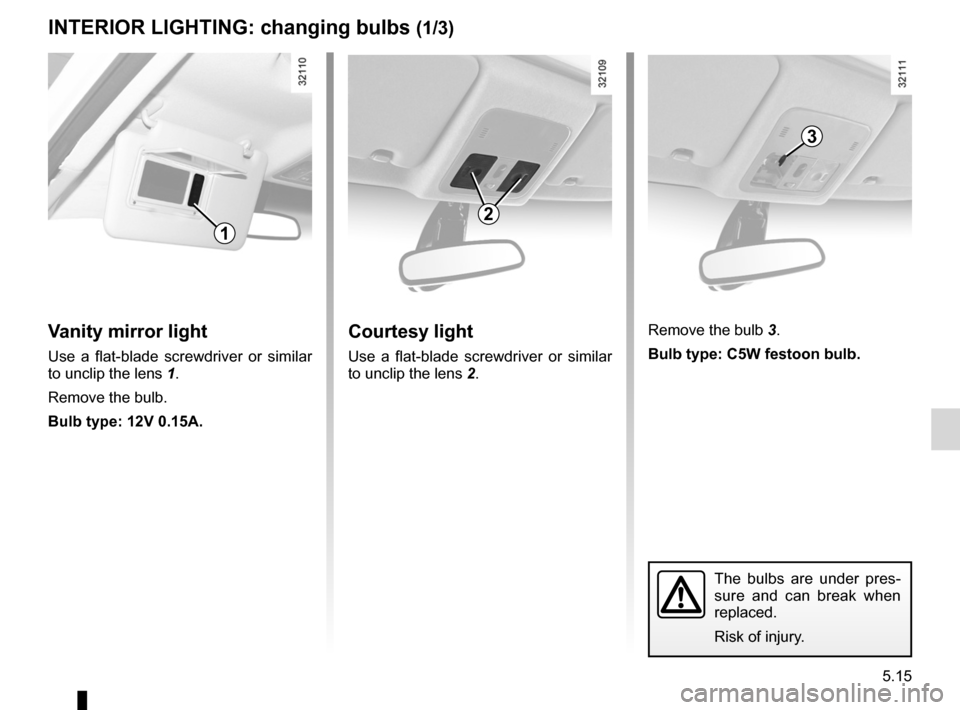
InterIOr lIghtIng: changing bulbs (1/3)
Vanity mirror light
Use a flat-blade screwdriver or similar
to unclip the lens 1.
Remove the bulb.
Bulb type: 12V 0.15a.
courtesy light
Use a flat-blade screwdriver or similar
to unclip the lens 2. Remove the bulb
3.
Bulb type: c5w festoon bulb.
The bulbs are under pres -
sure and can break when
replaced.
Risk of injury.
1
2
3