2012 RENAULT CLIO SPORT TOURER light
[x] Cancel search: lightPage 84 of 264
lights:dipped beam headlights ................................... (current page)
lighting: see-me-home ................................................... (current page)
1.78
ENG_UD10541_1
Éclairages et signalisations extérieures (X85 - B85 - C85 - S85 -\
K85 - Renault)
ENG_NU_853-8_BCSK85_Renault_1
Jaune NoirNoir texte
EXTERIOR LIGHTING AND SIGNALS (2/5)
kDipped beam
headlights
Manual operation
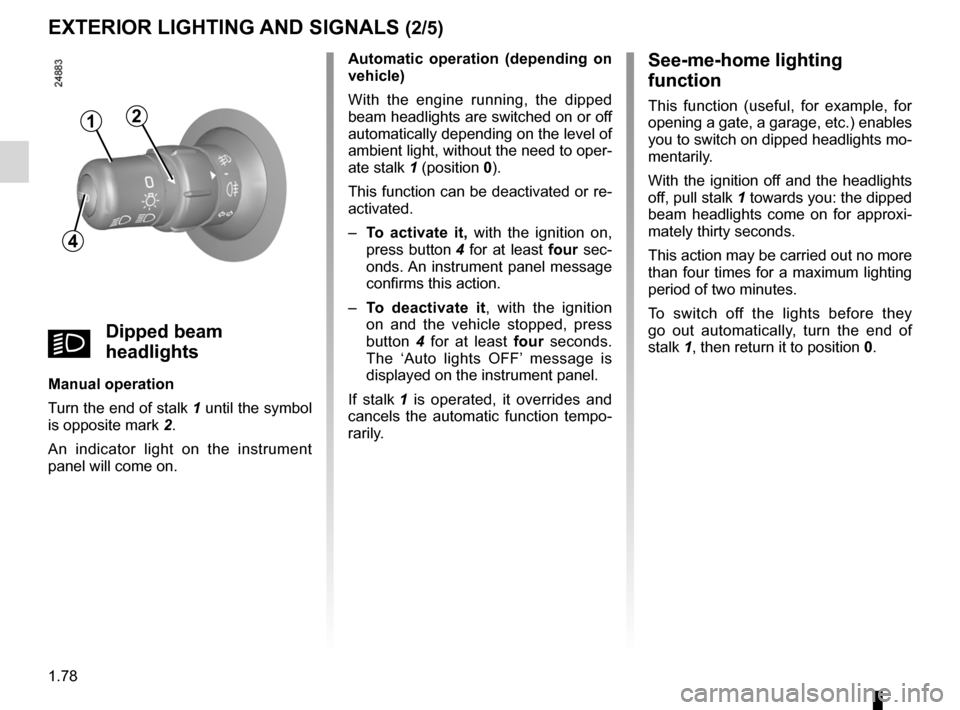
Turn the end of stalk 1 until the symbol
is opposite mark 2.
An indicator light on the instrument
panel will come on. Automatic operation (depending on
vehicle)
With the engine running, the dipped
beam headlights are switched on or off
automatically depending on the level of
ambient light, without the need to oper-
ate stalk 1 (position 0).
This function can be deactivated or re-
activated.
–
To activate it, with the ignition on,
press button 4 for at least four sec-
onds. An instrument panel message
confirms this action.
– To deactivate it , with the ignition
on and the vehicle stopped, press
button 4 for at least four seconds.
The ‘Auto lights OFF’ message is
displayed on the instrument panel.
If stalk 1 is operated, it overrides and
cancels the automatic function tempo -
rarily.
See-me-home lighting
function
This function (useful, for example, for
opening a gate, a garage, etc.) enables
you to switch on dipped headlights mo-
mentarily.
With the ignition off and the headlights
off, pull stalk 1 towards you: the dipped
beam headlights come on for approxi -
mately thirty seconds.
This action may be carried out no more
than four times for a maximum lighting
period of two minutes.
To switch off the lights before they
go out automatically, turn the end of
stalk 1, then return it to position 0.
4
12
Page 85 of 264

lights:main beam headlights ...................................... (current page)
lights mobile directional ............................................. (current page)
JauneNoirNoir texte
1.79
ENG_UD10541_1
Éclairages et signalisations extérieures (X85 - B85 - C85 - S85 -\
K85 - Renault)
ENG_NU_853-8_BCSK85_Renault_1
EXTERIOR LIGHTING AND SIGNALS (3/5)
Cornering lights
Depending on the vehicle, if the dipped
beam headlights are on when corner -
ing, and under certain driving condi -
tions (speed, steering wheel angle, for-
wards gear selected, etc.), additional
lights are switched on to light the inside
of the bend.
Note: under certain conditions of pro -
longed use, this system will be switched
off automatically as it is intended for
use over limited periods.
áMain beam headlights
With the dipped beam head -
lights lit, pull stalk 1 towards you.
When the main beam headlights are lit
up, an indicator light on the instrument
panel comes on.
To return to the dipped headlight posi-
tion, pull stalk 1 towards you again.
Automatic lighting with main
beam headlights
Depending on the vehicle, when you
change to main beam headlights, the
dipped beam headlight raise to improve
lighting.
Note: in the event of an operating fault
on this system, when returning from
main beam to dipped beam headlights,
the dipped beam headlight concerned
goes out and the front fog lights come
on, accompanied by the
g warning
light and a fault message on the instru-
ment panel
Warning: as this operating mode is not
a normal driving condition, consult an
approved Dealer as soon as possible.
1
Page 86 of 264
lights-on warning buzzer........................................ (current page)
1.80
ENG_UD10541_1
Éclairages et signalisations extérieures (X85 - B85 - C85 - S85 -\
K85 - Renault)
ENG_NU_853-8_BCSK85_Renault_1
Jaune NoirNoir texte
EXTERIOR LIGHTING AND SIGNALS (4/5)
Switching off the lights
Manual operation
There are three options (depending on
the vehicle):
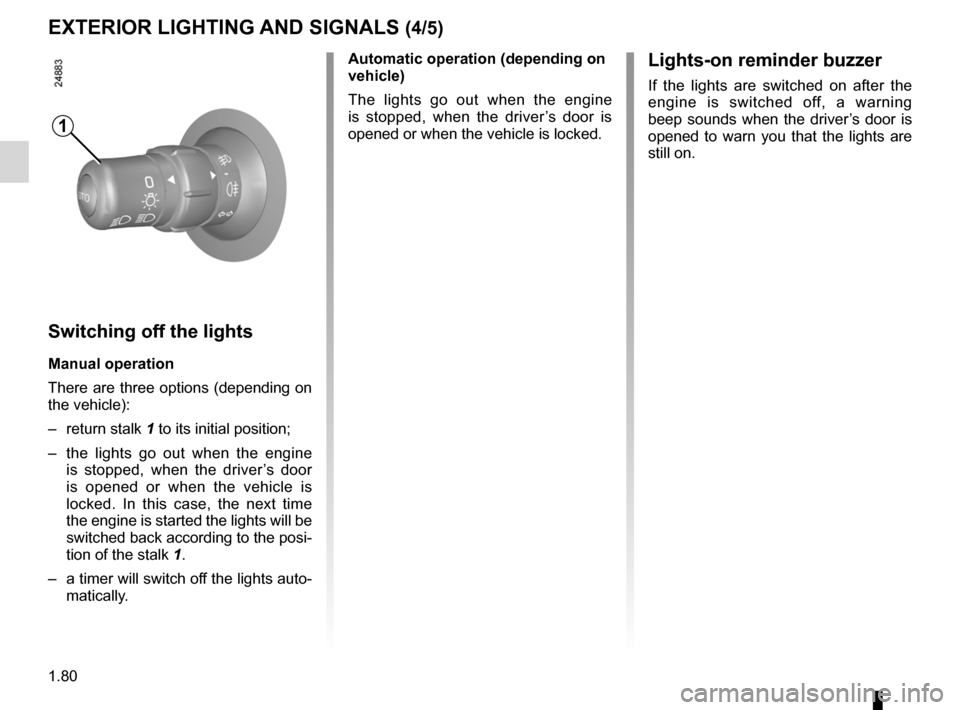
– return stalk 1 to its initial position;
– the lights go out when the engine
is stopped, when the driver’s door
is opened or when the vehicle is
locked. In this case, the next time
the engine is started the lights will be
switched back according to the posi-
tion of the stalk 1.
– a timer will switch off the lights auto-
matically.
Automatic operation (depending on
vehicle)
The lights go out when the engine
is stopped, when the driver’s door is
opened or when the vehicle is locked.Lights-on reminder buzzer
If the lights are switched on after the
engine is switched off, a warning
beep sounds when the driver’s door is
opened to warn you that the lights are
still on.
1
Page 87 of 264
fog lights ................................................................ (current page)
lights: fog lights .......................................................... (current page)
JauneNoirNoir texte
1.81
ENG_UD10541_1
Éclairages et signalisations extérieures (X85 - B85 - C85 - S85 -\
K85 - Renault)
ENG_NU_853-8_BCSK85_Renault_1
EXTERIOR LIGHTING AND SIGNALS (5/5)
gFront fog lights
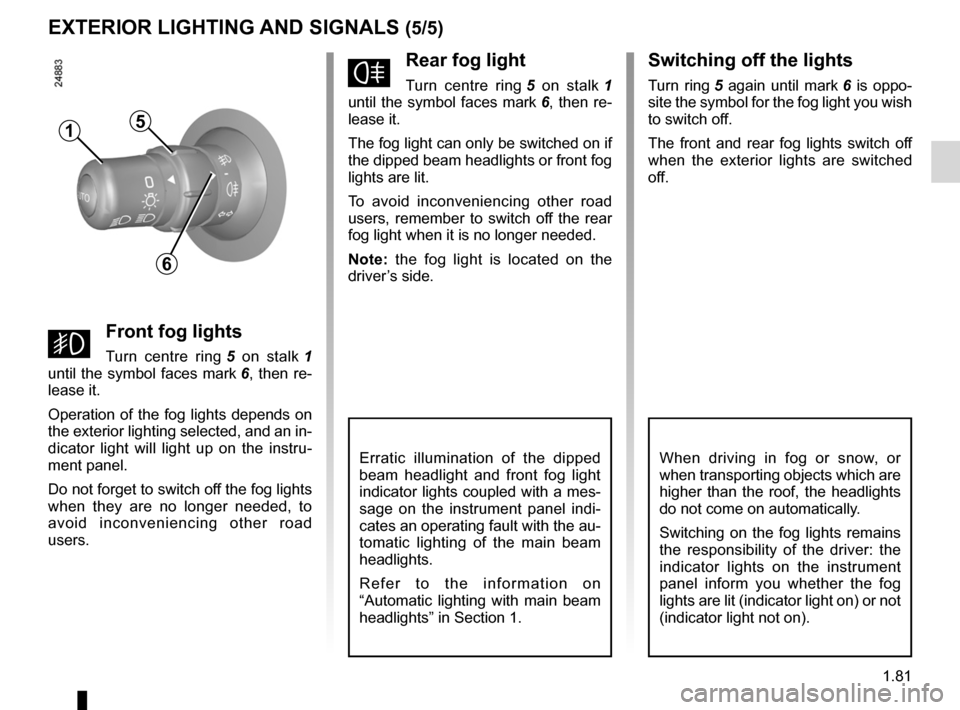
Turn centre ring 5 on stalk 1
until the symbol faces mark 6, then re-
lease it.
Operation of the fog lights depends on
the exterior lighting selected, and an in-
dicator light will light up on the instru -
ment panel.
Do not forget to switch off the fog lights
when they are no longer needed, to
avoid inconveniencing other road
users.
fRear fog light
Turn centre ring 5 on stalk 1
until the symbol faces mark 6, then re-
lease it.
The fog light can only be switched on if
the dipped beam headlights or front fog
lights are lit.
To avoid inconveniencing other road
users, remember to switch off the rear
fog light when it is no longer needed.
Note: the fog light is located on the
driver’s side.
Erratic illumination of the dipped
beam headlight and front fog light
indicator lights coupled with a mes-
sage on the instrument panel indi -
cates an operating fault with the au-
tomatic lighting of the main beam
headlights.
R e f e r t o t h e i n f o r m a t i o n o n
“Automatic lighting with main beam
headlights” in Section 1.
Switching off the lights
Turn ring 5 again until mark 6 is oppo -
site the symbol for the fog light you wish
to switch off.
The front and rear fog lights switch off
when the exterior lights are switched
off.
15
6
When driving in fog or snow, or
when transporting objects which are
higher than the roof, the headlights
do not come on automatically.
Switching on the fog lights remains
the responsibility of the driver: the
indicator lights on the instrument
panel inform you whether the fog
lights are lit (indicator light on) or not
(indicator light not on).
Page 88 of 264
lighting:exterior ............................................ (up to the end of the DU)
lights: adjusting ......................................... (up to the end of the DU)
lights adjustment ...................................... (up to the end of the DU)
headlight beam adjustment .................. (up to the end of the DU)
signals and lights .................................. (up to the end of the DU)
1.82
ENG_UD10542_1
Réglage électrique de la hauteur des faisceaux (X85 - B85 - C85 -\
S85 - K85 - Renault)ENG_NU_853-8_BCSK85_Renault_1
Headlight beam adjustment
ELECTRIC BEAM HEIGHT ADJUSTMENT
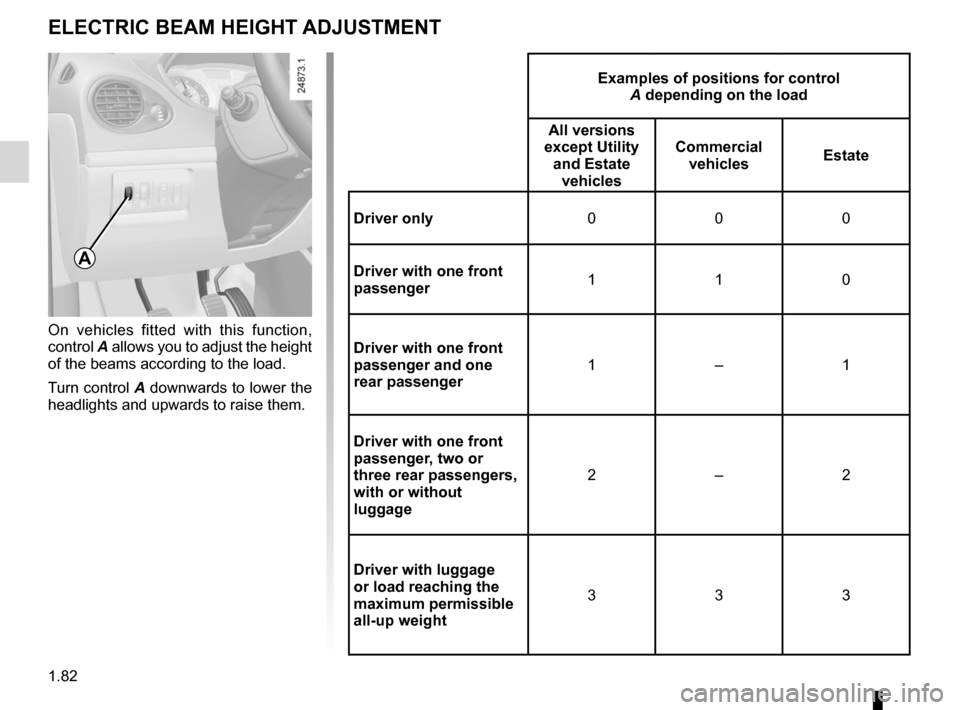
On vehicles fitted with this function,
control A allows you to adjust the height
of the beams according to the load.
Turn control A downwards to lower the
headlights and upwards to raise them.
Examples of positions for control
A depending on the load
All versions
except Utility and Estate vehicles Commercial
vehicles Estate
Driver only 000
Driver with one front
passenger 1
10
Driver with one front
passenger and one
rear passenger 1
–1
Driver with one front
passenger, two or
three rear passengers,
with or without
luggage 2
–2
Driver with luggage
or load reaching the
maximum permissible
all-up weight 3
33
A
Page 90 of 264
1.84
ENG_UD19811_2
Essuie-vitre / lave-vitre avant (X85 - B85 - C85 - S85 - K85 - Renault)\
ENG_NU_853-8_BCSK85_Renault_1
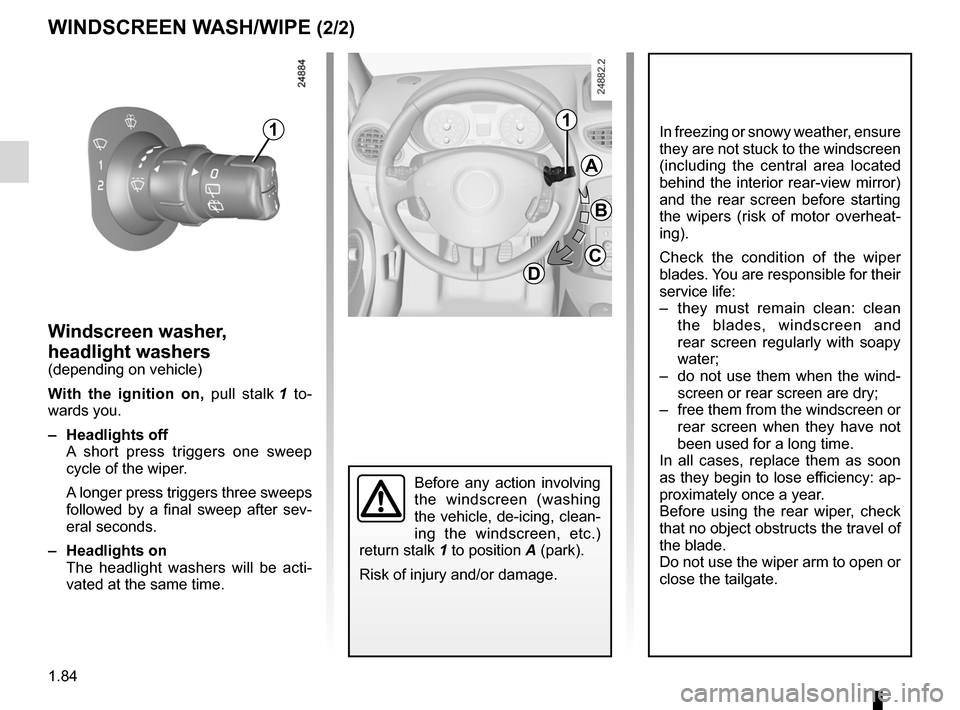
Before any action involving
the windscreen (washing
the vehicle, de-icing, clean -
ing the windscreen, etc.)
return stalk 1 to position A (park).
Risk of injury and/or damage.
Windscreen washer,
headlight washers
(depending on vehicle)
With the ignition on, pull stalk 1 to -
wards you.
– Headlights off
A short press triggers one sweep
cycle of the wiper.
A longer press triggers three sweeps
followed by a final sweep after sev-
eral seconds.
– Headlights on
The headlight washers will be acti -
vated at the same time.
WINDSCREEN WASH/WIPE (2/2)
A
B
C
D
11In freezing or snowy weather, ensure
they are not stuck to the windscreen
(including the central area located
behind the interior rear-view mirror)
and the rear screen before starting
the wipers (risk of motor overheat -
ing).
Check the condition of the wiper
blades. You are responsible for their
service life:
– they must remain clean: clean
the blades, windscreen and
rear screen regularly with soapy
water;
– do not use them when the wind-
screen or rear screen are dry;
– free them from the windscreen or
rear screen when they have not
been used for a long time.
In all cases, replace them as soon
as they begin to lose efficiency: ap-
proximately once a year.
Before using the rear wiper, check
that no object obstructs the travel of
the blade.
Do not use the wiper arm to open or
close the tailgate.
Page 93 of 264
JauneNoirNoir texte
1.87
ENG_UD24919_5
Réservoir carburant (X85 - B85 - C85 - S85 - K85 - Renault)
ENG_NU_853-8_BCSK85_Renault_1
Filling up with fuel
With the ignition switched off, insert the
nozzle so that the valve is open and
fully insert the nozzle before engaging
it in order to fill the tank (risk of splash -
back).
Keep the nozzle in this position through -
out the entire filling operation.
Petrol versions
Using leaded petrol will damage the
antipollution system and may lead to a
loss of warranty.
To ensure that the fuel tank is not filled
with leaded petrol, the fuel tank filler
neck contains a restrictor fitted with a
foolproof system which only allows
the nozzle for unleaded petrol to be
used (at the pump).
Petrol and diesel versions
When the pump cuts out automatically
at the end of the filling procedure, a
maximum of two further filling attempts
may be made, as there must be suffi -
cient space in the fuel tank to allow for
expansion.
Petrol version
It is essential to use unleaded petrol.
The octane rating (RON) must con -
form with the specifications given on
the label inside fuel filler flap A . Refer
to the information on “Engine specifica-
tions” in Section 6.
Special features of vehicles running
on ethanol-based fuel:
It is essential to use unleaded petrol or
fuel containing a maximum of 85% eth-
anol (E85).
To make it easier to start the engine in
very cold conditions, it is recommended
to use unleaded petrol or, on equipped
vehicles, to use the heater integrated in
the engine.
In this case, connect the special end of
the extension piece supplied into the
socket integrated into the radiator grille
and the other end into a 220V socket
for at least 6 hours before starting.
Note: when using ethanol-based fuel,
you may notice over-consumption.
FUEL TANK (2/2)
No modifications what -
soever are permitted on
any part of the fuel supply
system (electronic unit,
wiring, fuel circuit, injector, protec -
tive covers, etc.) as this may be
dangerous (unless undertaken by
qualified Network personnel).
Persistent fuel odour
If you notice a persistent
fuel odour you should:
– stop the vehicle as soon as traf-
fic conditions allow and switch off
the ignition;
– switch on the hazard warning
lights and ask your passengers to
leave the vehicle and stay clear
of the traffic;
– contact an approved Dealer.
Page 97 of 264
engine start/stop button ........................ (up to the end of the DU)
ignition switch ....................................... (up to the end of the DU)
starting the engine ................................ (up to the end of the DU)
starting the engine ................................ (up to the end of the DU)
switching on the vehicle ignition ........... (up to the end of the DU)
2.3
ENG_UD26548_3
Contacteur de démarrage : véhicule avec clé / télécommand\
e à radiofréquence (X85 - B85 - C85 - S85 - K85 - Renault)
ENG_NU_853-8_BCSK85_Renault_2
Ignition switch
Special note on vehicles with an au-
tomatic gearbox
Before starting, move the lever to posi-
tion N or P.
Note:
If a gear other than neutral is displayed,
it flashes; starting is not possible unless
you depress the brake pedal, while
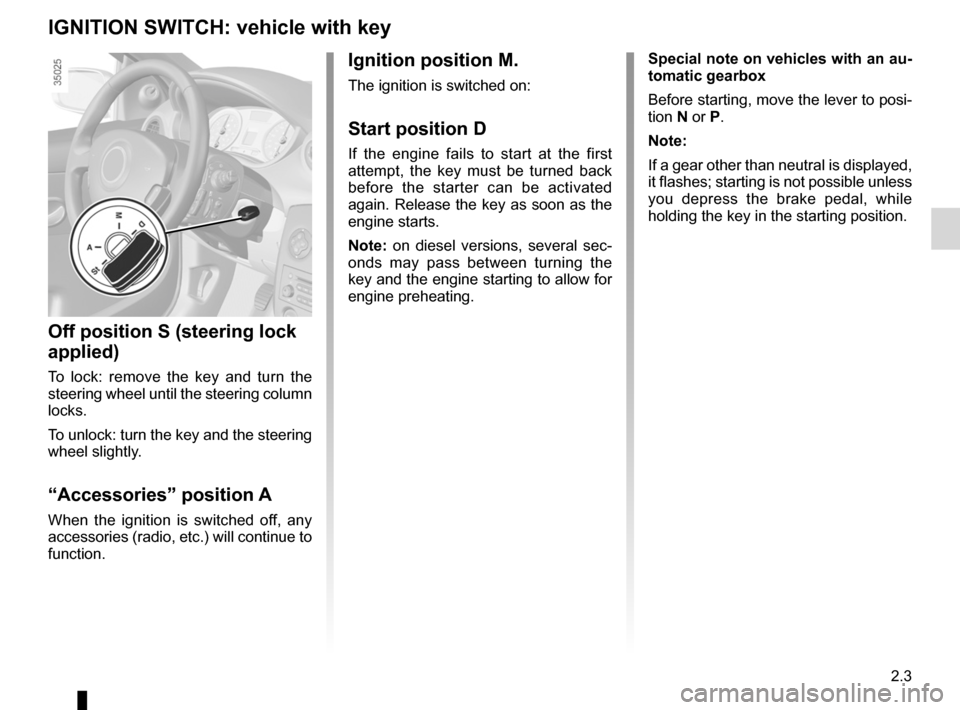
holding the key in the starting position.Ignition position M.
The ignition is switched on:
Start position D
If the engine fails to start at the first
attempt, the key must be turned back
before the starter can be activated
again. Release the key as soon as the
engine starts.
Note: on diesel versions, several sec -
onds may pass between turning the
key and the engine starting to allow for
engine preheating.
Off position S (steering lock
applied)
To lock: remove the key and turn the
steering wheel until the steering column
locks.
To unlock: turn the key and the steering
wheel slightly.
“Accessories” position A
When the ignition is switched off, any
accessories (radio, etc.) will continue to
function.
IGNITION SWITCH: vehicle with key