2012 PEUGEOT 4007 brake
[x] Cancel search: brakePage 124 of 236

7
DRIVING
When the cruise control is in
operation, pay attention if you
press and hold one of the pro-
grammed speed adjustment
buttons: this can result in a very
rapid change in the speed of
your vehicle.
Do not use the cruise control on
slippery roads or in heavy traffi c.
On a steep descent, the cruise
control will not be able to pre-
vent the vehicle from exceeding
the programmed speed.
To prevent the mat from becom-
ing caught under the pedals:
- ensure that the mat is posi-
tioned correctly,
- never fi t one mat on top of
another.
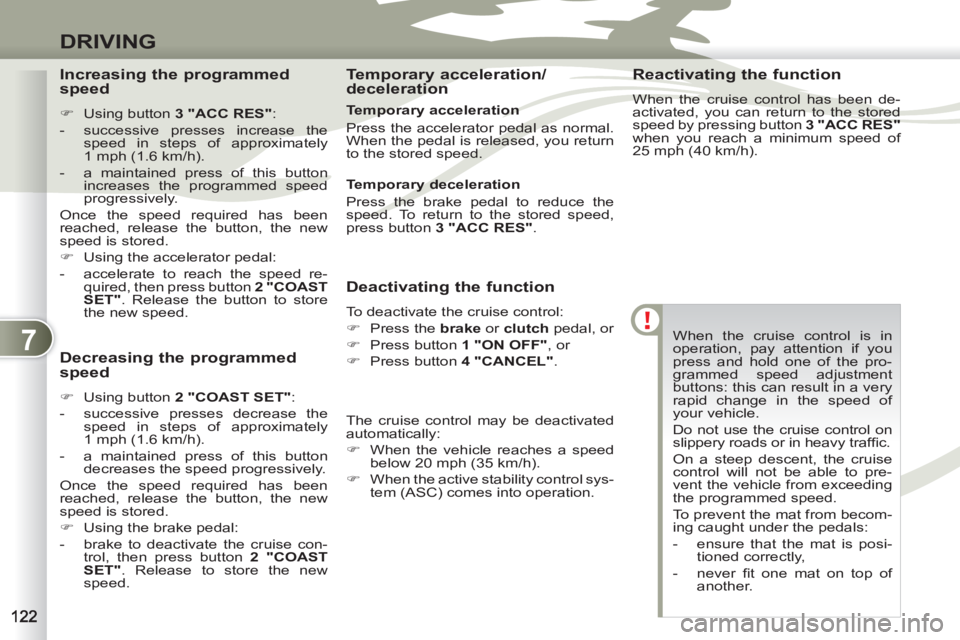
Deactivating the function
To deactivate the cruise control:
�)
Press the brake
or clutch
pedal, or
�)
Press button 1 "ON OFF"
, or
�)
Press button 4 "CANCEL"
.
The cruise control may be deactivated
automatically:
�)
When the vehicle reaches a speed
below 20 mph (35 km/h).
�)
When the active stability control sys-
tem (ASC) comes into operation.
Reactivating the function
When the cruise control has been de-
activated, you can return to the stored
speed by pressing button 3 "ACC RES"
when you reach a minimum speed of
25 mph (40 km/h).
Decreasing the programmed
speed
�)
Using button 2 "COAST SET"
:
- successive presses decrease the
speed in steps of approximately
1 mph (1.6 km/h).
- a maintained press of this button
decreases the speed progressively.
Once the speed required has been
reached, release the button, the new
speed is stored.
�)
Using the brake pedal:
- brake to deactivate the cruise con-
trol, then press button 2 "COAST
SET"
. Release to store the new
speed.
Temporary acceleration/
deceleration
Increasing the programmed
speed
�)
Using button 3 "ACC RES"
:
- successive presses increase the
speed in steps of approximately
1 mph (1.6 km/h).
- a maintained press of this button
increases the programmed speed
progressively.
Once the speed required has been
reached, release the button, the new
speed is stored.
�)
Using the accelerator pedal:
- accelerate to reach the speed re-
quired, then press button 2 "COAST
SET"
. Release the button to store
the new speed.
Temporary acceleration
Press the accelerator pedal as normal.
When the pedal is released, you return
to the stored speed.
Temporary deceleration
Press the brake pedal to reduce the
speed. To return to the stored speed,
press button 3 "ACC RES"
.
Page 129 of 236

8
CHECKS
PETROL ENGINE
1.
Screenwash and headlamp wash
reservoir.
2.
Coolant reservoir.
3.
Power steering fl uid reservoir.
4.
Brake fl uid reservoir.
5.
Fusebox.
6.
Battery.
7.
CVT gearbox dipstick.
8.
Radiator cap.
9.
Engine oil dipstick.
10.
Engine oil fi ller cap.
11 .
Air fi lter. Access for checking the levels of the various fl uids and the replacement of certain components.
Page 130 of 236

8
CHECKS
SEL ENGINEDIESEL EN
Access for checking the levels of the various fl uids and the replacement of certain components.
1.
Coolant reservoir.
2.
Power steering fl uid reservoir.
3.
Screenwash and headlamp wash
reservoir.
4.
Brake fl uid reservoir.
5.
Fusebox.
6.
Battery.
7.
Engine oil dipstick.
8.
Engine oil fi ller cap.
9.
Air fi lter.
Page 131 of 236

8
CHECKS
CHECKING LEVELS
Brake fluid level
To avoid any risk of scalding, unscrew
the cap by two turns to allow the pres-
sure to drop. When the pressure has
dropped, remove the cap and top up
the level.
Oil level
The reading will only be correct
if the vehicle is on level ground
and the engine has been off for
more than 15 minutes.
The check is carried out either
when the ignition is switched on using
the oil level indicator on the instrument
panel, or using the dipstick.
It is normal to top up the engine oil be-
tween services. The manufacturer recom-
mends that the oil level be checked, and
topped up if necessary, every 3 000 miles
(5 000 km). The brake fl uid level should be
between the "MAX" and "MIN"
marks.
If it is not, check the brake pad
wear.
Changing the brake fl uid
Refer to the servicing booklet for details
of the interval for this operation.
Coolant level
The coolant level must be mea-
sured when the engine is cold
and should be between the
"LOW" and "FULL" marks.
When the engine is warm, the
temperature of the coolant is regulated
by the fan. This can operate with the ig-
nition off.
On vehicles which are fi tted with a
particle emission fi lter, the fan may
operate after the vehicle has been
switched off, even if the engine is
cold.
In addition, as the cooling system is
pressurised, wait at least one hour after
switching off the engine before carrying
out any work.
Screenwash and headlamp
wash * fluid
Check the fl uid level regularly,
using the gauge.
*
According to country.
Changing the engine oil
Refer to the servicing booklet for details
of the interval for this operation.
In order to maintain the reliability of the
engine and emission control system,
the use of additives in the engine oil is
prohibited.
Oil specifi cation
The oil must correspond to your engine
and conform to the manufacturer's
recommendations.
Fluid specifi cation
The brake fl uid must conform to the
manufacturer's recommendations and
fulfi l the DOT4 standards.
Changing the coolant fl uid
Refer to the servicing booklet for details
of the interval for this operation.
Fluid specifi cation
The coolant must conform to the manu-
facturer's recommendations.
Fluid specifi cation
This fl uid must conform to the manufac-
turer's recommendations for optimum
cleaning.
Power steering fluid level
Check the fl uid level with the engine at
idle.
Check that the power steering fl uid
level is always between the "MAX" and
"MIN" marks and top up if necessary.
Fluid specifi cation
This fl uid must conform to the manufac-
turer's recommendations.
Check all of these levels regularly and
top them up if necessary, unless other-
wise indicated.
If a level drops signifi cantly, have the
corresponding system checked by a
PEUGEOT dealer or a qualifi ed work-
shop.
When working under the bonnet, take
care as certain areas of the engine may
be extremely hot (risk of burns).
Page 133 of 236

8
CHECKS
Manual gearbox
Refer to the servicing booklet
for details of gearbox mainte-
nance.
Brake pads
Brake wear depends on the
style of driving, particularly in
the case of vehicles used in
town, over short distances. It
may be necessary to have the
condition of the brakes checked, even
between vehicle services.
Unless there is a leak on the circuit, a
drop in the brake fl uid level indicates
that the brake pads are worn.
Brake disc wear
For information on checking
brake disc wear, contact a
PEUGEOT dealer or a quali-
fi ed workshop.
Parking brake
If the parking brake travel is
too long or if you notice a loss
of effectiveness of this sys-
tem, the parking brake must
be adjusted, even between
two services.
This system must be checked by a
PEUGEOT dealer or a qualifi ed work-
shop.
Only use products recommended by
PEUGEOT or products of equivalent
quality and specifi cations. In order to optimise the opera-
tion of units as important as
the braking system, PEUGEOT
selects and offers very specifi c
products.
To avoid damaging the electrical
units, the use of a high pressure
washer in the engine compart-
ment is strictly prohibited.
Transfer box and rear
differential
Refer to the servicing booklet
for details of the service inter-
val for these components.
Page 137 of 236

9
PRACTICAL INFORMATION
Parking the vehicle
Immobilise the vehicle where it
does not block traffi c: if possible,
park the vehicle on level, stable
and non-slippery ground.
Apply the parking brake, switch
off the ignition and engage fi rst
gear to lock the wheels.
If necessary, place a chock un-
der the wheel diagonally oppo-
site the wheel to be changed.
Never go underneath a vehi-
cle raised using a jack; use a
stand.
Removing a wheel
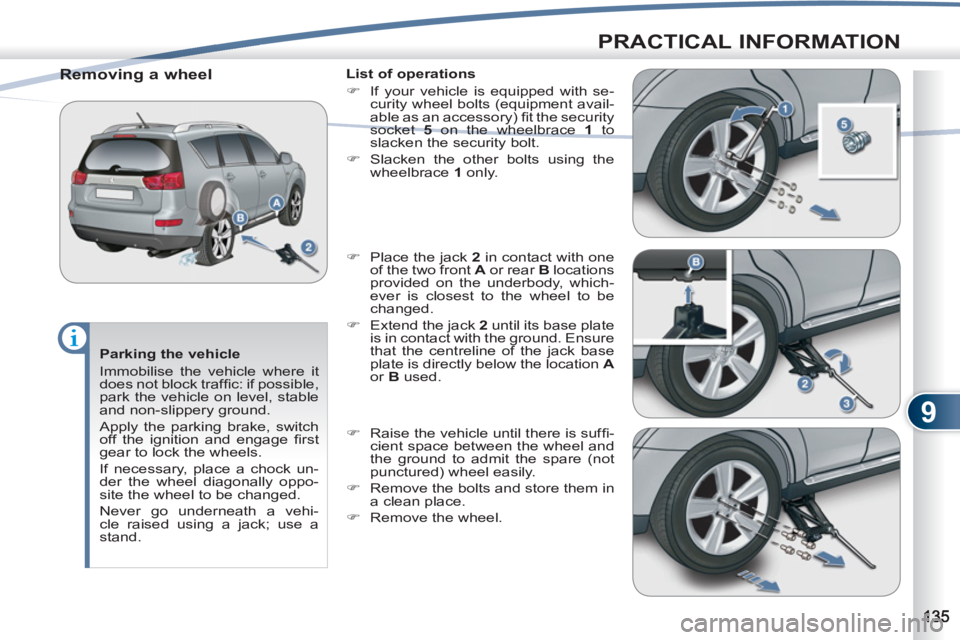
List of operations
�)
If your vehicle is equipped with se-
curity wheel bolts (equipment avail-
able as an accessory) fi t the security
socket 5 on the wheelbrace 1
to
slacken the security bolt.
�)
Slacken the other bolts using the
wheelbrace 1
only.
�)
Place the jack 2
in contact with one
of the two front A
or rear B
locations
provided on the underbody, which-
ever is closest to the wheel to be
changed.
�)
Extend the jack 2
until its base plate
is in contact with the ground. Ensure
that the centreline of the jack base
plate is directly below the location A
or B
used.
�)
Raise the vehicle until there is suffi -
cient space between the wheel and
the ground to admit the spare (not
punctured) wheel easily.
�)
Remove the bolts and store them in
a clean place.
�)
Remove the wheel.
Page 143 of 236

9
PRACTICAL INFORMATION
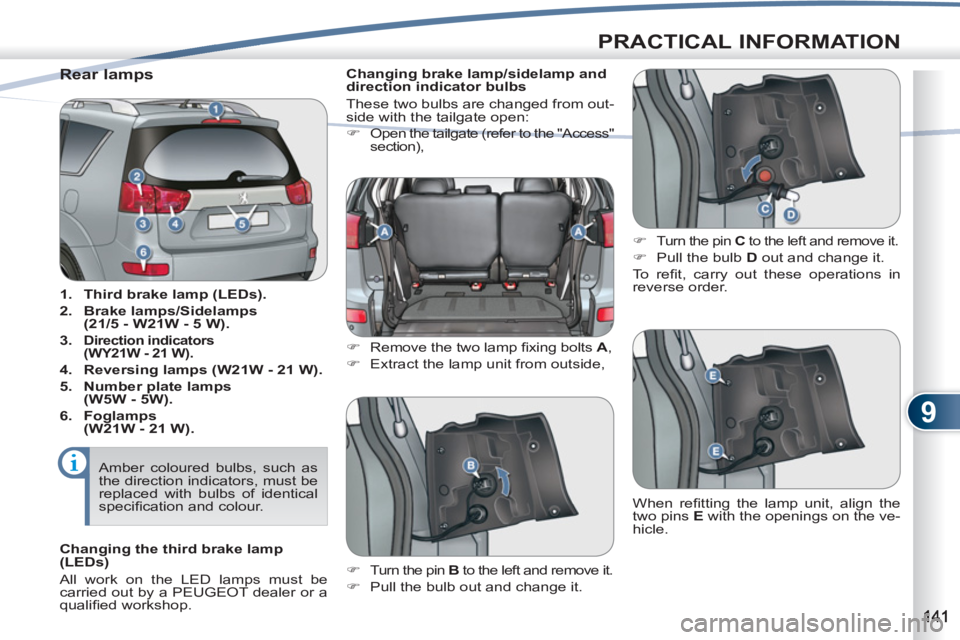
Rear lamps
1.
Third brake lamp (LEDs).
2.
Brake lamps/Sidelamps
(21/5 - W21W - 5 W).
3.
Direction indicators
(WY21W - 21 W).
4.
Reversing lamps (W21W - 21 W).
5.
Number plate lamps
(W5W - 5W).
6.
Foglamps
(W21W - 21 W).
Changing brake lamp/sidelamp and
direction indicator bulbs
These two bulbs are changed from out-
side with the tailgate open:
�)
Open the tailgate (refer to the "Access"
section),
�)
Remove the two lamp fi xing bolts A
,
�)
Extract the lamp unit from outside,
�)
Turn the pin C
to the left and remove it.
�)
Pull the bulb D
out and change it.
To r efi t, carry out these operations in
reverse order.
�)
Turn the pin B
to the left and remove it.
�)
Pull the bulb out and change it. When refi tting the lamp unit, align the
two pins E
with the openings on the ve-
hicle. Amber coloured bulbs, such as
the direction indicators, must be
replaced with bulbs of identical
specifi cation and colour.
Changing the third brake lamp
(LEDs)
All work on the LED lamps must be
carried out by a PEUGEOT dealer or a
qualifi ed workshop.
Page 147 of 236

9
PRACTICAL INFORMATION
Dashboard fuses
The fuseboxes are placed in the lower
dashboard behind the enclosed storage
compartment (left-hand side).
Access to the fuses
�)
Open the cover A
,
�)
Pull it towards you to extract it,
�)
Change the fuse (refer to the cor-
responding paragraph).
Fuse N°
Rating
Functions
1*
30 A
Heating.
2
15 A
Brake lamps, third brake lamp, built-in systems
interface.
3
10 A
Rear foglamps.
4
30 A
Windscreen wipers and screenwash.
5
10 A
Diagnostic socket.
6
20 A
Central locking, door mirrors.
7
15 A
Audio equipment, telematics, multifunction screen,
Bluetooth system.
8
7.5 A
Remote control key, air conditioning control unit,
instrument panel, switch panel, steering mounted
controls.
9
15 A
Multifunction screen, instrument panel.
10
15 A
Built-in systems interface.
11
15 A
Rear wiper.
12
7.5 A
Instrument panel, 4 wheel drive control unit,
air conditioning control panel, ABS control
unit, multifunction screen, automatic headlamp
adjustment, heated seats, airbag control unit,
steering wheel angle sensor, sunroof, rear screen
demisting, remote control.
13
-
Not used.
14
10 A
Ignition switch.
15
20 A
Sunroof.
16
10 A
Door mirrors, audio equipment, telematics.